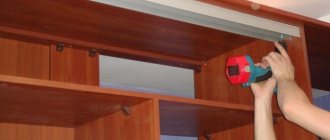
The installation of guides under sliding doors for a wardrobe should be carried out using a level - be sure to maintain the accuracy of the geometry and the same indentation along the entire length of the element, otherwise the doors will be installed crookedly, which will not only worsen the appearance, but may also make their movement difficult or impossible.
Please note that the top guide is not subject to loads and is not a support. It simply supports the structure in a given position and directs the movement of the rollers in the right direction. The weight of the door will be distributed over the lower element, the installation of which we will proceed to next.
Correct installation of sliding wardrobe doors involves precise installation of the lower guide element, since the ease of movement (opening and closing) depends on this. We proceed as follows:
1. Choose the right position.
- Apply the guide to the surface;
- Select the correct horizontal position using a level.
2. Adjust the vertical.
- We install one of the doors in a future location;
- We insert the rollers of the upper edge into the stream of the upper guide;
- We lift the rollers of the lower edge and insert them into the stream of the lower edge.
3. We carry out markings.
- Using a level we build the correct vertical;
- We mark with a pencil the places for fastenings and outline the part itself along the perimeter;
- We remove the door.
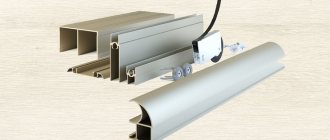
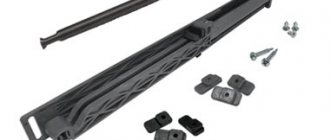
Assembly of the Ramir lower support system
This way we get a marked place for mounting the lower guide element. Before you install sliding doors with your own hands, you should remember that the installation of the bottom guide can be done in two ways: using dowels and screws, as well as using strong double-sided tape. Each of these options has its own characteristics.
What are wardrobe doors made of?
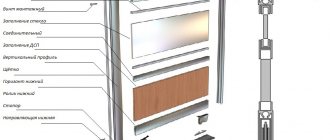
A sliding system usually consists of these components:
- door frame (side pillars + horizontal stripes);
- Filler - door leaf;
- lower and upper rollers;
- Tape stroke;
- Guides.
For a better understanding of the terms and the entire assembly process, you will find a detailed description of each component in the table.
| door frame | |
| Side racks | Duralumin racks have longitudinal slots into which the tape is inserted. From the outside, the profile is made in the shape of a curve, which acts as a handle. The cross-section of the racks may vary, but they all hide a longitudinal groove with a bend. Some side stripes are made solid, and individual handles in the form of shaped plates are attached to them in the middle. |
| Crossbars | Cross beams connect the vertical posts into a single structure - the frame. A pair of vertical rollers are installed inside the lower cross beam. The horizontal bar section and the height of the side walls completely hide the rollers. |
| If the filling consists of several parts, then the central strips are inserted into the frame. They have double-sided slots into which the top and bottom sheets fit. Find out more about profiles for your wardrobe. The products of the Austrian company Stern deserve attention. | |
| Adhesive tape | Self-adhesive elongated tape (also called Schlegel) is designed to perform two functions. The soft texture of the strip dampens the sound of the door adjacent to the side wall of the case. The stack prevents dust from entering the shiforob. On the racks, on the outside of the frame, there are vertical grooves for the damping strip. |
| The door frame can be constructed in the same way as a window frame from a wooden beam. In it, as in a metal frame, make longitudinal grooves along the inner perimeter of the frame with the router. The width of the slots should be equal to the thickness of the filling sheet. | |
| Guide tracks | They have a different cross section. In cross section, both strips resemble the letter “S”. The bottom rail is made with low grooves in the longitudinal direction. This is enough to prevent sideways movement of the wheels. The upper tire has high sidewalls (40 mm) to prevent the upper rollers, and with them the entire gate, from tipping over. Read more about cabinet slides here |
| Filling the door leaf | |
| Mirror | Mirrored cabinet doors create a beautiful furniture façade, visually expand the space and improve room lighting. You can use clear and colored mirrors in silver, bronze, matte and various colors. Their back side is covered with a film that retains fragments in the event of destruction of the door trim. Three techniques are used to decorate mirrors:
|
| MDF and chipboard | MDF can be used to fill entire sliding systems. For compartment doors, use slabs with a thickness of 6 to 10 mm. Their surface can be laser engraved with beautiful patterns. The material is also laminated with PVC film, painted with patterns. Laminated chipboard is cheaper than MDF. On the building materials market you can find laminated chipboards with matte and glossy facades that imitate leather and small wood species. |
| Laminate | Laminated parquet slats can completely replace expensive material for filling sliding doors. It is available in light and dark shades that imitate fine wood species. 10 mm thick parquet fits perfectly with an aluminum door frame. |
| Plywood | Use laminated plywood to assemble a façade on a budget. The material can be easily sawed and sawed with a jigsaw. The filling can be uniform or combined. You can insert fragments of the correct geometric shape or make a shaped combination of MDF or laminated chipboard with a mirror. Aluminum profiles have grooves 10 mm wide. If the filling material is thinner than this dimension, a seal will need to be installed. |
| Upper and lower rollers | |
| Bottom rollers | Fastened with self-tapping screws on both sides inside the horizontal profile of the door frame. The wheels are made of polymer, which ensures silent movement of the door. The sliding assemblies are designed in such a way that when the gate is installed, they are pressed against the bottom bar using springs. This allows the top of the frame to fit into the track. |
| Top rollers | Installed on frame posts on both sides of the door. Unlike the lower wheels, the wheels rotate horizontally and are completely hidden by the high crossmember profile. |
Sash design
The wardrobe door consists of profiles:
- lower;
The lower profile has deeper side walls - upper;
Upper profile for compartment door leaf - profile handles;
The handle can be on both sides - Intermediate.
These profiles are placed between parts of the door leaf, but you can do without them - if the door is solid and not composite.
This entire assembly has the appearance shown in the photograph. In this frame, the door material you choose is inserted into the grooves. It can be glass, mirror, chipboard and other materials.
Hanging structure without filling
Separating profiles are optional. They are necessary if you assemble doors from different materials or simply like them this way. The maximum thickness of the filler is 10 mm, the minimum thickness is 4 mm. Thinner ones - glass, plastic, mirror - are inserted through a gasket.
In order for the gate to move, upper and lower rollers are installed on it. The lower rollers bear the entire weight of the gate, and the upper ones stabilize the vertical position of the gate, preventing its deformation.
Rollers for cabinet doors
The rollers are attached to the side profiles with special fasteners.
Types of sliding systems
Sliding doors can be of the following types:
- Hanging. The door leaf is suspended on the upper guide, the lower one is used for fixation. Such a door will open easier and hesitate less. If the bottom rail is mounted in the floor (below the floor level), the cabinet is built without a threshold, into the floor. Hanging systems are most often used for sliding interior doors, but can also be used for sliding wardrobes.
- With support on the lower profile. The door rests on the lower profile, the upper bar serves for fixation. Doors of this design are cheaper and easier to install, but the doors can play (back and forth).
- Combined. The sash is fixed on both the lower and upper profile. The most reliable design - there is no play relative to the line of movement. The downside is that such doors are difficult to install and are more expensive.
Guides for sliding doors
As you can see, fascia isn't everything. You need guides along which the doors will move. There are two of them: upper and lower. They differ significantly in appearance.
Top rail for cabinet doors
Metal bottom rail
When installing the gate, first push it firmly into the top track, lift the gate until it stops and insert the lower rollers into the corresponding groove. The entire structure is shown in the following photo.
Installation diagram
Required Tools
Before assembling the cabinet doors and installing the guides, you should prepare a number of tools. Among them:
- Metal ruler, square and tape measure.
- Drill-driver.
- Electric jigsaw.
- Hacksaw for metal processing.
- Driver for self-tapping screws.
- Construction level and plumb line.
- Cutter and scissors.
Materials and sizes
Doors for a cabinet built with your own hands are not as complicated as the owner might think at first glance. However, in this case, preparation is important, which includes the acquisition of all materials and accessories, as well as the selection (calculation) of the dimensions of the compartment doors.
Materials for making doors
This is the first stage that you need to go through if you plan to make furniture with your own hands. There is a choice: you can use several suitable materials to create cabinet doors.
- Chipboard is a traditional candidate. These boards are the most common and convenient material, so they are often purchased for making various furniture. If the master does not yet have experience in this type of work, then chipboard will be the best choice: working with them is relatively easy. The best option is the most secure laminated panels (LDPE).
- MDF. This material is of higher quality, but the price is also less attractive. If you just make the doors out of MDF, you can save some money on cabinet assembly, but the doors will look better.
The last contender is a massive tree. This is the beauty leader on this list, but working with such an expensive material requires a lot of experience. So for beginners, chipboard or MDF is more suitable.
Dimensions
Width is a parameter that depends more on the size of the furniture, but there is no limit. However, there are a number of recommendations for creating a design that will be as convenient and hassle-free as possible.
- The optimal minimum width of one door is 500 mm. Yes, the master can narrow it, but in this case the sheet may become deformed and then simply “slip out” of the guides.
- The maximum recommended width is 1100 mm. But even this size is not the best option, since the owners will have to put in a lot of effort, and for small family members, “filling up” the wardrobe can become an unattainable goal.
If we talk about the recommended sizes in which you will not have any difficulties when operating the “warehouse”, they are in the range from 600 to 900 mm. The width of the furniture affects the number of doors. When the doors are open, they should not block access to the contents of the cabinet.
As for the height of the doors, in this case there are no strict restrictions. This parameter depends on the height of the ceilings or the height of the furniture being installed, so this measure is chosen by the owners themselves.
Opening requirements
They are much stiffer than traditional swinging structures and even stiffer than horizontal surfaces. The original dimensions remain the length of the opening and its height, but the top and bottom edges must be ideal along the entire length.
Small vertical deviations in the side walls will not affect the cabinet doors too much. It is not difficult to cover these imperfections with decorative trim. However, even a small horizontal difference can cause the cabinet doors to gradually come off. The worst-case scenario is that they jam. To avoid such consequences, the top and bottom profiles are often mounted on adjustment bars. The first, “cheapest candidate” is an element made of chipboard.
The width of these strips is selected depending on the system; the standard is 100 mm. If you select this option to compensate for unevenness, the height of the opening is measured after installation is complete. The second method is to subtract their total thickness from the previously measured opening height.
Varieties
The videos are presented in several types, each of which has its own purpose and rules of use:
- upper roller - designed to implement a supporting function throughout the entire system. Its correct installation ensures that the door leaf is secured vertically. For a sliding wardrobe, a mechanism is selected that includes not only the rollers themselves, but also rubberized wheels. Rubber is intended to reduce the noise that occurs during the movement of the doors, and also ensures that there is no knocking if the doors swing or significant force is applied to close them. The upper rollers can be spring loaded. They differ in size and structure, and the choice depends on what type of vertical profile is used in the furniture. If there is an open profile, then an asymmetrical roller is installed, and if the profile is closed, then only the symmetrical option is suitable;
- lower rollers - perform a supporting function. They are the ones that are affected by the main load coming from the cabinet door. The mechanism is equipped with a special pressed-in bearing, and its presence guarantees a long service life of the product, as well as high quality construction. An additional shock-absorbing spring is certainly used, thanks to which the sash moves softly and smoothly. The installation of this type of roller must be carried out with special care, since the correct adjustment of the position of the doors relative to the walls of the furniture depends on this. This is especially true if the floor in the room has numerous uneven surfaces.
To install cabinet doors, a different number of rollers can be used; if the weight of the leaf does not exceed 60 kg, then you can use two rollers, and if the weight is more than this indicator, then it is advisable to use 4 pairs. Types of casters further vary depending on the installation method, as certain varieties are mounted into aluminum frames installed along the door, while others are simply installed inside the cabinet.
Upper
Lower
DIY wardrobe doors
Work will continue without delay or pause if everything necessary is prepared in advance. And in this case, the master cannot do without tools. The required set includes:
- hammer (rubber mallet);
- drill, metal chisels;
- sandpaper, folder;
- Punch for fastening profiles to solid walls;
- ruler, angle, plumb line, level (regular or laser);
- Metal hacksaw or electric hacksaw with aluminum hacksaw blade;
- a set of screwdrivers or screwdrivers with bits (standard and hex);
- a hand-held circular saw or an electric jigsaw if you decide to make your own door inserts.
Angle grinders and aluminum do not mix. Cutting with a grinding machine will inevitably lead to overheating and destruction of the structure of the protective coating of the metal. There is an alternative to “working with your hands.” You can take the easy way out and order profile cutting from a company that sells sliding systems.
Filling
After this preparation, begin assembling the fillers. Most often you order door filler. However, sections can be made with your own hands. In this case, the work must be completed flawlessly. The accuracy of marking, observance of right angles, and uniform cutting are extremely important. Otherwise, there will be no guarantee that the elements will fit the finished frame. Incorrectly cut blanks can deform it. Another necessary step is chamfering (depth and width - 2-3 mm).
If the design includes glass or mirror parts, first place a rubber seal around the perimeter. It is placed by pressing a finger into the end of the element. The ends of the sealant are located opposite each other, leaving no overlap. To avoid injury if the element breaks, the protection is glued to the back of the mirror. An ordinary self-adhesive film is suitable for this role. A door consisting of several fragments is assembled using intersecting profiles.
Sometimes it may take considerable force to insert the upholstery. In such cases, the material that will not come out is forced to tap on the back of the hand or with light, gentle blows with a rubber mallet. After the sash is assembled, the final blade profiles are installed equally at the top and bottom.
Framing
Then proceed to installing the side profiles. The steps here are similar to the previous ones: first, the filling is carefully inserted into the groove, using hands or tools, then the section is pushed until it stops, preventing the slightest displacement. After assembly, the frame is tightened using fasteners.
Start at the top of the sashes. Insert the fasteners into the drilled hole, tighten the connection with a hex key. Insert the upper rollers between the profile bridge and the screw head. Then the screw is tightened. Proceed in the same way on the other side of the sheet.
Installation of guides
The dimensions of the slides must correspond to the width of the cabinet. The difference of plus or minus 3 mm is not significant, so a small dimensional error is acceptable. Install the top rail first.
Top guide
Secure the guides with 4.2×16 self-tapping screws or 3.5×16 countersunk screws. Drill a hole in the top rail with a 4mm drill bit. The distance between the holes is approximately 300 mm.
If you need to secure the rail with a countersunk screw, then the holes need to be secured with a 6-8 mm countersunk head. This is to make sure the screw is fully seated, so to speak. So the instructions for installing the top rail are quite simple. Once you've drilled the holes in the rail, you need to insert it, line it up flush, and secure it.
Bottom guide profile
In this case, it is also necessary to drill holes in the profile. But don't rush to attach the bottom rail to the cabinet. The reason for this is that it must be offset within the cabinet by 20mm. In order to achieve an accurate notch, you must first install the bottom rail profile into the cabinet. Next, install the doors to the closet. It is impossible to do without an assistant in this task. The door must be installed strictly vertically. This can be achieved by moving the lower guide profile, checking verticality using a spirit level.
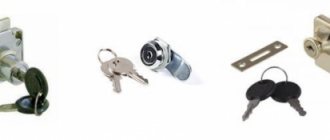
Install the locking device before screwing the bottom rail. The next section describes how to do this correctly.
Sources
- https://remboo.ru/dizajn/mebel/dveri-dlya-shkafa-kupe.html
- https://made-box.ru/samostoyatelno/sborka-dverej-shkafa-kupe-svoimi-rukami.html
- https://stroychik.ru/mebel/dveri-dlya-shkafa-kupe-svoimi-rukami
- https://dom-i-remont.info/posts/mebel/dveri-dlya-shkafa-kupe-svoimi-rukami-sborka-i-montazh-udobnoj-sistemy/
- https://kakpravilnosdelat.ru/ustanovka-dverey-shkafa-kupe-svoimi-rukami/
Profile cutting
If you plan to assemble wardrobe doors with your own hands, then always start with a preliminary calculation. There is an excellent site where you can calculate doors for coupes. I'll leave the link here, you can safely use it. A very convenient program for calculations. Many professionals use it.
Before assembly, parts are cut from profiles of the required sizes. It is recommended to do cutting using a miter saw. Make sure that the blade on it is sharp enough and is designed for working on metal.
Or you can order cutting of parts, and already work with ready-made profiles.