Doors of this type are installed both in wall openings and in built-in cabinets. Therefore, installation systems may differ slightly. But in general terms, the algorithm of actions when calculating the parameters of compartment doors does not change. The technique is quite simple, and if you understand the meaning of each stage, you can do everything yourself, without turning to a professional.
Calculating the cabinet (if it is the one that is being assembled) is not limited to just determining the dimensions of the sashes. It is necessary to take into account its layout, calculate the optimal dimensions of compartments, drawers, and modifications of various components. For example, a roller mechanism. But that is another topic.
Preparation of the workplace
You need to start with this, and it doesn’t matter whether the installation of sliding sashes is supposed to be in a niche or a wall opening. It is necessary to ensure that the geometry of the selected area of the room is correct, without distortions. Otherwise, calculating dimensions will not only become more complicated, but the result will also have large errors. In addition, the profiles will lie unevenly, and the compartment door leaves will roll spontaneously.
What's included
If you want to get more information directly about the manufacturer itself, visit their official website. There you can see photos, read reviews, and study a number of useful materials.
Those of our readers who have experience working with Aristo will also be very helpful. Leave your feedback, tell us what you had to buy and use, how difficult the installation was, and what pitfalls you encountered.
If you need a classic in terms of compartment doors, or you want to get something original, sometimes it makes sense to buy components of the Aristo system, and based on them assemble a full-fledged wardrobe, designer storage systems, interior compartments, etc. The choice is yours.
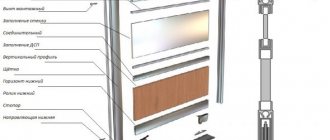
The main components that make up the Aristo system are:
- profiles C;
- H profiles;
- guide lower profile;
- upper door frame;
- lower door frame;
- straight stop;
- U-shaped profile;
- upper symmetrical rollers;
- upper asymmetrical rollers;
- lower support rollers with adjustable screw;
- assembly screws;
- coupe stop;
- Schlegel, etc.
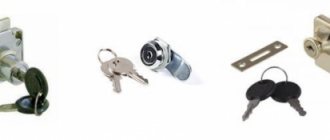
There is also a list of additional accessories, which, if necessary and desired, can be purchased separately. Basically we are talking about the lock, closer, plugs, magnetic stoppers, etc. They do not directly affect the assembly, but they provide certain advantages when using ready-made compartment doors.
Sash size calculations
Height
To calculate this parameter of compartment doors, no formulas are needed. The initial value is the corresponding size of the opening (it is already known). Since the sash should not “fall out” of the profile, you need to take into account the height of its wall. If we focus on the Raumplus mounting system, which is most often used, then it is 45 mm.
It is enough to subtract about 40 from the height of the opening, and you will get the desired value. There will be a guarantee that the rollers in any case (dynamic or static) will not jump out of the upper guide. The maximum height is determined in the same way. Only the double thickness of the profile wall (top + bottom of the opening) is subtracted.
Using this method, the height of the sliding wardrobe is determined, regardless of the scheme according to which it is mounted. The algorithm of actions is identical for any constructions of this type.
Width
It should be selected so that the overlap of the canvases is ensured by an amount sufficient to install the selected type of handle.
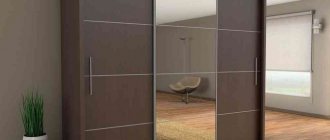
Design Features
Before we talk about how doors are assembled, we need to talk a little about what Aristo is. The profiles of this company are made on the basis of primary aluminum. The products are distinguished by high-precision dimensions.
The system involves the creation of various doors, but the main emphasis is on sliding systems for compartments. Rollers for sliding doors are equipped with metal rolling bearings, which do not require the use of lubricants throughout their entire service life.
Aristo designs provide long service life, they operate smoothly and silently. Of course, the ability of the master himself to assemble the door plays an important role in this. But if you follow the instructions and follow some rules, you will definitely succeed.
The upper rollers serve to ensure the stability of the structure, holding the door leaf in a vertical plane, and also helping in smooth movement along the upper guide.
As the manufacturer of the Aristo Nova, Flat and other interesting solutions notes, their compartment doors can withstand about 100 thousand opening and closing cycles. For a coupe this is a very respectable figure. Moreover, in practice it has been confirmed that these words are not a marketing ploy, but correspond to reality.
The assortment includes various colors and design options that aluminum profiles can have. This allows you to install just such doors yourself, which will complement your interior. You can also safely play with contrast.
You can also buy profiles that imitate wood. To give the desired color, two-layer laminating films are used. The monochromatic appearance of parts during production is achieved through anodizing.
By purchasing profiles for compartment doors from Aristo, you can make sliding doors filled with a mirror, a combination of glass with plywood and fiberboard, chipboard panels, MDF boards, etc. The maximum design reaches a width of 1500 mm and a height of 3300 mm. The maximum weight of one leaf is up to 160 kilograms.
Recommended calculation formulas
The calculation principle is the same, but the number of leaves is taken into account. The initial value is the width of the opening.
- Wardrobe with 2 compartment doors. The overlap value is added to the result of measurements of the niche (opening), and the resulting value is divided by 2.
- Three-door design. The difference is that the number of handles and overlaps of the canvas increases. Consequently, the formula takes a different form. The calculation is made as follows: the double size of the door hardware is subtracted from the width of the opening, but the result is divided by 3.
Note
This applies if you want to calculate the maximum door width. As a rule, home craftsmen install so-called sash bumpers. And if their thickness is significant, then this value (multiplied by 2, since the installation of devices is done on both sides) will have to be subtracted from the obtained value. This will be the optimal width of the wardrobe.
Width and overlap of compartment doors
It is not recommended to make gates smaller than 500 mm: the gate will be unstable due to the proximity of the rollers. A little more force when opening and it may fall off the tracks.
Also, don't make the compartments too wide: they will be awkward to use. The maximum width is 1000-1100, but it is better to stay at average values of 700-900 mm.
When calculating the width of a door, "good practice" is to avoid overlapping the interior space with the side profile. That is, the overlap of sliding doors must exactly match the width of the profile.
In this case, the thickness of the "dust cap" (schlegel) is usually not taken into account, leaving the choice - whether to glue or not - after the final installation of the front of the compartment.
If we take the width of the open door (asymmetrical profile, C) to be 25 mm, and the width of the closed door (symmetrical profile, H) to be 35 mm, then the formulas for calculating the width of doors 2, 3, 4 and 5 are conveniently presented in tabular form.
According to the calculation formulas for frame doors with the Aristo profile, it can be seen that the presence of a dust collector reduces the depth of the ceiling.
There is no exact calculation formula for frameless sliding systems. Usually there is an overlap of 20-30 mm, and the door width is rounded to an integer value.
Calculation method
To clearly understand all the nuances, let’s take specific aperture sizes as an example. Let's assume the main inputs are:
- Height Hpr = 2400 mm;
- Width Lpr = 2700 mm;
- number of leaves N = 3 pcs;
- buffer tape thickness B = 6 mm;
- number of overlaps A = 2 pieces;
- frame profile width C = 20 mm;
- The thickness of both rails is S = 40 mm.
When calculating, it is necessary to take into account the dimensions of the upper and lower tires of the housing. The top load-bearing lip is an inverted "W" cross-section.
The buffer strip can have different widths. The minimum thickness of the racks is 6 mm, and the maximum is 10 mm. This factor is taken into account when calculating sliding systems. In our case, the calculated strip thickness is 6 mm.
The profile of the handle determines the width of the vertical edges of the door leaf. The aluminum posts are slotted to hold the blade in place and are curved on the outside for easy hand grip. The thickness of the horizontal and vertical frame slats is the same, 20 mm.
Fill calculation
Doors for sliding structures are made of different materials - multi-layer plywood, chipboard, and sometimes high-strength glass. They all differ in thickness. But the calculation procedure for any filling of compartment doors remains unchanged. The basis for all calculations is the configuration of the profile for edging (that is, the features of its cut) and the standard dimensions of slab (sheet) products.
- Height. It has already been defined for the opening. All that remains is to subtract twice the thickness of the guide (top + bottom). When installing compartment doors, the seal is also taken into account. Its material has its own thickness, which must be multiplied by 2 and subtracted to obtain the desired value.
- Width. Also nothing complicated. If the filling is done in a metal “edging” (frame), then the thickness of the “ribs” is taken into account. Accordingly, its total value is subtracted from the calculated door width.
When independently assembling sliding structures, individual drawings are used, developed in relation to local conditions. The main thing is to understand the principle of calculating the size of doors, be it a wardrobe or doors in a wall opening. And everything else is just minor nuances that are not difficult to take into account. For example, the thickness of the divider partition, the design features of the handle, and the like.
How to calculate the dimensions of wardrobe doors
It is very important to calculate everything correctly and measure accurately so that the finished structure stands firmly in place. Any inaccuracy can lead to jamming or warping of the doors. The first thing you need to do is measure the width of the structure's platform.
When measuring, check the dimensions at several points.
The next step is to calculate the cabinet doors. We are interested in the dimensions of the opening for them, its height, width and depth. The last preparatory stage is to determine the number of leaves and the pattern of their overlap. The simplest design is with two doors and an overlay. Arm yourself with a calculator and start calculating.
Assemble a wardrobe compartment with your own hands for someone with practical skills, it is quite possible.
Measuring the opening
In order to place a closet in a room, corridor or hall, it is worth calculating the correct size of the opening. To do this, first select a location to install the structure.
Important notes to keep in mind when measuring aperture:
- To measure the hole correctly, you need to measure the width and height of the space;
- The smallest width of this type of structure is 50 centimeters; models larger than one meter can be found. The main thing is to calculate that there is enough space on the territory for all construction;
- Remember to measure the width of the space at the bottom and top, this will help you get an average;
- We recommend measuring the height, which is usually between 2 and 2.5 meters.
Necessary measures
Determining the number of doors
An obligatory step is the calculation of the cabinet doors. But in order to accurately determine the size, you need to take measurements from the hole where the clothing will be located. Its height, width and depth are taken.
For all measurements and calculations, certain rules must be observed:
- It is better to measure in different areas because there are differences;
- There may be an inch and a half error between measurements;
- the height value should be 4 cm less than the same value as the hole;
- It is essential that the calculations are made accurately;
- When measuring doors, it is advisable to take into account an important factor - the possibility of passing these elements through the openings of the living space.
For ease of opening the cabinet, a design with double wings is recommended. Selling products with three doors is common; they are quite wide and take up a lot of space. When choosing a product, you should first consider the available space in the room.
Apartment door layout options
Creating a Project
There are many computer programs to help you create a project. But if graphic editors are higher mathematics for you, all you have to do is arm yourself with a simple pencil, an eraser, a ruler and a checkered piece of paper. We will draw the wardrobe by hand.
On a piece of checkered paper, the easiest way is to draw an image to scale - let two cells be equal to 10 cm. That is, the height of our wardrobe is 24 cm (48 cells), and the width is 16 cm (32 cells). We draw a rectangle, based on the overall dimensions and not forgetting about the chosen scale.
Next, you need to decide on the design of the cabinet itself—whether it will be on adjustable legs or the sides will be placed directly on the floor. In our example, we will consider the option of a sliding wardrobe with a plinth, that is, the sides stand on the floor.
The plinth is the bottom strip that connects the two sides of the cabinet. Its recommended height is 100 mm.
We separate these 100 mm (2 cells), we get an internal opening. Before you decide to divide it in half with a vertical line, carefully read the following advice from the wizard.
The sliding doors of the wardrobe will interfere with the drawers if it is divided into equal halves. The middle side of the cabinet must be moved to one side by 50–70 mm, and drawers must be installed in the smaller part. You should also pay attention to the fact that the door rail has a certain height. It is enough to raise the front of the lower drawer by just 10 mm, and it will be able to move out without any hindrance.
So, the wardrobe is divided into unequal parts and the lower drawer is drawn with the necessary gap. Now it’s time to show your imagination and try to use the resulting space in the most functional way. Here is the sketch our designer came up with:
Based on it, you can easily sketch out your own initial wardrobe design on a sheet of paper.
What depth should be built into the closet for such a door? For sliding doors it is usually 8 cm. Will it be possible to save on the required depth if you use hinged doors instead of sliding ones? Thank you
For pivot doors, the filling is minus 50 mm if the cabinet is straight.
Dmitry, what if it’s corner? And how is the guide attached, how far from the edge?
Hello! Depends on what degree of angle. Mainly in fact, so that the profile does not shuffle when opening.
I had problems adjusting the sash height. The screw does not tightly tighten the strip and sash. I can't figure out what the problem is. Could you give me some advice?
Correct room measurements
Correct measurements are the first step to successful assembly and installation of a sliding wardrobe. Unfortunately, smooth walls and floors are quite rare. Furniture, on the other hand, is a structure with right angles. Therefore, when measuring the space allocated for a wardrobe, you should take into account the curvature of the walls and make the necessary technological gaps. To understand what size the future product will be, using a construction tape, we measure the height and width in several places: top-bottom-middle along the wall, height at three or four points, and width relative to the floor and ceiling at the estimated depth of the cabinet.
Now you should pay attention to protrusions, sockets, radiators, door openings and other objects located nearby. Nothing should interfere with installation, and in the future the cabinet should not block any of the above. Therefore, in order not to forget about their existence, it is best to draw strategically important objects and measure the distance to them.
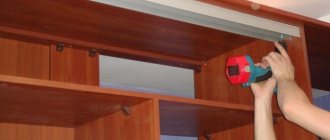
Assembling doors
We cover the mirror door with film on the back side. It doesn't matter which one. You can even use simple self-adhesive. This is done so that the mirror, even if it suddenly breaks, does not crumble and cause injury.
Then we apply a special seal along the edges of the mirror. We install the lower horizontal profile. We align the handle along its lower cut and hammer it with a mallet.
There is no need to hit it hard; in principle, the handle can be filled simply with the palm of your hand. Then we install the upper horizontal profile. Secure with screws. At the same time, we install the upper rollers in the upper profile. They are attached with screws.
We fix the lower profile through the hole marked at 43 mm . through the 7 mm . We do the same with the second handle.
We glue the Schlegel and the door is ready!
Schlegel is a special brush seal that is glued to the handles. It has a dual task: firstly, it softens the impacts of doors against each other and against the walls of the cabinet, and secondly, it prevents dust from penetrating into the cabinet.
We do the same with a chipboard door. It’s good if the chipboard is ten-millimeter, if its thickness is 16 mm , then you will have to choose a groove. To do this, we lower the saw blade on the machine so that it cuts only 6 mm in depth.
On the right ruler we also set 6 mm , and run the chipboard on all four sides. Then we take the router, set it up and select the excess. Then we do everything in the same way as described earlier...
That's it, the compartment doors are ready!