Repair is a long process and it is difficult to keep everything under control. Selecting and purchasing furniture is a stage that directly brings you closer to a pleasant result of all work. But even calculating the exact dimensions of furniture and its parts can be confusing. To prevent this, it is worth knowing the correctness and sequence of actions.
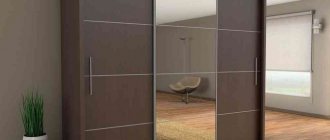
Sliding wardrobes have long become an integral part of modern apartments due to their functionality and convenience.
Sliding wardrobes have been a part of our lives for a very long time. Their simplicity, durability, accessibility and functionality have captivated many. Determining measurements is a fairly understandable and everyday matter, but calculating the size of wardrobe doors makes you think.
The larger the compartment door, the heavier the door leaf, which makes it difficult to move.
Doors for sliding wardrobes: recommended sizes
If we talk about strict restrictions on the size of doors for a wardrobe, then there are none. You can make any length and width. But there are recommended parameters determined based on operating experience:
- The minimum width is 50 cm. Nothing prevents you from making the canvas narrower, but when moving it will warp, as a result it may even jump out of the guides.
- The maximum width of the sash is 110 cm. In this case, considerable effort has to be made in order to move it.
- The optimal width is 60-90 cm.
- The profiles come from the factory with a height of 5.5 m, and in stores they are usually cut in half. So there is a real opportunity to make doors for a sliding wardrobe of the required height. At high heights, you just need to pay attention to the rigidity of the handle profile.
- The number of compartment door leaves is selected based on the optimal width. Choose them so that they do not block access to the cabinet contents.
Almost no size restrictions
Using the interior space of the cabinet
Before you start creating a wardrobe project, you need to decide for what purpose it is intended. Simply put, what things do you plan to store in it. And here again you need to arm yourself with a tape measure and carefully examine the cabinet that you are currently using:
- The optimal distance between shelves is 300 mm. But it’s better to approach this issue individually: measure stacks of folded things, try on boxes of shoes, analyze what doesn’t suit you in the old closet.
- The required cabinet depth for hangers on which hanging items are placed is 550–600 mm. If the actual depth of the future wardrobe varies within these limits, then without a doubt you can use a rod. If the depth is significantly less, then it is best to install retractable hangers and then things will be located “facing” you.
- Decide what you will store in the drawers, what height they should be and how many drawers are needed.
- Advice from the expert: it is advisable to divide wide drawers into several cells, thereby creating an organizer that optimizes the storage of oversized items.
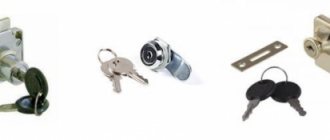
- Study the market for the proposed accessories for sliding wardrobes: retractable nets, tie hangers, built-in ironing board, pantograph, shoe shelves, etc. Properly selected fittings will greatly facilitate filling the internal space.
Sash design
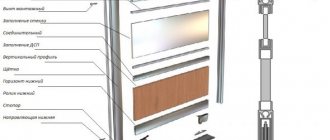
The wardrobe door leaf consists of profiles:
- lower;
The lower profile has deeper sidewalls - upper;
Upper profile for sliding door leaf - handle profile;
The handle can stand on both sides - intermediate.
These profiles are placed between parts of the door leaf, but you can do without them - if the door is solid and not composite
All this together looks like in the photo. The door material you choose is inserted into this frame, into the grooves. It can be glass, mirror, chipboard and other materials.
Sash design without filling
Separating profiles are optional. They are needed if you assemble the sashes from different materials or you simply like them this way better. The maximum thickness of the filling material is 10 mm, the minimum is 4 mm. Thinner ones - glass, plastic, mirror - are inserted through a sealing gasket.
In order for the sash to be able to move, rollers are installed on it - at the top and bottom. The lower rollers bear the entire weight of the door, and the upper rollers stabilize the vertical position of the leaf, preventing it from deviating.
Rollers for wardrobe doors
The rollers are attached to the side profiles using special fasteners.
Preparing parts
Many people, in order to save money, wonder whether it is possible to do without the help of experienced furniture manufacturers and how to make wardrobe doors with their own hands. First, the parts to be installed are prepared. Having chosen the most suitable material (chipboard, MDF or natural wood), having purchased accessories, you can get to work. It will be necessary to create a reliable frame from ready-made parts:
- two side walls;
- Cover;
- at the bottom.
Shelving and storage systems will then be installed on site.
A sheet of the selected material is cut out using special equipment, which cuts out the described parts of the future cabinet with great precision. If you don't have special tools for this, you can get the material cut by professionals. After sawing, the workpieces are processed and covered with end caps to make them more aesthetically pleasing. Below we will tell you how to assemble the doors and get a complete closet at minimal cost.
Hanging structure without filling
The profiles may be different, so they must be measured separately.
Guides for sliding doors
As you understand, the sash is not everything. Guides are needed along which these very doors will move. There are two of them - upper and lower. In appearance they differ significantly.
The top guide for the wardrobe door The bottom guide is made of metal
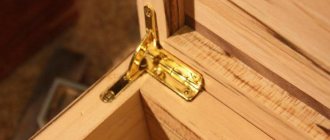
When installing the door, first insert it tightly into the upper guide, lift the sash all the way and place the lower rollers in the corresponding slot. The entire structure is shown in the following photo.
Assembly diagram
Maximum width
The number of partitions and guides for one design is not limited. So, you can create a wardrobe of any required length.
Important! Please note that when designing a product that is too long, it is necessary to create additional support for the top panel and shelves. It is better to choose a wardrobe model constructed from several independent blocks (modules) connected to each other by a single facade system made in the same style. A high-quality fit makes the joints between the modules less noticeable and does not at all spoil the quality characteristics of the material.
Size calculation
When assembling a sliding wardrobe door yourself, there are two options. The first is to measure the opening, think about how many doors you want to have and contact a door manufacturing company with this information. Just make sure they sell the parts without paying for assembly. The manager himself will count all the necessary materials for you, give you the dimensions and announce the amount. It's simple. But you will have to purchase everything from this office, i.e. choose from what is available.
The second way is to calculate everything yourself and look for the necessary components from different companies. It’s more complicated and more expensive, but there’s a wider choice. For those who do not like simple paths, we will describe the calculation of the components.
Doors
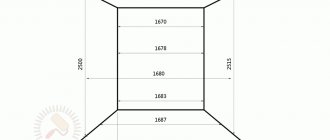
Calculate the width of the doors so that when closed, only one handle is visible, but it should not cover the door leaf itself. For a sliding door with two leaves, you calculate it like this: measure the width of the opening, add the width of the profile and divide in half. This will be the width of the sash.
For example, the opening is 1600 mm, the width of the handle profile is 26 mm. We get 1600 mm + 23 mm / 2 = 811.5 mm. Please note that the width of the handle profile is taken arbitrarily. It can be different in shape and, naturally, in width. When making calculations, substitute the width of your chosen structure.
Profiles may be different, so they must be measured individually
To calculate a tricuspid one, you will need to add twice the profile width and divide by 3.
Example: opening 2100 mm, handle width is the same - 26 mm. We count: 2100 mm + 2*26 mm / 3 = 717 mm.
Everything is easier with height. Subtract 40-45 mm from the height of the cabinet and obtain the required height of the sash, as well as the length of the side profiles. That's all about the dimensions of the sashes.
Filling
Since the filling is in a frame of profiles, we subtract twice the profile width from the total width of the sash. We do the same with the height - subtract the height of the lower and upper profile.
Measuring the width of profiles
So, the width of our sash is 811.5 mm. The measured width of the handle profile is 18 mm. Since the handles are placed on both sides, we double this figure. We get 36 mm. Total filling width 811.5 mm - 36 mm = 775.5 mm.
We also calculate the height: let the initial one be 2350 mm, the width of the upper profile 12 mm, the lower one 48 mm. Total filling height 2350 mm - 12 mm - 48 mm = 2290 mm. This is if the filling is solid and it is laminated chipboard, which does not require a silicone seal. If the sash is a solid mirror or glass, the thickness of the sealing rubber must be subtracted from the found height. It is 1 mm, but since it is put on around the perimeter, it takes up 2 mm in general - above and below. In this case, the filling height is 2290 mm - 2 mm = 2288 mm.
If the sash filling consists of fragments, the thickness of the connecting profile is also subtracted. It is also approximately 1 mm.
Profiles
The height of the vertical profiles of the frames is equal to the total height of the sash. The width of all horizontal ones is calculated depending on the width of the handle: from the width of the sash we subtract twice the width of the handle (there are two of them).
How to measure handle width
Let the handle width be 26 mm. We get the width of the vertical profiles: 811.5 mm - 26 mm*2 = 759.2 mm.
Allowable depth
There are some maximum and minimum depth restrictions related to:
- Choice of accessories. To store outerwear, the minimum width of the wardrobe compartments, taking into account the sliding system, must be at least 650 mm. While other departments for accessories - tie holders, trouser holders, shoe racks - are designed for an overall compartment depth of 600 mm (with an increase of 100 mm for the sliding system).
- Choosing a cabinet location. It is not advisable to install a large wardrobe in the hallway. The dimensions of the overall structure (if they are more than 600 mm) will simply clutter up the already narrow corridor. But how can you use a narrow cabinet without losing functionality? Such models have their own tricks: for example, a retractable end bar on which coat hangers are placed along the back wall.
Photo report on the assembly
First, all profiles are cut exactly to the calculated dimensions. The accuracy must be perfect. The cut is strictly perpendicular, at 90°. Holes are drilled in the handle profiles for installing rollers and fasteners.
The holes are made through two diameters. The exact size depends on the dimensions of the purchased fastener, but basically there are two sizes: 4 mm and 6 mm, as well as 6 mm and 10 mm.
How to drill holes
One such hole is made at the top, the center of which is located at a distance of 7 mm from the edge of the profile, at the bottom there are two holes - the first at a distance of 7 mm from the edge, the second at a distance of 42 mm from the profile cut.
Holes at the bottom of the side profiles
During assembly, all parts of the filling are assembled first. First, if there is glass or a mirror, sealing rubber is installed around the perimeter. It is simply put on the end of the part by pressing a finger. The seal is cut off along the edges and placed end to end, but without overlapping on the next side.
Seal on the mirror
A protective film is glued to the back of the mirrors. You can use regular self-adhesive. This film will prevent fragments from scattering if the mirror breaks.
If the sash is composite, we assemble it using connecting profiles. The filling parts are simply inserted with force into the profile. Sometimes considerable effort may be required. You can tap the end with the back of your hand or use a rubber mallet for this.
Simply insert the filling parts into the grooves of the profile and tap on the end
When the sash is assembled, the corresponding profiles are installed at the top and bottom using the same principle.
Top profile installed
Then it’s time to install the side handle profiles. Everything is the same: push the filling into the groove, make sure that it fits all the way along the entire length without distortion. When the frame is assembled, it is necessary to tighten it with fasteners. Let's start from the top. Take the fasteners and insert them into the previously drilled hole. If the distance was measured accurately, the screw fits into the groove of the upper cross member.
If drilled correctly
Tighten the connection using a hex wrench. Slightly not tightening it all the way, insert the upper rollers between the screw head and the profile jumper, then tighten the screw.
Insert the upper rollers
We repeat the same operation on the other side. Then we move down. Here the fasteners are installed in the upper hole. Just tighten it all the way. We repeat similarly on the other side.
Install the fasteners from below
Next, install the lower rollers. We insert the thrust plate into the groove and press it.
Installing the lower roller - insert the plate into the profile
We press the spring, tucking the roller body inside. We insert a screw into the hole, trying to get into the socket, and tighten it with a hexagon. You may need it in a different size - slightly smaller than the others - since this screw is usually thinner and longer.
Press the roller, insert the screw
There is no need to tighten it all the way. So that it goes into the plate half a centimeter or so. Then, when installing the door and adjusting its travel, this screw adjusts the position of the sash - the angle is raised or lowered.
Tighten the screw that fixes the roller
If you press the roller wheel, it will go into the housing, then return due to the elasticity of the spring. This simple mechanism ensures smooth movement of the sliding wardrobe door.
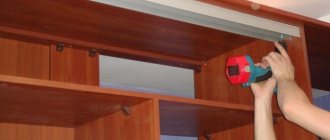
Having assembled all the sashes, we proceed to installing the guides. They must be located strictly one below the other, even without deviations of a millimeter. Use a plumb line or a laser level (read how to use a laser level here).
First screw on the top guide. It is attached either to the ceiling or to the top of the cabinet. The distance from the shelves is at least 100 mm, otherwise the doors will touch shelves, things, and hangers.
Screw on the top guide
We insert bumper springs into the grooves in the lower guide from the sides. They will limit the movement of the door. The number of springs is equal to the number of leaves; they are installed at both ends.
Door stoppers
Insert travel limiter springs
If you don’t have a laser level, so you don’t have to worry about plumb lines, you can start by simply laying the bottom guide without fixing it yet. Then install one blade, placing its upper rollers at the top and installing the lower ones in the desired groove. This way the doors will connect the upper and lower guides.
Having aligned the sash vertically, automatically align the bottom guide
By aligning the canvas strictly vertically, you will automatically align the lower guide. All that remains is to screw it on. Just be careful that the doors do not move.
The last thing left to do is to glue the Schlegel on the sides. This is a fleecy self-adhesive strip that softens the impact of the sash on the walls of the cabinet (or simply on the walls, if the cabinet is frameless).
The final touch is the Schlegel sticker
Here the wardrobe doors are installed and ready to go. You can watch the process again in the video.
Drawing and detailing
Today, wardrobes are popular among tenants of small city apartments and owners of spacious country cottages, because they are highly functional, practical, serve for a long time without breakdown, and also retain their appearance for a long time. Furniture can be adjusted to almost any size, style of room. And to spend a minimum of money on this, make your own furniture. How to make closet doors and what do you need to do to start installing closet doors? Floor plans and details of drawings of the future project indicating where this or that investment will be carried out will significantly speed up the work.
SchematicDrawing
Frame and profile assembly
The location of the door leaf assembly depends on its type. When using glass inserts, the silicone gasket is first placed on the end surface. After this, all elements of the canvas are connected by central frames. Unlike sealant, which is easily pulled out with your fingers, difficulties may arise at this stage; in particularly difficult cases, the putty is covered with a rubber hammer (which is not always possible when working with a mirror or glass). The upper and lower frame profiles are attached to the already assembled sash with similar forces.
The side profile is installed last, starting from the top:
- To secure the frame in the pre-drilled hole, carefully insert the screw, with the tip extending 10-15 mm.
- This tip is inserted into the groove of the top profile of the frame and tightened with a hex key until a distance of 3-4 mm is reached.
- Insert the upper support roller fork into the space created, and then tighten the screw until it stops.
- The process of assembling the cabinet doors is completed by attaching the bottom of the frame at a distance of 42 mm from the edge and attaching the support roller (in the same way, but without careful tightening).
Design, details and assemble your wardrobe with your own hands step by step
Some craftsmen approach the assembly process differently: first they fix the door frame without filling, after checking the work, this structure is partially unscrewed and filled with glass or particleboard flooring. A description of this method can be easily found on thematic resources; the basic rules for assembling and fixing the profile remain unchanged. To avoid mistakes, it is worth installing cabinet doors in accordance with the recommendations of the sliding system manufacturer and clarifying this point in advance.
Fixing the guides
Particular attention is paid to installing the rails directly into the body. These elements are fixed with vertical strips and aligned vertically to the nearest millimeter. First, the upper horizontal rails are fixed, then the lower ones after checking their evenness. Their location depends on the type of side profile. When installing doors with an asymmetrical C-profile, the lower guide moves away from the line of the facade until it coincides with the internal guide of the upper guide. When using an H-profile, all horizontal rails are located in the same plane and aligned with each other.
Individual
If the assembly is carried out according to an individual project, the dimensions must correspond to the parameters of the room and personal preferences. For example, a wardrobe in the hallway for outerwear is significantly different from a wardrobe for linen in the bedroom.
Non-standard solutions for dead-end and narrow hallways and corridors
In some cases, the specifics of the corridor make adjustments to the drawings and layout of the cabinets. Long, narrow and dead-end structures are often shortened to create embedded systems. Such solutions are more economical, since all components are fixed to the walls of the niche.
To create such a cabinet, you need to prepare guides for the doors, the door leaves themselves and related elements (bars, fasteners, fittings, etc.).
The height of the built-in wardrobe is determined by the height of the ceilings. Sliding systems are also designed for the distance from floor to ceiling. The implementation of such a project often justifies itself if the internal space is used correctly.
In most cases, the depth of niches varies from 70 to 90 cm. Such dimensions differ from standardized values, since things will be in hard-to-reach places.
To avoid difficulties when using furniture, you should divide the niche into three sections. The side parts will be reserved for shelves and pull-out containers, as well as nets for shoes.
The middle section consists of two parts:
- Shelves are hung along the perimeter of the wall.
- A rod with hangers is fixed in front of them.
It is customary to keep shoes on the shelves, which often change with different seasons.
Inside the spacious furniture you can store seasonal clothes and shoes for all family members. Under such circumstances, the depth of the cabinet does not interfere with ease of use, but simplifies access to the necessary things at any time.
Sliding wardrobes for narrow hallways
In narrow corridors, cabinets have a fundamentally different structure. If only 45 cm of depth is allocated for furniture, then care must be taken to fill the available space using a narrow cabinet configuration.
In this case, instead of a classic bar, you can install a 35 cm long console. 10 cm of reserve is used for the tracks along which the door will move.
Depth of wardrobe for bedroom and hallway
Corner, modular and built-in wardrobes are often found in hallways and bedrooms. The optimal depth of the wardrobe for such rooms should correspond to their parameters. To make the final decision, you should consider the shape and area of the room.
So, it is customary to keep clothes, bedding accessories and underwear in the bedroom, so it is better to stick to a depth of 65 cm.
The free space in the closet for clothes that will be on hangers is 60-65 cm. To avoid wear of clothes when they come into contact with sliding doors or the back wall, you need to take care of a space reserve of 10 cm. It is better to store light clothes in closets with a depth of 50 -55 cm.
With variable depth
They are functional systems with a compartment with 60 cm shelves, as well as a radius compartment with a transition to the body. It is possible to go in the opposite direction if there is free space.
Corner cabinets with variable depth will be indispensable in places where it is not possible to place other furniture sets. They significantly save free space in the building without disturbing the aesthetics of the interior.
Cabinet height: influencing factors
A classic sliding wardrobe, the size of which is indicated in the project, has a height of 2200-2400 mm. To reach a height of 2600 mm, you have to supply mezzanines or shelves, which can also be found on the open market. Widths from 900 to 2400 mm are also standardized.
The height of the shelves is adjustable in every possible way. In this case, the doors have a width of about 1 m. If there is a need to increase this value, you should make sure that this does not harm the harmony and ease of use of the storage system.
Determining cabinet height
Typically, the height of the cabinet is determined taking into account the distance between the floor covering and the ceiling. However, such a standard is not used when designing small cabinets, where everything has to be calculated individually. It is also not applicable in apartments in old high-rise buildings, where ceilings with a height of 3500-4000 mm are found.