Every apartment must have such a multifunctional piece of furniture as a wardrobe. It will save space in your home and organize space. Not everyone can afford to purchase it due to various circumstances. This is not a reason to refuse such a thing. For a jack of all trades, it won’t be too difficult to make and assemble it yourself.
Of course, some knowledge will be required. There is nothing complicated here as it seems at first glance. In addition, what joy and pride you will experience from the work done. After all, furniture assemblers charge quite a high fee, but you can handle it on your own.
After the decision to buy a wardrobe has been made, the need arises to assemble it correctly.
General rules for assembling cabinet furniture
To assemble purchased furniture, you must follow the cabinet assembly instructions provided by the manufacturer. There are certain rules. By following them, you will assemble any item with high quality and in a short time.
- You shouldn’t take everything out of the packages at once, much less mix parts from different packs. Maintain the order.
- Read the instructions carefully so that later there are no overlaps and you don’t have to redo it again.
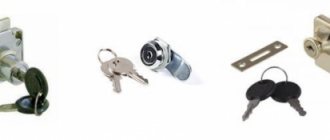
- Make sure the fittings and components are in place. Otherwise, you will not be able to completely assemble the furniture. The handles must match the color scheme. It is necessary that the drawer guides have a soft movement.
- Assemble one section at a time in order. You need to start from the bottom, gradually moving to the sides.
- Open the package, lay out the parts, prepare the tools.
- Mirrors and glass are installed at the final stage. This way you will avoid damage.
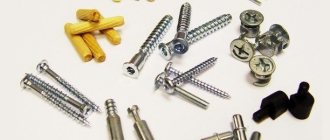
For assembly you need a screwdriver, a screwdriver, a hex key, and a tape measure.
If you do the manufacturing yourself, it will be much easier to assemble.
It is very important to follow the assembly sequence, otherwise you will be forced to disassemble and reassemble the cabinet in the correct sequence.
Installation of walls
On the sides, it is worth pre-trimming the edges, ensuring a smooth and tight fit to the back wall. It is advisable to sand the ends of the walls. Using a level, you will be able to align the side parts perfectly evenly.
At this stage, you will most likely need an assistant to hold the installed parts of the case.
Sometimes a cabinet model is sold without side elements, suggesting placement between walls. In this case, you will have to mark it in such a way as to attach the shelves under the mark. Next, you need to work with a hammer drill to make holes in the walls just below the level markings. Then the fasteners are inserted and the corners are secured. Shelves will be placed on them. It is necessary to install the rear pillars according to their level.
The side wall is placed on the already installed pins and thus attached to the base.
How to work with laminated chipboard - a popular material for cabinet furniture
Currently, laminated chipboard is mainly used in the production of furniture. This is the first principle. It is wood shavings of coarse dispersion. Using the hot pressing method, it is given the shape of a sheet. In the manufacture of slabs, formaldehyde resins are used; they are an additional component. The difference from simple chipboard is the coating with a film made of paper and melamine resin. In terms of environmental indicators, it is better to use materials of class E1. Laminated chipboard boards have good compaction, due to which furniture made from them is strong and has a long service life.
Fastening the rails to the cabinet door
If you think that this material has the same composition, then you are mistaken. Based on their coating, they are divided into veneered, rough and laminated. Based on their quality composition, they can be divided into three grades: first, they use first-class sawdust (usually wood of the same species). The surface is flawless, not a single chip. The plate is decorated, laminated with film or veneer. Second grade – you can already see small defects. There may or may not be cladding. Third, there are already noticeable defects here. Such slabs are not covered with anything.
Until the cabinet is fully assembled, make sure that the attached parts do not tilt, as the fasteners may break off.
In addition, laminated chipboards are moisture-resistant and fire-resistant (withstand high temperatures). They are mainly used to make furniture frames, but are also used in the production of partitions or used as interior decoration. It is worth mentioning that laminated chipboard, due to its composition, perfectly holds nails and screws.
In order to give rigidity to the wardrobe, it is necessary to secure the back wall.
The main “steps” for assembling sliding wardrobes with your own hands are indicated in the instructions.
Furniture made from these boards has many advantages compared to other materials.
- Acceptable price indicators.
- No difficulties in manufacturing.
- Good quality.
- Significant period of use.
- Variety of colors and decorations. This will help you choose the perfect furniture for your living room, kitchen or children's room.
- Blends perfectly with other materials.
Such furniture looks great in any interior.
Another important feature of laminated chipboard is that these boards have heat and sound insulation. Therefore, they can sheathe the walls of the room.
Make sure that the holes for the shelves and hanger rod mounts match the holes on the opposite rack.
Also, if you have started remodeling an apartment/house, knowing how to assemble a wardrobe yourself will help you easily and quickly resolve the issue of moving this furniture.
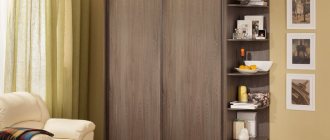
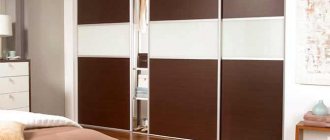
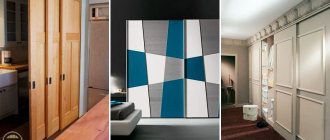
DIY three-door wardrobe
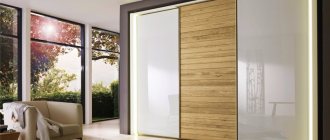
Undoubtedly, the most spacious and at the same time compact piece of furniture is the wardrobe. And if you choose embellished sliding doors or sandblasting, the wardrobe will also become the crown jewel of the room.
A wardrobe with mirrors is ideal in the hallway, in a children's room - with images of “cartoon” characters and animals, and in the bedroom, calm pastel decorations are appropriate.
Of course, it’s easier to buy a wardrobe in a specialized store or order an individual design, but today we invite you to try to assemble a three-door wardrobe yourself. It's not as difficult as it might seem at first glance.
Sources
- https://kuppe.ru/sborka/tryohdvernyiy-shkaf.html
- https://MebSam.com/trexdvernyj-shkaf-kupe-svoimi-rukami.html
- https://foto-designa.ru/assortiment-shkafov/kupe/trehstvorchatyj-shkaf-kupe-41-foto-sborka-shkafa-s-zerkalom-i-antresolyu
- https://mebel-sovet.ru/shkafy/kupe/605-kak-sobrat
- https://stroy-podskazka.ru/shkaf-kupe/sborka/
- https://udobno77.ru/kak-sobrat-shkaf-kupe-3kh-dvernyy-instruktsiya/
What tools are needed
Significant expenses in purchasing the tool will not be required. To assemble a kitchen set, a wardrobe or a hallway, you need to have the usual set of tools: a screwdriver, a hex key for confirmation, a screwdriver, various drills, a bat for confirmation, an awl, a pencil, a tape measure, a square, fine-grained sandpaper, an electric drill, a stationery knife, iron, joint knife, rubber mallet, clamp for parts.
The distance between opposite corners should be the same.
Assembling a wardrobe with your own hands is quite easy and anyone can do it simply by following the instructions.
It is unrealistic to guess what tools will be needed to assemble furniture. It depends on what kind of project it is - difficult or not.
Now you need to install the wardrobe doors.
To open a closet, you don't need to remove chairs or move other furniture.
Rear wall installation
Further assembly steps will be the installation of sheets and fixing them to the back wall of the furniture. The canvas essentially acts as a strong wall, firmly holding the entire system throughout its operation.
Before installing the back wall, you must first measure the diagonals of the structure - this way you can check the correctness of the angles.
Often the front side of the sheets is decorated with colored surface lamination. Fixation is performed using miniature nails. They must be carefully hammered into the ends of shelves and internal partitions.
The back wall of the fiberboard is nailed to the body. In this case, it is necessary to maintain the same indentation.
The main thing is to accurately determine the nailing area. Due to the fact that the cabinet elements are not noticeable from the reverse side, but if damaged from the wrong choice, the product may lose its appearance. The back wall is usually screwed on with self-tapping screws. It's much more convenient than just nailing it down.
Preparation before assembly
First you need to prepare the room. The final outcome of the case depends on this, how much time you spend on work. The important point is that nothing interferes. Make sure all materials and necessary tools are at hand.
As a depth limiter, you can use a 6 or 8 plastic dowel mounted on a drill.
With the help of a wardrobe, you will visually separate different zones in the room, for example, a working area from a relaxation area.
Assembling furniture at first glance seems simple. Many people make mistakes, resulting in defects: the doors and sashes do not fit together well, the doors can creak when opening, misalignment of the holes causes misalignment of parts, furniture does not stand securely on the floor. To avoid this, you must adhere to certain rules and instructions.
Built-in wardrobes of various models, made from natural and artificial materials, are very popular in interior design.
Some models of wardrobes can be transformed to suit the features of the room: the presence of a corridor, recesses in the wall where the wardrobe can be placed.
Assembling the cabinet frame
The first step is to install the base. The slab must be attached to a support running along the long part of the furniture. This is done using European screws. Then you need to correctly place the internal partitions. There are special holes at the bottom into which dowels should be installed.
You need to adjust the legs so that the bottom is level.
At the bottom of the podium there are non-through openings provided for such rods. Next you need to connect them by placing them in the holes. For the stability of the structure, the shelves acting as stiffeners should be fixed. Confirmations are used for this. The main thing is to tighten everything tightly at this stage.
After you have determined the “bottom” of the cabinet, place it in a vertical position and, using Euroscrews, screw the plinths (the height of which is 60 mm) to it.
To complete the frame assembly, you need to install the side parts and the top. These elements are installed immediately, since the features of the entire system will depend on the quality of this work.
Main assembly steps
The wardrobe is assembled strictly according to the diagram, vertically or horizontally. The second option is better, this way you can prevent skewing of the parts being connected. If the height of the ceilings does not allow you to raise the finished cabinet, then it is better to carry out the work in a vertical position.
You can easily assemble a sliding wardrobe with your own hands if you follow the step-by-step instructions.
In such a closet you will place twice as much clothes without the expense of the enormity of the furniture itself.
The first step is to attach the base and adjustable legs to the bottom. They are necessary if the floor is uneven. Next, we begin assembling the body. We connect the sides to the base. To make the structure durable, we attach an intermediate rack and a shelf. This is necessary so that the sidewalls do not tilt. Then we screw the remaining parts and attach the lid. It is advisable not to nail the back wall, but to screw it with self-tapping screws. At this stage we put the cabinet in its place. We install guides for drawers, holders for shelves, and a bar for hangers. Check that the drawers should slide out smoothly.
You need to familiarize yourself with all the details of the product (so as not to confuse anything during the assembly process and not have to start all over again), prepare the tools and the place where the assembly and installation will take place.
This work will take a lot of your time.
Next up is door installation. First we attach the guides, then we fix the rail with screws. We insert the doors, check that they open and close smoothly. Adjust them if necessary. Lastly, glue on the sealing brushes. We attach plugs to the confirmation holes.
As a rule, sliding wardrobes, like all furniture, are assembled in the lying position of the cabinet.
Do not warp the cabinet parts, keep the corners straight.
To summarize, we can say that assembling a wardrobe is not such a difficult job. Your desire, skill and ability will allow you to do this without difficulty.
After you do everything, be sure to check how the doors work (do they creak, move freely, etc.), how securely the shelves and other parts are fastened.
Be careful that until the cabinet body is assembled and the back wall is installed, all fasteners can be easily broken.
Calculation of the dimensions of a sliding system for three doors
I would like to talk more about calculating door sizes. This is a very important point because the cabinet is designed in such a way that when the door is opened, only one section can be accessed, while the other two remain closed.
Therefore, if you want to make drawers instead of shelves, which are adopted in our three-piece cabinet design, and install a pantograph lift instead of a coat rack, you must carefully calculate the width of each door. In addition, the section in which the drawers or pantograph lift will be installed must be smaller than the width of the door (approximately the width of the profile).
To calculate the height and width of the doors, you need to calculate the size of the cabinet opening. So we calculate:
- Opening height: From the cover height of 2400 mm, subtract the chipboard thickness of 32 mm (top/bottom) and the height of the plinth of 100 mm. Result 2400 - 32 - 100 = 2268 mm.
- The width of the opening is calculated as follows: from 1800, subtract the chipboard thickness of 32 mm (right and left posts). We get 1800 - 32 = 1768 mm.
As a result, we get the opening dimensions of our three-door cabinet: 2268 * 1768 mm.
These calculations are quite sufficient; it is enough to provide the overall dimensions of the height and width of each door (in our case they are the same), as well as the dimensions of the upper and lower slats, and the same furniture store specialists will calculate the length of the vertical profiles, the dimensions of the crossbars, etc.
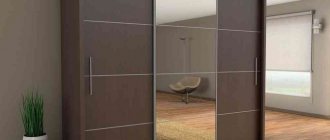
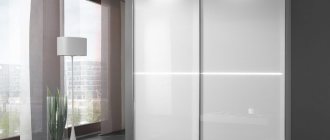
The design of our three-door wardrobe assumes the presence of one door with a solid mirror panel, and two doors with a matte mirror, separated by crossbars. You will need to tell the cabinetmaker that the doors should be divided into four equal parts and they will figure out the size of the inserts and the number of headers.
Door installation
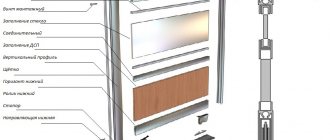
Initially, gutters located in the lower strip are inspected. They must be clean and free from contamination. Otherwise the rollers will not move well. It is better to check all connecting elements for strength once again. Next, the door is placed in the upper rail, while the end rollers in the lower channel must be correctly positioned.
Fastening the sliding doors - facades is the final stage of assembly.
The remaining canvases are installed in the same way. Everything is clearly described in the instructions supplied with the product, so you should follow the schematic images and descriptions.
A point that deserves special attention:
- first screw the upper guide, leaving the lower part intact;
- Next you need to insert the doors, stepping back from the bottom guide.
The canvases must stand straight, only then can the bottom be screwed on. When doors are inserted, the upper part is wound up first, followed by the lower part. Using a hexagon, be sure to correctly adjust the tilt of the doors.
If the cabinet is installed at the correct level, the doors will close freely and smoothly, regardless of which direction they are moved.
After making sure that the doors are installed correctly, you can begin equipping the furniture with special sealing brushes. It is better not to touch the pasting area, otherwise the fastener will not give the desired result. Usually, when purchasing a sliding wardrobe, the doors are already assembled by the manufacturer of this product. Of course, it also happens that you have to study additional instructions on how to assemble a wardrobe yourself.
The completion of the work will be the placement of external hooks on the sides of the panels, if provided for by the modification. You also need to remove the cabinet collection area. After this, you can calmly put your things in the compartment you assembled with your own hands.
If the instructions were followed during the process, there is no need to worry about the strength of the structure. The part will not fall off and the clothing will not be damaged.
Installation and adjustment of doors
Our cabinet assembly is coming to an end, this is the final stage. First you need to install the inner door. Even when installing the door, there are instructions: you need to insert the upper edge of the door into the back space and the upper rails, and clamp the wheels from below and place them in the lower part of the rails. He does exactly the same machinations with the outer door.
For close contact of the doors to the side walls, there is a special adjustment screw on the lower wheels.
If it requires lowering the corner of the door, then the screw must be turned counterclockwise. To do this, you need to use a hexagon of a suitable size, usually 4 millimeters.
To reverse the operation, you need to carry out all the steps above in reverse.
After adjusting the doors, when these screws are no longer needed, you need to glue a buffer tape to the edge of the doors to avoid a strong knock on the door when closing or, worse, broken glass on the door.
The very last thing you need to do is remove the film from the glass on the door. With this, the entire process of assembling the wardrobe has come to an end, and it is completely ready for use.
Some cabinets may have some additional components. Such as internal or external tint. Usually it is a regular LED strip, which sticks on its own thanks to the adhesive back side. Its connection is carried out strictly according to the instructions.
Please repost
0
Installation of rods and fittings
This stage of the assembly process involves placing a rod for convenient distribution of the wardrobe. Thanks to these details, things do not wrinkle, while the internal space is fully used.
Next, shelf holders, a pipe for hangers and guides for drawers are installed.
The point taken into account is that the rod must be fully placed on the supporting planes of the holder. In the case of the oval version, the length is equal to the distance that is equal to the side walls of the opening. If the product is round, it should be slightly less than the distance between the walls.
The holder is secured to the base using suitable screws. The first step is to determine the fixation areas for the first bracket. It is secured with three screws. You need to drill the grooves, then tighten the screws firmly.
After this, you can install the rod on the second holder, while pressing it with a screw.
The completed structure must be tried on and leveled horizontally. Then you can make notes and attach them using self-tapping screws.