Terraces and verandas attached to the house have not only an aesthetic, but also a practical function, transforming the appearance and increasing the usable space of your country house. With proper design, a terrace or veranda quickly becomes a favorite vacation spot for the whole family. According to statistics, it is here, in a cozy circle of friends and relatives, that household members spend most of their free time. However, despite the similarity, with identical role functionality, these two buildings have certain differences.
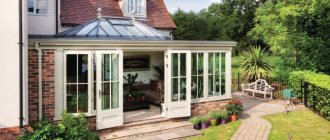
An open chalet-style terrace harmoniously attached to the house
General principles for planning
A little protection of the front door from precipitation should be present, even if it is planned to equip a completely open veranda. To do this, the design is supplemented with an element called a “visor”. The veranda itself is often attached to the front side of the house. The only exceptions are situations when the house has two exits from the very beginning.
The parameters of verandas are determined by several factors:
- Exterior of the main building.
The veranda must fit organically into the existing structures so that their appearance is maintained or improved. It is unlikely that a small veranda will decorate the area if it is attached to a two-story house. Another thing is when a one-story house is connected to the structure along its entire length.
- Opportunities of owners from a financial point of view.
- Functional purpose of the veranda.
Usually the buildings are used for summer recreation, or serve as a kind of vestibule. Some owners add small closets where personal items are stored.
- The size of the area available for the extension. This will help you understand how to attach a veranda to your house.
Preparing the area
The first stage in construction is preparing the territory. In order to begin constructing a veranda, it is necessary to clear the area of various kinds of objects, plants, shrubs and trees.
After the earth remains absolutely clean, you need to remove the fertile layer - 15 cm from the surface of the earth.
We recommend reading:
- How to build a bathhouse from timber - 125 photos of the best projects and ideas on how to build a bathhouse correctly
- Do-it-yourself canopy: step-by-step description of how to build a canopy correctly. The best ideas and beautiful design options (95 photos)
- Beautiful canopy over the porch - installation options, design options and installation tips (95 photos)
After the fertile soil layer has been removed, it is necessary to level and mark the area. The breaking of the earth occurs by driving in metal stakes and tying twine around them.
The outer layer of the breakdown corresponds to the dimensions of the entire structure, and the inner one indicates the contour of the foundation.
Initial stage of construction
It must be remembered that the weight of the main house is always greater compared to the extensions. Therefore, the shrinkage of structures is different. The veranda will need a separate foundation so that during operation it will not have such an impact on what is nearby.
Most owners prefer a columnar foundation. Its depth should be the same as that of the main building. Another approach is used for buildings made of heavier materials - brick or concrete. Then choose a strip base. This choice contributes to the uniform distribution of loads over the entire area. Then the owners will have a veranda attached to the house with their own hands for a long time.
What are the types of terraces?
Glass
A great way to enjoy nature in the best possible conditions: the glass extension is completely protected from the elements, but is still completely open to view.
A glazed terrace is a great helper for a decorator, as it gives room for creativity. The first thought that comes to mind is the living/dining room. An extension of the covered patio with an outdoor terrace that could be used for a barbecue and outdoor kitchen would be ideal. Add flowers in massive clay pots, some antique armchairs and a comfy sofa.
Transformer
These terraces are compact and versatile. This is an enclosed space that turns into a relaxation area. You can install a sliding panoramic window or a folding partition. The patio front opens up and can be converted into a canopy.
Covered
The roof is the most important part of the patio. A decorative roof does not protect from rain and wind, but creates shade and visual limitation. A traditional roof provides protection from rain, snow, wind and sun. There are also retractable, tension and hip roofs. The choice of materials is unlimited - wood, glass, fabric, plastic.
A swing will look great as a decorative element on a covered patio. This can be either a comfortable sofa for reading or relaxing, or a dining area with a round table and classic Viennese chairs.
Brick
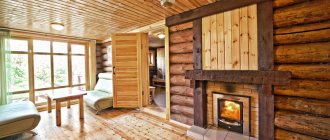
A brick or block veranda attached to a wooden roof will look illogical and ugly. But the wooden extension to the brick building looks very impressive. Make sure of this by looking at numerous photos of options for verandas attached to the house.
With summer kitchen
This is the dream of every dacha owner. In the summer, when the weather is good, the whole family inevitably moves to the veranda; a small kitchen allows you to actually live outside.
An outdoor kitchen may be equipped with a stove or grill, small running water, and a kitchenette with a sink and countertop. The best choice is a solid brick or stone structure. The floor of the veranda can be paved with stone or tiles.
With walls
The patio has walls but no roof. This is a summer version of the recreation area. In the warm season it is much more pleasant to spend time outdoors. The walls in this case are a fence. They mark the space and protect it from the wind.
Choose folding furniture for such a patio so that in case of rain you can easily hide inside.
Don't make a high wall as tall as a person; make a middle design. Decorate the top with plants. This effect can provide additional shade to the patio.
On the roof
Replicas with balconies. However, you may want to reinforce the barrier as safety comes first. The advantage of such a terrace is the huge space, without walls or partitions.
Balcony
There are two ways to convert an existing terrace into a small balcony or convert an open balcony into a terrace. The main feature of such a balcony is the dense vegetation. If you want to turn your balcony into a terrace, you can plant living plants in pots or boxes, make a phytowall, or arrange a lawn.
A city balcony can also be turned into a terrace. Create a sliding window composition - panoramic windows. Use glossy, shiny floors for maximum light reflection. Add some flowers and plants and you have an outdoor terrace.
For private houses, terraces are created as the highest function - balconies are converted into terraces. Ideally, if you have a view from your balcony, you can continue the theme of the surrounding landscape.
With windows
Add lots of windows to your indoor balcony: On particularly warm days, you can leave them open and enjoy the benefits of being outdoors. Large glazing provides a good view - so you can admire all the trees and plants from the terrace of your dacha.
Pergola
This is a gazebo with a lattice ceiling and walls. The trellis design is suitable for climbing plants. But if you don’t want to overgrow your area with climbing plants and vines, order an unusual pergola with a dense lattice. It creates an interesting visual effect and casts beautiful shadows on a sunny day.
Patio
Essentially, this is an open terrace. Only the terrace is elevated, the patio is completely flat.
You can light a fire or cook a barbecue. It is practical and reliable: there is no need to create an additional living room or change the interior. A patio fireplace is very convenient - it can be placed anywhere. The most important thing is to isolate the chimney from the windows so that smoke and soot do not enter the house. Yes, you will also need a good hood.
Cocoon
This is a solid room with a streamlined shape. The floor goes into the walls, and the walls into the ceiling. It really feels like a cocoon - a cozy, integrated space.
The cocoon is a skeletal structure. It is lined with wood or stone, which creates a sense of perspective. The stylistic goal of such a terrace is to create a comfortable environment.
The rectangular rooms are surrounded by color: soft, light shades are chosen for the walls, floors and ceilings. These rooms are small but very cozy. They are decorated with plants and natural decor.
Pavilion
You can use existing structures such as summer kitchens or gazebos. The roof, floor and walls are the main parts of the pavilion. The walls do not have to be covered with a blanket; they can be made from wild vines, wooden or wrought iron nets or shrubs.
The interior design of the pavilion is always individual and reflects the tastes of the home owners. A large round wooden table and Viennese chairs are ideal dining room furniture. If they are used and have a slightly different shape then it is a good idea. If the pavilion will be used for secluded relaxation, a comfortable reading chair and a small coffee table will be ideal. Light curtains in natural colors will go well with the glass design of the pavilion.
Main stages
After the foundation is erected, the main stage of construction begins. First, subfloors are created. Insulation and laminate or bars are laid on top of them, only after these layers come decorative coatings on top. Step-by-step instructions will not cause problems when studying.
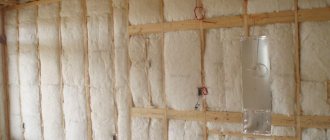
Even at the initial stages of construction, it is necessary to think about how the veranda will be insulated. Nowadays many materials are produced, each with its own characteristics.
Roll or tile materials are best suited for such buildings. They perfectly remove moisture and cold air. This property is especially important for a wooden floor, which will be protected from rotting for a long time. Then the open veranda itself, attached to the house, pleases the owners with its appearance for a long time.
Frame arrangement
Insulation is then laid on the frame along with other types of materials. When installing the roof in this case, the same procedure is followed as in the case of ordinary houses. Then it will be easier to ensure that the buildings are similar to each other, they will harmoniously complement the elements.
Sloping to one side is the most common option when installing a closed veranda attached to the house.
Note!
- Do-it-yourself porch to the house - the best projects and construction ideas (125 photos of new products)
DIY brick barbecue: diagrams, drawings, photos, dimensions. Review of simple and complex structures on a summer cottage!
House with a bay window - 150 photos of the best planning and design ideas. Overview of all features of an architectural element
Roof
Traditionally, the roof for the veranda is made of a pitched roof. The basis for it will be the top trim, and the angle of inclination was set at the stage of constructing the frame. Making a roof consists of the following steps:
- The sheathing is being constructed. Several longitudinal rafter boards are laid on the base, and transverse strips are nailed on top. The thickness of the sheathing depends on what roofing material is chosen for the finishing layer.
- If the project provides for insulation of the veranda, a layer of waterproofing and insulation is mounted on the sheathing. When installing them, galvanized nails with wide heads should be used.
- Roof installation. Care should be taken when choosing a material: if it is too heavy for the structure, it may collapse in the future. For the construction of a country veranda, metal tile sheets are often chosen; For their fastening, special self-tapping screws with a rubberized washer are used.
The roof is given a slope of 10-12° Source forvardplast.ru
Further work on the formation
After the initial installation, the frame is sheathed with basic materials. For internal cladding, you can choose any modern material that meets the requirements.
Insulation at this stage is the most important aspect. Waterproofing films cannot be used if metal is present. When condensation forms, such structures simply begin to rust.
The insulation must be placed between the outer cladding and the inner layer. The waterproofing film goes on both sides of the insulation. This rule is mandatory for everyone who is interested in learning how to attach a veranda to their house with their own hands.
How to attach the stand and bottom trim
Work on the construction of the veranda frame begins after the foundation concrete (if used) has gained some strength. 50% of the calculated value is enough, and this at a temperature of +20° C will happen in 4-5 days. Then, on top of the concrete, in those places where the posts or trim will be attached, two layers of waterproofing are laid. It can be roofing felt, roofing felt, folded in half. You can coat it twice with bitumen mastic or use other modern materials.
Then there are two ways:
- secure the racks and then the harness;
- first the strapping, there are stands for them.
If the first option is chosen, special holders are inserted into the foundation when pouring. These can be different devices (see photo), but the most convenient is a metal plate in the form of an inverted letter “P”, to the bottom of which a pin is welded, which is walled up in the foundation. A stand is inserted into this plate (the end must be treated with an antiseptic), its level is checked, and secured with bolts or nails.
How to attach posts to the foundation
After all the posts have been positioned and secured, the framing bars are nailed between them.
With the second option, the situation is different: the racks will have to be attached to the harness. The strapping beam is attached first. It is more convenient to do this if studs are embedded into the concrete at some intervals. Then holes are made in the beam in the right places, it is put on studs and secured with bolts. Then, using one of the methods suggested in the photo, the racks are installed.
Options for attaching racks to strapping beams
Any of these methods does not exclude the use of metal corners. They make the fastening more reliable, which is very important in this case. After all, the racks will support the roof, as well as the walls or fence.
About the final stages
Typically, in this case, windows and doors are installed.
The entrance door to the veranda cannot be located opposite the entrance door to the house. Otherwise, drafts appear. It is better to choose the option with end mounting. In a small space, this also adds free space.
There are a large number of photos in which the doors of the verandas are located in this way. This solution is considered the most convenient, regardless of how the building is arranged from the very beginning. The roof of the veranda attached to the house also benefits from this.
Note!
Do-it-yourself tandoor made of brick: ready-made drawings, dimensions, step-by-step instructions + 100 photo ideas
- How to make a gate with a wicket with your own hands: step-by-step instructions, drawings, design dimensions, design, assembly and installation
- Do-it-yourself greenhouse - a review of the best ideas on how to build a good greenhouse on a summer cottage (80 photo ideas)
Design of a veranda at the dacha - do-it-yourself decoration
The veranda can be open or closed. If it is insulated, it helps expand the dimensions of the house. The room often houses a dining room, kitchen, library and work area, garden, and creative corner. You can connect several directions at once.
An open building, blown by the breeze and protected from the sun, is in demand only in good weather.
The open-type design was created specifically for the summer season, when it will be comfortable to relax on it, thanks to the constant coolness. But can only be used in good weather. Regardless of the type, it is better to place the terrace behind the house. If it becomes a continuation of the home, then it is placed on the required side of the facade.
The design of the veranda should correspond to the overall design of the house
You can design a veranda at your dacha yourself. It is necessary to take into account several important nuances and you will be able to realize functionality and beauty.
See also: Gazebo design in landscape design of different styles
Additional Tips
At the initial stage, it is better to take care of permits and issues from a legal point of view. Then the construction itself will take much less time. After receiving all the documents, they usually purchase materials and tools and begin implementing the project.
The veranda will have to be legalized in any case, regardless of the original dimensions of the building. It is better to do this before the actual construction, so as not to receive penalties later. In this case, a wooden veranda as an extension to the house will only please you.
Many people think that for any construction it is enough that the site is owned. But there are certain requirements, without which the work cannot be continued. It is necessary to take into account some nuances.
- The location of buildings is chosen in a certain way to preserve the rights of all interested parties, including in neighboring areas.
- The design of the general structure and its area change when using any buildings, this is also a general rule.
- Not only the legal side of the issue is taken into account, but also the safety, including that of the residents of the house itself. After all, during construction, the distribution of loads can seriously change. Additional load on the house appears even when creating light varieties of verandas.
- Without legalization, it will not be possible to officially sell or exchange the house.
A light veranda belongs to the group of non-permanent extensions. Everyone can figure out how to build this building with their own hands.