Vetonit is one of the types of construction powder mixtures used for finishing and construction work. Excellent quality has made this brand popular. The main purpose is to work at the final stages of leveling surfaces. Vetonit putty can make walls perfectly smooth and hide cracks and cracks.
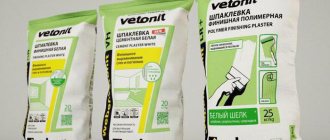
Example of packaging "Vetonit 25 kg"
The type of mixture depends on the components - gypsum, cement, polymer. They are capable of covering walls and ceilings of various types - plasterboard, concrete, wood, etc.
Most solutions are universal, used for interior and exterior decoration.
Features of the Vetonit brand:
- Natural, environmentally friendly composition;
- Distributes easily, without visible differences;
- The powdery structure makes surfaces smooth and even;
- Sands without problems, leaving no dust;
- Provides additional sound insulation;
- Applied manually or mechanically;
- Economically used;
- Sold in reliable three-layer packaging of 5 and 25 kg.
How to dilute Vetonite for wall putty
Putty consists of filler and binder.
In the form of the first, limestone or sand is used, and the binder is a substance that connects the filling material into a monolith and guarantees gluing to the plane. The final putty is a putty with dimensions of less than 0.5 mm in the former Soviet republics - in other words, the one after application of which they proceed specifically to painting work or wallpapering.
Vetonit finishing putty is used in rooms with low humidity. It is used to level the surface of walls and ceilings, using plaster or mineral materials. It dries quickly, creating a perfectly smooth and even surface, allows a layer of more than 0.2 mm, and has a long service life.
Prices for Vetonit LR putty and its other varieties in most cases depend on the binding material (polymer materials, cement, organics) and the size of the package. It is packaged in multilayer paper bags. You can choose Vetonit LR putty 25 kg, 20 kg and 5 kg.
Methods for applying putty
Leveling walls with putty is done in two ways:
- mechanical spraying (using special equipment);
- applying the putty mixture manually (using spatulas of different sizes).
The latter option is more often applicable for putty polymer materials. It all depends only on the personal preferences and tasks of the person performing the construction work. The putty layer should not exceed 5 mm, otherwise the coating will dry out for a long time and unevenly.
When applying several layers of putty, each subsequent layer is applied only after the previous one has completely hardened.
Types of final putty Vetonit
There are two types of putty:
- dry;
- pasty - this is a ready-made mixture for thin, finished cladding.
The composition of Vetonit putty also divides it into different types: organic, polymer and cement binder.
Putty with organic binder
It is used exclusively for dry rooms when leveling stone, concrete, brick, wood or porous surfaces, facing gypsum boards.
Putty Vetonit LR 25kg costs between $8-10.
Polymer mixture
She is afraid of humidity. Used for finishing walls and ceilings made of materials based on minerals, wood, porous slabs and gypsum. But it is not suitable for sealing seams between plasterboard slabs, for floor leveling, or as a base for tiles.
The cost of finishing putty Vetonit LRr 25kg is about $9-10.
Cement based putty
Can be used for plastering walls in any premises and on facades. It is used for working with brick, concrete, expanded clay concrete or pre-plastered surfaces. Can be painted.
Vetonit LR (25 kg)
Vetonit LR (25) is based on polymeric substances. It is used to cover plastered and concrete surfaces.
The task performed by finishing putty is the treatment of walls/ceilings of various types. It is distributed mechanically or manually. For independent work, choose a wide spatula and use it to adjust the thickness of the layer.
Vetonit LR easily levels surfaces, preparing them for further processing, and is applied in one layer.
This composition is not used for leveling floors and is not used in places with high humidity.
Properties
Vetonit finishing putty has a white color with a gray tint and a weak characteristic aroma.
To prepare pasta from 25 kg of dry mixture you will need 9 liters of water. Moreover, the mixture is poured into water, but not vice versa. Using a mixer for construction work, the mixture is stirred for 3 minutes and allowed to brew for 10 minutes. Then they go through it again with a mixer and apply it to the wall surface.
The largest putty layer on a plane is no more than 5 mm. But this is already the limit, since such a layer dries for a very, very long time than that of gypsum-based putties. Also, the price of this particular mixture is slightly higher than others.
Recommendations for mixing
In order to obtain the optimal consistency and structure, you need to dilute the dry putty with water, adhering to the proportions noted in the instructions. As a result, you should get a homogeneous mass with an average degree of viscosity. Before mixing the components, remember that water should be added in small portions. Its temperature should be about +20 degrees.
On this score, the experts give 3 pieces of advice:
- The dry mixture should be stored in a dry, dark and cool place.
- After mixing, no more than a day should pass before applying the composition, and if this rule is neglected, the mixture will harden and lose its performance qualities.
- 10-15 minutes after creating the mixture, it should be mixed using a construction mixer.
And now about application methods.
Work technique
For the work you will need an angled spatula, a wide and narrow spatula, a mesh jointer and an abrasive mesh, a plastic work bucket, and a rag.
The working order is like this.
The surface of the wall or ceiling is carefully cleaned. Remove the slightest particles of previous plaster, paint or wallpaper rolls, dirt or grease. Power tools for sanding walls after puttying?
If possible, wash and allow the room to dry thoroughly.
Using a large rule and a flashlight placed next to the wall, mark all the bumps and depressions. The bumps are immediately carefully knocked down, and the pits are outlined with a pencil.
The wall is being leveled. The tools are thoroughly washed and wiped dry with a clean, lint-free rag. The mixer for construction work must also be clean, without adhering remains of the previous mixture. Knead the paste-like mixture.
Important : you cannot add water or dry putty to the finished paste.
Apply a similar amount of paste to a long spatula, which can be used in one stroke.
Cracks, depressions and pits are covered with a long or medium-sized spatula using sweeping movements with equal pressure. Grouting is done until the putty is flush with the wall , without sagging.
It is important to choose a good spatula. Drying is performed with the interior doors open. Acrylic varnish for walls: how to apply video? In this case, balcony doors, entrance doors, to the bathroom or kitchen must be closed.
Additional equipment cannot be used.
It is enough to apply putty under the rolls of wallpaper for starting work to seal all the irregularities. The wall is leveled “to zero” so that there are not even the slightest depressions or humps.
For painting, after grouting the starter, use it as a finishing putty. It is applied in a thin layer and, after drying, rubbed down with an abrasive material with a number of 150 or more. Under mirror painting, they are additionally passed with a trowel with suede.
How much material is needed for finishing?
The main criterion when choosing a product for puttying surfaces in domestic conditions is product consumption. As for Weber putty, all models in this series have different viscosities. Thus, the version of Weber Vetonit lr putty, as well as individual modifications of Vetonit kr putty, have different consumption.
Before purchasing a putty mixture, you need to calculate the required amount of material. To make it clearer, let’s look at the consumption of Vetonit kr putty as an example. When finishing walls, about 1.2 kg of ready-made mortar is consumed per 1 m2 of surface, while seven liters of water are enough to dilute the mixture (this figure may vary depending on the structure of the material).
Finishing and - Vetonit LR+.
It is puttied almost perfectly, but under a 300W lamp in places you can see marks from a spatula, marks, etc. I started to rub it, but no such luck - I couldn’t. I tried to first use a coarser fraction of sandpaper, then a finer one... I tried a dozen sandpapers with mixed grades. grain size, different manufacturers... I tried different ones. holders and bars for paper... I tried to rub it in decomposition. directions...The result is the same - the layers are removed, but the marks from the emery remain nearby. Moreover, they disappear only if you reach the Fugenfüller (the previous layer of putty), which is extremely disappointing
Has anyone sanded Vetonit LR+ before painting? Share how to deal with this capricious putty?
Minor scratches from the skin are acceptable. I usually use 60 or 80 mesh for finishing sanding.
2ArchiS: For grinding these, there are meshes of different cell sizes (sold at household markets in packs of 10 pieces) on holders. They are more convenient to sand than sandpaper and they clean perfectly.
small scratches that are visible under the lamp will not be noticeable after painting, I also sanded another finishing putty, then I was horrified by what I saw under the lamp, I redid it again countless times, and when I painted it, I realized that I had tried so hard in vain
2ArchiS
, Fight with a layer of finishing putty. Vetonit LR+ has a fairly large filler. When sanded with anything, it crumbles, and defects remain on the surface in place of large grains that have flown out. (Especially if LR+ was mixed without Vetonit Dispersion recommended by instructions).We already discussed this in detail with photos on the old forum, but after the move that topic, something like “Faktura LR+” disappeared somewhere and cannot be found by any search.
We level the ceiling using the raw method in cases where the level differences are no more than 5 cm. For example, to remove inter-slab joints, cracks and potholes in the ceiling. Raw ceiling leveling is suitable for smoothing out differences between slabs (this is a common problem in modern buildings).
Preparing the ceiling for leveling
We cover the furniture in the room with construction film or take it out of the room. You also need to lay construction film on the floor, which will further reduce the amount of cleaning.
Cleaning the ceiling surface
Next is the most important trick: sharpen the spatula with a block so that it cuts like a knife. We will do the main work with this tool. We do not use a spatula that is too wide, because the pressure will spread over a larger area, and accordingly, we will have to apply more effort. Then we scrape off the layers of plaster, paint, and old whitewash down to the concrete slab. This work is tedious and hard, but necessary. Especially you need to carefully scrape the joints and seams with the walls.
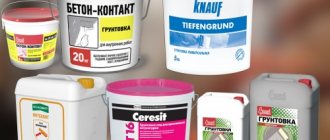
Ceiling primer
We sharpen the spatula periodically; the timber should always be at hand. Afterwards, wash off the remaining whitewash with warm water and a sponge. We constantly change the water, otherwise the lime will be smeared on the ceiling. When the ceiling is completely dry, we treat it with a roller or brush with a primer for weakly absorbent materials (for example, “Betonokontakt”). It is advisable to use the same brand of primer as the gypsum mixture that will be used to level the ceiling in the future. We especially pay attention to the corners and seams - here you can’t do without a brush, and we prime the rest with a roller. When the soil is dry, we begin to level the ceiling.
Rough ceiling leveling
Preparation of the solution
For leveling, prepare a solution. To do this, we use the Rotband mixture from Knauf. Before use, strictly follow the instructions on the package - mix the solution in cold water and mix thoroughly after 5 minutes. after mixing, otherwise the solution will dry out directly on the spatula. The mixture dries out very quickly, so you don’t need to knead it a lot. Compared to a wall, leveling a ceiling is much more difficult, and it will not be possible to apply the solution in large quantities at once, and the rest will take 25...30 minutes. will have to be thrown away in the form of a frozen monolith. It is better to knead 3...5 kg in a plastic bowl.
Applying the solution to the ceiling
Apply the solution to the iron with a small spatula and place it on one side. Do not apply the solution to the edges, as it will squeeze out and flow. Next, we apply the iron with the solution to the ceiling and stretch it lengthwise with little pressure, as if we were rubbing the solution into the ceiling. We need to press so that the solution sticks to the ceiling, and does not squeeze out completely onto the floor.
Technology of applying solution to the ceiling
We level the ceiling in several layers, so there is no need to try to completely fill deep unevenness - we make a layer of mortar of such a thickness that it holds normally (no more than 1.5...2 cm). Also, do not try to apply the solution without bubbles and seams - this is a very difficult task that requires a lot of time. All this will be leveled out with the following layers; first, the main thing is to eliminate large irregularities.
Applying a second layer to the ceiling
The solution sets very quickly, so while we finish it, we can continue working in the place where we started. We cut off the seams with a spatula, again, do not worry about evenness. To detect protruding bumps and seams, apply a plinth or even strip. It is better to cut off the bumps and seams immediately. Next, we don’t wait for the layer to dry, but start on the second layer. We apply it in approximately the same way as the first one.
Third layer application process
Then, with the last layer (there were 3 layers, but for small irregularities it may be less, for larger ones, respectively, more) we eliminate minor irregularities, seams, bubble pits, etc. Make the solution for the last layer thinner and apply it with a medium or wide spatula . Again, we leave the seams alone - after drying, it is easier to remove them with sandpaper. Having applied the last layer, wait for it to dry completely, then clean the seams and unevenness with coarse sandpaper. We clean the ceiling from dust with a brush or a damp cloth, cover it with primer (make the solution liquid and apply it with a spray bottle).
Materials for leveling the ceiling:
- Concrete contact type soil;
- Rotband gypsum mixture;
- Finishing putty Vetonit LR+
Tools for work:
- Spatulas: 5…10 cm, 15 cm, 70 cm;
- Metal ironing;
- Drill with an attachment to stir the solution;
- Sandpaper;
- Construction foam
Final ceiling leveling
For this we use finishing putty such as Vetonit LR+. Without fear, immediately mix the solution in large quantities (shelf life 2 days)
When finishing putty is needed, many people prefer Weber products, choosing a mixture labeled Vetonit LR. This finishing material is intended for interior work, namely: for finishing walls and ceilings. However, putty alone is not enough for a high-quality coating. The process of its application has a number of nuances that everyone who plans to use this plaster should know.
Features of Vetonit finishing putty
Weber is a subsidiary of Saint-Gobain. It is a world leader in the production of dry construction mixtures, including putties, developed using modern technologies. Vetonit is a line of putty mixtures used for cladding the internal and external walls of buildings. The mixture is most often used as a finishing mixture, for finishing walls for painting or wallpapering.
The main qualities include the following features.
- The putty is easy to sand.
- Improves sound insulation.
- Made from natural ingredients.
- Provides a smooth surface.
- The consumption is small.
- Easily lays down and stretches along the wall.
Advantages and disadvantages
Like other plaster materials for finishing floors, Vetonit LR putty has its pros and cons.
- It is created on modern equipment using new technologies, which improves the quality and performance characteristics of the material.
- It is easy to use. Applying the material to the floors is easy; the mixture does not stick to the trowel and does not fall off the base during operation.
- With a small thickness of the applied layer, it trims the base, smoothing out minor unevenness of the starting leveler.
- The material is environmentally friendly. The composition is harmless to health; the coating will not emit toxic substances during operation.
- The mixture is fine-grained. Due to this, it is uniform, has a pleasant texture and smoothness of the finished coating.
- In some cases, if you have enough experience, you don’t need to grind it further.
- It is economical. At the same time, due to its powder form, it practically does not create waste. Portions can be diluted in parts, which will eliminate excess mixture.
- The composition has a long life cycle. After preparation, it is suitable for work within 24 hours, which allows the master to complete the finishing without haste.
- The material has noise and heat insulation properties, despite the thin layer of application.
- It is suitable for further finishing of surfaces for painting or wallpapering.
- The mixture is available to the buyer. It can be bought at any hardware store, and the cost of finishing putty will not hit the buyer’s budget due to its cost-effectiveness.
In addition to its advantages, this material also has disadvantages.
For example, Vetonit LR putty cannot be re-diluted. As a result, it loses its properties, which can negatively affect the quality of work. In addition, it is important to consider the storage conditions of the dry mixture. If it is placed in a room with high humidity, it will become damp, which will make the composition unsuitable for work.
Vetonit LR is picky about the base.
Putty simply will not stick to a surface that is not properly prepared. On the World Wide Web you can find reviews talking about poor grip. However, few online commentators describe the preliminary preparation, considering it a useless step, a waste of time and money. They also ignore the fact that there should be no drafts in the room during work.
In addition, they exceed the application layer, believing that the mixture will withstand everything. As a result, such a coating is short-lived. A prerequisite that the manufacturer pays attention to is that the characteristics of the material correspond to the construction work. This mixture is not a base leveler; it does not mask serious defects, which beginners in the field of repair and finishing do not think about.
If the preparation rules are not followed, difficulties may arise in further work with such a basis.
For example, according to the opinions of craftsmen, when trying to re-glue wallpaper, the canvas can be partially removed with putty. It is necessary to strengthen adhesion, even if the base looks good, and the ceiling is made according to all the rules of construction and does not have a porous structure with crumbling. Sometimes an ordinary buyer with a limited budget may not like the price of a large bag (approximately 600-650 rudders), which forces them to look for cheaper analogues on the market.
Types of Vetonit putty
Finishing putty Vetonit comes in different versions. To begin with, a distinction is made between gypsum, polymer and cement mixtures. According to the release form, there is a paste-like mass in buckets and a dry, undiluted mass. The latter is sold in three-layer paper bags of 5 and 25 kg.
Different types of finishing putty are produced under different markers.
- "VH" is a mixture made from cement binder and limestone aggregate. Can be used in damp areas.
- "KR" is used only in dry rooms. Requires correct application. After drying it has a stable, white color.
- “LR Pasta” and “LR+” are polymer putties designed for use in dry rooms with normal humidity.
Photo of Weber Vetonit LR+, VH, LR Pasta putty
Weber Vetonit LR+
Weber Vetonit LR+ finishing putty is sold in three-layer paper packaging, weighing 20 and 25 kg. Shelf life 1.5 years. The mixture is white, crumbly, and consists of polymers and finely ground marble.
This type of putty is suitable for leveling indoor surfaces (where it is dry). It is not recommended for the street or bathroom or kitchen, because it turns yellow with prolonged exposure to moisture.
To obtain a working mass, water is added to the mixture. For 25 kg, you need about 8-9 liters of water. The result is a snow-white mass that can be used for 24 hours, then it will deteriorate. Always apply only to a clean wall free of grease. It should be dry and hard. Application layer – 1-5 mm. Movements should be smooth, from bottom to top. In order for the Weber Vetonit LR+ polymer finishing putty to dry quickly (in 24 hours), the room must be +10...+30 degrees and have good ventilation.
Vetonit LR Pasta
This type of putty is necessary for super-finish leveling of a wall or ceiling. Can only be used in a dry room. Allows you to create a perfectly flat surface for paint. Made from limestone and polymer glue. Suitable for leveling concrete and plastered surfaces.
It is a white paste, located in buckets of 20 kg (12 l) and 5 kg (3 l). It is already ready for use, no dilution is required. Conveniently applied in a layer of 0.2-0.3 mm. At a room temperature of +20, and a layer thickness of 0.5 mm, this polymer finishing putty dries in 4 hours.
Weber Vetonit VH
This putty option is convenient because it can be used in rooms with any humidity. It is suitable for finishing concrete and brick inside or outside buildings. However, it will not adhere to surfaces treated with water-soluble or lime-based products!
Before using this putty, you need to clean the wall, then prepare the working composition. It is diluted with water, beaten with an electric drill for 5 minutes and then left for 3 hours. You can apply it with a spatula, which is convenient for work. Movements should be smooth to avoid unevenness. One layer dries in up to 3 days.
The main advantages of weber.vetonit LR+
What are the main advantages of putty from Vetonit?
- The mixture is very easy to apply even on a surface that is not very smooth. If the builder is a master of his craft and knows how to apply putty correctly, then after applying the mixture there will be no need to additionally sand the walls;
- After drying, the putty becomes loose, which makes it easy to sand to a smooth surface. Comparing the putty from Vetonit and from Knauf, the second one is sanded very reluctantly and hard, which cannot be said about weber.vetonit LR+, because you don’t need to make any effort to eliminate unevenness;
- the finishing material can be stored for a very long time even after adding water and mixing. The putty can be left for as long as 3 days, and after opening the lid, a completely workable putty mixture will be “waiting” for you. To use it, you need to mix the mixture again with a puncher and mixer.
Despite the fact that there are quite pleasant advantages of putty, after use you can also find disadvantages. As was said earlier, the putty mixture does not have moisture resistance, which imposes a number of difficulties on the process of applying building materials. What is the difficulty? For example, let's say you are wallpapering. After gluing one layer of paper, you suddenly notice a layer of air underneath it. It is almost impossible to “push” it out, and when the wallpaper is peeled off, the putty is removed along with it, which is not very pleasant. To prevent this from happening, you need to apply the putty more carefully and level the surface so that there are no air bubbles under the paper. The above case does not happen often, but still the fact remains a fact.
This putty can be used for painting walls, but this is highly not recommended. However, the finishing material from Vetonit has an increased fraction and after application, the surface turns out to be quite rough. For example, in the mixture from Sheetrock it has a softer structure and using it for painting is a good solution. For the average builder who wishes to line the walls of a house, a rough putty surface will be acceptable. If you decide to use Vetonit under paint, it is better to apply the mixture in two layers.
The first layer is used to smooth out unevenness, and the second for painting. For everything to work out, you need to wait for the first layer to dry 100%, and then apply the second. There is no need to worry, because a layer less than 5 millimeters thick will take about 4 hours to dry, while a 5-millimeter layer should take at least one day to dry. As you can see, applying weder.vetonit LR+ putty before painting is not the best solution for quickly covering walls, since the entire application procedure will take at least 8 hours.
How to dilute Vetonit putty?
Depending on the type of Vetonit putty, the dilution method may differ slightly. But in any case, there are always detailed instructions on the packaging, so you can’t go wrong. If you follow the manufacturer's recommendations, there will be no problems with dilution and subsequent application of the mixture.
Important at this point:
- correct ratio of water and mixture;
- high-quality mixing with a construction mixer;
- exact holding time (if required).
It is better to use the finished mixture the first time. Some types, like Vetonit VH, are sometimes used over time (even the already mixed mass), but this can affect the quality of application, so it’s better not to take risks and make as much diluted putty as required.
Features of using putty
Vetonit finishing putty is applied using special equipment or a simple spatula of a convenient size. The procedure for working with this type of mixture is described below.
- The first step is to remove the old coating, if any, or simply clean the wall to remove grease stains, paint, and wallpaper residues. The surface is also washed and dried.
- Irregularities must be marked. You can use a pencil for this. This way, it will be easier to notice areas that need special attention while working.
- Then the wall is plastered with simple putty. All chips, cracks, gouges and other imperfections are smoothed out. The wall is drying.
- Vetonit finishing putty is applied in a very thin layer. Due to the high quality of the product, this is not difficult to do if you have practice.
- After the finishing layer has dried, they go over it with an abrasive, then everything is polished.
- To ensure that the corners are even, they are additionally treated with a spatula.
The average consumption of this putty is 5 kg of mixture per 5 square meters of area, but this figure may differ for different types.
Puttying ceiling and wall structures
Vetonit putty has proven itself to be an excellent leveling agent. If the ceiling is rough, it should be cleaned and made perfectly smooth.
Puttying drywall seams
Sequence of actions when repairing the ceiling:
- First, apply a primer suitable for the given surface. Do this carefully, using a roller. Afterwards, all places where the composition came into contact are thoroughly cleaned.
- Fill the bucket with water and pour out the putty, mix with a drill. Using a narrow spatula, transfer the solution onto a wide one, then distribute it over the ceiling area. The first layer is the starting putty, and the second is the finishing layer. The overall result of the repair depends on the quality of application.
- Ceiling sanding.
Wall finishing stages:
- The walls are cleaned of old finishes.
- Cover with primer and wait for it to dry. Cracks and irregularities are plastered. Afterwards, the surface is treated with sandpaper and re-rolled with a primer.
- The number of layers of putty depends on the type of decorative finish. The composition is distributed carefully, with smooth movements from left to right.
- When the putty has dried, it is sanded with sandpaper, then the dust is removed. The wall is primed again before the next layer of finishing putty. After applying it, repeat the sanding and priming steps.
- Start wallpapering or painting.
Reviews of Vetonit finishing putty
Vetonit is a very good type of putty. Its main drawback is the price. Repairs using it will not be cheap, but quality and long service life are guaranteed.
- Mikhail Drozd : “During the renovation in the living room, we used Weber-Vetonit LR+ putty. The main difference from many analogues is that it is simply super white. It looks beautiful after application. Just what you need for painting. In addition, it was applied without problems, in a thin layer, although a long spatula was used. A pleasant surprise was that all the tools were easy to clean after work. Now you can use them again instead of buying new ones.”
- Anatoly Vetryak : “I tried Weber-Vetonit VH putty last year. The advantages include the fact that it is easy to work with, it is not afraid of moisture and is cement-based. The only thing I'm not happy about is the price, but the quality is worth it. I took it in 25 kg bags, it’s easier. The packaging states that it may cause skin irritation, but I worked without gloves and had no problems. I was pleased that it lays easily on the wall, there is no need to level it several times, and the mixture does not harden quickly during work, so you can work slowly.”
- Valery Wenger : “Weber-Vetonit KR is a plastic putty for quick application. The price is affordable, so to speak, although there are plenty of cheaper analogues. Made on a lime base with the addition of organic glue. Lasts well but is not waterproof if diluted and applied correctly. Plus - the room turns out to be vapor permeable. Minus - if used incorrectly, it will not fit well. I know that many people have problems with this type of Vetonit, but if you use it where needed, using the right technology, then there will be no problems.”
Source
Execution steps
To achieve the desired effect, the surfaces are treated with an acrylic primer.
Prepare the solution, taking into account the consumption - for a layer of 1 mm it is 1.2 kg/m². The contents of the bag (25 kg) are mixed with water (8 l), using a drill with an attachment, taking into account that the powder is poured into the water, and not vice versa. To obtain a homogeneous thick mass, beat for 10 minutes, then leave for 20 minutes and repeat stirring . You can use the prepared mixture at a temperature of +10 0 for 24 hours.
Execution example
For work, take two spatulas - one 70 cm wide and the second 30 cm wide. The putty is applied in one or two layers, provided that each one is completely dry.
If the room has normal humidity and temperature, there is ventilation, the layer dries in 2-3 days, after which they move on to decorative surface finishing - painting, wallpapering.