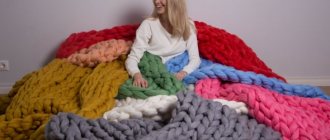
Now on frosty winter evenings you can easily relax with a cup of hot coffee, wrapped in a warm blanket that you can make yourself. You ask how? Very simple! To do this, you don't need to know how to sew professionally or go to the store for expensive fabric. You may have everything you need at home. To make a warm blanket, all you need is old sweaters. Choose a color palette that matches your decor, or combine different shades to create a bright and colorful blanket.
DIY fleece blanket
Traditionally, knitted blankets and bedspreads are made from scraps of fabric , but it is worth paying attention to other unusual materials. Currently, products made from fleece, which is very popular among needlewomen, are widely used.
Fleece is very easy to process. The fabric is very light and retains heat well. Fleece makes a great baby blanket.
To make a fleece blanket you will need:
- fleece in two colors for making squares;
- plain fabric;
- threads;
- pins, needles, scissors, tailor's chalk;
- iron and ironing board;
- sewing machine.
- Cut out the shape of the future product from a plain fabric. The blanket can be rectangular or square.
- Next, from fleece of two colors we mark and cut out squares measuring 15x15 centimeters; the size of the squares can be taken arbitrarily, at the discretion of the craftswoman.
- Sew the prepared squares together in a checkerboard pattern.
- Next, you should carefully smooth out all the seams so that the part does not deform;
- Then we connect the workpiece with a plain fabric. To make the product look more impressive, you should use threads of a different color for stitching. A cozy and soft fleece blanket is ready.
Patchwork in the house
Patchwork techniques have become very popular all over the world. This is not surprising, because things made in this way are bright and original, and also allow you to recycle unnecessary fabric scraps. A do-it-yourself patchwork blanket can be plain or variegated, have a complex or simple pattern - the patchwork technique gives wide scope for creativity. To sew such an unusual blanket, you will need:
- The material is white and contrasting color.
- A circle template with a diameter of 15 cm, a square template inscribed in this circle.
- Scissors, thread, sewing machine.
From material of both colors, cut out the same number of circles of the selected diameter. Fold in pairs face to face, stitch around the circumference, leaving a 1.5-2 cm gap. Turn inside out through this gap, sew up. It is advisable to iron every detail.
Patchwork for the lazy
You can sew a blanket from pieces of fabric with your own hands, spending a minimum of effort and time. It is not even necessary to process the material. You will need a large sheet of non-woven fabric, an iron and many scraps of fabric of different colors and sizes.
The first stage is the artistic layout of the shreds on non-woven fabric. They need to be laid out so that there are no empty gaps between the material. After this, carefully, without moving the shreds, iron them with a hot iron to glue them to the material.
Next you need to stitch it all, starting the lines at the closest possible distance from each other. The closer the seams are, the more wear-resistant and durable the product will be. You can take this blanket with you outdoors, to the beach, or lay it on the floor for children’s games.
To decorate your home with a cozy, beautiful and practical thing, you don’t have to spend a lot of money or look for something special in stores and on the websites of famous designers. A little time, imagination and effort, and everyone will gasp at your interior.
Blanket from old sweaters: master class
Using old items to make a blanket can be an unusual design solution.
To make a blanket from old sweaters, you will need about 10 old sweaters, plain fabric for the reverse side, scissors, a washing and sewing machine, and yarn.
Manufacturing procedure
For the bedspread, you can use old things that are quite warm, but have long lost their appearance or are out of fashion. You can also buy things on sale, where they will be offered for pennies. But for the craftswoman, it is not the style or size that is important, but the quality of the material.
- before work, you should decide on the choice of color for the future product;
- rip all things apart at the seams, cut off buttons, zippers, labels;
- parts need to be felted. A washing machine is used for this. You can only felt parts made of natural wool; artificial fabric may not feel or give the desired result. All blanks should be folded into a washing bag or pillowcase, placed in the drum of the washing machine and add a few items for washing. Felting is carried out in a long mode with switching water from cold to hot with mandatory spinning. After this, the parts should be straightened and dried.
- After the parts have dried, two templates should be prepared: squares measuring 25x25 cm and 14x14 cm, which will be sewn into one large square;
- It is more convenient to lay out the workpiece on a large table or on the floor, so the future product will be visible;
- If old sweaters had pockets, they can be placed along the edges of the bedspread. The pockets will be convenient to place the TV remote control, handkerchief and other small items;
- Sew the parts using a sewing machine using the widest stitch. First, small parts are stitched, then larger ones and rows of squares;
- For lining, it is recommended to use soft fabric - tartan or fleece. The edges of the blanket must be rounded or left straight.
- Using a thick needle and wool yarn, sew the front side and lining together. On the back of the product you can embroider your initials or the year the blanket was created.
Blanket made from old sweaters without felting
A warm blanket can be made without using felting technology. To do this, you need to rip out the old products at the seams. If the edges are overlaid, it is easier to cut the seam.
Prepare a template for the motifs of the future product. It is not necessary to use squares. These can be triangles, diamonds, stripes. Cut out the parts and lay them out on a large surface, combining them by color and size.
Expert opinion
Romanova Ksenia Petrovna
Interior design expert and fabric store manager
Sew the parts together with a double stitch on a sewing machine, this will prevent fraying. Further. Smooth out the seams and you can begin joining with the lining.
Preparing for work
Fortunately, even a novice needlewoman has a wonderful opportunity not only to sew a stylish patchwork bedspread, but also to recycle unnecessary items. The technique of sewing from scraps of various materials is called patchwork. The history of this type of needlework goes back to the Middle Ages, but today there is no complete information about it.
To sew a new blanket from scraps, you need to prepare for work. First, a sketch of the product is created. It is according to the sketch that pieces of old fabric will be prepared. During the work you will need:
- scissors;
- thread and needle;
- measuring tape.
After creating a sketch, you need to select suitable old things. They can be very diverse. T-shirts made of light fabrics, scarves, scarves, shorts and much more are suitable. In patchwork, you can use any materials, even completely different in density and texture. Next, the selected items must be prepared, namely, ripped apart.
Shredded plaid
- To make such a blanket, you should wash and iron the fabric in advance, mark and cut out patterns. Templates will require thick paper or cardboard. The square size can be arbitrary, at the request of the needlewoman. To the desired size of the square flaps, add one centimeter on each side. This allowance will be required when stitching motifs.
- Cut out the blanks according to the template and lay them out on a large table to imagine the future blanket.
- Connect the pieces of fabric together using a sewing machine. Connect the squares vertically to create long strips that should be sewn horizontally.
- Make small cuts on the wrong side of the workpieces. Connect the canvas to the bottom of the blanket, for which it is better to use a soft, plain fabric.
- Then you can quilt the blanket, sewing the product with seams diagonally.
- Finish the edging of the blanket. To do this, you can use binding, the length of which is equal to the length of the product, and the width is five centimeters.
Assembly of the canvas
After things have lost their shape and turned into regular old fabric, the iron comes into play. It is necessary to carefully iron the former items so that they are smooth and easy to cut into separate flaps. Using a pre-prepared sketch or experimenting on the fly, we cut the fabric into parts of a convenient, creative and desired shape. Once all the pieces are prepared and cut out, you need to carefully sew them together.
It is best to use a sewing machine. Thanks to it, the seams will be even, and the strength of the product will be higher. If you sew the flaps by hand, then the entire work will take more time, and this is worth taking into account. When the main canvas is ready, you can begin the main task. Now you will need to sew a cozy home blanket from it.
The first step is to prepare a piece of fabric for the lower part of the future product. You can make a bedspread with or without filling. If the goal is to get a light blanket, then it is best to choose padding polyester and use it in one or maximum two layers. A sketch is again drawn on paper, the dimensions of the bedspread are indicated to scale.
The filled bedspread is made of three parts. Filling is placed between the two parts of the canvas, and the parts are sewn together. After all decorative elements are sewn and glued, and the filler is in place, you can proceed to the final stage. You need to trim the edges of the bedspread; for this you will need a plain strip of fabric. A strip 5 centimeters wide will be enough. The length is selected individually.
A blanket. We sew from old things.
Winter, frost. We spend a lot of time at home. To make the evenings useful, let’s do what we simply don’t have enough time and energy for in the summer, spring and fall.
But you will need a positive attitude. We are waiting for spring, a time of renewal and new hopes .
Therefore, we not only tune in internally to change, but also externally: first of all, let’s put things in order at home. And let's start with this: let's check our closets, chests of drawers and bedside tables.
It is behind their doors that all our shortcomings, omissions and long-forgotten unnecessary things are often hidden. Today we will work on the chest of drawers and the closet in which clothes are stored.
I would like to draw the attention of those site visitors who generally do not accept any alteration of old things, for whom it is easier to throw away everything old. Then this article is not for you. To avoid getting irritated and spoiling your mood, do not read further!
I will share my little experience with everyone else. Today, for the first time, I decided to repurpose old sweaters and blouses into something useful. Circumstances prompted me to this idea:
- too many of these same knitted items (which are not used at any time of the year) have accumulated in the closet
- the new bed is covered with an old tapestry bedspread
- I have some free time that I want to spend productively
- I wanted to learn patchwork sewing
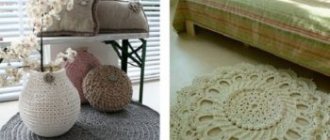
I have already tried to master the patchwork technique and sewed a rug for the kitchen. And I really like him! Such a cozy, handmade wool rug. It fits perfectly into the interior of my kitchen.
Let's start work! We open the closet and look for those knitted items that we haven’t worn for a long time. One important condition: we select knitwear according to tones. So, pink, red, gray will look harmonious together.
Note: white will suit any color and will refresh any product well.
Take to work everything that you don’t wear: skirts, pullovers, jumpers, sweaters and warm old woolen scarves! I decided to use red, pink, gray and white knits for my bedspread.
Once you have collected enough knitwear and matched it tones, start cutting things at the seams. The seams must be carefully cut out and placed in a separate bag. Imagine that even these strips can also be used! You can use them to make rugs for your balcony or cottage.
Next, we cut the resulting pieces of knitwear into strips (rectangles), but if you want, these can be squares. It will be much more difficult to work with other shapes (triangles, circles, trapezoids and others). Therefore, we will leave them for real craftswomen.
I cut rectangles 8cm wide.
Important: the rectangles must be the same width in order for the bedspread to be the correct shape.
The length of knitted strips can be completely different: from 10cm to 40cm. For me, the most convenient length of the strips was from 20 to 35 cm.
If you have the patience to cut a large number of strips, that’s already half the battle. Don’t give up what you started and finish everything: sew a new bedspread for your bed!
Expert opinion
Romanova Ksenia Petrovna
Interior design expert and fabric store manager
The cut strips need to be ironed. By the way, for my bedspread I used knitwear of different thicknesses. This may not be entirely correct, but in principle it is possible to combine them.
I put all the cut pieces in a shoe box to make it easier to use when sewing. The box helps keep the blanks in piles by color and prevents them from falling apart.
I would like to warn you right away: be patient!
It will take several evenings of hard work to sew a blanket from cut-up pieces of knitwear.
- take two pieces of jersey from your supplies box
- place them with their right sides facing each other in width (the side where 8cm is), and on the wrong side make a seam connecting these two rectangles
- then, without tearing off the threads, turn the second stitched rectangle to the front side and apply a new piece of knitwear (from the box) to it, also with the front side and again make a seam from the wrong side
- the next pieces are sewn similarly to the first until you get a fairly long strip of blanks
For a frosty winter: learn how to make a blanket from old sweaters with your own hands (video)
Now on frosty winter evenings you can easily relax with a cup of hot coffee, wrapped in a warm blanket that you can make yourself. You ask how? Very simple! To do this, you don't need to know how to sew professionally or go to the store for expensive fabric.
You may have everything you need at home. To make a warm blanket, all you need is old sweaters.
Choose a color palette that matches your decor, or combine different shades to create a bright and colorful blanket.
Easy way
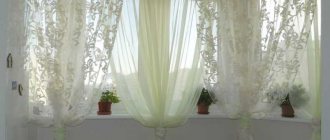
There is an easier way to sew a bedspread for yourself. To do this you will need a ready-made piece of fabric. The most difficult thing in this case will be to decide on the type of fabric. A piece of fabric with the required parameters is purchased in the store. The size is selected according to the sofa or bed you have at home. A cozy blanket can be light or warm, with or without lining.
Matter is processed in such a way as to produce the desired result. A rectangular piece of fabric purchased in a store is decorated with embroidery or appliqué, and the edges are processed and decorated with ruffles or frills. This is the easiest way to make a bedspread at home yourself, spending a minimum of time and effort.
It’s worth talking about a creative solution that will appeal to many. The home bedspread can be made double-sided.
Things you sew with your own hands are always more valuable, so you shouldn’t waste time on handicrafts.
I love quick and simple projects - you can make a blanket or a blanket from sweaters without felting, with different compositions. Felting sweaters for blankets can be a challenging task. This is a labor-intensive process that takes time for felting and drying, preparing things, and caring for the washing machine after washing the wool.
Do it yourself
To create a warm blanket from old sweaters, you will need the following materials and equipment:
- pins;
- sharp scissors;
- contrasting or plain threads;
- a sewing machine or thread and needle for those who decide to sew by hand;
- 10-12 soft wool or cashmere sweaters;
- flannel fabric for the reverse side.
You may not have that many old clothes at home. In this case, you can buy sweaters at a consignment store or any other store.
If there are various elements on the clothing, such as pockets, buttons or decorative details, they do not need to be removed. They will become a bright accent on the finished product and give it originality.
You can also buy ready-made scraps of fabric to create a similar blanket. But they are usually made from cotton rather than wool or cashmere. Therefore, the finished product will not be as warm.
Tip: do not forget to wash the sweaters in the washing machine on a delicate cycle before starting the manufacturing process. They may have stains or an unpleasant odor.
How to make a blanket from old sweaters?
The process is simple and does not take much effort. Let's get to work!
Decide what size you want to make the finished blanket, for example, it will be 2.1 x 1.5 meters. We carefully cut the selected material on the sides and divide it into equal fragments of 30 x 30 centimeters - you should get 35 squares.
We cut strips 12 cm wide from old sweaters, sew pieces of three strips into rectangles, be sure to sew all seams - with an overlocker or by hand
We grind them off carefully. We sew the finished product with an overlock stitch to prevent the knitting from unraveling. The bedspread is ready.
We take scissors and cut the stitched parts into strips - now crosswise, we make our plaid from the strips we received, and carefully sew them together
Do-it-yourself ready-made country blanket from old knitted sweaters
Choice of shape and size
Denim is a high-quality, durable material; you can sew a neat bedspread or a large blanket from old things. If denim pants are not enough, you can use unnecessary denim shirts, skirts, and jackets. The blanket is made according to the principle of a mosaic - it is assembled and sewn from individual fragments into a blanket of the desired shape and size. The advantage of sewing is that no special pattern is required. It is recommended to choose a simple layout of denim fragments and avoid too small flaps - they are difficult to sew and the finished product turns out to be heavy and bulky. Tips for choosing the shape and size of a blanket:
- if you need to sew a blanket for a sofa or bed with your own hands, you can base your calculations on the size of the finished textile;
- to calculate the required number of denim patches, draw a diagram of the plaid;
- when making a patchwork-style blanket, round blanks are cut out;
- Between the elements of the blanket you can lay cotton strips cut from old shirts.
Plaid scraps can be folded in various ways: according to a simple pattern, with a pattern, from squares or circles, with lining, trim along the edge, with fringe. After choosing the shape and size of the denim blanket, you need to draw a sketch of the model and be guided by it during the work process.
To make the blanket durable and neat, you need to make a lining - it will cover the seams on the wrong side of the bedspread. For sewing, you should not use scraps from jeans from heavily worn places, otherwise the appearance of the bedspread will be shabby.
Blanket made from old sweaters with individual parts knitted
To sew a blanket with binding you will need:
- old sweaters;
- Knitting thread;
- hook and scissors.
We rip the sweater and give its fragments (sleeves, back, front) a rectangular shape
We cut the prepared material into squares or rectangles. We lay out the resulting blanks, forming them into a blanket (it’s better to do this on the floor).
We crochet the resulting shred in a circle, the first row with a single crochet
The second and subsequent rows are double crochet, we knit an arbitrary number of rows for our fragment of a blanket
We take one flap and tie it in a circle, crocheting on all sides, adjust the number of rows of tying at your discretion.
We connect the resulting fragments together with a single crochet stitch.
We do this with each element of the blanket. We tie together the parts of the blanket with a single crochet.
Having made the required number of “sweater patches”, we connect them all together with a single crochet
The finished fabric for our blanket, if desired, you can make it double-sided or with a lining
A cozy warm blanket looks great on the sofa
"Granny Squares"
One of the most popular crochet motifs is the granny square. One scheme, but the flight of imagination is limitless. You can vary the colors, take different yarn, and each time you will get something new. You definitely won’t have any questions about how to knit an original blanket.
This motif is performed in a circle. First of all, you need to knit a chain of 6 air loops and connect it using a connecting post.
1 row. Knit 6 chain stitches: 3 chain stitches + 3 chain stitches according to the pattern:
Then knit 3 double crochets into a ring.
Next, 3 chain crochets, 3 double crochets, 3 chain crochets, 3 double crochets, 3 chain crochets and 2 double crochets. Connect the row with a connecting post, inserting the hook into the 3rd chain lifting loop of this row.
To start knitting the next row, knit 1 connecting stitch in an arch.
Related article: How to make a paper bookmark for a book: video and photo corner
2nd row. 3 chain stitches, 2 double crochets in the arch from the chain stitch of the previous row, then 3 chain loops and 3 double crochets in the same arch.
After this, knit 1 chain stitch and in the next arch from the chain loop of the previous row, knit 3 double crochets, 3 chain loops, 3 double crochets. Continue knitting in this manner until the end of the row.
3rd row. Knit 4 chain stitches, then into the arch from the chain stitch of the previous row, knit 3 double crochets, 3 chain loops, 3 double crochets.
We knit 1 chain stitch and 3 double crochets into the next arch from the chain stitch of the previous row. 1 chain stitch, 3 double crochets, 3 chain crochets, 3 double crochets into the corner arch from the chain stitch of the previous row. Repeat 2 more times.
Next, knit 1 chain stitch and 2 double crochets into the next arch. Close the row using a connecting post.
Subsequent rows are knitted in the same way until the desired size of the square itself.
The motifs are stitched together in any convenient way.
An example of stitching with a needle can be seen in the photo:
In addition to knitted blankets, patchwork blankets are now in fashion. The popularity of such products is quite clear: they look bright and catchy, but at the same time create an atmosphere of warmth and comfort. Decorative elements made using patchwork technique can give the room originality and an unsurpassed look.
DIY blanket using felting
This technique is only suitable for sweaters made of natural wool (see wool 100 – 80% label). We'll throw it in the washing machine. Here are some simple tips to achieve the desired result:
- It is better to immediately cut the sweaters into squares or strips of the required size, removing parts unnecessary for work;
- to avoid clogging the filter with fluff from natural items, it is better to put them in a pillowcase;
- For better matting, add a tablespoon of grated laundry soap, a teaspoon of soda and tennis balls (if available) to the pillowcase.
Experts advise putting an unnecessary towel or denim along with woolen items. The washing water should be very hot. After completing the cycle, see if the knitted seams are visible, if so, then run the wash again. If the machine has a drying function, use it, this will increase the chance of getting the desired result.
There is an alternative to felting in the washing machine - simply boil woolen sweaters. When the material stops fluffing, you have achieved the desired result. Rinse in cold water.
Expert opinion
Romanova Ksenia Petrovna
Interior design expert and fabric store manager
Our blanks are felted and dried, let's start assembling the blanket. We assemble the parts and sew them together. At the end we sew on the lining fabric. Cover the edges of the bedspread with bias tape.
Ideas for warm little things from an old sweater
In addition to making blankets, you can use old sweaters to decorate your home with your own hands and prepare for the coming cold weather. We offer you some interesting ideas.
- a piece of clothing, from an unfashionable sweater you can sew a skirt, a warm hat, a snood, a stylish dress and even a coat;
- you can make cozy mittens or fashionable mittens;
Striped mittens from your favorite sweater
DIY leg warmers from a sweater
Making pillows from old sweaters, which, thanks to the softness of the material, are very cute and cozy
Cup warmer made from an old sweater
These are some simple ways that will help breathe a second life into your favorite clothes. And it doesn’t matter whether it’s a blanket or a cover for a mug, the main thing is that the thing makes you happy and gives you positive emotions.
Don't be upset if you don't succeed the first time, don't give up. As popular wisdom says: “The eyes are afraid, but the hands are doing.”
Good luck and creative inspiration!
Knitted
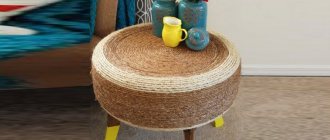
Surely many people recognized “grandmother’s” rug. Yes, previously it was an attribute exclusively of village houses, but changing fashion has turned its face to a modest handicraft product. Now interior designers are vying with each other to advise clients to decorate respectable villas with the simplest handmade rugs - it’s stylish. Traditional rug made from leftover fabric
DIY blanket for a newborn made from plush yarn
If you knit from a strip of fabric, the rug will be soft and cozy. Many people prefer the improved version: tie a strip of fabric with thread, then the product turns out more dense and holds its shape better.
Color combinations can be the most unimaginable. And don’t be embarrassed if it turns out too bright: the main thing is that you like the result.
Improved "grandmother's" rug
Using this technique, it’s quite difficult to make straight edges on rectangular rugs, but I wouldn’t complain about it. In my opinion, the absence of perfectly straight lines only emphasizes the originality of the product.
Which sweaters are best to take for making a blanket?
Take all available products. The wider the color palette, the more varied the materials, patterns and reliefs of the patches, the brighter, more original and unique your plaid will be.
For a bedspread with dimensions of 200x200 cm you will need approximately 8-10 blouses. If you do not have a shortage of the required amount of consumables, but, on the contrary, have a surplus, select products for alteration that are suitable for the following parameters.
- Color palette . First, decide for what purpose the blanket is being sewn and in what room it will be used. For going on picnics or relaxing at the dacha, choose a darker tone, and choose a denser and warmer fabric composition. If the item will serve as a bedspread for a bed or sofa, select the palette of the product taking into account the color scheme of the interior and its style.
- Composition of sweaters . There are two ways to go. The first option is to select materials that are similar in composition, and in the other, play with contrast, using products made from both natural wool and the addition of synthetic threads.
- Invoice . Knitted sweaters come in a variety of patterns. This can be a straight stockinette stitch, purl stitch, ribbed stitch, braids, squares and diamonds. The more varied the pattern of the patches, the more interesting the final result.
- Aesthetics and suitability . Things must be clean, not eaten by moths. They may be old, but not dilapidated. This is necessary so that the blanket lasts longer. After washing, we iron the items, do not recycle areas with defects, cut out buttons and seams.
Once items have been selected, washed and ironed, the creative process begins. In order for the result of your work to be positive and you want to repeat a similar experience again (to create another masterpiece), you must clearly understand the stages of production and the tools necessary for it.