Today, collecting dolls made by hand, to order, as well as those purchased from limited editions or simply popular ones has become widespread. Of course, no one wants to store such a collection in a desk drawer. Beauty should please the eye, be visible, and not gather dust on the mezzanine. Therefore, real collectors have a need to make a doll stand with their own hands. So that not only the collection surprises with its originality, but also the holder matches the favorite one hundred percent.
Possible materials
A stand for dolls must meet the following requirements, regardless of the materials used for its manufacture:
- stability so that it does not fall on its side from the weight of the doll;
- simplicity so as not to distract attention from the doll itself;
- accuracy;
- ease of use.
Possible materials for making stands:
- tree;
- wire;
- cardboard;
- newspaper tubes;
- gypsum;
- computer disk;
- seaming cap, etc.
Let's look at different ways to create stands using different materials as examples.
Old computer disks are good helpers
In a very original way, you can use old CDs to model stands. To work, take one old disk, a balloon stick, a piece of soft wire, a ball of twine, Moment glue and PVA.
First, a wire ring is made on the shelf. Then this stand is inserted into the hole of the disk. Then glue is applied to the disk in a circle and wrapped with twine all the way to the ring. They get something similar to a lamp stand. Such an original little thing will delight little housewives.
The most natural material
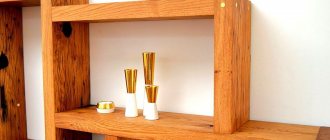
We will talk about making a wooden stand for dolls. The material is the most environmentally friendly, but also the most difficult for beginners, and even for masters without specific equipment. But, on the other hand, a wooden base can always be made to order or bought ready-made. For example, you can use a wooden frame or a wooden hot stand as a stand.
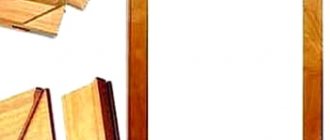
If it is possible to make a base yourself to make a wooden stand, then for this you need to take a flat block of suitable size and weight. If necessary, cut the base out of it to the desired shape with a jigsaw. Thoroughly sand the workpiece on all sides.
Stepping back a little, drill a hole for a wooden stand from the edge or in the center. The location for the hole and its size depend on how the doll will be attached to this stand and how thick the stand is. If desired, paint the workpiece with paint or burn a pattern with a soldering iron. Then open with varnish.
Related article: DIY photo album in a marine style as a gift with a photo
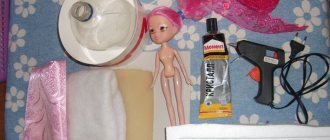
Master class on making a wooden stand for a Tilda doll.
Necessary tools in the photo:
Materials:
- Chinese stick;
- finished wooden stand;
- wire;
- silk thread;
- knitwear or fleece;
- PVA glue;
- acrylic paint.
Drill a hole in the center of the workpiece, suitable for the thickness of the Chinese stick, so that it holds well at the base.
Drill holes in the stick (not all the way through) from opposite sides at distances of 0.5 cm and 1 cm below the edge.
Make a wire blank, as in the photo:
Insert one end of the wire into one hole, and the other from the opposite side into the other. Tighten the joint with silk thread.
Straighten the wire saddle and try it on the doll.
Cut a piece from the fabric that fits the size of the wire saddle:
Sew the part directly onto the structure.
If desired, decorate, open with varnish.
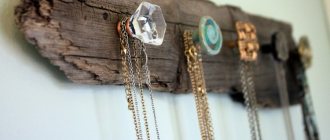
How to make a doll hanger
Most girls have a passion for playing with dolls. For many, it does not go away in adulthood. As a rule, they have more than one or two favorite toys, and each has a decent wardrobe. Over time, all these dresses, skirts and blouses accumulate in such quantities that they need to find a place to store them. It could be a homemade hanger, on which each doll outfit hangs on its own hanger.
How to make a doll hanger
There are many options for such toy hangers - from hooks screwed to wall shelves to full-fledged cabinets. In general, everything is the same as in humans, only the sizes are smaller and the material may not be as durable.
If you or your child also have this problem brewing, we will help you solve it by telling us how to make and arrange a doll’s wardrobe with your own hands.
Paper coasters
This type of coaster is made from cardboard (2 mm thick) or newspaper tubes. Let's look at how to make a base from these materials.
For a cardboard stand you will need:
- cardboard;
- office paper or napkin;
- PVA glue;
- glue Moment;
- sandpaper;
- acrylic paints;
- acrylic lacquer.
Depending on the desired thickness and size of the stand, cut 6-10 pieces of cardboard. Cut out identical circles from the pieces.
Glue the circles together with Moment glue and place under a press for an hour. Use sandpaper to smooth out any uneven areas on the sides.
Cover the workpiece with crumpled office paper and dry it in the oven. If desired, paint and varnish. Make a hole for the holder.
Base made of newspaper tubes. Prepare newspaper tubes. To do this, cut a newspaper page into 4 strips. Start winding the newspaper strip onto the knitting needle from the corner. If the knitting needle is covered with newspaper, move it aside and continue winding. When the newspaper runs out, glue the tip with PVA glue.
Take the first tube and screw it onto the future stand. When the first stick is finished, the stand can be removed. Wind up enough tubes so that the diameter of the base is sufficient for a stable stand.
Article on the topic: Crochet Knitted Jackets with a Pattern - my Selection of Models
Make several such disks, but each one is slightly smaller than the previous one.
Assemble the stand onto the stand. To do this, it is good to glue each new disk to the previous one.
Decorate the resulting pyramid as desired.
The simplest support option
There are several options for the simplest frame models. The first is a wire stand. The base is made in the form of a ring and a stand with a hook is attached to it.
The next option is just a base with a stick. The doll is attached to it using a pocket on the back.
For dolls in dresses, a simple option with a holder is suitable. Under clothing, such a product is not visible at all. The frame of the stand is made of wire. Plastic tubes or cambrics are put on the ends. The base can be a wooden cube. Everything is simple - brilliant!
Construction material
In this master class we will look at how to make a stand for a doll from plaster. The main materials are plaster, thick wire, metal tube.
Take a wire 3 times longer than the height of the stand. Fold it in half, form a ring for the stand, and then a holder according to the size of the doll. Pass the ends of the wire through a metal tube.
To make the base, choose any unnecessary plastic mold. Dilute the gypsum in the required proportion (indicated on the package) and pour it into the mold. Insert the stand and leave to dry at room temperature. After a few hours, remove from the mold, but leave to dry for a while. The glue does not stick to wet plaster, and the base can easily be damaged.
Decorate as you wish. You can paint it with paints, cover it with fabric or corrugated paper.
Such holders are often used for Barbie and Monster High dolls.
Disc stand - master class on video:
Tripods with corsets
Doll beauties with labile, soft bodies can be placed on a stand by placing them in rubber band corsets. It is better to make these rubber belts narrower than the waist. First, a base and a stand are made from scrap materials. It can be a wooden base and a metal tube. The loop for the stand is made of wire. Some people manage to saw off the top of the paper towel holder.
How is the doll secured? First, a rubber corset is put on her, and then she is placed on a metal loop. This corset stand is very convenient.
Furniture to boot
Often there are so many doll clothes that they cannot be placed in just one closet. In this case, you can make several other furniture analogs of the doll wardrobe with your own hands.
A doll chest of drawers is prepared as simply as a wardrobe. Take several matchboxes (usually 3-5) and glue them together. After this, wrap it in thick paper, paint the composition in the desired color and decorate it at your discretion.
Your daughter will really like this part of the doll decor - similar hangers are used in star locker rooms.
Take a small oblong box and attach it vertically along the crossbar parallel to each other on its 2 shorter sides. Stretch another crossbar between them. Decorate the composition.
Hang several hangers on the horizontal bar for a more natural look.
Remember that the best materials for children's doll furniture are wood and thick cardboard. In this case, it is imperative to remove all sharp corners, protruding spines and places where splinters may appear, so as not to injure the child.
In order to adequately decorate a particular gift, sometimes it is necessary to show a little imagination by using various objects as complementary elements, for example, if you need miniature hangers, you can make them from ordinary paper clips in a matter of minutes.
You can decorate holiday cards with ready-made hangers by gluing them to a paper surface, and then sticking an origami product on top of them, for example, a dress, a children's bodysuit or an origami coat. According to this scheme, you can also decorate a gift box by gluing the necessary elements to its top cover.
Chair made from clothespins
You will need: 10 clothespins, Crystal moment glue, sandpaper.
Master Class
- Remove the metal clips from the clothespins and divide each clothespin into 2 parts.
- You should get 20 blanks.
- Sand the workpieces.
- Glue 3 blanks together to form the letter H. Make 4 of these pieces in total.
- Glue the 4 pieces together to form the chair legs as shown in the photo, then leave to dry.
- Glue 8 blanks together to form a seat.
- Glue the seat to the legs.
- Glue 6 blanks to form the back of the chair as shown in the image.
- Leave to dry.
The clothespin chair is ready!