In recent years, a built-in wardrobe can be found in almost every home due to its spaciousness and ease of use. You can customize such a cabinet to suit your needs and not have to worry about trying to choose several cabinets of the same style and size to store various items.
If there are niches, sliding wardrobes become an even more profitable option due to the fact that they do not eat up space. Despite the fact that such structures are assembled mainly by professionals, there is also the option of self-assembly. Today we’ll talk about how to assemble a built-in wardrobe with your own hands.
DIY built-in wardrobe
Advantages and disadvantages
Today, a wardrobe can be placed on a par with the most popular types of furniture. Due to sliding doors, it allows you to significantly save space, which is an important factor for modern apartments. Its “filling” can be almost anything, based on the wishes of the owners, and the floor, ceiling and walls of the room can serve as the bottom, top and even walls of the cabinet, which allows you to save consumables.
Before designing a product, it is important to take into account its advantages and nuances.
Let's consider the advantages of a sliding wardrobe:
- Space saving. Sliding doors do not require extra space, and the product itself is installed as close to the wall as possible.
- Capacity. The large volume allows you to store many necessary things.
- Versatility. The design can be adapted to any interior design of the rooms.
- Internal filling. Making a wardrobe with your own hands means providing it with the elements you need.
- Zoning. Often, sliding wardrobes are used to divide studio apartments into separate zones.
- Wide design possibilities. There are many types of products that are suitable for placement in your home.
The disadvantages include the need for precise measurements regarding the cabinet design. It is important to consider the width of the doors, the correct location of the rails and other nuances for the normal operation of the product.
We recommend taking a training course on making cabinet furniture at home at a professional level. You will not only learn how to make furniture with your own hands , but you will also be able to earn money from this skill ! You can watch a free introductory lesson using this link.
"Ear", or furniture hinge
The most common and budget method. With this installation method, cabinets are hung on a screwed-in screw using a special suspension (the so-called “ear”)
- Helper needed.
- A budget option
- Can be used for minor uneven walls.
- It is more difficult to fix on one horizontal line, the process will be long and labor-intensive, it is necessary to constantly try on the mounted modules and check the level. Even a minor mistake of a fraction of a centimeter will be costly.
- There is no way to adjust or change the position of an already installed module.
- The cabinets will fit tightly to the wall without gaps.
Deciding on the type of wardrobe
The convenience of placement in the room and comfort of use are influenced by the design of the wardrobe. The following common types exist:
- Built-in. The back, sides, ceiling and floor in the niche are the walls of the structure. The cabinet can be adapted to individual dimensions and space configuration. The disadvantage is the impossibility of transfer.
- Free-standing, cabinet-mounted. It looks like a standard wardrobe with separate walls, but has sliding doors. Disadvantage: large size.
- Angular. It can be built-in or case-mounted. It is convenient because it can be placed not only on the wall, but also around the configurations of the room, for example, arches, corners.
- Diagonal-angular. Contains a module for closing a swing door. It combines wheels with rails and a rotating mechanism for convenient operation of the structure.
Compass 3D program tools
Let's look at the interface of one of these programs - Compass 3D (by the way, the portable version is very convenient).
Let's look at the most basic tools you'll need:
- Geometry Toolbar
- “Segment” is the main tool used to draw lines
- “Trim Curve” - eraser for erasing excess segments
- “Parallel straight” - parallel guide
- “Arc by points” - makes an arc according to specified marks
- “Rounding”—rounding corners along a certain radius
- Dimensions toolbar
- “Auto size” - setting automatic size changes
- “Linear size” - setting “your” size
Well, you will also need a binding panel, which is a virtual ruler.
Choosing material
Its durability depends on the correct selection of raw materials from which you plan to make a wardrobe for your bedroom with your own hands. Mahogany is considered the most durable and reliable. Oak and beech will be equally high-quality materials. More expensive, but also excellent wood would be Karelian birch, which ensures a long service life of the product.
Recently, fiberboard, MDF, laminated chipboard, as well as plywood are often used to make furniture. Structures made from them differ in reliability characteristics, but they are cheaper compared to solid wood. As for aesthetic qualities, laminated pressed boards and MDF are today manufactured in various design variations. Internal components are also made from MDF, chipboard, and plywood.
Drywall is used less frequently as a raw material for the production of cabinets, since it provides parameters that are less resistant to external influences. It will be difficult to move such a structure, since the material crumbles when unwinding again.
Furniture panels contain a special wood structure and are often found defective, which affects their strength. This kind of material may not be very advantageous in comparison with more durable and reliable MDF and laminated chipboard panels. The panels are suitable for creating small cabinets in niches. For large-scale products, the use of strong solid wood is recommended. The facade can be decorated with glass, tinted with film and other materials.
To the corners
The modules are mounted on rigid metal corners and self-tapping screws screwed into the dowel.
This fastening method has the same features as the option with furniture hinges. Suitable for fastening not only kitchen units, but also any other furniture.
Although this option is more budget-friendly, it is very outdated and is therefore rarely used, as it is inferior to the more modern method of mounting on a rail.
Design features
The most important step is planning the wardrobe. When independently calculating the placement of parts, you need to be extremely careful, taking into account all structural elements. The length and height of the product are measured taking into account the dimensions of the room and the volume of things that will be stored in it.
Structural components are determined by the type of cabinet selected. But for any variety, the characteristics of the height and depth of the shelves and rods are important. We must not forget about proper calculation of the position of sliding systems. Be careful that the doors do not hit each other or walls while closing. Today there are restrictions for this.
The best option would be to create a sketch with the exact location of the components and their dimensions, method of fastening, and a description of decorative nuances.
Step. 9. Detail
Table of parts for making a cabinet
Based on the finished drawing, make a list of parts indicating their dimensions (specification).
Mark the parts whose ends need to be covered with a decorative edge and, taking into account the thickness of the edge, adjust the dimensions of the parts.
Mark the parts where you need to make “cuts”, for example, under the baseboard on the sidewalls.
How to design a wardrobe - ready-made drawings and diagrams
To create a high-quality product, you must first work out a detailed drawing of the sliding wardrobe. To do this, you need to independently take measurements of the room where installation is planned.
We suggest using an online calculator to calculate materials for a wardrobe:
Sliding wardrobe online calculation
Often people are faced with problems of uneven floors and walls, which leads to troubles in drawing up a construction plan. Therefore, during measurements, it is important to reflect the room configuration errors in sketches. If the difference in heights and latitudes is too great, it is necessary to initially level the surface.
Below are examples of finished drawings of a sliding wardrobe. These diagrams will help you navigate the calculations necessary for the full creation of the product.
Measurements can be taken with a tape measure or laser level. Pay attention to all the points and elements indicated in the project. Try to take measurements as accurately as possible, write down the dimensions in the diagram.
Instructions for mounting on a mounting rail
If necessary, level the walls and corners. The latter should be clearly below 900. Different materials are used to level the walls - putty, plywood, drywall, etc.
Required Tools
To fasten kitchen furniture we need a minimum set of tools:
- perforator;
- building level;
- roulette;
- pencil or marker;
- dowel-nails, self-tapping screws;
- wrench;
- set of drills for wood and concrete;
- clamp;
- screwdriver;
- hammer;
- fastening accessories (depending on the chosen installation method): screws, rails, canopies, corners, mounting “ears”, etc.
Determining the hanging height
The height is selected individually depending on the height of family members. If we take into account the standard parameters, then the average location level should start at about 130-155 cm from the floor.
Making markings on the wall
Having determined the height of the mounted modules, you can begin to apply markings. Using a building level, it is necessary to draw horizontally the upper and lower boundaries of the location of the modules, starting from the corner. The upper level is determined by the height of the mounted headset modules. Depending on the chosen fastening method, the location for fastening is marked.
The mounting rail is located 3-4 cm below the top edge of the cabinets.
Installing fasteners
Holes are made at the fastening points with a hammer drill and fasteners are installed depending on the chosen method.
If the wall crumbles at the drilling site, then start with a thinner drill and only then use a thick one of the required diameter.
How to make a wardrobe for the bedroom with your own hands
After choosing the material from which the structure is made, you need to determine a list of parts. Description and dimensions are indicated on a separate sheet. It will be used to cut elements and select fittings.
Sawing and fittings
The advantage of doing the cutting yourself is to control the consumption of materials. You need to cut sheets of wood, MDF, chipboard, plywood, taking into account the description of the drawings of the sliding wardrobe with your own hands. Therefore, preliminary preparation and design of the product is one of the key stages of work. You need to carry out carving activities using high-quality equipment so as not to get chips on the saw cuts. The edges must be sealed with specialized PVC film. It sticks to the surface by heating the adhesive strip.
High-quality fittings play a vital role in the normal functioning of the cabinet. The correct adjustment of compartment doors and the reliability of fastening shelves and rods depend on the parameters of the elements. The main fasteners do not differ from the components used in the production of cabinet furniture.
Among them are:
- door hinges, if swing mechanisms are provided;
- rods;
- guides for drawers;
- trouser rack, shoe rack, pantograph, retractable hangers;
- small accessories: handles, fasteners for mirrors.
The list of these parts is determined by the selected product configuration.
Fastening the frame
The principle of fastening the frame depends on the type of cabinet. Typically, supports are made of metal profiles that are mounted to the walls. To properly secure the parts, you need a diagram of the wardrobe. Profiles cut according to a pre-drawn drawing are screwed to the walls using dowels, positioned along even guides (vertically and horizontally). They form the frame and main support for the elements.
Shelf guides need to be attached to the side elements of the frame. If a partition is made of plasterboard and other not very strong materials, they need to be strengthened. To do this, you can place a durable beam of suitable dimensions in horizontal profiles.
A cabinet wardrobe does not require a profile and is assembled according to the principle of conventional furniture, excluding the door mechanism.
Door preparation
Preparing the doors is one of the most critical aspects of the assembly. Correct installation requires maximum precision. Ceiling and floor guides are mounted using self-tapping screws. It is important that they are located in the same vertical plane, since a deviation of even millimeters will create difficulties in operating the structure. It is important to take into account the characteristics of the floor and the factor of rail contamination.
Common door suspension systems:
- Double rail with bottom support. The most popular type. The lower rollers act as support rollers, and the upper ones, in turn, prevent the sash from falling out. With this system, the doors practically do not jam or touch each other when opening. But high sensitivity to floor subsidence is provided. First, the upper roller is inserted into the groove, then the door is raised, and the lower part is wound up.
- Double rail with top support. The upper rail is supporting, which makes the operation of the sashes quiet, since there is no subsidence. The disadvantages are that a perfectly flat ceiling is required to install the suspension; when pressed hard, the doors may fall inward. When installing, the sash must be tilted.
- Monorail. The carriage contains 2 pairs of rollers, and the suspension of the sashes is located in separate guides. They are more reliable. But installing such a system requires time and skill, since first the carriages are installed in the rail, then it is attached to the ceiling, and then the door leaf is installed. After hanging the sashes, you need to adjust the stroke.
The main feature of the wardrobe is the sliding doors. They are the facade of furniture, therefore they have not only a structural, but also a decorative function. This is a complex design that requires metal or aluminum rollers and rails.
According to the method of installing the system, there are:
- suspended - the mechanism is located on top;
- supporting - fasteners are installed from below.
The edge of the door that is not in contact with the rail moves along the guide. It is better to prefer sliding elements to metal ones, as they are stronger than plastic rails.
Fastening the shelves
Recommendations for fixing shelves:
- The distance between the shelves of the product should not be less than 30 cm. This is necessary for ease of use of the cabinet.
- The depth of the compartment for hangers should not be less than 55 cm.
- The number, size and location of drawers should be noted on the diagram.
- The dimensions of additional elements are taken into account: retractable nets, hangers for umbrellas, shoes, ties, hats, baskets, pantographs, etc.
Shelves can be installed using specialized fasteners that are used to construct conventional cabinet furniture. On the modern market there are more reliable fastening mechanisms for storage systems, consisting of flippers and rods.
Painting and installation of doors
After preparing the internal filling, painting and installation of doors is carried out. The canvas can be painted using special acrylic dyes, stains, and varnish. You must first coat the wood with a protective antimicrobial agent.
Principles for installing doors with bottom and top supports:
- Bearing elements fixed at the two upper points of the blade are installed in the upper groove of the guide.
- The compartment door is slightly raised, after which the rollers are inserted into the lower rail.
It is important to take into account the features of hanging systems, since in some cases additional tilting of the sash is required. Monorail fasteners differ in the installation method described above.
There are various locking designs on the market that prevent excessive movement of sliding doors. They are installed on the rail mechanism. After this work, decorative handles, moldings and other elements are installed.
Lighting
Before working on the frame part, it is necessary to take into account the desired lighting principle. Based on the design drawing, a diagram for connecting the lighting to the wiring is worked out. For a built-in cabinet, a plasterboard structure is constructed on the ceiling, based on a profile support.
The light can be installed in the upper part of the cabinet, having previously cut the required diameter for the lamps. To ensure safety, internal wiring must be enclosed in corrugated tubes.
Assembling a wardrobe with your own hands at home is quite simple if you make the drawings correctly and follow the calculations.
When the main installation of the product is completed, lighting is installed and the furniture is finished. Fluorescent and LED lamps are used to illuminate products.
Such lamps do not heat up, creating safe operating conditions for the product. When choosing to install recessed lighting inside a built-in cabinet, you need to take care of it before installing the frame. You can illuminate furniture from the outside, which is achieved by installing lamps in the furniture's cornices.
Decor
Do-it-yourself wardrobe decoration is done using various materials. In this case, it is important to pre-prepare the product, that is, degrease, remove any remaining varnish and paint using sandpaper.
Many people limit themselves to hanging mirrors and painting furniture to match the color of wood. But others strive to create creative furniture models, in which many tools help them.
The following methods are the most popular today.
Decoupage
A primer and acrylic varnish are applied to the sanded and cleaned surface, then sanded and again coated with varnish and primer, after which the pattern is attached and varnished. You can additionally draw in the details of the image to create a painting effect. The result is fixed with several layers of acrylic varnish.
Drawing
The painting is applied manually or using a stencil. First you need to sand the surface and cover the area with a primer. The finished image is varnished.
Film
One of the most popular processing materials. It is suitable for decorating various surfaces, including furniture. There are many varieties of film, including a holistic pattern, individual elements (flowers, birds, curls, geometry). It is glued to a cleaned surface.
Mosaic
Acrylic and glass materials are used to create fantasy patterns or paintings. The canvas is first cleaned, and markings are made for even gluing of the elements. Fastening is done using liquid nails.
Engraving and matting of mirrors
Performed if you have the equipment and skills to work with glass and sandblasting.
Making a wardrobe is a labor-intensive, but at the same time interesting process. To create a high-quality product, it is important to take a responsible approach to the calculations of dimensions, content, and lighting principles of furniture. It is recommended to record your planning notes in a separate notebook so that important points are at hand. The drawings and tips provided in the article will help you pay attention to the key nuances of design, as well as inspire you to come up with your own interesting solutions.
Planning is the key to success
The beauty of built-in furniture is that it doesn’t matter what kind of structure you are going to install. Whether the cabinet will occupy the niche completely, partially, or a corner layout is planned, in any case, the sequence of actions is similar.
- The choice of material is the first thing you need to decide. If the floor is concrete, then there is not much difference, you can take what you like, but for wooden floors you need to choose lightweight panels. Plus, recently such a characteristic as environmental cleanliness has come to the fore;
- Preparing the niche itself - this point is not relevant for every owner, but you still need to know some subtleties;
- Cabinet layout - there are enough beautiful diagrams with dimensions on the Internet, but you need to rely on the practical benefits and feasibility of arranging a particular section;
When assigning the purpose of sections, one should rely on practical expediency.
- Doors - as practice shows, in sliding wardrobes sliding doors are the most important component, moreover, they take up at least half of the budget;
- Cutting the material and installation - if all the previous points were completed efficiently, then assembling the cabinet will take a maximum of 2 - 3 days.
From a practical point of view, it is easiest to build furniture into a niche, because you already have a ready-made box, all that remains is to fill it and mount the facade.
Preparing the installation site
Before assembling the themed item on site, it must be cleaned. This is especially true for the wall surface, because it will serve as the rear plane of the directly built-in cabinet.
It may be necessary to install utility lines in some places to simplify the operation of the furniture if it has lighting. Instructions describing built-in cabinets rarely emphasize the importance of site preparation.
We are drawing up a project
Having decided on the place where the built-in closet will be located, first of all you will have to take up not the tools, but paper and pencil and draw up a project. You should draw a sketch taking into account the external dimensions, which must correspond to the dimensions of the niche or room where the cabinet will be installed.
Based on the external dimensions, we determine the internal design in accordance with the features of its further operation. The sketch shows the number of shelves and sections, the location of additional fittings and decorative elements. When determining the exact dimensions of internal partitions, the thickness of the panels should be taken into account. The front cut of the internal shelves must be at a distance of at least 100 mm from the place where the doors are attached.
Recent Entries
Soldering or crimping electrical wires Why is there humidity in the apartment and what to do Chopped at home: technical features and advantages
The size of the doors themselves and the number of leaves is determined by the overall dimensions of the cabinet and the number of sections in it. Too wide sashes easily move off the guides during operation. The optimal door width is considered to be not exceeding 600–700 mm.
An approximate drawing of a cabinet installed against a blank wall. A cabinet without external walls is built into a niche
. Materials suitable for making the cabinet:
- The most commonly used materials are laminated chipboard (chipboard), MDF (tiles made from small sawdust), fiberboard (fibreboard), which are used to assemble all types of furniture. These are universal, practical and durable materials, quite resistant to external factors and easy to process. They are produced by industry in the form of sheets of different sizes, which allows cutting with minimal losses. A wide range of colors will help you fit the coupe into the design of any room. The most commonly used for installation and the most practical is laminated chipboard with a thickness of 16 mm of medium or high density, which is best in terms of price-quality ratio.
- Wood is less suitable for installing a wardrobe, as it is more difficult to process, it easily absorbs moisture and warps. When using wood, you will have to decide on its treatment with special compounds to increase moisture resistance and visual appeal.
- Some craftsmen use plasterboard to assemble built-in cabinets. Of course, this finishing material has a number of advantages, but it is of little use for the design of a built-in compartment. This is a heavy and fragile material; wide metal profiles are used to make a supporting structure from it, and therefore the partitions are thicker. The option of using drywall for installing practical furniture should be excluded.
As a material for doors, you can use laminated chipboard, ready-made aluminum structures with mirrors, as well as plastic structures with pseudo-mirrors.
Fittings set
In appearance, this built-in wardrobe resembles a large box running along the wall. When you need to use this cabinet, it becomes clear that the following parts are present inside it:
- Self-tapping screws and dowels for attaching sheets to each other or to the frame;
- Corners for attaching canvases under shelves;
- Friezes, guides and rollers for door operation (if the doors are hinged, then only hinges are needed);
- Handles, locks, latches for opening and closing and locking door leaves;
- Crossbar, crossbar holders, baskets - for storing outerwear and other things.
Applying an edge
If you have never done edging, then watch the lesson first. Thanks to a special tape, it is easy to process the edge, that is, the place of the cut, yourself. Detailed step-by-step instructions are included with the material. There are craftsmen who recommend edging on parts involved in the visible zone. But on the other hand, the edge protects the cutting area from moisture and dust.
Simply apply the tape yourself by securing the adhesive side and heating it with a hot iron to ensure adherence.
Please note that we are not talking about a professional tool - an ordinary household iron. It is recommended to heat the material on mode “2”
Be sure to wear gloves to avoid burning your hands. After cooling, the excess tape is trimmed and cleaned with fine-grained sandpaper or a special whetstone that has a soft side and is low-abrasive. Edge around the perimeter of all structural parts.
PVC edge
Examples
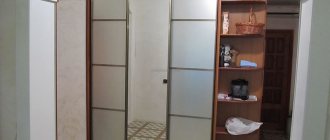
Double door wardrobes
A two-door wardrobe fits organically into a small space.
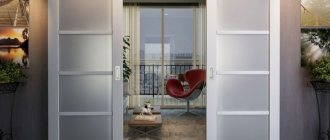
Three-door wardrobes
Fans of classic solutions will appreciate the variety of three-door cabinets.
Schemes and drawings of sliding wardrobes of a rectilinear configuration
The internal content of a three-door bedroom closet can be as follows.
The diagram shows that the owner has more long clothes on his hangers than short ones. And also that the wardrobe will also be used as household storage - there is a niche on the left for storing an ironing board and a vacuum cleaner. Drawers are more convenient for storing laundry, but they increase the cost of the entire product. So, if the issue of economics is of any importance, then it is better to replace them with open shelves.
For three-door wardrobe designs in the hallway, the predominance of sections with shoulders for long coats, coats and short jackets, and down jackets in two rows is more typical. Drawers are often used to store scarves, hats, gloves and shoes.
A pantograph can be provided for storing seasonal outerwear if large “garbage” shelves on the mezzanine are not particularly needed.
Sources
- https://dekoriko.ru/shkaf-kupe/svoimi-rukami-chertezhi-opisanie/
- https://shkaf-kupe-info.ru/chertegi-shkafkupe/shemy-i-chertezhi-shkafov-kupe-s-opisaniem-poshagovo.html
- https://MebSam.com/shkaf-kupe-svoimi-rukami-chertezhi.html
- https://obustroen.ru/komnaty/mebel/shkaf-kupe-svoimi-rukami.html
- https://mebeldok.com/katal/03_shkafi_kupe.html