Different fittings are installed on interior doors depending on their purpose and material of manufacture. Particularly worth highlighting is an element such as a latch handle, which prevents spontaneous opening of the canvas under the influence of drafts. Such fittings are made from different materials and may have a locking mechanism in their design. A distinctive feature of the latch handle is its proper operation throughout the entire period of operation, low price and maintainability if necessary.
Most interior doors are equipped with latch handles
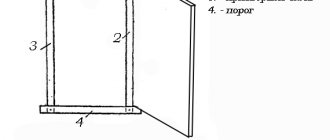
Types of door structural elements
There are two types of installation methods:
- Invoices are the simplest. Installing the handle on an interior door takes little time: it is simply fixed to the surface of the door.
- Mortise - mounted in a hole pre-drilled in the door leaf.
There are two types of mortise structures:
- Rotary or knob handles . The mechanism of action is simple: the door opens by turning the holder without pressing the handle. The decision to install a round handle is correct, as they are very convenient. There are rotary handles with a lock that locks the lock tongue to close the door from the back.
- Push or latch handles . The principle of their operation is pressing on the lever.
Depending on the material of the product there are:
- wooden (from different varieties);
- plastic - such handles are used for rarely used doors (for a closet or niche);
- glass - made from Bohemian or Murmansk glass;
- stone - the most expensive in terms of cost, but with a long service life.
When choosing fittings for a door leaf, adhere to the basic rule: the material, color and shape must match the characteristics of the door itself and the interior. It is better to take more durable and expensive products that will not require replacement after 2-3 months of operation.
Tip: Hidden handles are suitable for sliding doors, which will not interfere or spoil the walls and wallpaper.
How to disassemble and remove the handle?
Above we described how to install a latch handle in a new door leaf. But it happens that you need to replace the existing handle, and to do this you need to remove it. It's simple, because you know its structure. The procedure will be as follows.
- Loosen the decorative flange. It has a small groove on the edge - pry the flange behind it with a knife and carefully pull it out. You will see that there are fastening elements hidden under it, which cannot yet be reached with a screwdriver, since the handle is in the way.
- The handle is secured with a spring-loaded locking pin. How to find it? At push handles it protrudes on a decorative flange. Press it in with a key (if it is included in the kit) or a screwdriver. If the handle is rotary, the pin is hidden inside the housing. To access it, there is a technological hole on the flange into which you need to insert a key or an awl. While pressing the pin, pull out the handle at the same time - you're done!
- Now you can unscrew the fastener. Remove the handle and decorative flange. This way, you will separate the inside of the handle from the outside and can remove them from the door.
- To replace the latch mechanism, unscrew the screws that secure it to the end of the door, remove the bar and remove the mechanism from the door leaf.
Attention! Sometimes, due to improper installation of the latch handle, it is not possible to feel the pin. The fact is that the technological hole does not coincide with it. To fix this, you need to turn the flange until it aligns with the pin.
As you can see, disassembling the latch handle with your own hands is not difficult. This means you can quickly deal with this and move on to installing a new handle. The main thing is that it is reliable, and you do not have to replace it after a few months due to low-quality components. We offer you to buy reliable latch handles in our online store. Here you will find branded products that will last trouble-free for many years. The kit contains everything necessary for installation and instructions with a drawing for making holes in the door leaf. By the way, you can also purchase a tool for installing the latch handle yourself from us.
Marking
The procedure begins with marking the door leaf.
- Use a pencil to mark the location for drilling. Diagrams are usually included with the product.
- If there are no explanations, you can apply the dimensions yourself. To do this, mark with a pencil a distance of 60 mm from the door edge, the height of the location is from 90 to 1100 mm.
- We mark the central point for drilling on the side edge of the door leaf. Dimensions are drawn along the center line.
Height and distance from the edge of the door
The internal element (latch) is uniform, so it is installed the same for different handles with a latching mechanism. The height from the bottom of the door and the distance from the edge are standard.
For latch handles, there are two options for inserting into the canvas: 60 or 70 millimeters from the edge. The rotary latching mechanism can “move” to the right or left by about 1 cm, and this also needs to be taken into account.
- If the handle has a spherical shape, and the distance from the edge of the door to the decorative element of the door (for example, glazing) exceeds 140 mm, it is better to fix the mechanism 70 mm from the edge. If you install the handle at a distance of 60 mm, when closing the interior door from the inside, you can hit your hand on the door frame.
- When installing a pressure product, the indentation must definitely be 60 mm.
The standard handle installation height (distance from the floor to the center of the latch) is 900–1100 mm. If the door is usually used by one person, the optimal height will be located at the level of his waist.
Installation of the product on an interior door is carried out on the right or left side. For round handle models, you only need to reverse the latch design. The tongue should point towards the closing of the interior door. If the device is asymmetrical, the elements simply need to be swapped, focusing on the opening side.
Required Tools
To install the handle, arm yourself with tools, without which it will not be easy to do this:
- a simple pencil;
- square;
- roulette;
- chisel;
- screwdriver;
- drill;
- drill;
- crown.
The crown and screwdriver can be replaced with other available tools, but the quality of the work will suffer and it will take a lot of time.
Before starting installation, read the instructions for the product. It indicates all the dimensions, which will help you choose the right drill bit and crown according to the radius.
Hole preparation
At this stage we do the following:
- Using a chisel, we hollow out a 3 mm recess under the face plate of the latch, corresponding to its width. It is better to mark the center in advance with an awl so that you do not have to apply the markings again.
- Using a half-centimeter crown, we drill a through hole. It is better to do this on both sides of the door leaf so as not to damage the door coating at the exit of the crown.
- Now let's move on to the side edge. Take a wood drill (about 24 mm in diameter). They need to make a hole in the marked center for the latch. You shouldn’t go too deep, otherwise you can make a hole in the canvas all the way to the panel.
Materials for work
Materials for work:
- – roulette;
- – electric drills;
- – screwdriver;
- – self-tapping screws;
- – chisels;
- – square;
- – hammer;
- – a set of wood drills;
- – pencil;
- – conductor.
The conductor allows you to simplify the process of marking on the door leaf and spend a minimum of time on it. It needs to be attached to the end of the door so that at the end of the work its holes coincide with the lining of the tongue of the screwed handle.
Installation procedure
The example used is the installation of door handles with a latch. Round and oblong ones are installed the same way.
For installation we will need:
- hand drill or screwdriver;
- wood crown with a diameter of 50 mm;
- wood drill with a diameter of 22-25 mm;
- chisel;
- hammer;
- pencil.
The standard height for the handle is 80-90 cm from the floor. It is usually installed at waist level. It is necessary to take into account that for all doors you need to choose the same height, otherwise it will look ugly.
The height must be marked on the door leaf at the end and side. Mark the center at the end so that you can later drill a hole for the halyard latch. To correctly mark the drill location on the side of the door, measure the distance from the edge of the latch to the middle of the hole into which the square is inserted. Transfer this length to the side of the door.
After marking the centers, we proceed to drilling the holes. To do this you will need a drill, a thin drill (2-4 mm) and feather drills (22 and 25 mm). We need a thin drill to set the guide. When drilling through the exit side with a feather drill, chips are formed. To avoid this, just make a hole with a feather half the thickness of the door, and then start drilling from the back side. To do this, we need to make a guide with a thin drill. The first hole is drilled on the side with a diameter of 25 mm, the second is made on the side with a diameter of 22 mm.
For those models that come with 3 additional screws for attaching the base to the door leaf, you do not need to drill a large hole with a crown. It is enough to make a hole for a “square” with a pen drill with a diameter of approximately 12 mm and holes for the tightening bolts. This design will last longer.
Now mark and make a recess for the latch. To do this, insert the latch into the end and trace the outline of the bar. Then you need to select a groove for the strip. It is better to do this with a milling machine. If you don’t have one, you can get by with a chisel. It is enough to go deeper into the thickness of the plank.
Now installing a handle on an interior door will not be very difficult. All that remains is to assemble the door handle inside the door leaf. To do this, clean the hole from dust and wood chips, insert the latch and secure it with self-tapping screws. However, you should not be zealous and clamp it too tightly, otherwise it may jam.
Now insert the square into the latch hole. Then put on the handle. The kit comes with left and right handles, so make sure you insert them correctly before screwing them on. After installing the handle with the lock, screw the handle with three self-tapping screws to the door leaf.
Mount the second handle in the same way. After assembly, check whether everything works correctly, whether the latch moves, whether it slides in all the way and whether it is jammed. When finished, decorative caps are screwed on to hide the fasteners. On the bottom of the handle, as a rule, there is a hidden screw for a hex key to secure the caps.
If you have a round handle, insert a rod into the hole. It has grooves on both sides. There are also grooves on the handle that must coincide with each other. Put it on and press until it clicks.
Foley handles can be mounted on both left and right doors. To change, you need to remove the cylinder mechanism and the locking mechanism from the handle body and swap them in accordance with the side of the door opening.
Subtleties of self-installation of different models
If you don’t go into the design features of any specific models, the installation of most of these devices is similar, but before you cut in this or that handle, figure out where it will be installed.
Installation of door handles of various modifications
Below are step-by-step instructions on how to install each type of door handle.
How to insert a device with a lock and latch?
Installation of door handles is carried out in stages:
- Marking the door leaf . Mark the drilling location with a pencil. Usually a diagram is attached to the product, but if it is missing, you can make the markings yourself. The distance from the door edge is 60 mm, while the height of the location will be 90–110 cm. The central point for the hole is located on the side edge of the leaf, and all dimensions are applied along the center line.
- Hole preparation is carried out in several steps:
- Hollow out a 3 mm recess under the front side of the latch of the appropriate width.
- The center is marked in advance with an awl so as not to re-mark.
- Drill a through hole for the handle using a half-centimeter crown. It is better to carry out this procedure on both sides of the door so as not to damage the coating of the door leaf at the exit of the crown.
- Move to the side edge. Use a wood drill (approximately 24 mm in diameter) to make a hole for the latch. In this case, you should not go too deep, otherwise you can hole the canvas right through.
- The final stage is installation. By this stage, 2 holes should already be ready. The work order is as follows:
- Remove the top part of the handle through the side hole. Use the special key included in the set. Press the tab located inside the hole and lift the handle up.
- Remove the decorative trim.
- Attach the outer part of the fixture first, and then the inner half. Secure the two parts together with the screws included in the kit.
- Install the decorative trim and housing for the latch handle by pressing on the inner tongue with a key.
- Close the door to determine where the tongue touches the door frame. Using this mark, drill a recess for the lock entrance.
- Install a decorative plastic pocket, and attach a metal plate over the hole under the latch tongue.
Attention: If you don’t have a drill, installation work can be done with a chisel, but the work will take more time and practical experience will be required.
Upon completion of installation, check the operation of the handle and lock - movements should be smooth, without noise.
The video demonstrates the process of installing a handle on an interior door:
Installation of stationary handles
In order to install a stationary handle, the only tools you need are a screwdriver and a drill. The overhead handles are simply attached to the door in the intended place with self-tapping screws. To install through models, you need to drill a hole in the door leaf and insert a threaded rod into it. After this, the handles are screwed onto it on both sides.
Latch handle installation
Before installing a rotary or push handle with a halyard tongue, you need to familiarize yourself with the structure of its mechanism. As you can see in the photo, the main details are as follows:
- lever;
- base (decorative overlay, rosette);
- square (profile pin);
- screws.
What parts does the latch handle consist of?
The installation process itself looks like this:
- At the selected height at the end of the door, mark the center; this will be the place for drilling a recess for the latch.
- We measure the distance from the root of the tongue to the center of the hole into which the handle square will be attached. We mark this distance from the edge of the door leaf at the same height - this will be the place to install the handle.
- Next, using a drill with a crown, holes for the handle are drilled on both sides of the blade. First you need to drill a hole on one side to a depth equal to approximately half the door leaf. The drill must be held strictly at 90º. Then the same thing is done on the other side. If you drill a hole in one step, the drill may get lost and it will turn out crooked.
Drilling a hole in the floor handle using a core bit
- At the end of the door, mark the recess for the latch plate using a chisel. The depth should be such that the plate is flush with the surface, usually 3 mm. In order not to lose the mark for the latch, it must first be deepened with an awl.
- Next, put a feather drill with a diameter of 23 mm and make a hole for the latch at the marked point on the end. Its depth should match the length of the latch mechanism.
- We put the latch in place, fasten the front plate with two screws.
- Now we insert a “square” (profile pin) into the hole for the handle and fasten the handles on it using tightening bolts through special holes in the latch mechanism.
- The final touch: installing a decorative trim and additionally securing the door handle using a locking screw, which is usually located at the bottom of the base.
- Next we prepare a counter hole on the box. First, use a chisel to make a notch for the tongue. The most convenient way to mark the place for it is as follows: smear the tongue with toothpaste and twist the handle. After this, we prepare a recess for the metal strip, which is then screwed in with two screws.
Installing the Latch Handle
For those models that come with 3 additional screws for attaching the base to the door leaf, you do not need to drill a large hole with a crown. It is enough to make a hole for a “square” with a pen drill with a diameter of approximately 12 mm and holes for the tightening bolts. This design will last longer.
Method of installing a handle with separate holes for “square” and bolts
Installation of handle with lock
A more difficult question is how to install a handle with a lock on the door? In order for the work to be neat, it is better to remove the door from its hinges.
Stages of work:
- We outline the contours of the lock on the end of the door.
- Using a drill with a feather drill, we drill several holes inside the contour close to each other, after which we remove the remains with a chisel, periodically applying a lock. It should fit there completely.
- We make a recess for the face plate.
- We drill holes for the handles; the diameter must be chosen so that the square rotates freely inside it. The drilling location must be marked exactly.
- We prepare a hole for the keyhole and make a recess for the base, which can be either a bar or two circles.
- We insert the lock and install the square pin.
- Screw and fix the base and handles. We make a recess for the strike plate, recess it flush with the frame and fasten it.
Installing a handle with a lock: diagram
Installation of handles for sliding doors
Installing a handle on a sliding door will require only a drill with feather and simple drills and a router with a cylinder cutter. Let's consider the procedure for installing an oblong-shaped handle. It looks like this:
- We disassemble the handle, which consists of a plastic insert and a decorative overlay.
- We determine the height and mounting location of the handle and transfer the contour of the plastic insert to the canvas.
- Using a drill with a feather drill with a diameter of 25 mm, we drill several holes inside the contour close to each other to a depth of 12-13 mm. We remove the rest with a chisel. This work can also be done using a router.
- We insert the plastic liner into the recess and secure it with two screws.
Attaching the plastic insert
- We put the decorative trim in place, it should snap into place.
Installing oblong handles for a sliding door
For a round knob, the installation process is much simpler. You just need to make a round recess using a feather drill of the required diameter, and then everything is the same as in the case of an oblong one. If desired, you can additionally install a lock on the sliding doors, as well as an end grip if the handle is equipped.
Mounting a handle with a magnetic lock
As for the question of how to insert a handle into a door if it is equipped with a magnetic latch, everything here is similar to inserting a handle with a lock. Difficulties arise only when installing the strike plate, because it is necessary that the lock clicks smoothly.
Design and installation of a magnetic lock
You need to do the following:
- Close the door and mark the top and bottom of the magnetic latch on the frame.
- Attach the counter strip to the marking and mark the contour of the recess for the magnet.
- Make a recess in the center using a feather drill or router.
- We fasten the bar with self-tapping screws and check the operation of the lock. If you need to move the bar a little, we fill the old holes with wooden chips and drill new ones.
Attaching the magnetic lock bar
It is not recommended to deepen the counterplate flush: it is possible that over time the magnet will no longer easily fit into the hole and the strip will need to be moved.
A process such as installing door handles yourself requires patience, accuracy and strict adherence to instructions.
Caring for fittings
Replacing the handle is a simple process. However, proper care of the fittings will guarantee durability and uninterrupted functionality. Intensive use causes locking mechanisms to become unusable. They wear out, get old, don’t turn, don’t latch. Care instructions:
- Cleaning . Wipe the mechanisms from dust in a timely manner with special cleaning agents. It is not recommended to use substances that contain aggressive acids, alkalis and abrasive particles. Door hardware suffers from such components and quickly rusts. After cleaning, wipe it with a dry, clean cloth.
- Checking mechanisms . If the user feels that the handle is loose, then it needs to be tightened. Inattention and negligent attitude will lead to the final failure of all mechanisms present in the design.
- Additional door care . In damp rooms it is susceptible to damage by mold and mildew. Wooden panels are eaten by insects. Moisture-proof compounds are used. When the panel swells, the door lock rusts and is squeezed out. The result is that the structure does not close, the handle spoils the slopes and walls.
- Careful handling . Careful, careful use of the handle does not cause mechanical damage to it. Jerking or forcefully slamming the door will damage the design and functionality.
- Lubrication, inspection for cracks. If the handle sticks when turning, it is necessary to lubricate the mechanisms with special oil. The composition is sold in construction stores. Over time, the panel near the locking element cracks and gradually forms gaps. Typically, such consequences appear when the handle is inserted carelessly.
Solve the problem in several ways:- Seal small cracks with silicone sealant and putty so that the new layer does not protrude beyond the panel. Otherwise the door will not close. Wait until completely dry and sand the surface. Choose the color of the putty mixture to match the tone of the door surface.
For large gaps, use wood chips made of the same material as the doors. Select wood chips with identical gap dimensions. Carefully insert, cover with sealant, then putty. You can fix the element with construction glue. The main thing is that it does not protrude beyond the boundaries of the piece. After drying, check the door to ensure it can close completely.
Attention
Some models have hard-to-reach elements. It is not always possible to properly disassemble the mechanism in order to lubricate all its parts. You can make the process easier if you use a convenient attachment in the form of a thin and long tube or brush with natural fibers.
Strike plate and lock recess
The installation of the door handle on the interior door is complete. All that remains is to do the final touch, namely, to embed the mating part of the latch into the hole. The first step is to mark the center of the latch. To do this, close the doors not too tightly and draw a pencil at the required level. You can also close the door tightly and open and close the latch several times to leave marks. Now select a groove in the middle of the loot. There is no need to make it deep. Measure the length of the latch at its largest point and choose 1-2 mm less.
The groove under the lock is selected deeper and larger. Everything depends directly on the castle itself. Sometimes the kit may include a plastic pad in the groove - it needs to be inserted before the strip is secured.
A decorative strip is attached over the groove. There is no need to cut it flush. It is enough to screw it with self-tapping screws or nail it with nails. All that remains is to check if everything is working correctly. At this point, the installation of handles on interior doors is completely completed.
Handles with a lock are installed according to the same principle. The difference will only be in the diameter of the end hole.
What to pay attention to
When installing, you should correctly calculate the installation height of the handle. The degree of ease of use of interior doors largely depends on this. There are no clear regulations regarding such a height anywhere. The generally accepted indicator is 1 m from the level of the floor covering.
This figure is based on adults and children. In many ways, this indicator may depend on the height of the people living in the house or apartment. It is also necessary to pay attention to the height at which the handles are installed in other doors: they should all be installed the same. Thus, the interior of the room will acquire harmony and completeness.
Useful tips
- It is first necessary to carry out careful calculations and then carry out any actions.
- When creating a through hole, you should be extremely careful and do not drill the door on only one side. This can cause chips on the back side of the door leaf. As soon as the drill begins to appear, passing through, you need to continue working on the other side. After completing the installation, it is necessary to double-check the tightening force of the bolts or screws used so that poorly fixed parts do not soon damage the handle.
Installation of a plate for inserting the lock tongue into the door frame
It is impossible to complete the handle and lock installation process without installing the tongue plate into the door frame. The first step is to make measurements and accurate calculations so that when the handle is lowered, the tongue does not exactly align with the box part.
To make the procedure easier, you can apply toothpaste to the tongue of the mechanism vertically and close the door. In the place where the imprint of the element remains on the box part, you need to make a hole for the tongue.
You can make a recess using a chisel or drill. A metal plate with an opening is attached on top of it and secured with self-tapping screws.
Demonstration of installing a lock plate on a door frame step by step
Video about installing a handle on an interior door
This video demonstrates how you can embed a lock and door handle into an interior door without expensive professional tools:
Recommendations for inserting a magnetic lock in this video:
The process of installing handles on interior doors yourself requires not only strict adherence to the instructions, but also patience and accuracy. Work carried out in accordance with these recommendations will allow the fittings to perform their function efficiently and serve the owners for a long time.
Sources
- https://okcomfort.com/dveri/ustanovka-ruchki-v-mezhkomnatnye-polotno.html
- https://mr-build.ru/konstruktsii/ustanovka-ruchki-na-mezhkomnatnuyu-dver.html
- https://BestDoor.guru/montazh/ustanovka-dvernoj-ruchki.html
- https://doorchange.ru/montazh/ustanovka-dvernoj-ruchki-na-vhodnuyu-i-mezhkomnatnuyu-dver.html
- https://furni-info.ru/ustanovka-dvernoj-ruchki.html
- https://cozzyroom.com/remont/ustanovka-ruchki-na-mezhkomnatnuyu-dver.html
[collapse]
Features of the blocker
There is no definite answer to the question of how to repair the handle on a plastic window yourself, because first you need to understand what brand the fittings are. After a careful inspection of the window, you can find the name on one of its parts (most likely it will be on the end).
How to pinch the lock at the end with your finger Source stroisam2.ru
Aubi
For window systems, disabling a jammed locking system can only be done with the window in a vertical position. You need to find a metal part on the side of the door being repaired that acts as a spring, and press on it so that it also becomes vertical. Only after performing all the above actions must the handle be returned to the correct position. For an open window, this state is strictly horizontal.
After these simple manipulations, you should check whether the mechanism works. When problems arise again when attempting to open/close the sash, you need to find out what the relative position of the blocker and the response mechanism is. When you turn the handle and close the window, the locking mechanism must cling to the counter. If the breakdown is not corrected, the cause may be expansion of the material due to exposure to high temperatures.
The solution to the described problem is simple. You need to open the window sash and, having found the response mechanism, carefully unscrew it. After this, cardboard, thin plastic or something similar should be placed between the mechanism and the frame. Once the mechanism is screwed into place, the problem should disappear.
The blocker can also be located below Source arcont.it
Winkhaus
If the handle on a plastic window is broken and you don’t know what to do, try working with the lock. Owners of Winkhaus window fittings may be familiar with the problem of this device wearing out. Do-it-yourself repairs will require removing the window sash. You should first prepare pliers and a screwdriver. After removing the top hinge cover, you need to pull out the pin. Now you can remove the sash, freeing it from its hinges, and carefully install it on the floor, providing a strong support.
After the scissor mounting bolts are removed, you need to separate them from the window and then remove the blocker. Now you can install the scissors and the sash back. If the error has not been corrected, more serious repairs from professionals are required.
General selection rules
The average person usually buys accessories solely based on external features, in other words, whether they like it or not. But to choose the right door handle, you need to consider several factors.
- The first and perhaps the main point is the material from which the fittings are made. If the handle is wooden, then you need to pay attention to the type of wood; pine, linden or spruce are not suitable; high-quality handles are made from oak, beech or species of similar strength.
- Those who prefer metal should take handles made of steel, copper or brass. The price for models made of alloys will pleasantly please you, plus they look quite decent, but such fittings last no more than a year.
Advice! You can distinguish a low-quality alloy from real metal by weight. Steel, brass and copper will be orders of magnitude heavier than any cheap alloy.
- The next point you should pay attention to is the type of door leaf. Handles can be attached using through pins or self-tapping screws. You can install any fittings on metal and solid wooden doors, but for hollow frame doors it is advisable to use handles with through fixation on studs; self-tapping screws in a thin wall of the door won’t last long.
Choosing a handle on a socket is much easier, because most models differ only in appearance, the device and main dimensions are the same
- Most mistakes are made when choosing a handle for an already embedded lock. If the handle is based on a socket, then there are no problems with it, but models with a solid bar need to be selected carefully; the most important parameter here is the distance from the keyhole to the handle shaft; if it does not match, you will have to buy a new handle.
When choosing a handle on a bar, the main parameter is the distance from the central shaft of the handle to the keyhole
conclusions
Replacing the hardware on the door locking mechanism is a simple job that can be done by any home craftsman who has little experience in repairing any equipment. If you need to install overhead handles on the door leaf, this procedure will also not raise unnecessary questions, since the device only requires fixing the finished part to the door leaf with self-tapping screws.
Rice. 8. Defects during installation
However, when installing a new mortise handle with the need to make holes with a large diameter along the pin, it is better for the apartment owner to turn to professionals for help. In the absence of proper work experience and a good router, the result may not live up to expectations, and the operation of the entire set of doors will be significantly difficult.