On the eve of the holidays, you often have to think about gifts that can surprise you with their elegance. One of these souvenirs can be a decorative box for storing all kinds of small items. However, a truly unique gift is a handmade box, the patterns of which are quite simple for beginners. If you wish, you can draw up sketches yourself or use ready-made designs provided by professionals. To get an idea of how to do this, here are some helpful tips to consider.
Creating a pattern
When making boxes from wood or plywood, they follow a certain pattern, using a drawing on paper indicating the exact dimensions of each component. Cardboard boxes are made using the same principle. First, select the template you like, and then print it out in the required scale. You can create your own sketch by taking parameters from a finished sample or implementing personal design solutions.
To make an original box, the patterns of all the parts must fit each other perfectly. If the parameters do not match, it will be impossible to assemble the product.
Schemes and blanks for cardboard boxes can take different shapes and be of different sizes. However, they are all created according to two basic principles:
- A model with a common base, the configuration of which is cut from a single sheet. In this case, it is assembled by bending the segments along the contour lines and gluing them at the closure points. This method is good for linear structures.
- The second option involves assembling individual elements into a common whole using stitching. Using this method, you can take a configuration of any complexity.
When making a box using the first method, to ensure clear contours of the bent lines, you should mark the bend points using a sharpened rod. This procedure will ensure smooth corner borders even when using thick cardboard. In addition, when drawing up the drawing, connection points should be marked. Indentations for gluing should be left at each joining point.
When using the second method, the parts are connected with colored threads. In order for the seams to acquire a decorative appearance, it is necessary to first mark the entry points of the thread into the cardboard. The marks should be placed at equal distances from the edge and from each other. Using an awl, neat holes are pierced along the finished lines and the segments are sewn together with a needle. To finish the interior of the box, various seals are often used, which are installed under the fabric. Cotton wool, foam rubber or synthetic fiber are suitable for this purpose.
The material is attached to the cardboard with glue or sewn with thread.
With common ground
From individual parts
If you need a drawer
In general, a wooden box with a drawer is made in the same way as the classic version, but there are a number of features.
A simple rectangular shape of the lid and bottom will spoil the appearance of the product. It is better to make the long sides of these elements wavy using an electric router. In addition, by choosing this option, the lid and bottom are not placed inside the body, but left outside.
The walls are made of different heights. In particular, the back part and ends are made of the same height and glued together. For the front wall, cut out a die half as wide as the back part. This element is not recessed between the ends, but is installed overlapping and fixed with glue.
The box consists of two parts: the box, which fits freely between the walls, and the front part, which is similar in size to the top die. The elements are also mounted on wood glue.
A partition is installed between the upper and lower parts, which will serve as the bottom of the upper compartment of the box. Inside the retractable and stationary drawers, you can make partitions from thin plywood, delimiting the internal space into several compartments. The lid is installed on decorative hinges, the wood is covered with several layers of furniture varnish.
Required materials and tools
Homemade boxes are made from various available materials, selecting them in accordance with the chosen model of the craft. For the most ordinary boxes, it is enough to have postcards of the required size or colored cardboard on hand. In addition, it is necessary to prepare paper for making templates for repeating elements.
When using the kanzashi technique, a more complex selection of specific materials is required. Typically, for this purpose, blanks are required according to the following list:
- cardboard;
- a round box or a piece of cardboard tube (internal diameter from 10 to 15 cm);
- satin ribbons;
- decorative fabric;
- felt.
Creating a box using patterns is a complex and painstaking process. In this case, you need to have on hand a tool suitable for the relevant materials. The list of necessary devices for each specific case is different. For example, when working with plywood, the following list will come in handy.
| Name | Purpose |
| Jigsaw | Cutting plywood |
| Hammer | Correction of fasteners |
| Files | Edge processing |
| Screwdriver | Installation work |
| Sandpaper | Surface treatment |
| Rollers | Coating |
| Brushes | Finishing coating in hard-to-reach places |
| Varnish | Creating a decorative layer |
To make a plywood box, you need to prepare chipboard sheets of the required thickness (about 1 cm), hinges to connect the lid to the body, a lock and a decorative handle (if necessary).
For cardboard, the list of tools is slightly different.
| Name | Purpose |
| Scissors | Cutting elements according to the drawing |
| Pencil | Marking |
| Ruler | Transferring dimensions and correcting straight lines |
| Eraser | Making amendments to markup |
| Sharpened rod | Preparing fold lines |
| Glue | Fixing elements |
| Needle | Stitching edges |
For the kanzashi technique, in addition to scissors, you will additionally need glue to fix the elements and a syringe for its precise dosage.
Cardboard Round box
Satin ribbons Decorative fabric
Felt
Tools for working with plywood Tools for working with cardboard
About carved boxes
To perform this type of woodwork, you should prepare:
- oblique knife;
- pencil;
- pen knife;
- compass;
- ruler.
Oblique knife
If you need to cut out oblong-shaped parts, use a feather knife for the job. It is more convenient to cut geometric shapes and straight lines with an oblique knife.
On a note! The required pattern must first be applied to the wood, for which you can use a ruler with a compass or a stencil. If a piece cannot be cut with a knife, then stripping will be required. Having finished cutting, all that remains is to sand the product with sandpaper.
Carved wooden box
Manufacturing stages
To create a beautiful gift with your own hands, you need to familiarize yourself with the technique of making boxes from the presented materials. Master classes that determine the sequence of actions for different execution options will help you cope with this task. The first step is to decide from which raw material it is preferable to make your model; only after that do you select a sketch and prepare the necessary tools.
From postcards
This material involves, first of all, making a pattern from rough cardboard, which will allow you to display all the rounded lines of the box. After a pattern has been made for each element, individual parts are cut out from it. In this case, each part is cut out twice, to decorate the back and front sides.
According to ready-made diagrams, all components are transferred to the surface of the postcards, cut out and trimmed along the edges. Next, all elements are connected in accordance with the dimensions. This means that the front and back sides of the blanks must be attached to the long part of the bottom, and the side fragments to the short part. In this case, the lid should be sheathed using a loop stitch.
After this, the convex components of the base are prepared using a pattern. Then they are transferred to the surface of the postcards and trimmed along the edges with thread. In the same way, the front, side and back parts are fixed to the base. It is important to observe the correct arrangement of elements.
Boxes made from this material are not intended for long-term use. Such a gift can only be presented as a model of applied art or a souvenir for a little girl.
Pattern diagram
From cardboard
Thick cardboard is the most common material for making a homemade box. This design involves the use of masking tape for the purpose of pre-assembling the components. The handicraft is then decorated using scrapbooking. The rigid design allows the use of any decorative materials in finishing.
First of all, it is necessary to prepare all the components and glue the lower part of the box, applying the adhesive composition to the ends of the blanks. The cover is attached to masking tape, maintaining a gap of 2 mm, this will allow free movement. Next, all the edges of the box are tied with masking tape, giving the structure stability. After this, all surfaces are covered with paper intended for scrapbooking. It is important to start from the outside and end on the inside. It is best to use a magnetic clasp to secure the lid. The finishing method of the product is chosen based on personal preferences.
Cardboard and paper parts
Cut out cardboard parts
Place the piece on the fabric and cut out a rectangle with a margin. Carefully glue the edges to the other side. Repeat with all the details. You can make any decor on the blank. Lay out the paper parts on the fleece and glue to it.
“Strengthen” the structure with masking tape Cut out
Cover parts with fabric
Future fold lines can be stitched
Fold the workpiece into a box and secure it with tape. Duplicate the remaining cardboard parts with fleece.
Cover the parts with fabric Glue them to the outside of the assembled workpiece Leave the box to dry
Cover the part with fabric only on the short sides
Glue it to the cover Cover the last part with fabric You can decorate the cover with an original tag Glue the bottom by inserting an elastic band
Finished box
Using the kanzashi technique
A box made using this method is distinguished by its rich finish. Such models look quite expensive and are not at all like simple hand-made boxes. To do something like this, no special preparation is required. However, you must have enviable perseverance and the ability to think creatively.
In order to make a box using this method, it is best to prepare a cardboard tube by cutting it to a size that matches the height of the product. Next, the workpiece is placed on thick paper and traced along the contour, outlining the boundaries of the bottom and lid. If the cardboard is not too dense, you can use it in several layers by gluing together identical elements. Next, cut out felt blanks commensurate with the bottom and lid. After this, the inside of the pipe is covered with fabric and the base is secured.
The outer part of the bottom and the top of the box are covered with decorative fabric. A loop of tape is glued to the inside of the lid, and a felt blank is attached to the top. The second workpiece is fixed to the bottom. After this, the decor is collected from the tape. They are cut into even squares in length and width and pasted over the outer surface of the box in the manner of petals. In this case, the ends are brought to the bottom and covered with braid. Do the same with the lid, placing the petals around the circumference in the form of a bud. You can insert a bright button into the center.
Materials for work
Cardboard and fabric blanks Cover the walls with white fabric and secure with glue. Cover the bottom with black cloth
Cut 11 black squares from 5cm wide ribbon. Fold 1 square in half. You get a triangle
Fold this triangle in half again. Taking the edges of the folded triangle, fold them towards the center, it should look like in the photo. This is an acute petal
Glue the base of the petal with a glue gun
Cut off the excess part of the petal with scissors at an angle of 30–45 degrees
By analogy, make 11 acute-angled petals, which will be used to paste one row of the side of the box
Light a candle and bring the bottom of each petal to the fire. Singe the edge, removing excess threads
Collect 56 petals from black ribbon for the lid and the second row Make 34 acute-angled petals from blue ribbon Alternating the petals, cover the side of the box
Finished box
From plywood
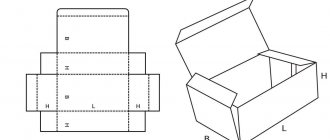
Making a box from plywood takes much more time and requires experience in handling special tools. The complexity of the design and the intricacy of the design depend solely on the level of training of the master. Without having the skills to work with a jigsaw, you can count on making a model of the simplest shape with a simple linear pattern.
In this case, they begin by transferring the contours of the elements to the surface of the plywood using patterns. Next, all the blanks are cut out with a jigsaw according to the intended markings. The resulting edges undergo preliminary grinding of surfaces and ends. After this, the sketches of the patterns are transferred and cut out with a jigsaw, and the holes are drilled with a drill. The structure is assembled from the side; the elements can be connected with glue or using various fasteners. The finished model is polished and varnished.
Scheme
Cut out parts using a regular or jigsaw
Finished elements must be processed using a cutter set at 45 degrees Treat all parts with sandpaper Assemble and glue the structure Putty the product to eliminate any gaps and cracks
After the putty has dried, carefully sand the product again.
Using a cutter, make indentations on the box and lid, adjust the holes if necessary
Install the screws The finished box Decorate the box with a pattern Or artificially age it using a gas burner
How to decorate a box?
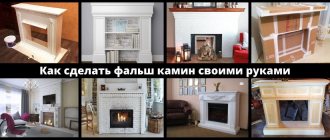
To decorate the product, you can varnish or paint it. Some people prefer carved boxes (such as the one in the photo below) or those made using decoupage technology. In any case, the final result will depend on the creativity and imagination of the master.
Chic vintage box created using decoupage technique
Decor options
Any available means are suitable for the visual design of the box. What is important here is imagination and the ability to compose compositions. For example, the kanzashi method involves the use of voluminous decorations made of satin ribbons. Another technique called quilling uses twisted strips of colored paper for decoration.
Decorative elements can even be made from eggshells by selecting fragments of the desired size, as well as suitable paints. Boxes lined with fabric and decorated with a bead pattern give an attractive look. An applique made of cardboard or a simple ornament applied with oil paint is also quite suitable. Another option is to decorate the box in a nautical style using shells of different sizes. Buttons of different colors and sizes are also suitable for this purpose. Sequins and glitter of various shades are popular today - these decorative options are attached to the surface of the box with glue. You can choose many options for decorating the box, the main thing is to find the necessary notes for inspiration, and then build a harmonious composition in your imagination.
Decorating a wooden box – what is worth knowing?
Despite the attractive design and shape, the box will look truly original only after decoration. The technique of relief carving provides in this case almost limitless scope for creativity.
You can decorate the box in different ways
Using key carving techniques, you can create original textures on the box. We can talk about both simple textures and complex ornaments or geometric shapes.
Chisels for applying relief
- A semicircular chisel used to texture the product with small dimples.
- Forming grooves with an angled chisel on the surface of the box lid.
On a note! In the photo below you can find more complex examples of decoration that use complex textures and geometric patterns.
Options for decorating boxes Several more decoration options
Are Drawabox tutorials good for new artists?
ReviewsFundamentals Disclosure: This post may contain affiliate links.
This means that if you purchase something, we receive a small commission at no additional cost to you (learn more) Aspiring artists should know about the free learning resource Drawabox.com. This is a completely free course created by Redditor /U/Uncomfort in his spare time.
This man studied art at the Academy of Conceptual Design in Pasadena, California. He has many years of practice as an artist, primarily with constructivist methods. The lessons teach you how to draw objects based on simple 3D shapes such as spheres, cubes, and cylinders.
Many people argue about the importance of basics. You really can't be a great conceptual artist without first mastering the basics like perspective, value, lighting, and baselines.
Draw A Box focuses directly on these basics with lessons learned from CDA instructor Peter Hahn.
Dynamic Bible
Peter Khan
Peter is even releasing a new book with many of the same lessons and notes from his CDA course.
So is Draw A Box lessons worth the effort? Will a complete beginner get anything out of the exercises? And is there enough information for a beginner to radically improve and eventually move on to concept art?
I will offer my opinion and overview of what the lessons offer. The best thing I can say up front is that Drawabox is completely free , and with that in mind, it may very well be the best way to learn without spending any money.
Learning the Basics
The actual fundamentals can be somewhat variable because what one person considers a fundamental subject another may consider ancillary to the fundamentals.
However, I don't want to make this philosophical, so let's try to define these basics. These are skills that will apply to every piece of art you create. These are the necessary skills that you want to work on in order to call yourself an accomplished artist.
Drawabox focuses directly on improving these skills and doesn't go too deep into any other subject.
Here's a short list of the basics you'll practice as you follow Drawabox's lessons.
- line
- Shape and form
- Value and tone
- Light and shadow
- Perspective
Artists may argue that this list includes other subjects such as color, proportion, and human anatomy. All of these topics are extremely important, especially for concept art.
But Drawabox starts with the basics of getting things right. You must be able to look at an object and see it correctly before you can draw it in perspective with the correct values and proportions.
Drawabox Home Page
As you can already tell, these basics are somewhat useless. How do you know when you finally know “enough” to understand a fundamental perspective? The answer is probably "whenever you can get the perspective right", but that's not very satisfying.
This is why I hate generic advice to just learn the basics and move on. Yes, this is accurate advice. But the beginner has no idea what this means, where to start or where it should end.
Drawabox will take care of this for you and guide you through all these steps step by step. This is perhaps the greatest value of the course: it will teach you everything you need to know, even if you're not sure what it is!
Practice technique
Everything in art relates to right vision and right execution. These hands-on classes aim to teach the same skills that every artist has acquired through furious repetition.
The Drawabox instructor is very clear that drawing is not a magical skill for some, but not for others. Every person can learn to draw with practice. But it must be the right practice to see progress.
That's the whole point of creating Drawabox. It started out as a free subreddit, but quickly grew big enough to warrant its own website.
Drawabox official subreddit /r/ArtFundamentals
Lessons are broken down into problems with practical work and homework.
The very first lesson teaches basic shapes with lines, cylinders and boxes. These fundamental shapes can be used to build everything you see around you.
Example Drawabox lesson
Other, more detailed lessons explain these concepts by teaching them through example. You'll follow more general lessons that teach you how to draw plants, insects, animals, objects, and vehicles.
These lessons may seem boring, but they are perfect for ingraining the basic principles in your brain.
Intersection form from Drawabox lesson
It's not just about your ability to draw rectangles, but also your ability to see organic shapes in everything you look at.
I will say that he feels like the classes are jumping around very quickly. By the 3rd or 4th lesson, some beginners may feel overwhelmed or defeated by their inability to draw correctly.
But if you follow exactly what is written in the lesson plan and keep practicing, you will get better. If you are struggling with a certain lesson, just keep doing it every day. Don't move on to the next lesson until you are really confident in your abilities.
Understanding how to see and how to construct what you see is a true benefit after taking the Drawabox lessons. The fact that they are free and accessible from any computer makes your training time much easier.
How far can you go?
Artists may wonder how far these Drawabox courses can go. Will they make you a professional concept artist? No. Not even close.
But they will take you from a complete beginner to someone who can truly be proud of their work. You will learn fundamental techniques on how to see, how to copy, and how to create objects from imaginary shapes.
The lessons don't go into detail about color, which is huge in concept art. And anatomy information is not enough to make you a pro.
Once you reach the anatomy learning stage, I would recommend that you purchase a full art anatomy book. There is also the Proko anatomy series if you are a visual learner.
Drawabox should be considered a resource for beginners. It will make you think like an artist and see things the right way. But this will not take you to a professional level.
If you're a beginner, it's still worth the time. It is completely free and teaches you the basic concepts that you will eventually need to learn. Plus, the instructor will critique your work for free, which is incredibly helpful for beginners.
Once you reach the point where you're itching to take on more challenging projects, look elsewhere. But return to these Drawabox lessons from time to time to sharpen your skills and confirm your understanding of the material.
advantages and disadvantages
The biggest disadvantage of Draw A Box is the inability to observe the drawing process. Many online YouTube videos show how to draw using a step-by-step approach. This also applies to the incredible video series Proko Figure Drawing Fundsmentals.
However, you get personal criticism from the creator of Drawabox for free. It's incredibly satisfying, and it takes a long time for one person to critique all of these pieces.
But if you're looking for related video content, there's a free Drawabox YouTube channel with several video tutorials, step-by-step tutorials, and drawing demos.
Painting progress video from Drawabox YouTube
At the end of the day, Drawabox is a nice experience. Is there anything to complain about on this site? It's completely free and offers truly valuable advice for aspiring artists. Not just advice, but actionable steps that you can follow and repeat to greatly improve your abilities as an artist.
Overall, I would definitely recommend Drawabox for beginners. Intermediate artists can even benefit from advanced lessons in composition and environmental design.
The key to practicing art is to follow and stick with it. You really want to draw every day and put these Drawabox lessons on your to-do list somewhere.
If you can do this, I promise these lessons will be worth the effort.
When it comes to completely free art education, Drawabox and its associated /r/ArtFundamentals subreddit have everything you need to start a successful journey as an accomplished artist.
,
Drawabox.com | Part One: Basics | Lesson 1: Lines, Ellipses and Boxes | Boxes
Now, 3 point perspective would be nice if we only had one perfect box in the scene, alone. But what about points 1 and 2? They are also used to draw similar setups (a perfect cube in a scene), but we know that our box is made up of 3 sets of parallel lines - so how can we have less than 3 vanishing points?
There are ways, based on how we look at a given object, that we can eliminate some of its vanishing points. Or perhaps a better way of putting it, these vanishing points are located so far outside of our canvas or page that the convergence of all parallel the lines leading to it are insignificant. This is effectively infinity, and although in theory, if we can look infinitely far away from where we are actually drawing, we will be able to see how these lines converge.
Two-point perspective usually involves a vanishing point for your vertical lines, which is usually very high, usually off the page or canvas, and is moved so high that the vanishing points become meaningless. Anywhere within your composition, any lines that go before this vanishing point, will effectively travel straight up and down, perpendicular to the horizon. We can only achieve this effect when we don't look at the box from too high or too low an angle.
One view takes this one step further. At two points, the vertical vanishing point is at infinity, leaving the remaining two vanishing points on the horizon line. To move to one perspective point, we move one of these vanishing points so far to the side that it too goes to infinity. Your only remaining vanishing point in this scenario will be sitting somewhere visible in your composition (not off the page frame) , otherwise things will look really weird and distorted. This means that the viewer will be looking down at the trunk of your box, or at least close to it.
Drawabox.com | Part One: Basics | Lesson 0: Getting Started
Drawabox is strict. It consists of structured exercises and includes a lot of work. Some students gravitate towards this type of course, viewing structure as something that can hold their hand and tell them exactly what to do until one day they are "ready" to draw what they want.
I've seen countless students shy away from drawing outside of the structure of a lesson plan, who feel like every moment spent drawing should be spent improving their skills. They insist that they're not ready to draw the kind of characters they're interested in building those robots or painting these complex scenes. They feel they have a lot to learn before they can do it. Many of these students burn out on their own, but those who are able to push themselves to the end find themselves at the end still feeling the same way - as if they are far from ready.
This thinking is common because we usually look for such a resource after trying to draw something and getting it bad. “I can't draw,” we tell ourselves. Some of us shrug and try something else. However, others may encounter this failure and think, “I can find someone to teach me.” While this latter mentality is certainly better, the overall focus on the outcome of our drawings is the biggest challenge. As little children, this didn't hold us back - we didn't focus on the end result because we didn't know good from bad. We drew because it was fun . Somewhere along the line we all forgot how to find it funny, especially when all we had to show for it was that shitty drawing at the end.
Fortunately, we can learn to draw again , but it's not that easy. This requires us to shift our focus from the result to the experience - to truly accept that when you say “I can't draw this”, what you really mean is “I can't draw this well ”. There's nothing wrong with bad drawing. If you're afraid that the thing you want to draw is out of your reach, draw it anyway. Even if - and ESPECIALLY if - you hate how it turns out.
The most important point I can make here is: . Bad behavior does not define who you are. It doesn't say anything about you as a person, and it's not a basis on which you can reasonably judge.
In the Drawabox Discord Chat, we actually have a channel dedicated to all the times we drew something and it turned out bad. #well-that-go-bad is a channel dedicated to celebrating the fact that we drew something, instead of staring paralyzed at a blank canvas. The channel itself deletes any messages so that people cannot encourage each other or leave feedback, because that's not the main thing. We know the drawing turned out bad, but we're glad we drew it anyway.
Drawabox.com | Part One: Basics | Lesson 2: Contour Lines, Texture and Construction