Every home owner wants to see his apartment beautiful and original. For this purpose, many techniques, styles and trends have been created to help decorate a home with taste.
One of these techniques that is popular today is decoupage in the Provence style.
In this article you will learn what decorative elements can be decorated using the Provence style decoupage technique with your own hands.
Provence style: features
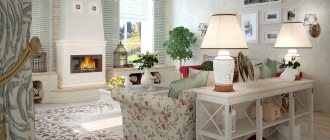
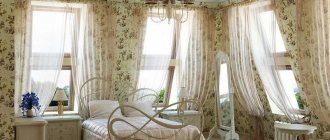
Surely many people know that the Provence style originated in France. Using this direction helps to create an atmosphere of comfort and tranquility, protecting you from the bustle of the city.
Today, Provence is popular due to its sophistication. It is often used in the kitchen area, as it creates a feeling of warmth and has a beneficial effect on the process of eating and cooking.
The color palette of the Provence style includes pastel colors that create a light and simple atmosphere.
When decorating furniture, forged elements and gilding are often used. Decoupage techniques in country and Provence styles are also used on such furniture. They have similar features, so you can often find an interior with an interweaving of these styles.
Master class on decoupage of a cutting board for beginners using the technique with printout
Don't know where to start learning a new hobby? Master class on decoupage technique with printout: cutting board for beginning craftswomen.
Crafts in the decoupage style with printouts are fascinating and inspiring. At first glance, it seems that making such beauty with your own hands is very difficult, but in fact this technique is quite simple and does not require special talents or artistic abilities. We offer you a master class with photos, which describes, step by step and in an accessible way, decoupage of a cutting board for beginners using printed images. With the finished work you can decorate your own kitchen or give a craft to your mother, friend, or mother-in-law. We are sure that you will definitely succeed!
- Materials and tools for decoupage
- Preparing the surface for decoration
- The process of implanting a printed image
Materials and tools for decoupage
If you are completely unfamiliar with the decoupage technique, we recommend starting by studying general information about this hobby. To decoupage the “Simple Breakfast” kitchen board you will need the following materials and tools:
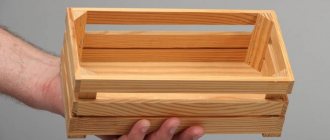
- board;
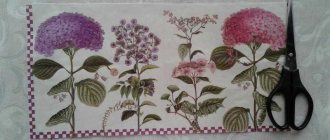
- an image printed on a laser printer (for this decoupage master class with a printout, a watercolor by the artist Aleksandra Nea was taken, you can use any picture);
- document file;
- rubber roller;
- white acrylic paint;
- artistic acrylic paints;
- acrylic lacquer;
- synthetic art brush (flat), soft bristle brush (pony), fine brush;
- sponge or piece of foam sponge;
- stencil;
- scissors;
- sandpaper No. 100, 150;
- foam rubber blocks or sandpaper No. 240;
- a bowl of water;
- clean rags.
Preparing the surface for decoration
Before starting work, be sure to sand the board with coarse sandpaper (No. 100, 150). This way you will smooth out roughness, burrs and get rid of dust that has become embedded in the top layer of the surface. Arrange the image harmoniously and use a pencil to mark the boundaries, which will be painted white. Cover the edges of the white background with masking tape and begin painting.
Using light movements, lightly driving the paint into the surface, evenly apply the first layer of white paint with a sponge and let it dry well (1-2 hours). The paint should not be too thick; if necessary, add a little water and mix thoroughly.
If you're short on time, you can speed up the blow drying process. The air stream should not be too hot and do not bring the hair dryer too close - otherwise the paint may crack. But natural drying is still preferable.
After the first layer has completely dried, apply a second and then a third coat of paint. The layers should be thin; to do this, do not put too much paint on the sponge.
Remove the masking tape and sand the painted surface with fine sandpaper. When the surface becomes even and smooth, re-apply the strips of masking tape and use a flat synthetic brush to apply 1-2 layers of acrylic varnish. Let each layer dry thoroughly. Lightly polish the surface to remove any minor defects.
The process of implanting a printed image
Now that the preparatory steps have been completed, a very interesting process begins - implantation of the image.
Carefully cut out the design, 2–3 mm away from the outline.
IMPORTANT! If there are inscriptions on the picture, the printout must be made in a mirror image. Place the picture face down on the surface and mark the location points in several places with a pencil (you will need to paste the picture quickly and these guidelines will help you stick everything evenly and in the right place).
Place the picture on the file facing you.
Apply the varnish to the entire surface using even and quick strokes so that the varnish covers the entire surface well. Take the picture and attach it to a white background, following the guidelines previously outlined in pencil. Pressing the roller tightly, iron the entire surface so that there are no air bubbles left under the picture and the motif sticks well. If excess varnish appears on the edges, carefully wipe it off with a soft cloth.
Now leave everything to dry for at least 5-6 hours (you can leave it overnight). When everything is well dry, you can proceed to an equally important moment - removing the paper. This process is painstaking, it must be done carefully, without undue pressure.
So: pour water into a small container. Using your fingers, gently and evenly moisten the entire glued printout. Gradually roll up the paper and, if necessary, wet your fingers again with water. Do not press too hard, otherwise the image layer may be damaged. When all the unnecessary paper is rolled up, a bright and elegant picture will remain. As a rule, small fibers still remain on the surface, which cannot be removed without damaging the design, plus the convex border of the design is often visible.
To get rid of these defects, cover the painted surface with two layers of varnish. Sand the design gently, paying particular attention to the edges. Repeat the procedure until the defects become almost invisible or completely disappear.
A little trick - if you slightly moisten the sandpaper with water, the boundaries of the transition will be leveled out faster, but here it is also important not to overdo it.
When you are satisfied with the quality of the image, apply two more layers of varnish and sand well the entire white fragment along with the design. In some places, you can expose the wood, make a couple of scratches with a sharp nail or scissors to give the work a slightly aged look.
If in some places the paper has rolled up along with the design, carefully paint on the problem areas with a thin brush. Finally, apply another coat of varnish.
Now you can start decorating the top and bottom of the board. Immediately paint the hole in the board dark green and use a small brush to create a gold rim.
Proceed to tinting the surface. To do this, you will need the primary colors that are in the picture - dark green, blue, yellow, brown, white. The paint for tinting must be transparent; for this it must be well diluted with water.
Use a soft watercolor brush to paint the surface and end parts of the board, blot off any excess with a soft cloth.
Apply the next color after the previous layer has dried. Try to create smooth transitions, gently shade the paint. Use masking tape to mark areas for edging. Using a stiff brush or sponge, apply dark green paint, then a little gold. Paint the end parts with gold paint diluted with water. If desired, you can decorate the work with a fragment of a stencil.
Now that the main steps are completed, take a close look at the board. If paint has leaked onto the back side, sand the surface thoroughly (the work should be beautiful from all sides).
Start varnishing. Before applying each layer, do not forget to stir the varnish. After applying a coat of varnish, rinse the brush thoroughly with running water. Apply up to 10 coats of varnish to the work, sanding in between after 2-3 coats.
Apply the varnish in the direction of the grain of the board, making sure that no drips form. When the surface becomes smooth and even, apply a finishing coat of varnish.
A step-by-step master class on decoupage of a cutting board with photos was prepared by Natalya Guseva , especially for the online magazine “Women’s Hobbies”. Find a hobby you like in the huge list of women's hobbies! If you want to master decoupage with napkins and cards, then make a passport cover or a plate.
What designs are suitable for decoupage?
If you look at a photo of decoupage in the Provence style, you can see which designs are used most often.
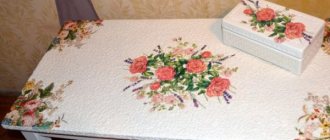
The subject of the pictures can be varied - from rural landscapes to various flower and fruit still lifes.
If you choose flowers, then cute field daisies or unopened rose buds are best. There should be elegance and smoothness of lines.
Cute animals, Provençal herbs, pastries with tea - and many other pictures are used in this style direction.
Dry method
It is simpler and recommended for beginners. First, you need to very carefully cut out the image so that there are no burrs at the edges. After this, you can proceed to applying it to the surface.
The image is glued to the board using glue, which is carefully applied with a brush.
The drawing should lie flat on the board without forming folds. If the latter do occur, you can remove them with a rubberized roller or spoon.
We recommend reading:
- Door decor - 130 photos of exclusive ideas and options. Instructions on how to make decor with your own hands (video + master class)
Beautiful DIY kitchen decor - a review of the best ideas. Original and modern design TOP-150 photos
- DIY wall decor - a review of the best and original ideas. 135 photos of ready-made solutions, all implementation features + instructions
A set of necessary materials for work
The selection of materials is carried out depending on the chosen technology.
Decoupage of furniture in Provence style involves the purchase of the following materials:
- acrylic paint (preferably white or other light colors);
- brush with good bristles (medium size);
- colorless varnish for fixing the finished product;
- Bronze or gold paint can be purchased upon request;
- PVA glue;
- stencils, napkins for decoupage and other designs.
The above materials are the main set that is most often used when creating decoupage.
Varieties
Modern craftsmen, when decorating furniture items, combine different decoupage techniques and various materials in their works. There are different types of decoupage:
- voluminous. In this technique, decorative elements are glued on top of each other. Thanks to multi-layering, the overall ornament is modeled. Most often, this technique is used when decorating furniture and creating three-dimensional pictures;
- direct. When applications from postcards, special napkins, textiles are glued onto pre-treated surfaces, and everything is covered with a layer of varnish on top;
- artistic. This option imitates artistic painting. The effect is achieved through the use of paints, with the help of which a light haze is drawn along the borders of the ornaments;
- deco patch. This technique combines decoupage and patchwork. It differs from other techniques in that it does not paste on the whole drawing, but only its small elements. As a rule, this method is used when decorating small decorative items;
- reverse. Used when decorating glass surfaces. To do this, postcards or napkins are glued face down to the back surface of the glass and coated with varnish.
Preparing surfaces for decoupage, gluing textiles or napkins and covering them with varnish is only half the battle when decorating furniture items. To give them an elegant appearance, it is necessary to modify them using other methods:
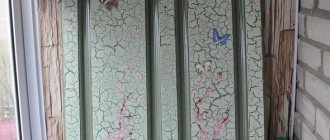
- painted. The Provence style is characterized by natural motifs: images of birds and domestic animals, flowers, meadows and fields, landscapes;
- aging effect. Various techniques are used here: spray (applied drops of paint, giving the surfaces an antique look), dry brush (When a small amount of paint is applied to the brush, the excess of which is removed with a napkin. Next, the surfaces are treated with an almost dry brush, leaving barely noticeable traces of paint), craquelure ( a special varnish that leaves cracks on surfaces after drying);
- patination and relief patterns. Ornaments on facades can be applied using a stencil, and a touch of patina can be applied to curves and gaps in furniture pieces.
Preparing the work area
Before you start decoupaging furniture in the Provence style, you must complete the following steps:
- The furniture on which work will be performed is taken and all unnecessary parts (fasteners, etc.) are removed.
- The surface is washed to remove existing contaminants.
- If there is old paint or varnish on the furniture, you need to clean it with sandpaper (carefully, without damaging the material of the furniture).
- After all actions, treat the surface with fat-free cleansers.
Only after such preparation can you begin decoupage. If you want to know more details, you can watch video tutorials.
Decor
The following elements are used as glued elements:
- napkins (for multilayer ones, only the top layer with a pattern is taken);
- photographs (they are soaked, the bottom layer is removed with twisting movements);
- magazine drawings (they are covered with several layers of varnish, after it has dried, the colors of the bottom page are carefully removed);
- printer printouts (before gluing, they are sprayed with water so that they lie more evenly on the surface);
- wallpaper (use only the base with the pattern, the rest of the paper is removed in its raw form);
- postcards (they need to be varnished and then processed like photographs);
- old newspapers (to create an aging effect, they are glued with the bottom layer);
- colored toilet paper (it’s ideal for creating a background; it’s easy to choose the right shade);
- scraps of fabric (cotton, silk);
- lace;
- tulle scraps;
- leg-split.
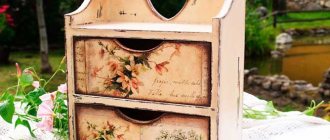
Interesting decoupage ideas
This technique can be applied to almost all materials - wood, metal, etc. Sometimes a couple of details are missing to completely complete the design of a room.
We will tell you how the options can be used in this case:
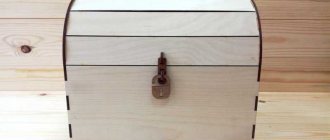
- decoupage of a tea house in Provence style;
- Wall Clock;
- wooden coasters for hot dishes;
- decoupage on fabric (pillow, chair, etc.);
- jewelry box;
- vases and jugs.