In a cozy dollhouse, everything should be beautiful and definitely comfortable for the beloved dolls who live in it.
In this article, the News Portal “Vtemu.by” has prepared several more photos and videos of master classes on a puppet theme especially for the youngest readers of our portal.
It is not always possible to purchase a variety of doll supplies, furniture and accessories in toy stores. Some people don’t have enough money to make this kind of purchase, while others fundamentally don’t consider it necessary to buy ready-made doll items if, if desired, they can be made independently from scrap materials.
The news portal “Vtemu.by” fully supports those who love and know how to create amazing things with their own hands from ordinary scrap materials, which are found in large quantities in each of our homes.
So let's get started...
Foam rubber option
A wonderful chair is very easy to make from foam rubber and fabric.
Below is a master class on how to make it with step-by-step photos. You will need five dish sponges, a piece of fabric, padding polyester, scissors, a needle and thread, lace and beads for decoration. Instead of sponges, you can take pieces of foam rubber or polystyrene foam and cut out parts of the desired size.
For parts from sponges you need to sew covers. We fold two sponges one on top of the other and sew the first cover on them. We sew the second one also for two sponges, but folded lengthwise. This will be the back of the chair, and it should be higher than the other parts. And one more cover needs to be sewn for one sponge. This will be the top seat of the chair.
Place covers on the parts.
Sew the backrest to the double seat. We sew a strip of lace along the edge of the seat.
Now you need to sew the seat from one sponge. The connection of the two seat parts must be decorated with another strip of lace, braid or decorative cord.
We sew two rectangular elongated bags from fabric.
We fill these bags with padding polyester and sew them to the seat along the edges. They make beautiful armrests. The chair is ready.
Wicker chair
You will need the following materials for work:
- Cardboard.
- Needle.
- Wire.
- Twine (can be replaced with regular yarn).
- Sponge for washing dishes.
In order to make such a cozy wicker chair for a dollhouse, you need to follow the given algorithm:
- Cut the back of the chair from a piece of cardboard.
- Make a hole along the edge using a needle.
- Arm yourself with pieces of wire, insert them into the holes, first folding them in half.
- Using twine or yarn, weave the top.
- When everything is ready, secure the thread by bending the wire.
- Weave the bottom, also securing it with wire to the end.
Important! Make sure that the chair does not wobble.
- Weave a twine or wool braid of the same color and cover the curved wire with it to decorate it.
- Make them with the same wire for the chair legs.
- Arm yourself with a thin piece of dishwashing sponge, cover or cover it with a fabric of a suitable color and place it on a wicker chair.
Your DIY wicker chair for a doll is ready!
Important! In a similar way, you can make a table, bench and other pieces of furniture for dolls.
Vintage furniture
We will make another chair in a vintage style from a plastic bottle, padding polyester and fabric.
To work, be sure to prepare sharp scissors, regular glue, cardboard, paper and a pen.
We measure the desired height of the chair and cut off the bottom of the bottle.
On paper we draw the back and a smooth transition from it to the seat.
Cut out the template. We cut the edge of the bottle along it.
Using the same template, cut out two parts from padding polyester.
We sew each detail with a ring.
Now you need to sew two rings along the top edge, turn them inside out and put them on the edge of the bottle. Glue the bottom.
Glue another rectangular piece to the top edge.
You need to sew a bottle cover from fabric. Its length should be the same as two heights of the chair.
Apply glue to the outer surface of the bottle and carefully put on the cover. Its lower part will be glued. We put the upper part of the case into the bottle.
We form beautiful folds on the back and glue them one by one.
We fill the bottom of the chair with padding polyester.
Cut out a circle from cardboard, the diameter is slightly smaller than the diameter of the bottle.
Cut a circle from padding polyester with a diameter slightly larger than that of a cardboard circle.
We bend the edges of the padding polyester and glue them to the mug.
Now the resulting soft seat needs to be covered with fabric.
We cut out a circle from the fabric with a diameter twice the diameter of the cardboard circle.
Place a frequent basting stitch along the edge of the circle.
We place the seat blank in a circle of fabric. Tighten the basting stitch threads.
The seat is ready.
We place the seat in the chair.
We decorate the chair with frills and beads. We sew small pillows.
Let's knit another pillow.
This makes a great vintage doll chair.
Dresser
You can use matchboxes to construct a wonderful chest of drawers with your own hands. For this we need:
- 4 matchboxes;
- 4 beads for legs and 4 for arms;
- thin fabric or colored paper;
- beautiful braid;
- glue, paints.
Paint all boxes inside and out with a single color paint. Glue them together and wrap them in cloth or paper. Glue the braid along the contour, 4 bead legs on the bottom, and bead handles on each drawer.
How to make a chair?
First, let's decide on the size of the cardboard (and, accordingly, the chair itself). Estimate the size of the doll. If you are making it for Barbie, just cut out a piece of cardboard measuring 21*12. In this case, we immediately cut off the right and left upper squares and bend them in the shape of a chair.
We will make a seat from the previously cut pieces. Let's glue the lower part (from the inside, by the way, you can also glue it with double-sided tape), but don't attach it to the main part yet.
Now let's glue the sponge onto the seat and back of the chair. Don't make them too thick.
Let's unfold our future doll chair for a moment. We will also wrap the armrests with a piece of sponge. Here it can be hemmed or glued. Immediately wrap the back and the visible part under it with a beautiful fabric - we will glue them.
We return the lower part of the craft to its place and estimate the size of the upholstery. Now we will paste over the arms of the future armchair.
Again, briefly unfold the top part and cover all open parts with fabric.
We glue it on the back at random, then carefully disguise it.
Let's put it all together. Glue up the missing parts.
Look, we have a real throne! And if you take satin or velvet, it will be even more beautiful. And even the cushion on our seat can be removed - our chair is just like a real one. Children will definitely be delighted!
We recommend you look: paper dolls clothing sets
Manufacturing instructions
Children's ottoman
How to sew a children's ottoman in the shape of a bag with your own hands?
Pouf patterns
The procedure is as follows:
- Make two patterns on paper: one for the inner cover, the other for the outer one.
- Lay out the templates on the material and secure with sewing pins, adding one and a half centimeters to the seams.
- Place the shapes on top of each other and sweep them away.
- Zigzag the edges using a machine and sew the two parts together.
- Secure the zippers.
- Make a funnel out of paper and pour foam balls through it.
It’s better to make two or three outer covers at once so that they can be changed for washing and updating the interior. This variety will surely be appreciated by your children.
Additional removable covers can be made
It is not necessary to sew a zipper on the inner cover. After filling in the filler, you can simply sew up the hole. But the outer cover must have a clasp so that it can be removed.
The chair should not be tightly filled. It is better to fill the balls to about 70% of the volume. Then it will be soft to sit in, and the pouf will take the shape of your body.
You can make a bag from a plain fabric and attach (sew/glue) a colorful applique of some cartoon character on top. A chair with a hanger (top handle) can be easily moved to other rooms or stored if it is not needed now.
How to sew a chair for a doll | crafts fair magazine
Hello everyone!
All pictures are clickable!
I needed a chair for someone, and I was like Buridan’s donkey: cut it out? glue it out, look for ready-made baby stuff and somehow remake it? Is yours weak? It was decided to sew. Well, let's go then, after the bike we sew a chair - ugh, you won't even notice)))
I drew approximately what I wanted, tried it on the finished doll, wrote down the dimensions and drew something similar to a pattern. It’s not difficult - just rectangles and squares made of cardboard. ………………………………………………………………………………………….
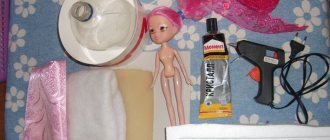
What you need: thick cardboard - a box of some kind of equipment, a breadboard knife (I don’t have one), scissors - I have this, natural fabric, at least a little springy (flax is dense, prickly, rejected for sewing clothes), stronger threads - denim threads, non-Chinese needles, foam rubber 3 cm thick, but in general you can have some synthetic padding polyester by the meter, patterned braid of any color you like - mine looks like gold, small buttons, beads for decoration - I have adhesive rhinestones “gold-like” caps from plastic bottles or wine corks - I used 8 caps from bottles with vegetable oil, they have a flat bottom and the size is correct …………………………………………………………… …………….
I cut out the foam parts using the pattern.
I glued them together in two (foam rubber is not very thick, so I cut each spare part twice from foam rubber and twice from cardboard)
I covered these double parts with padding polyester, here are the different stages of covering.
I marked the flax, then cut it into pieces approximate according to the patterns - there is no need for special precision, everything will still be pulled inside out.
The red-haired assistant appeared and lay down in the trash can. The fabric, cut into approximate pieces, is placed on the sheathed foam blanks, which are already lying on the cardboards, and all this is pulled on the wrong side with strong threads, the same procedure is done with another cardboard, but there will be no foam rubber, when everything is sewn together, the front part is soft and quilted , the back is dense and not quilted. It’s clear to me, but what do you think?
This is how all the parts look before assembly, I took a photo from the front and from the backside, you can see how I stretched the fabric onto the cardboard, the cardboard is always on the backside and under a layer of synthetic padding. If you want a chair with a stitch, then you need to quilt it before attaching the covered cardboard, and before painting .
Black actively helps, pressing his knees with his body.
Finished side panels, half of the backrest and next to it, almost out of the frame, a seat.
I’m sewing the seat and backrest together, it almost looks like something...
The spare part is attached to the side, you can see how I stretch the fabric onto cardboard with padding polyester glued on.
A roughly assembled chair from the front, from the side.
There will be such round legs, the covers covered with padding polyester are sewn into fabric.
I have already sewn three legs. Having assembled everything, I even went through all the seams twice, picking up all sorts of folds and wrinkles.
The white one came to play with a rag.
Phenomenon two - Mont is tearing up cardboard, they all really liked it...
Melanie checks the semi-finished product for convenience and strength)))
Getting ready to paint!
I paint and paint, paint and paint, the first layer is a preparatory layer with PVA.
Well, I finished painting it ;)!
I painted EVERYTHING, now let it dry. Next, you need to remove the roughness, which was very visible from the glue on the fabric, rubbed with sandpaper, lightly, but everywhere.
Painted it brown again.
And again I sanded a little. I glued a piece of textured, pre-painted cloth underneath to cover all the seams and joints of the seat cushions.
I painted the legs a light color for the second time.
Then I painted them to look like wood. And it’s ready, there is no process of gluing the braid, as I pressed the tape with both hands and held it for several minutes until it set, the same with the golden rhinestones: I glued it and held it.
Dimensions of the finished chair:
Height along the back – 28 cm, height to the “armrest” – 20 cm, height to the seat – 10 cm, seat depth – 10 cm.
I hope that my humble experience will be useful to someone!
Ways to decorate a bed
Playing with dolls often turns into a real performance when your beloved Barbie is already a mother herself, and her little child needs a crib. Matchboxes with cardboard are an affordable and free material to make a doll bed. The whole process consists of three steps:
- glue 2 boxes;
- backs are cut out of cardboard;
- For beauty, doll furniture is covered with colored paper.
Instead of cardboard, the legs can be made from popsicle sticks.
It's not much more difficult to make a bed with drawers. To do this, matchboxes are glued in 2 layers. On the side that will be used as a box, beads are glued or secured with wire. After connecting with the backs, the furniture is decorated with paper. Additionally, it is advisable to sew bedding.
A small bed can be made from cardboard sheets:
- Initially, print out the proposed drawing or draw it yourself.
- The parts are cut out of paper, then transferred to cardboard or plywood.
- They assemble an interesting design of doll furniture.
Comment! If plywood is used in the work, the edges of the workpieces are carefully sanded so that the child does not get hurt during play.
Master Class
- Draw a sketch of the cabinet.
- Draw each detail on paper.
- Cabinet parts: 2 side walls and 2 rectangular parts for them, roof, bottom, back wall, partition, 2 shelves, drawer module, 2 doors and 2 patterned parts for them, 4 figured legs, upper horizon (shaped part), drawer (bottom, back, 2 sides, front panel and a rectangular part for it).
- Cabinet size: height 34 cm, width 22 cm, depth 9 cm.
- Transfer the cabinet parts onto the plywood using carbon paper.
- Use a jigsaw to cut out every detail of the future cabinet.
- Sand each piece of the cabinet with sandpaper.
- Glue the redwood veneer to the cabinet sides, drawer fronts and cabinet doors, then leave to dry.
- Paint the patterned pieces for the cabinet doors, the rectangle for the drawer and 2 rectangles for the side walls with white paint, then wait until dry and glue them on as decoration.
- Paint the 4 curly legs with white paint and leave to dry.
- Glue the 2 sides, the back wall of the cabinet and the legs as shown in the photo and leave to dry.
- Glue the box parts together.
- Glue the roof and the upper figured horizon.
- Glue the partition inside the cabinet, visually dividing it in half.
- Glue 2 shelves as shown in the image.
- Glue a wooden stick as a pipe for things.
- Make hangers from pieces of wood and hooks.
- Paint the inside of the cabinet, hangers, top horizon and inside of the drawer with white paint, then leave to dry.
- Attach handles to drawer and cabinet doors.
- Screw the hinges to the cabinet and attach the cabinet doors.
The plywood doll closet is ready!
Kitchen set
Matchboxes are an excellent building material for doll furniture. These are ready-made drawers. You can make an entire kitchen set out of them.
- Take 9 boxes and fold them in three rows, gluing them together.
- Cover the perimeter with colored paper tape.
- Use a stapler to make staples at the ends of the “boxes”. These will be the handles.
- Make wall cabinets with your own hands from three boxes.
- Glue two parts of each box together.
- Paint or cover them with colored paper.
- Cut the top of the box down the middle. These will be the doors. Handles on them can be drawn with a felt-tip pen or glued onto a grain of rice.
Variety of materials
Every girl probably made a wish to receive as a gift a large house with several floors, many rooms and a huge amount of furniture. With what pleasure they play with their dolls in such miniature houses, with what diligence they make various interesting household items for toys!
It will be a great joy for children to see a new piece of furniture in their dollhouse. And parents can often delight their child by helping to create great furniture. This is a special and interesting way to spend time with a child, during which an interesting product is created.
Almost any furniture can be made in miniature from scrap materials. Matchboxes, plastic bottles, sponges, matches, wine corks, cardboard, plywood, wire - all of this can be used to make amazing furniture. Thanks to imagination, unnecessary trash can be turned into things of incredible beauty.
You can make beautiful upholstered furniture from different materials with your own hands. Using different fabrics and decorative decorations, stylish and beautiful things are obtained.
Soft chairs for dolls can be made from different materials, different shapes and styles. The only expense will be purchasing beautiful fabric to cover them. And if you have pieces of suitable fabric at home, then this wonderful furniture will cost almost nothing.
Vintage elegant chairs are best made from multi-layer cardboard. It can be carved with beautiful carved details and painted golden. Or glue very thin quilling patterns. Monograms can also be made from polymer clay. Cover the cardboard parts with beautiful satin or velvet fabric. Add a little padding polyester or cotton wool under the fabric.
Chairs of almost any shape can be glued together from cardboard and cardboard boxes. Cotton wool or padding polyester is used to make the chair soft. All that remains is to cover it with fabric and decorate it.
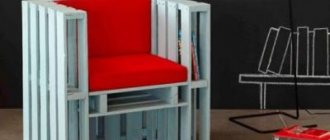
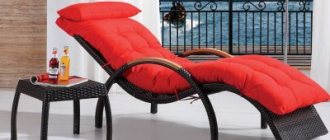
Interesting and unusual chairs are made from plastic bottles. The cut out part can be covered with fabric or soft pads can be added to it.
You can also make a chair from foam rubber or polystyrene foam. You can simply cut out the desired shape from these materials, and then paste it over or cover it with fabric.
Crib for doll baby
Barbie or Monster High are grown-up girls, so it makes sense that they could have a small child. It also requires some kind of hand-made furniture. For example, a crib.
There is a very simple option for making a cradle for little Baby - a crib made from matchboxes. You can use popsicle sticks for the backs. Glue two boxes together at the ends and cover them with colored paper. Glue the sticks and paint them. The crib is ready.
Salon
At home, you can create any doll sets from what you have at hand. After all, making furniture for dolls, and especially together with a child, is the highest reward for a parent. It becomes the most beloved and the most beautiful because it is made with love. There are a lot of recommendations and tips on how to make furniture for Barbie dolls, do-it-yourself clothes and other miniature accessories, including a real beauty salon.
A hairdressing salon must have tables, a sofa for relaxing, a sink, a TV, armchairs and a dressing table. Making this furniture for dolls from boxes with your own hands is not difficult at all. For the dressing table you will need: • cardboard box; • sheet cardboard; • a piece of foil; • a small piece of ceiling plinth; • glue, marker; • self-adhesive or colored paper.
Step-by-step instructions on how to make doll furniture from cardboard - in the form of a dressing table: 1. The height of the future structure is marked on the cardboard box. 2. The excess is cut off. 3. The base of the table should be the bottom of the box, and that is what is used. 4. Supports (legs) are cut out from the bottom. 5. Glue the parts together with glue. 6. We paste the decor on top - colored paper or film. 7. The shape of the future mirror is drawn on cardboard. 8. Glue foil onto the protruding part of the cardboard, the size corresponding to the mirror. 9. The edge (finishing frame) is made from thinly cut pieces of plinth. The table and mirror are connected.
The chair for the table is made according to a similar pattern. Only its height changes, and instead of a mirror, a back is made. If the dressing table is supplemented with a chest of drawers or a nightstand for storing things, the appearance of the hairdresser will significantly change. Lay out your hairdressing supplies beautifully on the top of your dressing table.
What will you need?
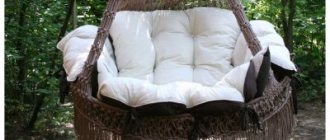
Scheme of a soft ottoman
To make a bean bag chair for a child, you will need to purchase the following materials:
- two types of fabric for covers;
- zippers;
- filler.
As a rule, homemade children's furniture is made bright and colorful, because this is the option that the baby will like. It is also important that the chairs are in harmony with the interior of the room. As for the material itself, it is important that it can withstand active children's fun. You can use leatherette, furniture or upholstery fabric. If you want, you can even take the skin.
The material for the inner cover should be light, breathable and smooth.
Some needlewomen have found a simple option - old unnecessary duvet covers. Regarding zippers, it is worth saying that it is undesirable to use metal ones, because a child can easily get hurt by them. They must match the color of the outer case.
Filler for an upholstered chair
Expanded polystyrene, or rather, balls made from it, is perfect as a filler. They are light, soft, non-toxic and fill the inside of the bag well. Thus, sitting in the chair will be very comfortable.
High strength
Aluminum product
For expensive dolls that belong to the Monster High collection, or similar series of toys, cardboard furniture is not always suitable due to their large mass. For them, it is better to make original accessories on a metal or wooden base.
The simplest furniture for dolls is created with your own hands from an aluminum beer can - to do this, you need to cut off its bottom, leaving about 5-6 centimeters of the walls. The master class involves cutting out four legs from the walls, which will be strips 4-7 mm wide - the rest of the walls are completely thrown away. The legs are bent in half to provide the necessary level of strength and expose the shiny part.
The filler is placed on the surface of the bottom in the recess, and a small cover is sewn for it with your own hands.
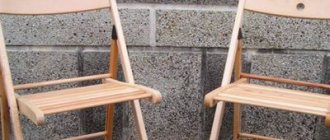
Wooden furniture
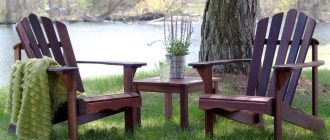
However, for Monster High dolls and other expensive toys it is better to use more aesthetic materials. In particular, a very wide range of different furniture can be made from wood:
- chairs;
- tables;
- sofas;
- beds;
- cabinets.
The simplest option, which does not require lengthy and precise cutting, are the first two items on the list.
To do this, you need to cut out a plane with straight or rounded edges from a sheet of plywood with your own hands, and also take four pencils, which will need to be painted in a certain color. The entry-level master class involves installing the legs with glue, however, if you have the makings of a carpenter, you can try making indentations in the sheet and grinding the top of the sticks for fixing into them.
Wire furniture
In addition, you can make a wire frame for Monster High dolls - for this you will need a steel thread with a thickness of at least 0.5 mm.
Do-it-yourself doll furniture is woven from a continuous piece, which will allow it to obtain maximum strength. If the wire is thinner than expected for creating such accessories, then it is worth repeating the weaving in several layers, or wrapping the main frame again in a spiral, winding a sufficiently large amount of metal.
In this case, it is better to make the chair seat, tabletop and sofa cushion separately, using materials such as wood, fabric, synthetic filler and others.
In general, furniture for dolls will provide room for your imagination to fly - you will only need to draw a sketch of a complex product in advance.
If you and your children are interested in this kind of activity, then it would be useful to purchase special tools - blades for cutting, brushes for painting and appliqué, as well as a jigsaw, engraver and burner.
In addition, you can create original embroidery with your own hands, which will later become part of the accessories.
Such an activity can be not only a simple hobby, but also a means of earning money. On the Internet you can find many advertisements for the sale of designer doll furniture - it is priced quite expensive compared to the cost of materials for it.
Instructions for making a paper house for dolls.
Nowadays it is quite fashionable to play with paper dolls and dress them up. Little fashionistas love to create stylish outfits for dolls. You can make a paper house for your little friend.
Preliminary preparation
Preparatory work involves creating a drawing for a specific model. Ready-made drawings can be found on the Internet, and video tutorials on making cardboard furniture will also be useful.
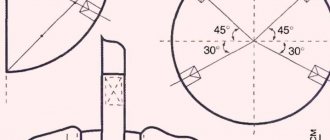
Cardboard table and chairs - dimensions
Next, you need to measure the area where the furniture will be located, and taking this data into account, create a design diagram or make adjustments to the finished drawing. If you have experience working in special programs for creating drawings, it’s worth using it. After depicting the drawing in volume and its projection with side, rear, front and top views, each detail should be drawn in detail.
Drawing of a chair made of cardboard
The process of making cardboard furniture includes preparing the raw materials themselves for processing. During transportation, cardboard is exposed to external influences and often becomes dirty. Since the material does not tolerate moisture, it is prohibited to wash it. It would be appropriate to wipe the stained area with a damp cloth. It is very difficult to get rid of creases and bends received during transportation at home, and they can ruin the appearance of the furniture, so you need to transport this fragile material carefully.
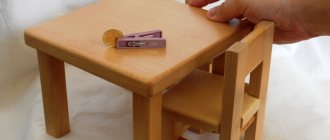
Desk
Just 4 matchboxes, three beads, thick cardboard and colored paper are needed to make a stationery table or desk. Take 3 boxes and glue them together with their flat sides. Cover them around the perimeter with colored paper.
Cover the fourth box with the same paper, which will serve as a second support for the tabletop. The width of a matchbox is exactly equal to the height of a stack of three identical boxes. Decorate drawers by sewing beads as handles.
All that remains is to glue the cardboard tabletop on top and the desk for the doll schoolchild is ready.
Start
Since 2006, my two cousins Andrei and Alexey have been engaged in laser cutting and engraving, producing products for the advertising and production sector: plates, numbers, signs.
Until 2015, I worked at the college as deputy director for educational work. Dealt with documents, organized conferences. I’ve long wanted to get creative, so I joined the guys to help them reorganize the company. This gave birth to our family business.
Over a cup of tea we discussed all possible options for new directions. My older brother Andrei, a designer, suggested making doll houses. The idea was taken out of thin air, but I liked it, although the market was not explored at that time.
At that time, I didn’t understand anything at all about business, so I took courses for aspiring entrepreneurs from the Ministry of Trade and Entrepreneurship. The result of this training was to be a business plan.
We had our own laser machine that could cut plywood, the optimal material for making dollhouses, so we decided to try it. All that was needed was to buy plywood, sandpaper and glue - all this required virtually no investment.
I submitted a business plan on the topic “production of doll houses”, we researched the market, identified competitors and audience, chose the design of the house and box, and set the price. Dollhouses have become a “little fun destination” that brings in extra income.
We had to change some suppliers of raw materials, because we work with premium grade FC plywood; 2/4 grade construction plywood does not suit us. We do not have our own large warehouse, so we have to constantly re-order small quantities. If roads are closed or raw materials run out, which happens periodically, there are supply disruptions, so we want to find two or three more suppliers.