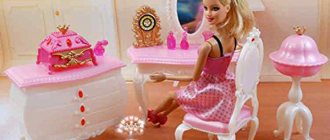
Every girl dreams of a dollhouse with beautiful furniture. And it is imperative that everything be as similar to the real thing as possible. Of course, there is a lot of toy furniture on sale, but you can make the original contents of the house yourself. And if you make furniture together with your child, then both parents and children will enjoy this wonderful, very exciting activity. It will be interesting for the little one to come up with the design herself and select textiles to her liking. A great way to develop a child's sense of style and creative thinking. In this article we will talk about how to make a chair for a doll with your own hands.
Step-by-step master class
Not everyone has experience making Barbie furniture with their own hands.
For such cases, ready-made drawings and master classes will be useful. It is important to focus on descriptions, as well as images of the process.
Matchbox chest of drawers
The easiest way is to make a chest of drawers from items in which something was originally stored. Matchboxes are the right size for this. To make furniture from them, you will need:
- Remove the grater used to light matches and paint the boxes. Let them dry.
- Fasten the boxes together with glue.
- For greater strength, the final structure can be wrapped with tape.
- Make handles from buttons or soft wire.
Cardboard sofa
Not a single dollhouse would be complete without a sofa. To decorate cardboard, you can use fabric and braid. To make this furniture you need:
- Cut out the parts of the back and bottom of the sofa (if the cardboard is thin, it is better to glue several layers together).
- Cut out the same parts from foam rubber.
- Fasten the cardboard and foam parts to each other - the back and the bottom separately.
- Cover the resulting parts with fabric - the seams can be treated with a glue gun, then covered with braid.
- In the same way, prepare the armrests and the base (a quadrangle of two longitudinal and two transverse cardboard blocks). Foam rubber is not required for the base.
- Glue all the parts together.
Soft chair
A chair is a rather difficult item to make. Thick cardboard is useful for the product. The best option is to use a box from household appliances. Its material is smooth on the outside, making it easy to assemble, and the corrugated middle adds strength.
Decor and filling will reduce the usable area of the chair, so it’s worth initially making it a little larger than required. Execution sequence:
- On cardboard you need to schematically draw the back, seat and handles. Each part is needed in such quantity that when gluing together you get a part of the chair 0.5–1 cm thick for the back, and 4–5 cm thick for the seat.
- The parts are cut out and glued together layer by layer so that you get one back, one seat and two armrests.
- The resulting elements are covered with fabric and stuffed with filler (sintepon or cotton wool).
Plywood bed
For a plywood bed you will need stencils, a jigsaw, thin sandpaper, and, if desired, paint or other decorative materials
Before printing the diagrams, it is important to check that the dimensions match the doll's parameters. Sequence of steps:
- Place the stencil on the plywood and trace it with a pencil.
- Cut out the outlined parts with a jigsaw.
- Sand the parts of the future bed with sandpaper.
- Paint and dry the parts.
- Assemble the structure.
How to sew a chair for a doll | crafts fair magazine
Hello everyone!
All pictures are clickable!
I needed a chair for someone, and I was like Buridan’s donkey: cut it out? glue it out, look for ready-made baby stuff and somehow remake it? Is yours weak? It was decided to sew. Well, let's go then, after the bike we sew a chair - ugh, you won't even notice)))
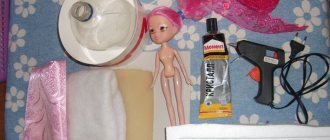
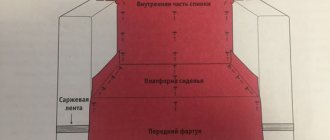
I drew approximately what I wanted, tried it on the finished doll, wrote down the dimensions and drew something similar to a pattern. It’s not difficult - just rectangles and squares made of cardboard. ………………………………………………………………………………………….
What you need: thick cardboard - a box of some kind of equipment, a breadboard knife (I don’t have one), scissors - I have this, natural fabric, at least a little springy (flax is dense, prickly, rejected for sewing clothes), stronger threads - denim threads, non-Chinese needles, foam rubber 3 cm thick, but in general you can have some synthetic padding polyester by the meter, patterned braid of any color you like - mine looks like gold, small buttons, beads for decoration - I have adhesive rhinestones “gold-like” caps from plastic bottles or wine corks - I used 8 caps from bottles with vegetable oil, they have a flat bottom and the size is correct …………………………………………………………… …………….
I cut out the foam parts using the pattern.
I glued them together in two (foam rubber is not very thick, so I cut each spare part twice from foam rubber and twice from cardboard)
I covered these double parts with padding polyester, here are the different stages of covering.
I marked the flax, then cut it into pieces approximate according to the patterns - there is no need for special precision, everything will still be pulled inside out.
The red-haired assistant appeared and lay down in the trash can. The fabric, cut into approximate pieces, is placed on the sheathed foam blanks, which are already lying on the cardboards, and all this is pulled on the wrong side with strong threads, the same procedure is done with another cardboard, but there will be no foam rubber, when everything is sewn together, the front part is soft and quilted , the back is dense and not quilted. It’s clear to me, but what do you think?
This is how all the parts look before assembly, I took a photo from the front and from the backside, you can see how I stretched the fabric onto the cardboard, the cardboard is always on the backside and under a layer of synthetic padding. If you want a chair with a stitch, then you need to quilt it before attaching the covered cardboard, and before painting .
Black actively helps, pressing his knees with his body.
Finished side panels, half of the backrest and next to it, almost out of the frame, a seat.
I’m sewing the seat and backrest together, it almost looks like something...
The spare part is attached to the side, you can see how I stretch the fabric onto cardboard with padding polyester glued on.
A roughly assembled chair from the front, from the side.
There will be such round legs, the covers covered with padding polyester are sewn into fabric.
I have already sewn three legs. Having assembled everything, I even went through all the seams twice, picking up all sorts of folds and wrinkles.
The white one came to play with a rag.
Phenomenon two - Mont is tearing up cardboard, they all really liked it...
Melanie checks the semi-finished product for convenience and strength)))
Getting ready to paint!
I paint and paint, paint and paint, the first layer is a preparatory layer with PVA.
Well, I finished painting it ;)!
I painted EVERYTHING, now let it dry. Next, you need to remove the roughness, which was very visible from the glue on the fabric, rubbed with sandpaper, lightly, but everywhere.
Painted it brown again.
And again I sanded a little. I glued a piece of textured, pre-painted cloth underneath to cover all the seams and joints of the seat cushions.
I painted the legs a light color for the second time.
Then I painted them to look like wood. And it’s ready, there is no process of gluing the braid, as I pressed the tape with both hands and held it for several minutes until it set, the same with the golden rhinestones: I glued it and held it.
Dimensions of the finished chair:
Height along the back – 28 cm, height to the “armrest” – 20 cm, height to the seat – 10 cm, seat depth – 10 cm.
I hope that my humble experience will be useful to someone!
DIY real armchair for Barbie
In the toy market, the most valued are working miniature models of real human everyday objects: cars, airplanes, clothes, etc. The smaller the models, the more difficult they are to make. Let's try to create such an exclusive piece of furniture with our own hands.
To make doll upholstered furniture, you need to prepare:
- thick cardboard 1-1.5 mm thick;
- plain paper;
- foam cardboard (0.5 cm thick) or corrugated cardboard (0.3 cm thick);
- tube with a diameter of 1.5-2.5 cm from any material. You can use an old marker or a cardboard thread tube;
- fleece or thin foam rubber 0.3-0.8 cm thick;
- upholstery fabric. It is better to choose calico or staple, so that it is better saturated with glue;
- PVA glue and “moment”;
- scissors, knife;
- ruler, pencil.
Making a real chair step by step
Make drawings of the parts on paper and cut them out.
Cut out the details of the chair according to the drawings. Glue four rectangles of foam board or six of corrugated cardboard together. This will be the base of the chair, the seat. Then glue the back and front of the chair, cut out of thick cardboard, with your own hands. Secure the armrest tubes. Then, after pasting them with paper, they will hold up well, but for now they can be lightly “basted” with pieces of tape.
Cut out several strips of corrugated cardboard, 1 cm wide and equal to the length of the tubes, and place them in a stack under the roller, covering the layers with glue. Determine the number of layers according to location. Cover the armrest first with thin paper and then with fleece or foam rubber.
Cover the chair with fabric. To do this, cut out pieces of material according to the same drawings, but adding a little (1-1.5 cm) in length and width for the hem.
Cover the back (removable) for the chair with your own hands, first with foam rubber on one side, and then with fabric on all sides.
Install the backrest in the chair. It can be glued to a stationary backrest, or it can be left collapsible.
Make the cushion for the chair in the same way as the backrest.
This is how the royal chair turned out, made with your own hands for your favorite doll.
Rocking chair
We’ll look at how to make a rocking chair for dolls from simple clothespins below in the article. Prepare a lot of parts and take out the metal spring, only the wooden parts are needed to work. The photo below clearly shows how to place the halves of the clothespins together so that the chair rocks on a flat surface. You can connect the parts together with wood glue or using a glue gun.
A wooden chair can be coated with a layer of stain and acrylic varnish. The craft looks impressive and is easy to do. Any dad can assemble it in a few minutes. The toy is durable, the child can freely rearrange the chair and hide it in the box.
In the article we looked at several of the most popular options for making chairs for dolls from a variety of materials. Choose the one you like and try to make the craft yourself. Good luck!
TV for doll house
In order for the interior to be fully developed, you need to put a TV on a table or chest of drawers!
In order to add it to the doll interior, you will need:
- thick matte black cardboard;
- a printed image of the TV depending on the desired size;
- image on screen;
- glue;
- scissors.
How to make a TV for a doll?
- Make a box out of cardboard.
- Print out a picture of the front and back of the TV. Cut them out and stick them on the box.
- If desired, you can stick an “image” on the TV screen.
Almost everything you need for everyday life is collected in a dollhouse!
Sleeve base
If you have a roll of kitchen napkins left over, you'll make a great cardboard chair. How to make a chair for a doll? Very simple. It is enough to draw the outlines of the future craft with a simple pencil and cut it out with a sharp stationery knife. The cardboard is incredibly thick, so cutting will take some time.
You can cover the shape of the chair with either fabric or colored paper and tape. Insert a fabric-lined foam cylinder inside. It should protrude slightly from the bushing hole.
Basic rules for creating doll furniture
The toy cabinet can be made of plywood, painted or covered with wrapping paper or self-adhesive film. There probably won’t be any questions here - everything is clear, and if you have questions, you can see their solution in the “natural” closet. But it can be made from very inexpensive materials. The good thing about making do-it-yourself furniture for dolls is that its cost is very low.
Many resourceful parents make excellent doll furniture with their own hands from scrap materials. For this purpose, tubes, paper clips, matches, chains, fabric scraps, and buttons are used. For example, crossbars are made from tubes, hangers are made from paper clips, and lids are used as vases. With a little imagination, you can weave small flowers from beads or felt them from wool. Floor lamps made from thimbles lined with velvet look very nice.
How to make a chair for dolls with your own hands
How to make a chair for dolls with your own hands, easy to make. The proposed concept of building a model will allow you to create products of any size range, for a specific character.
Let's consider several construction options shown in the figure.
The design of the chair consists of three components:
1.
The side part, which combines the rear leg, front leg and drawer.
2.
Back
3.
Seat
Side part:
A blank is cut according to the dimensions of the presented drawing, in which through holes Ø 2 (mm) are drilled.
The end faces are aligned. The right angles of the end faces are smoothed.
Back and seat:
They are made from wooden toothpicks that are cut to the same size.
The order of assembling the model of the first version:
1.
Lubricate the edges of the cuttings and the holes in the side parts of the chair with glue.
2.
Insert the cuttings into the holes in the side parts.
3.
Align the ends of the cuttings with the surfaces of the side parts.
4.
Carefully remove excess squeezed out glue with a rag.
5.
After the glue has dried, we begin the final finishing process.
6.
Apply a decorative coating.
Side part:
The workpiece is cut out by analogy with the first option, only through holes Ø 2 (mm) for fastening the backrest and seat are drilled at the end.
Manufactured according to the dimensions indicated in the drawing:
Manufactured according to the dimensions indicated in the drawing:
Assembly procedure for the second option model:
1.
We insert 2x8 (mm) metal rivets into the holes in the back.
2.
Lubricate the edges of the metal rivets and the holes in the side parts of the chair with glue.
3.
Connect the back with the side parts.
4.
Insert rivets into the holes of the seat.
5.
Lubricate the edges of the metal rivets and the holes in the side parts of the chair with glue.
6.
Connect the seat with the side parts.
7.
Carefully remove excess squeezed out glue with a rag.
8.
After the glue has dried, we begin the final finishing process.
9.
Apply decorative coating.
The manufacturing procedure is the same as for the model of the second option, only we will cover the back and seat with fabric, and instead of metal rivets, we will use wooden dowels made from toothpicks.
We already know how to make a chair for dolls with our own hands, let’s look at the following material on the topic of how to make a table for dolls.
How to choose
When choosing a growing chair, take your baby with you to the store. This way you can try on the chair and make sure your little one is sitting comfortably. Be sure to ask the seller to show a safety and quality certificate, check the environmental friendliness of the materials from which the furniture is made.
A good quality orthopedic chair should not have a slippery base and have a transformation mechanism so that as the child ages, right up to graduation, the furniture can be adjusted to suit the growing body. Parents should also check the strength of the mechanisms and their quality so as not to be disappointed in the future.
Barbie table made from a cardboard box
First, let's look at how to make a table for Barbie from an old and unwanted cardboard box. Also, to make it you will need several sheets of white paper and glue to glue it together. For decoration, you can use whatever your heart desires; shiny foil, beautiful and bright pictures cut out from books or from any other sources, fabric, beads will do.
Cutting the legs from the box flaps
, 2 cm wide and of such length that they are enough to be glued and there is still a margin for a height sufficient to accommodate the long legs of the doll, we bend the strips along the entire length at a right angle, in the upper part that will be glued we make a cut. That's it, the legs are ready, you can cover them with white paper or leave them as is. Also cut out the tabletop from cardboard, the size you want. If it is a table for two, then smaller, and if it is a large dining table, then naturally larger. Next, decorate the tabletop with what you have prepared for this. And the simple and beautiful table is ready.
Foam rubber option
A wonderful chair is very easy to make from foam rubber and fabric. Below is a master class on how to make it with step-by-step photos.
You will need five dish sponges, a piece of fabric, padding polyester, scissors, a needle and thread, lace and beads for decoration. Instead of sponges, you can take pieces of foam rubber or polystyrene foam and cut out parts of the desired size.
For parts from sponges you need to sew covers. We fold two sponges one on top of the other and sew the first cover on them. We sew the second one also for two sponges, but folded lengthwise. This will be the back of the chair, and it should be higher than the other parts. And one more cover needs to be sewn for one sponge. This will be the top seat of the chair.
Place covers on the parts.
Sew the backrest to the double seat. We sew a strip of lace along the edge of the seat.
Now you need to sew the seat from one sponge. The connection of the two seat parts must be decorated with another strip of lace, braid or decorative cord.
Related article: Origami paper heart: how to make it with diagram and video
We sew two rectangular elongated bags from fabric.
We fill these bags with padding polyester and sew them to the seat along the edges. They make beautiful armrests. The chair is ready.
Basic rules for creating doll furniture
The toy cabinet can be made of plywood, painted or covered with wrapping paper or self-adhesive film. There probably won’t be any questions here - everything is clear, and if you have questions, you can see their solution in the “natural” closet. But it can be made from very inexpensive materials. The good thing about making do-it-yourself furniture for dolls is that its cost is very low.
Many resourceful parents make excellent doll furniture with their own hands from scrap materials. For this purpose, tubes, paper clips, matches, chains, fabric scraps, and buttons are used. For example, crossbars are made from tubes, hangers are made from paper clips, and lids are used as vases. With a little imagination, you can weave small flowers from beads or felt them from wool. Floor lamps made from thimbles lined with velvet look very nice.
Required tools and materials
The basic set of necessary tools includes:
- stationery items (scissors, glue, ruler, pencils);
- napkins;
- cardboard;
- oilcloth;
- threads with needles.
The complete list depends on what kind of furniture you plan to make. Most items are easy to make from cardboard. But if you want the light to come on in the refrigerator when you open it, a blowtorch and LEDs with wires will come in handy. For upholstered furniture you will need to stock up on fabrics and filling.
The set of necessary materials also depends on who makes the furniture. If this is joint creativity with a child, it is better to start with basic things that are feasible for his age. And if you want to make a surprise and give a house furnished to the smallest detail, both special tools and any available material will be useful: a plane, a jigsaw, an awl, foil, fabric scraps, even ice cream sticks.
Cushion chair
If you have a sewing machine and sewing skills, then the easiest way to sew a chair in the shape of a round pillow. The photo below shows how to make a chair for a Barbie doll from pieces of fabric. Cut out 6 identical sectors from different pieces of fabric and sew them together so that when folded you get a circle. Before the last seam, fill the inside of the pillow with any filling.
These can be foam balls that are used in construction. You can fill the pillow with dried peas or lentils, or, in extreme cases, with sand or salt. The finer the filler, the easier it is to give it the desired shape by simple pressing.
Folding sofa for Barbie
You will need:
- A large piece of thick cardboard.
- Several dish sponges, the same size.
- Stapler.
- Black velvet material.
- Upholstery material.
- Tape and Velcro.
- Scissors, glue and ruler.
Glue the sponge to the cardboard. Cut it to size. Do the same with the rest of the sponges. You will end up with three identical pieces. Wrap them with material and secure them with a stapler from below. Then take the material a little smaller than the size of the piece and stick it to the surface from the inside, hiding the traces of fastening. Before us are three identical parts.
We process the back. Cut it out of cardboard and put the material on top. Secure with a stapler. Glue velvet material to secure it.
Place the mattresses on top of each other and apply them to the backrest. Then glue the bottom mattress and secure with tape. Attach it around the entire perimeter of the mattress and secure it at the back with glue. Then wrap the tape around the top mattress. Spread the glue over the surface, except for the middle, which will be a loop. They pull on it to unfold the sofa. There is no need to glue the tape to the wall, because it is secured at the back with Velcro.
The sofa is ready. To unfold it, unstick the Velcro and pull the loop. Then fold it carefully and use it.
High strength
Aluminum product
For expensive dolls that belong to the Monster High collection, or similar series of toys, cardboard furniture is not always suitable due to their large mass. For them, it is better to make original accessories on a metal or wooden base.
The simplest furniture for dolls is created with your own hands from an aluminum beer can - to do this, you need to cut off its bottom, leaving about 5-6 centimeters of the walls. The master class involves cutting out four legs from the walls, which will be strips 4-7 mm wide - the rest of the walls are completely thrown away. The legs are bent in half to provide the necessary level of strength and expose the shiny part.
The filler is placed on the surface of the bottom in the recess, and a small cover is sewn for it with your own hands.
Wooden furniture
However, for Monster High dolls and other expensive toys it is better to use more aesthetic materials. In particular, a very wide range of different furniture can be made from wood:
- chairs;
- tables;
- sofas;
- beds;
- cabinets.
The simplest option, which does not require lengthy and precise cutting, are the first two items on the list.
To do this, you need to cut out a plane with straight or rounded edges from a sheet of plywood with your own hands, and also take four pencils, which will need to be painted in a certain color. The entry-level master class involves installing the legs with glue, however, if you have the makings of a carpenter, you can try making indentations in the sheet and grinding the top of the sticks for fixing into them.
Wire furniture
In addition, you can make a wire frame for Monster High dolls - for this you will need a steel thread with a thickness of at least 0.5 mm.
Do-it-yourself doll furniture is woven from a continuous piece, which will allow it to obtain maximum strength. If the wire is thinner than expected for creating such accessories, then it is worth repeating the weaving in several layers, or wrapping the main frame again in a spiral, winding a sufficiently large amount of metal.
In this case, it is better to make the chair seat, tabletop and sofa cushion separately, using materials such as wood, fabric, synthetic filler and others.
In general, furniture for dolls will provide room for your imagination to fly - you will only need to draw a sketch of a complex product in advance.
If you and your children are interested in this kind of activity, then it would be useful to purchase special tools - blades for cutting, brushes for painting and appliqué, as well as a jigsaw, engraver and burner.
In addition, you can create original embroidery with your own hands, which will later become part of the accessories.
Such an activity can be not only a simple hobby, but also a means of earning money. On the Internet you can find many advertisements for the sale of designer doll furniture - it is priced quite expensive compared to the cost of materials for it.
Instructions for making a paper house for dolls.
Nowadays it is quite fashionable to play with paper dolls and dress them up. Little fashionistas love to create stylish outfits for dolls. You can make a paper house for your little friend.
Salon
At home, you can create any doll sets from what you have at hand. After all, making furniture for dolls, and especially together with a child, is the highest reward for a parent. It becomes the most beloved and the most beautiful because it is made with love. There are a lot of recommendations and tips on how to make furniture for Barbie dolls, do-it-yourself clothes and other miniature accessories, including a real beauty salon.
A hairdressing salon must have tables, a sofa for relaxing, a sink, a TV, armchairs and a dressing table. Making this furniture for dolls from boxes with your own hands is not difficult at all. For the dressing table you will need: • cardboard box; • sheet cardboard; • a piece of foil; • a small piece of ceiling plinth; • glue, marker; • self-adhesive or colored paper.
Step-by-step instructions on how to make doll furniture from cardboard - in the form of a dressing table: 1. The height of the future structure is marked on the cardboard box. 2. The excess is cut off. 3. The base of the table should be the bottom of the box, and that is what is used. 4. Supports (legs) are cut out from the bottom. 5. Glue the parts together with glue. 6. We paste the decor on top - colored paper or film. 7. The shape of the future mirror is drawn on cardboard. 8. Glue foil onto the protruding part of the cardboard, the size corresponding to the mirror. 9. The edge (finishing frame) is made from thinly cut pieces of plinth. The table and mirror are connected.
The chair for the table is made according to a similar pattern. Only its height changes, and instead of a mirror, a back is made. If the dressing table is supplemented with a chest of drawers or a nightstand for storing things, the appearance of the hairdresser will significantly change. Lay out your hairdressing supplies beautifully on the top of your dressing table.
Dressing table for a doll made of cardboard
Like any girl, our doll is a fashionista. And a fashionista must have her own corner where she can put herself in order. A dressing table is suitable for this, which is best placed near the bed.
To make it you will need:
- cardboard box, such as tea or paint;
- scissors;
- ruler;
- pencil;
- foil;
- glue;
- paper for decorating toys.
Manufacturing process:
Cut off part of the box - this will be the base of the table.
Cut the cardboard (future mirror) the same width as the table.
Use glue to connect them together.
- The part of the table where the mirror will be located can be cut off or left as is.
- Cover the table with decorative paper, and glue a piece of foil to the base under the mirror.
That's all. Our dressing table is ready!
Doll chest of drawers made from matchboxes
In order to make a chest of drawers, we need only three elements:
- matchboxes;
- good glue;
- decorative paper or napkins for decoration.
How to make a chest of drawers:
- Using glue, the matchboxes are connected in such a way that the future “boxes” can be pulled out.
- After this, decorate the chest of drawers by covering it with paper or napkins.
Plywood doll table
If there is a bed, a chair and a sofa, then you also need a full-fledged table.
In order to make it, you will need:
- plywood;
- jigsaw;
- liquid nails or super glue;
- fabric for decoration.
The manufacturing process is very simple: just cut out the tabletop and legs and glue them together. Don't forget to sew a tablecloth!
The simplest table is ready. You can make it carved or painted.
Coffee table for dollhouse made of plywood
A very simple interior element to manufacture.
You'll need:
- plywood;
- jigsaw;
- glue;
- varnish or paint for wood.
Coffee table manufacturing process:
It is necessary to cut two circles of equal diameter, legs and stands.
- Next, using glue, we connect the parts together as shown in the figure.
- Varnish or decorate the table with paints.
Matchbox furniture
This option is suitable for small toys. Before making a chair for a doll, buy packs of matches and set aside 6 boxes. Take out all the matches and cover the empty cardboard containers with any paper. Place 2 boxes on top of each other and connect them together. PVA glue can also handle such a simple fastening. The back is made up of 2 boxes glued together at the end.
All that remains is to attach the sides on the left and right, and the chair is ready! You can wrap it with thin foam rubber or padding polyester, and on top with fabric.
Doll life Sawing Furniture for dolls How to make chairs and stools from plywood Plywood
In my dollhouse, just like in a real house, there are many different chairs, high chairs and stools. I made all my furniture from 4 mm plywood. and 6 mm. To firmly glue the parts together, I used PVA glue.
I already told you about one type of chairs in the dining room (as well as about the table),
Mom’s chair in the children’s nursery was made using the same principle:
But today I want to talk about my other chairs: firstly, these are baby chairs:
secondly, the second type of chairs - the principle of their assembly is the same, and externally they differ little from each other - this is a chair at the computer table in the attic, a chair at my mother’s dressing table and a new chair for my mother’s workshop (it actually doesn’t exist yet, but I will make the chair (almost) before your eyes):
And, of course, you can’t ignore the stools from the kitchen:
So, flower chairs from a children's room for little ones. I really wanted to create some interesting and unusual children's chairs. In my opinion, the idea with the floral look was very successful. The chairs consist of a back - a green leaf, a seat - a flower and legs-columns.
This is the back of the chair. We make sure to make it with a protrusion from the bottom - its height is equal to the thickness of the plywood from which we cut the seat (for me it is 6 mm). For the back I took 4 mm plywood.
This is the seat of the high chair. Consists of 6 petals. I made it from 6 mm plywood, because... the legs turned out to be very thick, and a thin seat simply wouldn’t look good.
Now we cut out a hole in the seat, where we will subsequently insert the seat (i.e. the protrusion on the back). The hole should be large enough to not only insert the backrest into it, but also then glue it at an angle.
Let's consider the method of connecting the backrest to the seat. We see a slight angle of the backrest.
The legs of the chairs are made from these round sticks (each leg is 4 cm long). I had these sticks in my old baby (real) crib. They are coated with varnish on top, so before sawing them into pieces, I had to go over the sticks with sandpaper to remove the varnish. Glue the legs at the end.
These are the chairs we got.
The second type of chairs. They are larger than the previous ones.
This is what the legs of these two chairs look like. The legs are thin and therefore fragile, which means they need to be made of stronger plywood - 6 mm.
And these are the legs for a new chair in my mother’s workshop.
Now the seat of the chair. It can be made from 4 mm plywood. And it can be like this.
Or like this. This is the seat of the sea shell chair and the workshop chair.
The photo shows different backs of chairs. The back is made of 4 mm plywood.
This sink can be turned into the back of a chair by adding a little underneath.
Photo of the back of the new chair.
We are assembling a new chair for my mother's workshop.
Bottom line. Here's the new chair.
Stools for the kitchen.
Legs made of 6 mm plywood. The cut in the middle is equal to the width of the plywood - 6 mm. Both legs are the same, they differ only in the cut - in one leg it is from below, in the other - from above.
Seat made of 4 mm plywood. Size - 7cm. by 7.5 cm.
The legs are inserted into each other using holes - cuts (glued).
Simply amazing work. I look at your entire house and admire it. Everything is so thought out! My daughter keeps pestering me about the house for her dolls)))
Approximate Dimensions
Before you think about how to make a table for dolls yourself and from what material, you need to decide on the dimensions. You need to start from the height of the doll itself and the size of the house. The interior will look beautiful if all the furniture is approximately the same scale and style.
The easiest way to make all objects proportionally the same is to calculate the scale. You need to divide the average height of a person by the size of the doll. You will get a number by which you will subsequently need to divide all the real sizes of the furniture to get the doll sizes.
For example, the height of a doll is 20 cm. We divide the average height of a person 175 cm by 20 cm = 8.75. The actual dimensions of human furniture must be divided by this number to obtain the dimensions of doll furniture.
On average, dolls have a size from 7.5 to 15 cm. If the doll for which this or that piece of furniture is made fits these parameters, you can use the following sizes:
- Double bed - 13−16 cm.
- Single bed - 7.5−16 cm.
- Chair, stool - the back should be approximately 7.5 cm high. Place the seat at a height of 4 cm.
- Wardrobe - 16−17 cm in height.
- Sofa - 4 cm in height.
- Table - height from 7 cm.
Set of plastic bottles
You will need:
- three plastic bottles;
- scissors;
- felt-tip pen;
- double sided tape;
- cardboard;
- PVA glue;
- filler;
- beautiful rags.
Work order
First of all, you need to make a symmetrical template out of paper so that the chair for our doll has a flat back. Attach the template to the bottle and trace along the outline with a felt-tip pen.
Carefully cut out the chair.
Draw a straight line on the neck of the bottle, stepping back 3-4 cm, and cut it off.
Glue the two parts together with your own hands using double-sided tape.
Paint the doll's chair and put stuffing inside, wrapped in a beautiful rag.
The table in this set can be made from cardboard and the top of a bottle.
Tape one tabletop to the cork with double-sided tape. Paint the table.
Glue a beautiful tablecloth frill around the edge and place the second tabletop on top. The table is ready.
This chic doll set, made by yourself, can decorate any living room.
Vintage furniture
We will make another chair in a vintage style from a plastic bottle, padding polyester and fabric.
To work, be sure to prepare sharp scissors, regular glue, cardboard, paper and a pen.
We measure the desired height of the chair and cut off the bottom of the bottle.
On paper we draw the back and a smooth transition from it to the seat.
Cut out the template. We cut the edge of the bottle along it.
Using the same template, cut out two parts from padding polyester.
We sew each detail with a ring.
Now you need to sew two rings along the top edge, turn them inside out and put them on the edge of the bottle. Glue the bottom.
Glue another rectangular piece to the top edge.
You need to sew a bottle cover from fabric. Its length should be the same as two heights of the chair.
Apply glue to the outer surface of the bottle and carefully put on the cover. Its lower part will be glued. We put the upper part of the case into the bottle.
We form beautiful folds on the back and glue them one by one.
We fill the bottom of the chair with padding polyester.
Cut out a circle from cardboard, the diameter is slightly smaller than the diameter of the bottle.
Cut a circle from padding polyester with a diameter slightly larger than that of a cardboard circle.
We bend the edges of the padding polyester and glue them to the mug.
Now the resulting soft seat needs to be covered with fabric.
We cut out a circle from the fabric with a diameter twice the diameter of the cardboard circle.
Place a frequent basting stitch along the edge of the circle.
We place the seat blank in a circle of fabric. Tighten the basting stitch threads.
The seat is ready.
We place the seat in the chair.
We decorate the chair with frills and beads. We sew small pillows.
Let's knit another pillow.
Article on the topic: Openwork crochet jackets for obese women from Japanese magazines
This makes a great vintage doll chair.
Assembly Tips
It is best to purchase a high chair on the manufacturer’s website. To do this, simply select the appropriate model and, if necessary, select additional accessories. Representative offices of this brand are located in St. Petersburg and Moscow, so delivery in these regions is free. Furniture is sent to any other point in the country through transportation companies. The manufacturer provides a seven-year warranty for its products.
Making and assembling a folding chair with your own hands, decor options
The kit includes all the parts necessary to assemble the chair, from the frame to the screws and bolts and instructions. Additionally, the structure can be equipped with the following elements:
- fixed table;
- seat belts;
- pads on the seat and back;
- bookshelf;
- toy box.
Assembling the structure is not difficult; you can handle it yourself. To do this, you just need to follow these steps step by step:
- At the initial stage, the backrest is installed. For this purpose, it is attached to the side post, as well as to the seat. The back is fixed with bolts. They are tightened without much effort, there is no need to tighten them all the way - you need to leave a distance of about 0.5 cm.
- The lower backrest is installed in exactly the same way. Then it is rotated so that the edging is placed at the top end. In this case, the through hole should be in the lower part.
- A side stand is attached to the backrests.
- Bolts on the resulting base fix all other elements.
The growing chair produced by Kid-fix is suitable for children of different ages. It is convenient, safe, and looks very attractive. Thanks to the special design, the furniture can be easily adjusted in height; children will always be comfortable in this chair. In addition, the peculiarity of the products is that they have an orthopedic effect, so many parents prefer them.
Felt is a great material for play.
It is easy to make furniture for dolls and the house itself from soft, pleasant-to-touch felt.
Such a soft house can look like a handbag or a book, and it can also be hung on the wall.
The house pattern is drawn in life-size, then the template is cut into parts, each with its own color. A fairytale house with a castle roof and a chimney looks beautiful. We must not forget about the windows and door!
Recently, felt dollhouse books have become popular; they are suitable even for the youngest children.
At the next stage, the pattern elements are laid out on sheets of felt of different colors and cut out.
Felt furniture
First you need to make a bed pattern and cut out:
- large rectangle (the bed itself) – 2 pcs;
- bed sides (long parts) – 2 pieces;
- back and foot (short ends) – 2 pieces;
- legs-columns (smaller rectangle) – 4 pcs;
- ends of the legs (circles) - 2 per leg.
Progress:
- Legs. The felt is coated with glue and rolled into a roll; after drying, the ends are attached at the top and bottom.
- Making a bed base is simple: all the sides and ends are sewn to one large flat piece.
- Then the second large part is sewn on, while the seam remains unfinished - the bed is stuffed with padding polyester through the hole.
- The hole is sutured.
- The legs are sewn on. The bed is placed in the bedroom.
Making a felt bed with your own hands
Using the same principle, you can sew a sofa, armchair, or ottoman. The craftswomen even make a refrigerator and a clock.
It’s easy to make a cute carpet from felt; even a little girl can do this kind of needlework. A rectangle is cut out of felt of the desired color, a pattern is drawn on the fabric with markers, and you can also glue fringe along the edge. A felt carpet will decorate your living room or toilet; the carpet can be hung on the wall or placed on the floor.
Using the same principle, you can make the rest of the furniture from felt.
Soft felt makes cute pillows, especially if you sew decorative pink flowers onto them.
High chair for feeding doll “Maria”, folding
Every girl will like this high chair for feeding dolls from the Maria series. A young mother will be happy to feed her baby in it. The set includes many accessories for a fun game: a plate, fork, spoon and feeding bottle.
The chair is pale pink, with the image of the girl Maria, made of quilted fabric. Delicate lace gives the chair a charming, fairy-tale look, like a real princess. Everything in it is thought out to the smallest detail. Easily folds and does not take up much space. At the bottom there is a basket for accessories. Furniture for dolls, from the Spanish brand Decuevas Toys, looks very realistic, like the real thing. Little “mother” will be delighted with such a gift. The chair is made of high-quality materials, has a metal frame and will delight its owner for a long time.
- Age: from 3 years
- For girls
- Pink colour
- Set: high chair, bottle, plate with fork and spoon, net
- Composition: plastic, textile, metal
- Package size: 32x8x43cm.
- Toy size: 42*32*65cm.
- Country of origin: China
- Country of brand owner: Spain.
Delivery in Moscow and the nearest Moscow region
- The cost of delivery to your home or office is 149 rubles.
- When purchasing for more than RUB 2,500. delivery in Moscow within the Moscow Ring Road is FREE.
- Delivery is carried out only after confirmation of the order by phone by the manager of the online store and is possible only the next day after confirmation of the order.
- Delivery within the city is carried out from 08:00 to 22:00. The time interval for courier delivery on weekdays is four hours.
- Please indicate your desired delivery time in the comments to your order.
- The cost of delivery of an order outside the Moscow Ring Road is calculated at +50 rubles. for every 5 km.
- An hour before arrival, the courier will call to confirm the meeting.
- When receiving an order from the courier, you have the right to partially or completely refuse the goods, but payment for delivery will be made in any case.
Delivery to regions of Russia
- Sending an order to the regions of the Russian Federation is carried out upon 100% prepayment of the cost of the order and delivery.
- The order is dispatched immediately on the day the funds are received from the client.
- We use Sberbank.Acquiring - all your payments are reliably protected.
- Please note: this delivery method does not imply partial cancellation of the order, and the possibility of trying on is not provided.
- Delivery times depend on the distance of the final destination from Moscow and range from 2 working days from the moment the parcel is sent by the store.
- You can choose any transport company that is convenient for you to use.
- We cooperate with: SDEK, Russian Post, Business Lines, PEK, Baikal-Service, EMS Russian Post, IML, DPD. We recommend using SDEK services.
- Our customer service manager will calculate the final exact delivery cost for you.
1. Payment in cash
You can pay for your order in cash upon receipt, either to the courier or at the pick-up point. Payment is possible only in Russian rubles.
2. Payment by bank transfer
You can pay for your order in the following ways:
- by bank card (we accept VISA, MASTERCARD, MIR cards);
- Yandex money
- Yandex cash
- Qiwi wallet
Video: Paper sofa for dolls
The most important part of a doll's bedroom is the bed. It can be made from cardboard. If desired, you can use fabric to make the stock.
Instructions:
- Select your favorite sample online. Cut out the outlines and paste them into your notebook.
- If you want a voluminous bedroom, you will have to cut out the parts and glue them together.
- After this, you can decorate or cover the bedroom with self-adhesive tape. But you can simply print a beautiful color image.
Of course, without such little things as perfume, shelves, vases, flowers, the room looks uncomfortable. These little things make the doll's home cozy and lived-in.
As you can see, in order to captivate a child, it is not necessary to buy him expensive toys. A paper house with a doll would be an excellent alternative.
House is built
It doesn’t matter at all whether it’s big or small, made of brick or cardboard, whether Barbie or Snow White and the dwarves will live in it. In any case, he needs an interior, furniture and necessary accessories
Today you can buy everything in toy stores. But as you know, the most fashionable things are considered to be exclusive, one-of-a-kind, handmade items. Therefore, we roll up our sleeves and begin work on making doll furniture with our own hands.
The nuances of creating furniture from different materials
For those who want to make original toy furniture with their own hands, information about the features of working with each of the possible materials will be useful. Some of them can be easily processed at home, while others require specific skills.
Sheet cardboard
Cardboard is a raw material that is often thrown into the trash when unnecessary. Meanwhile, you can use it to make any piece of furniture for a dollhouse. It is ideal for novice craftsmen, and you can safely involve your child in the process of creating a bed or wardrobe. To work you will need:
- pencil;
- ruler;
- scissors;
- office glue.
Before making furniture for dolls from cardboard, you need to draw templates, cut them out, and then glue them. The finished product can be colored with pencils, felt-tip pens, and paints. Colored paper is also ideal for decoration. You can use it as a basis, but in any case you will need cardboard to make the furniture stable. High quality material is often used in doll miniatures due to the ability to process very small parts.
Along with sheet cardboard, you can use disposable paper tableware, toilet paper rolls, egg packaging, cereals, and sweets.
Boxes
Making doll furniture from matchboxes will be no less simple. This is an ideal material for working together with a child, for example, to create a chest of drawers, a cabinet, or a desk. It is enough to glue them together in a certain way and decorate them in any way. A matchbox can also become the basis of a doll's suitcase.
You should not throw away boxes of shoes, juices, and dairy products. They can serve as the basis for a closet, a sofa or the house itself. But such material is not suitable for professional activities; collectible miniatures require higher quality.
Plywood and wood
Wood products are more expensive than others, and also require at least minimal experience working with the material. First of all, you need to take into account the functional purpose of the furniture in order to determine the appropriate thickness of plywood. For example, 6 mm is suitable for the base of a bed, legs of chairs, tables, and for the side walls of a cabinet or drawer, 4 mm will be sufficient.
The process of creating toy interior items is identical to the manual production of real furniture. Showing your imagination, you can use any wooden products:
- window beads;
- toothpicks;
- skewers for kebabs;
- rulers.
The raw materials are polished, processed with special means, painted or used in their original form. By the way, furniture made from popsicle sticks looks original: tables, chairs, shelves, beds. To increase the strength of the finished structure, you should use furniture glue instead of office glue. Wood is ideal for creating doll miniatures in any style.
Wire and plugs
When working with wire, you need skills in using pliers and wire cutters. Older children can be involved in the process. The complexity of the work will directly depend on the intended furniture and the thickness of the material. The larger the diameter of the wire, the more difficult it will be to handle, because the principle of operation is based on bending it, making turns, connecting 2 or more units. As a result, you can really get a strong frame for a future doll bed or beautiful chairs in a classic style with original weaving.
Corks from various bottles are another multifunctional material at hand. You can make ottomans from plastic ones, tables and armchairs from wine ones, simply using them as a base. The options are not limited to this; if you have some imagination, plugs can be suitable for any piece of furniture. They are much easier to work with than wire, but unlike the latter, in doll miniatures they will not always look appropriate.
Washcloths, foam
Kitchen sponges are an unexpected but practical material for making toy furniture. Moreover, it is suitable even for kids who tend to break something. This is not to say that a chair made from a washcloth will fit perfectly into the classic interior of a purchased Barbie house, but it will last longer than a plastic one. Even in kindergartens they make crafts from sponges - they are used whole or divided into parts. To create the desired shape, the prepared pieces are glued or stitched.
Foam sofas and beds are a convenient option for a novice craftsman. Even a child can cut, fasten and paint pieces of foam. Such products require a minimum amount of time, effort, and money. It will not be possible to make small parts from foam or foam rubber, so they should only be used for large, simple structures.
Plastic
Plastic bottles, like polystyrene foam, are good for the base of sofas, beds, chairs and other furniture items. They can be given the desired shape using scissors, painted, or supplemented with fabric. Jars of cream, yogurt, sour cream, and other plastic items are often used with the same success. For example, you can use rulers to make an impeccable doll's cabinet or shelf - not only an adult, but also a child can cope with the task.
DIY methods for decorating furniture for a dollhouse
Plastic is also used in doll miniatures. But in this case, the craftsmen take high-quality, special material, and do not use improvised means. The design of plastic toy furniture is not limited to any standards.
Newspaper tubes
Newspaper tubes have long become one of the most popular materials for all kinds of crafts. To make them, ordinary newspapers are wound on thin knitting needles. Not only various baskets are woven from prepared raw materials, but also furniture for dolls. Of course, this is not the easiest option for beginners, but if you get the hang of it, you can make artful, unique items in a vintage or country style. To increase reliability and resistance to moisture, the finished table or sofa is covered with stain or varnish. Newspaper is not used to create collectible miniature copies of original furniture.
The stain and varnish do not cover up the letters on the newspaper even when several layers are applied in a row.
Textile
All kinds of fabrics, lace, leather or leatherette often play a supporting role in the manufacture of toy products. They are used for upholstery of upholstered furniture for dolls and accessories. No bed, especially a miniature one, would be complete without bed linen. And the sofa will take on a finished look only with a few pillows, decorated to match. Textiles are also suitable for toys intended for little ones. To give the shape, craftsmen usually use foam rubber or stuff the product with padding polyester.
Knitting also allows you to achieve excellent results. Beds, wardrobes, tables are created using knitting needles and crochet. Not all products will be as practical as wooden or plastic ones, but thanks to them, the doll can have a cozy apartment. You can safely involve children of preschool and older age in these types of needlework. If you have no experience, it is quite possible to make a toy item for home use.
Plastic compositions
When making furniture from plasticine, you can take a child as an assistant. No matter how high-quality the bed or nightstand turns out to be, they are easy to deform, so such products are not suitable for active games. But the baby will be interested in taking part in modeling.
The situation is completely different with cold porcelain; you can also create furniture for dolls from polymer clay. The high plasticity of the materials makes it possible to process the smallest parts with perfect precision. And the finishing firing consolidates the result, making the product very durable. Sealant is also sometimes used to create doll furniture.
Start
Since 2006, my two cousins Andrei and Alexey have been engaged in laser cutting and engraving, producing products for the advertising and production sector: plates, numbers, signs.
Until 2015, I worked at the college as deputy director for educational work. Dealt with documents, organized conferences. I’ve long wanted to get creative, so I joined the guys to help them reorganize the company. This gave birth to our family business.
Over a cup of tea we discussed all possible options for new directions. My older brother Andrei, a designer, suggested making doll houses. The idea was taken out of thin air, but I liked it, although the market was not explored at that time.
At that time, I didn’t understand anything at all about business, so I took courses for aspiring entrepreneurs from the Ministry of Trade and Entrepreneurship. The result of this training was to be a business plan.
We had our own laser machine that could cut plywood, the optimal material for making dollhouses, so we decided to try it. All that was needed was to buy plywood, sandpaper and glue - all this required virtually no investment.
I submitted a business plan on the topic “production of doll houses”, we researched the market, identified competitors and audience, chose the design of the house and box, and set the price. Dollhouses have become a “little fun destination” that brings in extra income.
We had to change some suppliers of raw materials, because we work with premium grade FC plywood; 2/4 grade construction plywood does not suit us. We do not have our own large warehouse, so we have to constantly re-order small quantities. If roads are closed or raw materials run out, which happens periodically, there are supply disruptions, so we want to find two or three more suppliers.
Kitchen furniture for dolls made from cardboard boxes
Unlike individual elements, a kitchen is a whole complex of complementary objects. Buying a kitchen for a doll can be quite an expensive purchase. Using available materials, you can easily make a kitchen set yourself, saving money and making it no worse than a store-bought one.
For this you will need:
- ruler, pencil;
- scissors;
- glue;
- beads;
- a shoe box with the lid still intact;
- colored cardboard or paper;
- scotch;
- thick cardboard;
- a plastic bowl, for example, sushi sauce;
- several small boxes.
Manufacturing process:
- Place the cardboard box on its side after removing the lid. If the future table is large, then it needs to be trimmed as evenly as possible to the required height.
- We make a wall for the kitchen from a thick sheet of cardboard; it should be 1.5 times longer than the table, and the height does not play a significant role.
- You need to make a hole in the table for the future sink and insert a plastic bowl there.
- Make a continuation of the table by cutting off a bottom from another box (for example, a powder box) with a height equal to the height of the table. And glue them together.
- Next, make a continuation of the tabletop from thick cardboard, gluing it to the base of the second table, as shown in the figure.
Then you can decorate it at your discretion, and the boxes will turn into a kitchen set.
Using wire and plastic container
It’s very easy to make a toy chair for a doll from a thick plastic container, for example, laundry gel or dishwashing gel. The step-by-step photo clearly shows how to make a chair for a doll. You need to cut off a corner with semicircular sides. Clean the edges with sandpaper to avoid sharp burrs.
The next stage of work will be making a stand for a plastic chair. You will need a piece of thick wire and pliers. The chair can be glued to such a base with hot glue both outside and inside the workpiece. All that remains is to sew a soft, bright pillow, fill it with cotton wool or synthetic padding and place it on the seat.
What material is best to choose for doll furniture?
Doll furniture can be made from various available materials and means. It could be:
- Cardboard. A common and affordable option. But, unfortunately, such furniture quickly wears out, corners and paints wear off. In addition, the cardboard can get wet or swell from moisture, which will completely ruin the appearance of the craft. However, this material should never be underestimated! It is very easy to use and a child can work with it.
- Matchboxes. An equally common and affordable option. From boxes you can make a chest of drawers, a TV, various drawers and even a sofa. The idea is very simple: you glue the boxes to each other, forming the intended interior element, and then paint or cover them with colored paper.
- Plastic containers. They are best suited for the bathroom; they can be used to make a bathtub, sink, or jacuzzi. While playing, the child can even pour water into it.
- Wire. Remember the forged bars on the beds? The bed frame and ornate bars can be made from wire. Designer table, chair, chandelier or floor lamp. The only limit can be your imagination.
- Plywood. To make such furniture you will have to put in some effort. But in the end you will get strong and durable interior items, almost like the real thing. Working with plywood will require some tools, skills and a little more time than using other materials.
- Paper. Thick paper can be a handy material. You can make absolutely anything out of it: not only tables and chairs, but even a door. Plain paper will allow you to decorate the walls, making the interior even more realistic: add windows, paintings, posters.
The choice of material depends only on you and what you have at hand. Some will find it interesting to create ornate wire grilles, while others will be happy to pick up a jigsaw and make a small copy of their bed in the living room.