Snags are partially rotten fragments of trees that have been lying on the ground for a long time.
Despite their unique and sometimes unpresentable appearance, driftwood is a good material for making various crafts and products.
The material combines fairly high mechanical strength and an unusual shape, and also has a wood texture.
In this article we will talk about what can be made from driftwood, and also teach you how to process this unique material.
How does such wood appear?
The basis for the appearance of snags is a living and dead tree, as well as its parts.
When a plant weakens or ages, its immune system can no longer effectively resist various pathogens and pests.
Therefore, damage appears in some areas, changing the properties of the wood.
Over time, damage leads first to death and then to decay of the wood, as a result of which part of the plant loses strength and is destroyed by wind, rain or other factors. Since there is no clear boundary between normal and damaged wood, the damaged areas take on the most bizarre shapes.
If destructive processes occur on a tree, then over time the damaged fragment breaks off from the trunk or roots and turns into a snag, that is, a severely damaged piece of any part of the tree.
If a branch or trunk breaks off from the tree even before the damage, then it will become a snag only after various microorganisms have sufficiently damaged it , and these defects will be noticeable even with a cursory examination.
If the damage affects the roots, then they turn into snags after the trunk breaks off from them, and the root system comes out of the ground under the influence of various factors.
Crafts for interior decoration
Original and simple crafts made from twigs can add pleasant variety to any interior.
A flower pot made from branches is easy to make.
For work you will need branches, a saw or jigsaw, a ball of twine, and burlap.
- The branches must be aligned to length using a saw.
- Connect them together using twine. You can tie it through two branches or secure the twine with a knot after each one.
- Wrap an old flower pot in a piece of burlap and secure it with glue.
- Wrap the pot with the finished twig product and tie it with twine.
An interesting element of home interior decoration is ready. Using this simple technique, similar additions can be made to a pencil holder.
Picture frame
To implement this idea you will need twigs or twigs, a wooden base, and a glue gun.
- Using a glue gun, the branches are attached to a wooden base. It is better to think through the design of the frame in advance.
- If desired, you can supplement the product with additional decorative elements (moss, wood slices, beads, and so on).
In this way you can decorate a mirror. Or use wood slices for decoration.
- DIY snowman craft
- Autumn paper crafts
- Crafts from stones for the little ones - learning colors
Wreath made of twigs for home
A simple step-by-step master class will help you make a decorative wreath to decorate your door.
To work you need wire and twigs.
- You need to make a circle from the wire, the diameter of which corresponds to the diameter of the future product.
- Tie the prepared twigs into identical bundles using wire.
- Secure the bunches of branches to the wire ring using wire.
- You can complete the wreath by painting it with paint.
- The product can be supplemented with cones, bells, ribbons, and beads.
This way you can make an original decorative decoration for Christmas.
Where can I find it and can I collect it?
Since driftwood comes from unmaintained trees, it is easier to find it in :
- forests;
- forest parks;
- forest belts;
- groves.
Despite the fact that Article 32 of the Forest Code of the Russian Federation allows the collection of snags and other fragments of trees separated from the plant in a natural way, local authorities often introduce various restrictions.
Therefore, before you go into the forest for snags, ask the local administration if there are any prohibitions at the local level.
After all, the federal law “On the general principles of organizing local self-government in the Russian Federation” dated October 6, 2003 N 131-FZ gives the local administration the right to independently establish the procedure for collecting any forest resources.
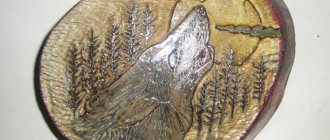
Original panels made of driftwood
If you want to get involved in the process of such needlework, stylish and interesting panels will help you. They are hung on the wall and used as paintings or stands for candles and souvenirs.
Gorgeous DIY wall decor
In our case, we will consider a master class on making a panel candlestick.
- Prepare a rectangular piece of driftwood (this can be a log) 30 cm long and 10 cm wide. Process it in accordance with the first master class. This will be the basis of the panel.
- Another element is attached across the base. It should have the shape of a parallelepiped and coincide in length with the width of the base. Fastening can be done with nails or good wood glue.
- Next, all you have to do is process the wood and place a candle on the protruding element - your home will be transformed in the blink of an eye!
This is what the original panel looks like. If you follow the instructions given, the result will pleasantly surprise you.
Preparation and processing
Here are the main ways to process this material:
- cleaning from dirt;
- cleaning of bark;
- drying;
- removal of loose wood;
- changing the shape of hardwood;
- putty;
- grinding;
- burning;
- impregnation with various reagents;
- painting and varnishing;
- polishing;
- connection with other parts.
Cleaning from dirt
To clean dirt, several methods are used, which differ in their effect on wood.
The simplest is washing - for this, the material is placed in a basin or bathtub and first watered with water to soften the dirt, then washed with a sponge.
If the surface of the wood is covered with something greasy, then you can use :
- any dishwashing detergent;
- washing powder;
- laundry soap crushed using a grater (toilet soap is less effective).
The advantage of this method is that it preserves the bark as much , but the disadvantage is its low efficiency, because it is impossible to remove dirt located in cracks and small depressions with a sponge.
A more effective way to clean the surface is to use a soft metal brush with brass or other soft metal bristles.
The brush removes dirt well and cleans even cracks and depressions, but it damages the surface of the wood, so it will have to be sanded. The most effective , but almost completely removing the bark, is to treat the driftwood with a high-pressure washer . This device removes any dirt, but does not damage the wood.
Cleaning the bark
Clearing bark can be either a separate operation or one of the actions carried out when removing loose wood or sanding.
In the first case blunt chisels are used to separate the bark from the wood. It is undesirable to use sharp chisels, because they can damage the wood and deprive it of its natural texture.
In the second and third cases, standard tools are used for removal or grinding, that is, attachments for a drill/grinder or sandblaster.
Drying
Forest snags have very high humidity (25–55%), which makes it difficult to stop the destruction processes in them, because high humidity is the main condition for the active life of microorganisms that feed on wood.
In addition, washing the material with a sponge or pressure washer further increases this parameter, making the material even more vulnerable. it is advisable to dry the driftwood after cleaning . This can be done by two methods - forced and natural.
For forced drying, the wood is placed in a dryer or oven and the heat is turned on.
The liquid inside begins to evaporate and seek a way out, which leads to cracking of the material. Depending on humidity and temperature, such drying takes 10–50 hours .
To dry naturally, the driftwood is placed in a well-ventilated, shaded room without drafts; it is advisable that the temperature in it be within 15–25 degrees above zero. Drying time is 10–30 months ; due to the slow release of moisture, new cracks do not appear on the surface of the wood.
Removing the loose part
Before removing loose or rotten wood, you must mark its boundaries with a simple pencil.
It is undesirable to use a marker for this purpose , because its paint is absorbed into the wood and can only be removed together with the top layer of the driftwood surface.
Then the middle of the rotten area is removed in various ways , for example:
- broken out by hand;
- knocked out with a hammer or an ax;
- cut with a jigsaw;
- grind off with a brush attachment with hard steel hairs.
During this stage, it is advisable to stay away from the edges of the hardwood, as you may accidentally damage them and then have to sand the area heavily. The debris at the border with hard wood is removed using a large rasp or a brush attachment with soft metal hairs.
Changing shape
Despite the fact that the unusual shape of the driftwood is its main advantage, sometimes the shape has to be changed .
For this:
- it is cut with a hacksaw, jigsaw or chainsaw, depending on the size and thickness of the snag;
- the surface of the material is leveled using manual/electric planes and jointers;
- Cutouts are made in the walls using manual and electric jigsaws.
All these operations are performed in the same way as when processing any other wood, for example, boards. Therefore, those who know at least a little how to work with wood will be able to independently change the shape of the driftwood, giving it the desired shape.
Putty
To seal cracks, both ready-made wood putties and a mixture of wood dust and PVA glue are used. You can get the dust of the desired color using a sander. In addition, you can use wood dust of any color and suitable water-soluble colors.
Before filling, it is necessary to clean the surface of the wood as much as possible and, if possible, sandblast it.
After filling the defect with putty, it is necessary to remove all excess so that the putty area does not protrude relative to the surface of the wood. If the dimensions of the defective area of the driftwood exceed the values recommended for putty, then it is advisable to fill the defect several times, this will prevent the putty from cracking.
Grinding
Using sanding , minor irregularities are eliminated and the wood texture is made clearer.
Coarse sanding can be done using a sander and coarse sandpaper or a brush attachment with soft metal hairs inserted into a drill.
Medium grinding of hard rocks, as well as medium and final grinding of soft rocks, is carried out only by hand using sandpaper with numbers from 20 to 6, gradually reducing the grit. For finishing hardwood sanding, use 5-grit or 4-grit sandpaper.
If during rough or medium sanding it is not possible to remove the lint, which constantly rises after the sandpaper passes, then the surface of the wood needs to be wetted. With any grinding method, it is necessary to periodically change the direction of movement of the sandpaper to avoid the formation of deep marks.
Burning
This operation is used to change the color of the surface of sanded driftwood, because during heat treatment the wood darkens, and the stronger the heating, the darker it becomes. You can burn the entire surface of the driftwood, or only individual areas.
For firing, use a blowtorch or gas torch. Before firing, all flammable substances must be removed.
If, by firing, the surface is made a little darker than necessary, and then sanded again, you will get a very unusual pattern of wood texture, which will retain its shape, but will greatly change the color.
Impregnation with various reagents
This impregnation is carried out if the finished product is located in places with high humidity or high temperature.
For such processing use:
- antiseptics (protect against pathogenic bacteria);
- insecticides (protect against insect pests);
- hydrophobic or water-repellent (to protect against high humidity);
- flame retardants (for protection against high temperatures and open fire).
For such processing, it is advisable to use only high-quality ready-made compounds, and also act in accordance with the instructions that are pasted on the containers with the reagent.
In addition, driftwood is often boiled in soda or table salt , but both methods are applicable only for those products that will then be constantly in water, because soda and salt are very hygroscopic, so they draw moisture even from the air.
Painting and varnishing
For painting, use both paint from aerosol cans and any water-soluble, for example, acrylic dyes.
Before painting with water-based materials, it is necessary to “wet” sand the surface to completely remove the lint, otherwise, after contact with water, it will rise and the surface will have to be sanded first to remove the dye, then painted again.
also use paints and enamels on any polymer base , but before doing this, the driftwood product must be thoroughly dried, otherwise excess moisture will not be able to escape through the vapor-proof polymer layer, and the wood will begin to deteriorate.
Also, the color of the wood surface can be changed using stains . Their main advantage is that they penetrate 0.1–1 mm deep into the wood, so by carefully sanding individual areas you can change the color saturation.
In addition, the color saturation in individual areas can be adjusted by the amount of stain or by applying it in several layers.
For varnishing, you can use any varnishes that are compatible with dyes. Varnishes based on acrylic and wood resin allow water vapor to pass through, so the workpiece can not be dried too much. Varnishes based on other polymeric materials form a vapor-proof film, so they can only be coated with well-dried driftwood.
Polishing and joining with other parts
Lacquered surfaces can be polished using the same mastics that are used for polishing parquet or wooden floors. In addition, you can use any polish for lacquered furniture.
There are two conditions for high-quality polishing :
- use mastic or polish that is compatible with varnish;
- strictly follow the procedure described in the instructions for the polishing material.
Often, driftwood is the main element, but only an element of the whole composition, so it has to be combined with other details.
For this they use:
- glue;
- dowels;
- nails;
- locks;
- threaded elements;
- furniture corners.
Any of the joining methods is no different from the same action applied to any wooden parts, so you will find more detailed information on this issue here.
Step-by-step instructions for making bonsai
Step 1. Find a small piece of driftwood that looks like an old tree. It should have a prominent thick trunk and crown branches on the sides. Do not pay attention to small branches; they can be cut off later.
Suitable driftwood
Step 2. Clean it from dirt, wash and dry it. First, use pruning shears to cut off all the excess and form a crown, work carefully, you won’t be able to glue anything back.
You need to cut off excess branches from the driftwood
Practical advice. Washing driftwood is much easier and faster with an old toothbrush. Its fibers remove dirt from even the smallest holes and bends.
Step 3. Stir the alabaster. The quantity depends on the container in which you plan to fix the driftwood. Alabaster will hold it and imitate the earth.
Fine-grained gypsum
The larger the snag, the larger and heavier the base should be to ensure the stability of the structure. In our case, approximately 0.7–0.9 liters of finished mass is sufficient.
Remember that alabaster hardens very quickly, first prepare a container for the composition, then you won’t have time to look for it.
The driftwood is fixed with alabaster
Step 4. Hold the driftwood upright with one hand and level the alabaster with the other. If dirty stains of the mass appear on the surface of the driftwood, they must be immediately and thoroughly removed with a slightly damp cloth. After drying, white alabaster is deeply absorbed into the wood, making it almost impossible to clean the surface.
Use a cloth to immediately remove spills and drops.
Wait a little until the solution begins to set; the driftwood should hold on its own. Leave the solution alone until it sets completely, this will take about 10-20 minutes.
Step 5. Prepare special artificial pine or spruce branches, they are then cut into small branches and inserted into the driftwood. To make holes you need to have an awl or a hand drill. The surface of the wood is impregnated with stain; it emphasizes the structure. Prepare small pebbles and a glue gun. It is better to use modern hot one, it is easy to work with, and the adhesion indicators are quite sufficient for our craft. To improve the designer look, a final varnish coating is applied. All these materials must be prepared in advance.
Step 6. Using a small brush, paint the alabaster with stain. The material absorbs a lot of water, you will need to cover one place at least three to four times.
Step 7. Saturate the driftwood with stain; here you need to be careful and achieve the most natural color of the wood. Don’t make it completely one tone, let there be areas with different shades.
Applying stain
Step 8. Using a small hand drill, carefully make holes in the driftwood, fill them with hot glue and immediately insert the pieces of artificial pine needles. Work carefully, do not leave thin strands of glue. They can be removed immediately or after the composition has hardened. The second option is preferable; the threads come off easily at the base and your hands don’t get burned.
Step 9. Gradually form the crown of the tree. Make every effort to make everything look organic.
Applying hot glue
Gluing twigs
Step 10. Cover the alabaster with moss and attach part of it to the driftwood. The fact is that in Japan such trees have been growing for many decades, and the trunk is always covered with living moss.
Gluing moss
At this point, the production of the craft is completed, you can install it in the designated place and enjoy the results of your labors.
Artificial bonsai made from driftwood
What products can be made?
Due to their unique appearance and fairly high strength, driftwood is a good basis for making a wide variety of crafts.
Here's
a short list of what you can do with them:
- decorations for an aquarium or terrarium;
- lamps and chandeliers;
- candlesticks;
- decorative figures from driftwood for the garden and interior;
- furniture;
- wall and table decorations;
- watches and watch stands;
- gazebos.
Decorations for aquarium and terrarium
Driftwood in aquariums and terrariums not only play the role of decoration, but also create a more familiar habitat for fish and other living creatures.
You can choose any type of wood for your terrarium, but when making driftwood for your aquarium, it is best to use the hardest hardwood available.
Although you can use driftwood from branches, material from roots is better suited for terrariums and aquariums. Moreover, it is advisable to take driftwood for this purpose , that is, wood that has lain for a long time in the sea or running water.
The selected material must be cleaned of bark and dirt, then thoroughly treated with a sandblaster or a soft wire brush. This will help you find any rotten or moldy areas that need to be removed, including some of the healthy wood.
Since the use of purchased antiseptics is unacceptable, because they can be harmful to the inhabitants of terrariums and aquariums, during preparation the wood
is boiled in a solution of table salt for 3-10 hours .
After this, it is boiled for another 5–15 hours in clean water, changing the liquid every half hour.
This preparation completely cleans the wood of harmful substances and dangerous microorganisms, and also saturates it with water, so that it will not float.
If the snag still floats, then you can attach a rubber suction cup and use it to fix it at the bottom. If the driftwood is prepared for a terrarium, then after boiling it is dried in a ventilated room for 3–5 months.
Lamps and chandeliers
Due to their unusual shape, driftwood is well suited for making lamps and chandeliers. It is best to use driftwood from the butt (the lower part of the trunk) or roots, in which there is a depression with uneven edges .
You can install a lamp in the recess, and uneven edges, especially with roots coming out of them, will give bizarre shadows.
Making a lamp from driftwood usually includes several steps :
- cleaning from dirt and bark;
- removal of loose areas;
- drilling holes for hanging on a wall, ceiling or other surface;
- drilling holes for installing the lamp and socket;
- coarse and medium sanding with lint removal;
- impregnation with stains or firing;
- fine grinding;
- varnishing;
- polishing;
- installation of the lamp and socket;
- laying wires;
- wall mounting.
Candlesticks
To make a candlestick, driftwood of any shape is suitable, and the type of wood does not matter.
If the candlestick will stand on the table, then it is necessary to ensure maximum stability , which may require changing its shape.
If the candlestick will be installed on a wall or ceiling, then it is necessary to install the mount on the most durable part of the material.
The most important processing steps are:
- cleaning from dirt;
- removal of loose areas;
- grinding;
- impregnation with fire retardants.
In addition, it is very important to choose the right places and method of installing candles . Candles can be placed either directly into the wood, for which you need to drill a hole 1 cm deep in the driftwood, the diameter of which is slightly less than or equal to the diameter of the candle, or in metal glasses of any shape, which are attached to the wood using self-tapping screws.
Decorative items
In the vast majority of cases, when making decorative figures, all processing operations have to be performed, some of which need to be done several times.
Some driftwood are shaped like people, animals or mythical creatures , so they can be made into beautiful decorative figures and used in garden design.
Often you have to make a composition either from several driftwood, or from driftwood and various additional elements , which can be anything.
For example, a figurine of a mythical gnome can be decorated with a wide-brimmed hat and old boots. And a horse figurine - with tufts of natural or artificial hair imitating a mane and tail. In addition, you can make other garden crafts from driftwood, for example, flower stands
Beds, tables, cabinets and other furniture
To make furniture, it is necessary to use the strongest and largest driftwood from roots and branches, because the finished product will experience significant loads.
From this material you can make:
- tables and coffee tables;
- chairs or stools;
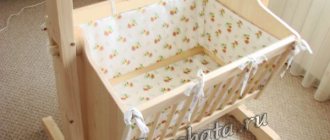
- beds;
- bedside tables and cabinets.
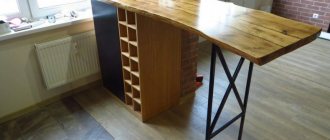
When making tables, only the legs or body are made from driftwood, and the tabletop has to be made from a different material.
The choice of finishing method depends on the shape and color of the driftwood, so in each case it is selected individually.
However, in any case, the required steps will be :
- cleaning from dirt;
- bark removal;
- sanding with lint removal;
- drying.
When making chairs or stools, both individual legs and the entire structure are made from driftwood.
To make such a chair or stool more comfortable, a soft bedding is made for it , which can either be attached to the surface of the seat, making it part of the structure, or made in the form of a removable pillow.
The minimum set of operations is the same as for tables. When making beds, driftwood is used as a decorative element or supporting structure.
In the first case, these can be relatively small parts of any thickness; in the second case, it is necessary to use only material from roots or thick trunks, and most of it must retain its mechanical properties .
The frame and lattice for the mattress are made of planed boards or metal, connected to driftwood in various ways to ensure the required strength and beautiful appearance.
In addition to the minimal processing used in the manufacture of other furniture, interior parts made from knots, branches, roots and snags must be thoroughly impregnated with antiseptics and insecticides so that various diseases do not appear in them and bugs do not settle in them.
All parts made of natural material must be varnished in order to prevent the raising of pile and the appearance of splinters.
For bedside tables and cabinets, only the body is made from driftwood , as can be seen in the photo, and the drawers and the top cover or tabletop of the piece of furniture (if provided for by the design) are made from other materials.
This approach allows you to make a bedside table that can not only be used to store things inside, but can also be used as a stand.
In addition to the minimum set of operations, you will have to change the shape of the driftwood, because without this it will not be possible to cut a box into it or attach a beautiful lid/tabletop on top.
Wall and table decor
Thanks to their unusual shape, driftwood makes stylish wall and table decorations . These can be flat, partially or completely three-dimensional figures. To make a flat decoration, you can use either a driftwood curved in two changes, or a cut from a large piece of driftwood of any shape.
The cut can be made with a chainsaw, circular saw or band saw, then level the surface with an electric plane or jointer. The same trimming can be done for a partially voluminous product; this will preserve the voluminous appearance, but will greatly reduce the overall thickness of the product.
On such decorations, the remains of bark can harmoniously fit into the overall design, so it is very important to remove as much as possible all damaged fragments and thoroughly saturate the workpiece with antiseptics and insecticides.
If such treatment is not done or done carelessly, then there is a high probability that in a few years, due to the destruction of cellulose, the bark will peel off from the wood, and it will have to be glued in place. In addition, various bugs can settle in poorly treated bark, which will ruin its appearance.
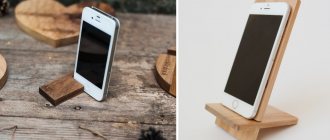
Watches and stands for them
Driftwood makes beautiful and stylish watch cases and stands.
To make the case, select driftwood, the size of which is noticeably larger than the size of the watch, then either insert it into a natural recess in the wood, or first cut or gouge out a hole for the watch with a chisel, then insert it there.
The first method is preferable for those who are not very good at working with a chisel, but the second method allows you to make a complete imitation of the fact that the watch is part of a piece of driftwood.
In addition, not only the case, but also the dial , into which the watch mechanism will then be embedded. To do this, you will need to not only create a flat plane, but also partially disassemble the clock, then attach the mechanism to the inside of the structure, and install the hands and numbers on the outside.
If a stand is made from driftwood, then it is necessary to select a material in the upper part of which there is a flat platform , not inferior in size to a watch.
In cases where there is no such platform, it can be made either by cutting off the top part of the material or by hollowing out a recess of the required shape in it using a chisel.
Gazebos
Thanks to their unusual shape, driftwood can be used to create decorative gazebos, including antique ones. The thickest and most durable driftwood is well suited for the role of load-bearing pillars ; medium and small sized pieces can be used for wall cladding.
Such a gazebo will look most stylish if its roof is made from tree bark or straw from various plants, while
the roof frame is best made from thin boards.
Chairs or benches, as well as tables in such a gazebo should also be made from driftwood, in which case the entire structure will be made in the same style.
To ensure that the wood does not lose its color over time, it is advisable not only to clean it , sand it and impregnate it with stain, but also to varnish it .
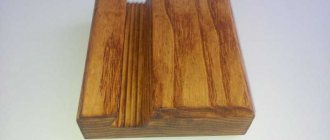
Preparing material for crafts
Natural materials are available and practically free. You can collect branches while walking in the park, in the forest, at the dacha, or just on the street. It is better to stock such material in spring or autumn.
What should you pay attention to when choosing?
- It is better to choose clean, straight and even branches and twigs. It’s more convenient to work with them.
- Branches damaged by pests, rotten, and showing signs of disease are not suitable for crafts.
- The branches of coniferous trees are too resinous. This will make the job more difficult. Resin is difficult to clean from working tools and hands.
Processing of wood material
Twigs, twigs, branches, and snags brought home require additional processing. First, they need to be carefully examined again for bug damage and disease. Suspicious branches should be disposed of.
Then the branches should be washed and smoothed with sandpaper for leveling.
All blanks for future crafts require drying. It is better to start it right away. Otherwise, the appearance of the finished product may suffer.
- Drying naturally occurs at room temperature. It lasts about two weeks.
- Twigs and branches can be dried on a radiator. In this case, the material will be ready for use in a week.
- You can dry it even faster in the oven. On low heat, with the oven door slightly open, you can get the finished material in a couple of hours.
Note! Easter crafts made from salt dough
After drying, it is a good idea to cover the branches with colorless varnish, paint or stain them, depending on the final design.
High quality corner sofas- How to wash a crystal chandelier
- Secrets of builders: working with couplings
Links to thematic forums
Homemade items made from driftwood are in great demand, so authors often discuss their works on thematic forums and share their experience there on what and how to do.
We have prepared a list of the most authoritative forums where you can get a lot of useful information:
- Forumhouse;
- Aquaforum;
- International Aquarium Forum;
- Farm "Nut Orchard";
- Forum about repair and construction;
- Club of decorative gardening lovers;
- Forum of aquarists of the Primorsky Territory.
Using branches for furniture
Large driftwood is ideal for creating tables and clothes hangers. Medium-sized raw materials will be the best option for making shelves and children's furniture. And small driftwood will come in handy for individual details. When making furniture structures, it is important to consider some points.
- The driftwood must be strong, since they will have to take on a colossal load, especially when it comes to pieces of furniture of impressive size.
- Raw materials are prepared for work in accordance with the information indicated above. They need to be bleached and sanded.
- Next, the tools are prepared. You will need a drill, a screwdriver, and nails for knocking down driftwood, if the furniture design allows for this. Other equipment necessary to create an original craft is also being prepared.
- After the production process, driftwood should be treated again with compounds that prevent rotting and pests. Leave it for a couple of days, and then put the piece of furniture into operation.
Since there are a huge variety of furniture designs made from driftwood, it is worth using tips on making specific types of furniture.
Conclusion
Despite the fact that snags are partially rotted remains of trees, they are very well suited for making a wide variety of crafts. You can use them to make stylish decorations that will fit into any interior, as well as furniture and other items.
Any piece of driftwood, regardless of its shape and condition, can be used. However, in order for a product made from it to serve for many years, the material must be properly processed.
Now you know:
- what can be made from driftwood;
- how to prepare and process them;
- what kind of driftwood can be put in an aquarium, and where to look for other ideas and tips on the use of this material.
Ideas for crafts from branches for children
You can make the simplest crafts from twigs and twigs with your own hands together with your children.
Star made of branches
Even twigs make excellent stars.
For the craft you need five branches of the same length. If you pre-dry them and coat them with transparent varnish, the craft will be durable.
- To fasten parts together, it is convenient to use rubber bands, cord, ribbons or wire.
- It will be more convenient to cope with the task if the blanks are immediately laid out on the table in the shape of a star.
- Fasten the workpieces at the joints.
- It is easy to attach additional decorative elements to these fasteners, such as buttons or beads.
Using this technique, you can make snowflakes, but you need to tie the twigs not in the corners, but in the middle. To make a New Year's snowflake, the twigs can be pre-painted with white acrylic paint.
Crafts toys
You can make little people to play with from medium-thick knots. It is enough to clean the top part, paint it with white paint and put on a red cap - you get a good gnome. If desired, you can draw a face with markers or paint.
- DIY New Year's crafts - 9 best options
- DIY crafts for the year of the monkey 2016
- DIY paper tulip craft
Using twigs and twigs as elements, it is not difficult to construct stylized animal figures. For fastening, you can use a keyway, hot glue or wire.
Creating a decorative tree
Using branches you can build an ikebana. To do this you will need the following materials:
- dry twigs;
- sea pebbles;
- decorative moss;
- Styrofoam;
- wooden, glass container;
- glue.
Step by step process:
- The prepared vessel is filled halfway with sea stones.
- The polystyrene foam is cut to fit the internal dimensions of the pot, and holes are made in it for attaching the main element.
- The prepared branched branch is installed in foam plastic.
- The resulting structure is lowered into a container and sprinkled to the top with sea pebbles, which are covered with moss.
- Dried leaves, flowers, and their imitation from various lightweight materials are glued to the branches.
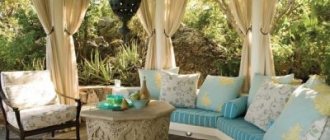
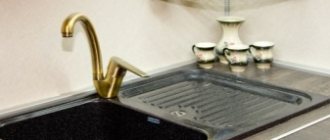
Decor elements
Driftwood is widely used to make all kinds of home decorations: mirrors, paintings, sculptures, candle holders and so on. You can create a bold mural, make a vase for succulents, or recreate a stunning animal image. Take a look at the ideas that fascinated us.
Decorative elements from driftwood Decorative elements from driftwood - creativeinchicago Decorative elements from driftwood Decorative elements from driftwood - instagram
Decorative elements made from driftwood
Decorative elements made from driftwood
Decorative elements made from driftwood
Decorative elements made from driftwood
Decorative elements from driftwood - hunker Decorative elements from driftwood Decorative elements from driftwood Decorative elements from driftwood Decorative elements from driftwood Decorative elements from driftwood Decorative elements from driftwood
Decorative elements made from driftwood
Decorative elements from driftwood Decorative elements from driftwood – diy.mr-bricolage
Decorative elements made from driftwood
Follow us on Pinterest for more inspiration.
Decorative design of a vase
Using branches, you can create both an independent structure and decorate a finished item. For clarity, let's consider several ways:
Pots for storing flowers.
- We choose a suitable vessel in which to place the flower. We measure its height and circumference.
- Cut a piece out of burlap and glue it to the glass surface.
- We take the prepared branches and cut them to the appropriate length for the workpiece.
- We tie the twigs together with twine at the top and bottom. The knots must be strong.
- We tie the resulting ribbon around the workpiece covered with burlap.
Fruit bowl. Only wood is used
- We take 40 even sticks of the same length, 15-20 cm.
- We make marks on them with an indentation from one edge of 1 cm and 7-10 cm.
- Using a drill and a thin drill bit, drill holes in the designated locations.
- We connect all the elements with copper wire, threading it into the lower holes.
- From the same material we cut 40 pieces of 1 cm each.
- We drill holes in them, passing in the middle through the two ends.
- In the prepared tape from long blanks, we insert copper wire into the first 15-20 cm branch in the middle, then stretch it through a short 1 cm stick, and move on to the next element.
- By stretching the wire in a circle, connecting the extreme parts, we get a beautiful flowerpot for fruit.
- Place a prepared wooden flat circle on the bottom of the product.
Lamps
There are a huge number of ideas for creating lamps from driftwood, it all depends on your imagination and the time you are willing to spend on your project. Do not forget that wood is a flammable material and should not be placed close to a hot light bulb.
Lamps from old driftwood Lamps from old driftwood Lamps from old driftwood
Lamps made from old driftwood
Lamps made from old driftwood
Lamps from old driftwood Lamps from old driftwood
Lamps from old driftwood Lamps from old driftwood Lamps from old driftwood Lamps from old driftwood Lamps from old driftwood
Lamps made from old driftwood
Process steps
Every business must be organized and planned in advance; in this way, many annoying mistakes can be avoided.
- Harvesting driftwood and branches. There is no need to choose rotten and pest-infected workpieces; they will be of no use, and can cause quite a lot of harm. Rotten snags can be recognized by their sound; tap them with a branch; if the sound is dull, then there is no need to take them.
Store driftwood conveniently on a table or shelves
The more blanks you have, the easier it is to work later. The fact is that creative ideas also come during production, and to implement them you need to have the material.
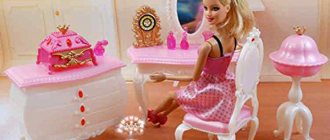
Furniture
Driftwood can become the basis for creating a dining table, coffee table or console table. But the authors’ imagination doesn’t stop there. Driftwood can be used to create racks, hangers, shelves and much more.
Furniture from old driftwood Furniture from old driftwood
Furniture from old driftwood Furniture from old driftwood
Scratching post with crib
Furniture from old driftwood Furniture from old driftwood Furniture from old driftwood Furniture from old driftwood
Furniture made from old driftwood – creativeinchicago
Furniture from old driftwood Furniture from old driftwood
Furniture from old driftwood Furniture from old driftwood
Furniture made from old driftwood
Installation tools
A standard set of tools is suitable for working with wood:
Figure 4. A self-made bed from driftwood is in no way inferior to one bought in a store.
- hacksaw, electric or chainsaw;
- chisel;
- drill with attachments and a set of drills;
- sandpaper;
- antiseptic;
- wood glue;
- screws, nails;
- natural materials: driftwood, driftwood, logs and branches.
In some cases, additional materials will be required for making furniture: fittings, glass, mirrors, etc. If you plan to make lighting fixtures, you will need lamp holders, lamps and electrical wires.
Return to contents
Style for the creative
An interior containing furniture made from driftwood and branches is called rustic. Some consider it a rough, even brutal variety of country style.
The classic design features wood floors and paneling and dark beamed ceilings. All this visually reduces the size of the room, so it is rarely used for apartments. But in country houses, in the country, in a bar, sauna or as garden furniture, this is the best option. And one hundred percent exclusive that you can be proud of. Fans of everything non-standard will appreciate it. In a modern interior, such things or a wall panel with imitation of living trees claim to be conceptual.