Smartphones in the modern world are replacing many items that were familiar just a few years ago. Player, clock, navigator, voice recorder, mini-cinema - one gadget contains maximum useful functionality. If previously this device spent most of the time in the bag, then with the advent of additional capabilities it migrated to the desktop. How to make a phone stand with your own hands and what materials are preferable to use, read on.
How to make a phone stand with your own hands?
How to avoid these inconveniences at home or at work
A modern gadget has many functions besides telephone communication. Plus a dozen more necessary digital things: graphic editing, the Internet, a notebook or pocket computer (organizer), TV and music player and more.
A lot of time is spent searching for a charger and headphones. And at least at home they should be next to the mobile phone on the same stand.
Below are clear instructions on how to make a stand with your own hands.
Use your imagination and select materials. If you don’t want to purchase neat and expensive factory-made coasters.
Types of phone holders for the car
The following varieties are currently on the market:
- Plastic clamp with silicone beads for fixing to the steering wheel. It is easy to use, but blocks the view of the dashboard.
- Clamp for installation in the air duct. Devices of this type benefit from functionality. There are models that allow you to quickly secure your mobile phone with one hand. They produce holders with a flexible cord, which allows you to rotate the gadget in any direction. But the fastening to the air duct grille is not reliable in itself. If the holder swings too much during movement, the phone or tablet will fall.
- Suction cup – attaches to the dashboard or windshield. The holder does not limit your view and allows you to quickly access the gadget’s buttons. But while moving, the mobile device will sway.
- Magnetic holder. It consists of 2 parts: a magnet, veiled in a frame placed on the panel, and a metal plate with a rubber gasket, which must be secured to the gadget. As long as you use a strong enough magnet, your devices will be safe. You can also make such a complex tablet holder for a car dashboard with your own hands.
- Silicone mat is a modern multifunctional mechanism. The clamps are angled for easy viewing of the screen. The mat is equipped with a USB connector to charge your phone if necessary. Additionally, magnetic outputs for Lightning and micro-USB can be built-in. The mat is installed on the panel without additional fasteners on its own sole, treated with a special compound.
Car tablet holder-mat
There are many offers from manufacturers. All products are in different price ranges, and every car owner can find something for themselves. But there are affordable ways to create your own model.
From cardboard
Pick any strong one. Although you can also practice how to make a paper stand (there is a video). If your smartphone is 18 cm long, then draw a rectangle 75 cm long and 2 - 3 cm wide than the narrow part of the gadget.
Cut it out. Mark the fold strips with numbers: 1 - at 17 cm, 2 - at 24 cm, 3 - at 18 cm, and 4 - at 16 cm. Count the 24 cm line as the middle, and make all folds from it inward.
The largest part (No. 2) is the gadget’s bed; make a slot in it five cm from the bottom according to the thickness of the cardboard.
No. 4, cut to a depth of 6 cm, will fit into it from the inside. Place your mobile phone on this ledge. No. 1 will become the base of the stand, and No. 3 will become the vertical support.
Models from scrap materials
If you need a DIY smartphone stand urgently, items lying on the table may come in handy:
A simple design is made from stationery clips and a plastic (or paper) card. It is enough to secure the binders on opposite sides of the base by placing the device on them.
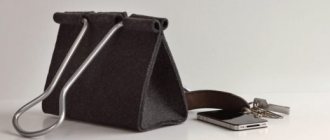
An alternative to clamps are paper clips, bent into miniature stands. No cardboard base is required for this holder. Two large paper clips are usually enough to hold a smartphone.
An unusual DIY phone stand is made using a toilet paper roll, which is a hollow cardboard tube. You can make a device in it where the device will be located. And plastic cups around the edges will give the design the appearance of a portable speaker.
A compact stand can be made from a plastic card. Considering that after such an upgrade the bank card will become unusable for its intended purpose, it is better to use an unnecessary discount card or gift certificate.
The plastic is cut off from one corner to create a support, and on the other side a connector is cut out that matches the width of the phone.
The base for the stand can be wire 2-3 mm thick. You just need to bend it into the shape of two letters “L”.
If you wish, you can assemble the holder from Lego. Various combinations are allowed here. Moreover, the homemade structure is just as easy to disassemble.
If you have any tape cassettes left in your home audio library, you can borrow a case from one of them for a while. To conveniently place the phone, just turn the design back side out.
If you have 6 pencils in stock, you can make a stand out of them, fastening them with elastic bands. In order for the structure to stand firmly, it needs to be made like a pyramid. The phone is placed on the base of a triangle made from two pencils.
Another version of the stand is made from wine corks connected to each other.
The simplest support for the gadget will be a roll of tape. If the diameter is sufficient, the smartphone can be placed inside.
From fabric
The shape is a soft pillow. This business is for women. Cut a square of textile 10 cm longer than the vertical of the smartphone. Then fold the fabric in half to create a rectangle.
Sew the bottom part using a machine or by hand, carefully place the remaining padding polyester or cotton wool there, twisting them into a roll. This will be the heel on which the smartphone will rest. Next, also lay a line behind it.
From there, about four centimeters, smooth out the bottom and front side and back of your rectangle of fabric, and stitch again.
Up to this part of the pad, stitch from bottom to top at the junction of the strips, and also from above. Only the space for stuffing the top of the pad with synthetic padding will remain open. Close it with a seam too.
But unusual. You will have to trim it further so that when sewn together you get a triangle, with an acute angle downwards. This is the leg of the pad, and the smartphone rests semi-vertically on the wide part.
The stand is mostly ready. All that remains is to stitch or attach a pocket for the charger with Velcro. Now you will be surprised how you managed to make the stand yourself so quickly.
What is needed for production (materials and tools)
Before you begin, you need to prepare the following:
- paper and cardboard material – colored and white;
- glue;
- pencils - simple and colored;
- ruler;
- glue brushes;
- scissors;
- scotch;
- stapler;
- stationery knife.
For decoration, you may also need different decor. elements.
PVC
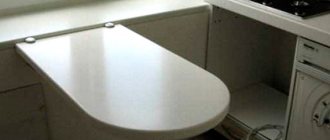
80 percent of apartment chemicals are bottled in PVC. Find an empty and flat one, or better yet a 0.5 liter semi-oval one. Wash well. Measure 24 cm from the bottom and cut off the entire top.
Take the back part as the sole of a slipper and cut it off so that a full slipper comes out. The recess of the container will become a pocket for the gadget.
Above, “on the heel of the slipper,” cut out a window. You will insert the plug of the mobile phone charger through it. The “slipper stand” with the gadget will hang on it.
You can paint the toe of the stand with paints at your discretion or cover it with prints. Look at the picture.
Step-by-step description of different stands
Making a cardboard stand yourself is not difficult. If the material is not very dense, several sheets are glued together. Micro-corrugated cardboard is most suitable for such an accessory.
Corrugated cardboard is a packaging material consisting of glued layers of paper.
A special stationery knife is most convenient for cutting from cardboard. With such a tool, the workpiece is cut more accurately and much easier. Let's look at how this is done in each specific case.
For pencils
Such a stand is a useful and necessary item for a desk so that office supplies do not get lost or scattered around the table.
You can create an individual pencil holder to suit your taste in an exclusive version with your own hands.
"Penguin"
A small cardboard box is required (volumes and sizes are determined at will): you can take a suitable one for juice (it is washed and dried). Cardboard cylinders will also work.
Next, the package is covered with paper of the appropriate size (black color - this will be the penguin’s body).
Pencil holders are a necessary and useful item for a writing interior.
Then templates are cut out of paper:
- breast - white;
- wings - black;
- paws - yellow.
The eyes are also made from black paper and the beak from yellow paper.
All elements are sequentially glued to the appropriate places. The penguin pencil is ready.
Such beautiful products will decorate any surface and will keep your writing instruments in order.
From paper tubes
First they need to be prepared. For this purpose, newspaper or magazine sheets are taken. Using a regular knitting needle, twist the tubes. There should be a lot of them. Then the ends are secured with glue.
Next, the tubes are painted in the intended color and left to dry. The juice packaging is cut to the required height. The tubes are cut to the height of the future stand and glued along the perimeter of the blank box.
The stand for pens and pencils, which is shown in the photo, can be made in just a couple of hours.
Important! It is necessary to glue tightly, without gaps.
Allow the product to dry and then it is ready for use.
Pencil with flowers
A pencil stand can be made with flower decoration. To do this, you can take napkins (color - optional).
The napkin is folded in half twice. It is fastened in the center with a stapler. Using scissors, make the edges of the napkin wavy. Each layer must be lifted upward, while at the base you need to press a little.
A pencil stand will allow you to always keep writing objects at hand, rather than looking for them in the corners of bottomless desk drawers.
You can make several multi-colored flowers and decorate a ready-made paper pencil holder with them. Flowers are “planted” on glue, or secured on the bottom with tape.
For phone
It is not difficult to build such a stand. Such work will not take much time. This is a practical and easy option to make the device yourself. And, besides, do it - at any time.
The following is a step-by-step guide to the most interesting ideas.
Shell
No special instructions are needed in this case. The main thing is to get a suitable, large enough shell.
To work, you need glue, which, when hardened, turns into a plastic tight mass - the so-called. rubber or liquid nails. There's no such thing? Then acrylic plasticine is used, which does not stain anything.
A layer of glue is applied to the area where the phone will come into contact with the shell surface. If the “workpiece” is not stable, glue is also applied to the lower part for a stronger fixation.
The main thing is to find a suitable shell from which you will make a phone stand.
Additional Information! This hand-made gadget stand looks great and fits into any interior.
Wine corks
This is an excellent material for creativity. Therefore, you should not throw them away.
A smartphone stand made from this material will be environmentally friendly, comfortable, durable and very original: thanks to the unusual design itself and the decor.
If you have a few wine corks, a little glue, a knife and some free time, you can make a smartphone stand.
To work you need:
- twenty traffic jams;
- leg-split;
- lace;
- Super glue.
The corks are lined up and glued together.
First, the back wall of the gadget stand is made (the corks are glued together in a row, and the “second floor” is assembled in the same way). One “floor” is pasted onto the other. The back wall is ready.
Next, glue the front one. The bottom part of the stand is glued gradually. The plugs are placed one at a time against each other. Then the back wall is attached.
As a decoration, you can add thin twine or lace to the stand. Floss threads and other cute little things will also work.
You will get a unique stand for your mobile phone.
Bamboo chaise lounge
To make such a stand you need:
- bamboo sticks and mat;
- dye;
- six coffee sticks;
- wire cutters
How to make such a stand step by step can be found here:
Upon completion of the work, you get a stylish and unusual accessory that no one will have. The stand can be presented as a present or to decorate your desktop.
The stand is made of bamboo - a beautiful and pleasant to the touch material.
Easy way
You will need a thick sheet of paper. Squares of 15x15 or 10x10 (cm) will fit a standard smartphone.
You must proceed as follows:
- The sheet is folded in half twice.
- Unfold and fold first the lower, then the upper halves in half.
- Now they make creases.
- Unfold the workpiece and make a bend on the other side.
- It is necessary to repeat all previously performed steps on the opposite half.
- The workpiece is unrolled. All folds must be clear.
- The paper is turned ninety degrees, one corner is lifted and placed inside. It looks like a pocket.
- The two corners are pressed against each other - the paper should curl naturally.
- The central part is tucked under the prepared pocket.
- All steps are duplicated on the opposite side. You need to start by forming a pocket.
- At the final stage, the central fold must be made clear: this will be the part of the stand that holds the main weight of the gadget.
A very simple phone stand made of paper using the origami technique.
Now the stand is ready.
For the Easter egg
Step by step work:
- Take colored paper. It should be a 15x15 cm square.
- Fold in half twice.
- Then you need to open the sheet and fold the lower and upper parts to the middle.
- Next, open the workpiece and position it so that the fold line is on top.
- A triangle is formed on both edges.
- Fold it back on both sides so that it turns out the same.
- Now on one side the bottom corner is turned up, on the other side they do the same. Unfold the workpiece and duplicate the previous steps.
- The upper triangle is folded down - everything is done on both sides.
- Now all that remains is to open the resulting “wallet”.
- Next, it is straightened so that the stand takes the desired shape.
Paper Easter egg coasters can be very original and interesting.
Now you can insert the Easter egg.
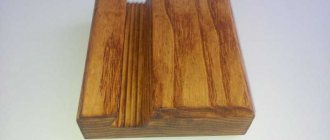
Made of wood, plywood
Unlike cardboard, which can be cut with a knife or scissors, these materials require a jigsaw. But it will turn out to be a very strong and stable stand.
Have you chosen the grumpy cat shape? Great, draw its outline as if looking at it from the front. The ears are strictly on the top of the head. Insert the lower part into the slot of the rectangle on which the cat will sit.
A little higher, glue in the paws and toes, also cut out with a jigsaw. You will place your mobile phone on your paws.
Phone stand made from paper clips
In 5 seconds you can make a strong and sturdy stand for your phone. Moreover, it is very cheap, two clamps cost me 10 rubles, and in general I think this is pennies for you.
Step No. 1 Materials for the stand
All you need are two clamps: one large and one smaller. You can buy them at any office supply store.
- Step No. 2 Assembling our phone stand
- Open the large clamp and place the handles of the small clamp into the large one as shown in the photo below.
- Step #3 Place your phone on the stand you just made.
Due to the fact that the stand is made of only 2 small and lightweight parts, you can carry it with you everywhere, I always carry it with me in my pocket.
Source: https://wdfiles.ru/blog/podstavka-dlya-telefona-iz-zazhimov-dlya-bumagi.html
Arrangement in a home greenhouse
Briefly about how to make a flower stand.
First, decide where the stand will be located: on a windowsill, on the wall of a balcony, just on a tripod in the courtyard of a country house or cottage.
Then decide on the materials: metal rods - they require welding, a little simpler - a wooden frame stand mounted on some wall. Next, watch the video to see how it’s easier to do.
Paper creations
You can make a stand out of paper not only for stationery. Once you set a goal and get involved in the process, you will see how easy it is to create a beautiful and useful paper craft.
Here are some examples to help a creative person create:
- coasters for Easter eggs. In this case, they make do with minimal materials: leave a fragment of a paper egg tray with 4-6 cells, decorate it with tulle, ribbons, artificial flowers;
- stands for newspapers and papers. They create from old cardboard boxes, pasting them with felt flowers, yellowed newspapers (vintage version), trimming them with buttons and fabric;
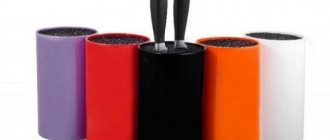
- organizers for kitchen utensils, household items, buttons, and so on;
- Baskets are woven from twisted strips of waste paper and coasters are made. If desired, they can be painted.
Be bold in your creativity! Take your example from children, because they are not bound by conventions and cliches. For them, the orange sun and grass doll hair are the norm, “but I like it that way!” Be artists, their motto is “That’s how I see it!” Let your imagination go free and you will be surprised how much space and material there is around you to realize your creative ideas.
Photo tips on how to make a stand
https://www.youtube.com/watch?v=AL77AN5hJBg
Types of tripods
“Tripod” is a tripod. This is elementary physics. If they have different legs for attaching a camera or phone. This is a general characteristic.
But there are also differences. Let's figure it out!
Monopods . The prefix “Mono” indicates that this device has one “leg”. A kind of selfie stick, the main purpose of which is to increase the distance from your loved one. Equipped with folding knives. The well-known AliExpress offers many options. Sometimes for a camera or camera.
I purchased a folding monopod selfie stick for myself. The design of the knife can be very unstable and fragile. These should be handled with care. She's doing everything she can to earn her living in the DIY category.
Tripod is a tripod in different designs. Professional equipment can change the camera angle, height, and rotation.
A multipod is the same tripod, mounted in such a way that when assembled it turns into a monopod. The “legs” are folded along the main rod or removed from it altogether.
- Mini tripods , the same, multipod, only with short legs, low design, 30-40 cm high.
- Tripods - clamps, tripods-clothespins are essentially structures for attaching to a table, shelf, etc.
- Flexible tripods are mini tripods with bendable “legs”, which, ideally, should be easily attached to any post, tree, branch, etc. In fact, everything is not so simple, especially in inexpensive options - the legs are not strong enough to hold a heavy mobile phone and, especially, a camera in any position. So the ability to insert the camera in the tilt and desired rotation is limited.
Video about mini tripods and selfie stick monopod.
Watch a piece of the video lesson from my training in the video montage where I show my working tripods. This will help you avoid thoughtless purchases or, conversely, buy exactly what you need.
Simple tripod holders using bolts and glue
Before moving on to more complex designs, review the requirements to ensure that the rack and mount you create does not become unusable.
Requirements for a homemade camera tripod
Working height of a homemade tripod
It is good if it is adjustable over a wide range. But for a homemade tripod it is difficult to ensure that the minimum height is 20-30 cm and the maximum is 1.5 meters.
Reasonable limits are from 50-80 cm to 1.5 meters. This is enough for both shooting objects on a table, for example, and for shooting “full-length” without distorting the picture.
Stability, reliability
– the tripod must support the weight of the camera and not fall at the slightest vibration of the floor or wind.
Carving is important to know!
For homemade tripods, this characteristic is important, since you will have to select bolts for mounting.
So, there are two main standards for fastening threads. These are 1/4" and 1/8". Check the threads of your devices and use bolts of the appropriate sizes.
Tripod made from a plastic bottle
The difficulty is not high:
- drill a hole in the lid;
- insert the bolt and strengthen it with glue;
- fill the bottle with water for stability;
- close the cover and place a gasket on the bolt;
- attach a camera or phone mount.
Do-it-yourself stable tripod tripod made from razor blade
The idea is not mine, I saw it on the Internet!
Three plastic razors will serve you as tripod legs.
By attaching them with glue or screws to the triangular base, you get an almost finished tripod.
Before attaching the razors to the base, you need to drill a hole in it, insert a bolt of the appropriate diameter for attaching a camera or phone holder - and the tripod is ready for use.
A problem may arise with the base - you will either have to cut it out of wood or look for a triangular object of acceptable size.
For reliability, it is better to strengthen the bolt with glue (moment, epoxy) and use a rubber gasket so that the camera is attached more tightly and does not rotate during shooting.
The spool is small, but expensive, isn’t it? Why not replace Chinese “octopuses” on the table?
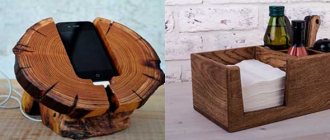
Wooden candlestick
This type of stand can be easily made from a tree trunk. To work, it is necessary to prepare the area of the trunk where there is a branch.
The bottom should be filed so that the end result is a strong and beautiful platform. In addition, from the thickest part of the trunk you need to cut out disk shapes with a diameter of about 3 cm according to the number of branches.
The finished cuts are fixed with self-tapping screws, each on its own branch. They are located parallel to the floor surface. After the structure is painted, it should resemble a large candlestick.
Types of bar counters
In conditions where the kitchen area is sufficient, the bar counter is installed taking into account its main purpose: just to quickly sit down and drink a cup of coffee or tea, or have a quick snack. In connection with this purpose, the bar counter is equipped with: there are holders for cups, for glasses, for wine glasses, as well as a shelf on which various drinks are placed. The shelf is fixed on one side to the wall, and the other side is attached to the edge of the kitchen unit. It is also permissible to place it in the middle of a free zone.
Bar counter in a small kitchen
If the kitchen area is small, then the bar counter is most likely multifunctional. It can serve as an element that divides the area into the kitchen and the dining room. If the kitchen is very small, then the bar counter will serve as a dining table. In this case, it is better to place it against the wall.
Bar counter along the wall
In kitchens with an area of 11 square meters or approximately the same, bar counters are made in the form of a peninsula, as if protruding from the side. To make more efficient use of space in the kitchen, cabinets and shelves are placed under the countertop. This is quite simple to do, since this element rests on pieces of pipe that are attached to the structural elements.
In the form of a peninsula
This is how multi-stage kitchens are formed, which are extremely popular. The fact is that in such kitchens it is more convenient to perform any operations.
As a rule, bar counters serve as a demarcation between different zones in studio apartments. They delimit the kitchen area, the hallway area and the recreation area: as you wish. Often, the bar counter is nothing more than a continuation of the desktop, in the form of an island or peninsula.
The bar counter can also serve as a partition, so its base is made of plasterboard, and the element itself is attached to either side.
Attached to a plasterboard wall
In other words, there are quite a lot of solutions, so choosing the most suitable one for specific conditions is not at all difficult.
DIY Tripod Tools
Tools needed to create a tripod
For five-minute tripods, you won’t need any tools, except perhaps scissors, and even then not always.
But for “serious” tripods, which have three legs that change height, more serious tools will be required.
Here's the main list:
- drill;
- hacksaw;
- pliers, wire cutters;
- screwdrivers (screwdrivers).
In addition, scissors, glue and other tools and materials that the Master always has in stock.
Original pencil holder made from ice cream sticks
Creating a bright and functional stand often does not require large financial expenditures. It is enough to limit yourself to the most accessible materials.
Let's list what you can make a pencil holder from:
- Wooden ice cream sticks;
- A plastic cup;
- Glue;
- Scissors;
- Paints with a brush;
- Some colorful yarn.
Stages of work:
- Using scissors, cut the cup to half its height.
- Cover the entire outside of the cup with chopsticks.
- They will lie tightly at the bottom, and a gap is created between each stick on top. Paint the workpiece with the desired color.
- Glue the end of the thread from the inside and begin to braid, as shown in the photo.
It is better to use several threads of colored yarn to make the pencil holder more original. The tips of the sticks should be left free at the bottom.
Home photos
Sometimes we want family photos to make us happy every day. But where to place them? I would like it in a very visible place, but they can’t float in the air!
In this case, it is best to go online and find a photo of a stand made by yourself.
To give yourself such a nice gift, you need to have the necessary materials and tools on hand. These include:
- wooden plank;
- spray paint;
- sandpaper;
- primer;
- masking tape;
- wooden clothespin;
- good and strong glue.
Work should begin by preparing the wooden board (sand it with sandpaper and, if necessary, prime it). To get straight lines when applying paint products, cover the board with masking tape.
Next, apply the paint and wait until it dries (one day will be enough). On the back side we attach a clothespin with glue (it will serve as a support for the stand).
- Cake decor - master class on original design and decoration methods (75 photos and videos)
- Do-it-yourself decoupage - manufacturing technique, master class and step-by-step instructions for drawing (105 photos)
- Original do-it-yourself decor: master class on making decorative elements with your own hands (110 photos and videos)
That's all, now a photograph of the closest people will delight a person every day.
Dimensions and dimensions
There are no strict rules in this regard. There are some recommendations that are violated in about half of the cases. The recommendations relate only to the height and width of the tabletop:
- The height of the bar counter is usually 1.1-1.2 meters. Then special high chairs are placed next to her.
- The width is at least 30 cm, optimally 50-60 cm. You shouldn’t go less than 30 cm: even a small plate on such a tabletop will be in danger. And it’s just inconvenient: you can’t put your elbows down, you can’t really lean on your elbows.
The length, shape, number and shape of the legs are all at your discretion. Speaking of legs. The traditional counters that were in drinking establishments are a table top on a cabinet. But for a kitchen, for some reason, a tabletop with one pipe from floor to ceiling is considered a “classic”.
Something like this counter is considered a classic in kitchen sets
By the way, in this form it is practically not used anymore. More functional analogues with cabinets and cabinets predominate.
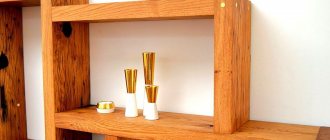
MK frame stands | Country of Masters
I needed an A4 frame, but I couldn’t find one with a stand to put it on a table, only one with loops to hang it on the wall. So I decided to make the stand myself.
I cut out 3 templates like this (you can do more, depending on how heavy the frame is)
And 2 such corners (a rectangle made of cardboard was bent in half)
I glued the templates together and glued the corner on one side and in the same way on the other side.
It should look like this.
I covered this blank with self-adhesive film and glued it to the frame.
Maybe it will be useful to someone.
stranamasterov.ru
Glass jar pencil holder for food
From a glass jar you will create a very convenient pencil holder with your own hands, which can be given as a gift to your child’s favorite teacher. Look at the photo how cute and romantic the finished craft looks.
To create such a masterpiece, you will need:
- Any glass jar;
- Masking tape;
- Red acrylic paint;
- Pencil;
- Scissors;
- Glue;
- White paper napkins;
- Stapler
Stages of work:
- Draw any pattern on masking tape: a heart or a little girl. Cut out and glue in the middle of the can.
- Paint the jar red and let dry. Then carefully remove the template.
- Fold the napkin in half twice and secure it in the middle with a stapler.
- Lift the petals and fold them so that the flower becomes voluminous. Create several of these flowers.
All that remains is to glue each flower to the edges of the jar.