How to avoid these inconveniences at home or at work
A modern gadget has many functions besides telephone communication. Plus a dozen more necessary digital things: graphic editing, the Internet, a notebook or pocket computer (organizer), TV and music player and more.
A lot of time is spent searching for a charger and headphones. And at least at home they should be next to the mobile phone on the same stand.
Below are clear instructions on how to make a stand with your own hands.
Use your imagination and select materials. If you don’t want to purchase neat and expensive factory-made coasters.
DIY stand case for your phone or tablet
The most popular option for a gadget stand is a stand case. You will have to tinker with it a little, but the result is worth it. This option is convenient to take with you when traveling, it is durable and can protect the screen.
To make such a holder you will need:
- facing material, it is best to choose leather
- material for interior cladding
- plain and thick cardboard or rigid material
- elastic band for fastening
- pencil
- ruler
- scissors
- glue
- double sided tape
How to do it?
- Cut the cardboard according to the size of the tablet so that it completely covers it. This is the future basis, the dimensions of which will be basic for all elements.
- Make several folds in the same way that the front of the case will then need to bend to support the tablet.
- Now we take hard material, which will give the case stability. We cut it so that it follows the contour of the workpiece.
- We apply it to the base and make an edging so that it does not interfere with the folds.
- From the inside we treat the case with soft materials, gluing it to the base blank with double-sided tape.
- The next step is fastening for the tablet itself. To do this, we make small holes in the rigid elements for elastic bands that will hold the tablet.
- We glue the finishing material on the outside.
Do this as carefully as possible. The appearance of the product will depend on this.
That's all. The stand is ready! It is convenient and can be used not only as a holder, but also to protect the screen.
From cardboard
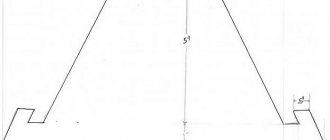
Pick any strong one. Although you can also practice how to make a paper stand (there is a video). If your smartphone is 18 cm long, then draw a rectangle 75 cm long and 2 - 3 cm wide than the narrow part of the gadget.
Cut it out. Mark the fold strips with numbers: 1 - at 17 cm, 2 - at 24 cm, 3 - at 18 cm, and 4 - at 16 cm. Count the 24 cm line as the middle, and make all folds from it inward.
The largest part (No. 2) is the gadget’s bed; make a slot in it five cm from the bottom according to the thickness of the cardboard.
No. 4, cut to a depth of 6 cm, will fit into it from the inside. Place your mobile phone on this ledge. No. 1 will become the base of the stand, and No. 3 will become the vertical support.
Pros and cons of each method
Let's summarize and consider the pros and cons of each method.
| Method | Advantages | Flaws |
| Cassette case | No additional tools required - simply deploy. | Unprepossessing appearance of the plastic box. |
| CD case | Hangs on the wall, conveniently holds your phone. | Due to the number of small parts, the technology requires human accuracy. |
| Pencils and eraser | Available raw materials. | Not suitable for large models. |
| Toilet paper rolls | Ease of execution. | Only for small gadgets. |
| Lego | There are many assembly options that can be modified to suit the device. The tired support is rebuilt into a new one. | Unpresentable appearance. |
| Wire | Lightweight designs do not take up much space. | They can scratch the body and glass of the phone. |
| Paper | There are many assembly options according to the diagrams. | They require accuracy from the performer. |
| Cardboard | Easy to create, suitable for gadgets of various parameters. | You need to take only dense raw materials. |
| Plastic bottles | Available material. | After cutting, sharp edges remain. |
| Binders | Easy to assemble and disassemble. | They slide on the table. |
| Paper clips | Easy to use. | They require attentiveness from the performer. |
| Wine corks | Availability, many assembly options. | Wine stains are difficult to remove. |
| Tree | Looks prestigious, lots of solutions and schemes. | You need to have cutting skills and have a special tool. |
3.8/5 — (5 votes)
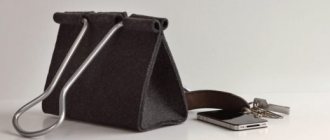
From fabric
The shape is a soft pillow. This business is for women. Cut a square of textile 10 cm longer than the vertical of the smartphone. Then fold the fabric in half to create a rectangle.
Sew the bottom part using a machine or by hand, carefully place the remaining padding polyester or cotton wool there, twisting them into a roll. This will be the heel on which the smartphone will rest. Next, also lay a line behind it.
From there, about four centimeters, smooth out the bottom and front side and back of your rectangle of fabric, and stitch again.
Up to this part of the pad, stitch from bottom to top at the junction of the strips, and also from above. Only the space for stuffing the top of the pad with synthetic padding will remain open. Close it with a seam too.
But unusual. You will have to trim it further so that when sewn together you get a triangle, with an acute angle downwards. This is the leg of the pad, and the smartphone rests semi-vertically on the wide part.
The stand is mostly ready. All that remains is to stitch or attach a pocket for the charger with Velcro. Now you will be surprised how you managed to make the stand yourself so quickly.
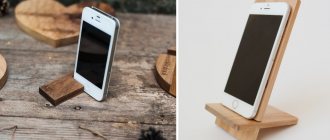
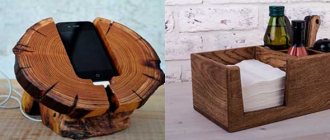
Wooden structures
It is worth considering that the stand for the tablet is made taking into account the weight of the device. Therefore, it makes sense to use harder and more durable materials for it. So, to make a structure from wood beams, you need:
- align the edges of the workpiece;
- outline the dimensions of the smartphone;
- cut along the markings with rounding and surface treatment to remove roughness;
- mark the locations for the grooves at the back;
- cut holes, clearing them of debris;
- sand the product, then treat it with stain;
- assemble elements into a single structure.
As an alternative, you can use a board in which you will have to cut a gap in the middle with a table saw.
The excess material is cut off. The groove must be made at an angle to ensure the desired tilt of the device. The hole made needs to be sanded and coated with oil.
PVC
80 percent of apartment chemicals are bottled in PVC. Find an empty and flat one, or better yet a 0.5 liter semi-oval one. Wash well. Measure 24 cm from the bottom and cut off the entire top.
Take the back part as the sole of a slipper and cut it off so that a full slipper comes out. The recess of the container will become a pocket for the gadget.
Above, “on the heel of the slipper,” cut out a window. You will insert the plug of the mobile phone charger through it. The “slipper stand” with the gadget will hang on it.
You can paint the toe of the stand with paints at your discretion or cover it with prints. Look at the picture.
Holders that attach to the wall
If you want to turn your smartphone into something like a television panel, you can use an old disc box as the base of the holder. The work is performed according to the following scheme:
- After measuring the device parameters, the case is disassembled into two parts.
- The smartphone diagram is printed on a flat plastic part. The design will require a rectangular back panel with four sides along the edges.
- The parts are cut according to the markings. To prevent the screen from scratching on sharp edges, they are dulled with sandpaper.
- Now we need to connect the structural parts with a glue gun.
- An element with openings for self-tapping screws is attached to the upper part of the holder on the wall side. The bottom edges are supplemented with corners and a soft film to prevent the device from accidentally falling.
All that remains is to screw a couple of screws into the wall and hang the finished structure on them.
A hanging holder can be easily made from a bottle. To do this, the neck and part of the front wall are cut off. All that remains is to make a hole for the hook in the upper back part. Using a similar scheme, holders are made from containers left over from shampoos or shower gels.
Made of wood, plywood
Unlike cardboard, which can be cut with a knife or scissors, these materials require a jigsaw. But it will turn out to be a very strong and stable stand.
Have you chosen the grumpy cat shape? Great, draw its outline as if looking at it from the front. The ears are strictly on the top of the head. Insert the lower part into the slot of the rectangle on which the cat will sit.
A little higher, glue in the paws and toes, also cut out with a jigsaw. You will place your mobile phone on your paws.
Classic version
It will require:
- Roulette
- laminated chipboard
- Screwdriver
- Jigsaw
- Pencil
- Scissors and paper
First prepare an ordinary rectangular shelf, where it is possible to attach a rack with a telephone directory and other small devices. The side shields are equipped with 2 similar stripes. The width is 25 centimeters, and the height is 30-35 centimeters. On the front side, you can round off all the sharp corners. This will protect your hands and other parts of your body from accidentally hitting a dangerous surface when you try to sharply lift the handset.
Mark on the tile in one place where you will cut, and then do a similar operation on the other side. Mark everything with a regular pencil so that everything can be easily erased later. You can cut off the excess with a simple jigsaw.
The shelf for the telephone in the hallway does not exceed 40 centimeters in width. The depth of the plates themselves does not change - 25 cm. The bottom shelf can be made so that it can accommodate a telephone directory or components for a phone - headphones and a charger. The height of the inner part can reach 11-14 cm. But there is no need to install another horizontal bar.
When assembling, measure and drill holes where the horizontal ceilings are then inserted. Only then can furniture screws be screwed in there. If this is not done, the tree will easily split and lose its pleasant appearance.
Arrangement in a home greenhouse
Briefly about how to make a flower stand.
First, decide where the stand will be located: on a windowsill, on the wall of a balcony, just on a tripod in the courtyard of a country house or cottage.
Then decide on the materials: metal rods - they require welding, a little simpler - a wooden frame stand mounted on some wall. Next, watch the video to see how it’s easier to do.
Additional Information
You can use an element that will suit both cases above - this is an edging running along the outer edge. To attach it, you need to find some kind of heating surface, for example, an iron. Apply it with simple movements and secure the edge.
Hallways 2022: TOP-200 photos of the best new products and modern design. Options for the ideal combination of color and style of furniture in the hallway- DIY stool: manufacturing methods and instructions for creating simple and stylish models (90 photo ideas)
- Do-it-yourself door finishing: 115 photos of the best options for entrance and interior doors
Be sure to try to hide any exposed connections. Before drilling, you need to remove a small area. Its diameter should match the diameter of the screw head. After you have drilled everything successfully, you can drip glue onto the wood, and then the cut element is pressed.
If you do all this carefully, nothing will be noticeable. You need to drill with a specialized drill, which ends in a special head that helps create a groove just the size of the head.
Usually, a wall-mounted shelf for a telephone, when made from laminated chipboard, also has a special design applied. First, they make a small hole, and then manually cut out, for example, a gnawed apple with a jigsaw. In this case, working with your own hands is justified.
When attaching to the wall, you need to screw a couple of fasteners on the back side, and for a good fit, you can take 3-4. If everything went well, then don’t rush to rejoice. The shelf must be disassembled and reassembled again, gluing all the joints with glue. Then you can safely forget about the service life of this item in the apartment. Everything will hold out calmly for 20, 30, and 50 years. The main thing is that your eye is pleased with the final finished product.
Photo tips on how to make a stand
https://www.youtube.com/watch?v=AL77AN5hJBg
Types of models
The era of information technology development dictates its own rules. Mobile phones have become so indispensable that people practically never let them out of their hands. With the increasing importance of this device, the telephone stand has its own advantages. Firstly, she organizes everyday life. Secondly, it discourages you from constantly keeping your phone with you.
Popular types:
A stand made from stationery binders A stand made from a sheet of paper A stand made from a Lego constructor A stand made from a paper clip A stand made from a case for a cassette tape A lounge chair for a phone