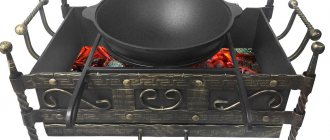
To cook food on the grill using a cauldron, you definitely need a special holder. It can be purchased at a specialty store.
Industrial devices for cauldrons are quite reliable, durable, easy to use and affordable.
Or you can do it yourself. In this case, tools and materials can be improvised objects, old buckets, pipes or remnants of fittings.
Many samples of factory devices can serve as an excellent example for making an analogue with your own hands.
Types of stands for cauldrons
Cauldrons for cooking are most often presented in the form of cast iron cookware in the form of a hemisphere.
Kazan is a cast cauldron. Its distinctive feature is its semicircular bottom, which does not allow it to be installed on the hearth without a special supporting device - a tripod.
Due to their structure, they are inconvenient to install on an open fire. Therefore, special stands were invented. They come in several types.
If you have a certain list of tools and materials, you can do it yourself.
Tagan on three legs
The tagan is a metal structure that consists of a small ring and three long legs.
The stand for the cauldron has varieties - depending on the material and place of use - on the grill, fire or stove.
The cauldron is installed in such a way that the legs rest firmly on the ground at an angle, and the cauldron itself is located above the fire in a ring.
The legs of the three-legged stand are installed in the form of a cone. An equal distance is maintained between them, which is an important factor determining the degree of stability of the structure.
Tagan on four legs
A tagan on four legs has a similar structure and operating mechanism. This design can be produced in disassembled form. Thus, you can adjust the length of the legs, and even the ring itself to hold cauldrons of different sizes.
The design of a four-legged stand is similar to that of a tripod. Their only difference from each other is the presence of a quarter support.
Supports for table or stove
A ring with small legs (about 30-50 cm) is called a ring. It is mainly used to hold semicircular dishes over a regular burner.
It can also be a stand for a cauldron on the table.
Support and hook design
Three long legs connected to each other are firmly installed in the ground, and at their intersection there is a hook - this is what the simple design of this cauldron holder looks like.
Instead of a circle on legs, there are models with a hook where the cauldron is hung.
But it will only work if the cookware has an additional handle, by which you can hang it where the grill is located.
A tripod for a cauldron is the most optimal solution for cooking over a fire.
Requirements for the grill
But before you cut and cook, you need to decide.
First of all, take a critical look at your grill: is it strong?
The cauldron stands precariously
Second: the width of the grill. The cauldron should fit the width of the grill.
Third: the depth of the grill. The cauldron is held securely if the ring fits almost under the handles. And in this position, there should be space under the cauldron for firewood or coals.
Some take a smaller ring and it turns out that the cauldron is wrapped in a ring in the lower half. But this is not reliable. Remember how well a wok collapses, the same will happen with a cauldron in such a stand.
Fourth: Grill legs. Considering the weight of the cauldron and the height of the center of gravity, it must be stable.
How to choose a stand for a cauldron
The choice of a stand for a cauldron depends on several factors:
- the environment where the cooking will take place;
- stand material;
- volume of the ring.
For example, stands made of cast iron, although they hold the fire temperature well, are very heavy. Therefore, they are more suitable for stationary use.
Such stands are used at home for cooking dishes in cast iron over electric stoves or in home blast furnaces.
The best option for lovers of picnics in nature are steel and aluminum stands. They are much lighter than cast iron and are not inferior to them in reliability. Therefore, they are more convenient to transport.
They are easy to move, but it is not recommended to place a heavy cast-iron cauldron on such a stand.
Important! When choosing a stand, regardless of the type and material, it is necessary to constantly compare the diameter of the cauldron and the ring of the structure. The latter should be slightly narrower than the dishes so that they are firmly supported by weight.
Preparation of material
Preparatory work and assembly are carried out in the following sequence:
- The pipe sections must be the same size and range from 150 to 200 cm. Using a saw, give them equal length;
- The loop of one of the bolts is slightly loosened with pliers. The loops of the remaining 2 bolts and the top link of the chain are threaded into it. Then the loop is clamped again with a hammer to ensure the reliability of the structure;
- The ends of the bolts with screwed nuts are inserted into separate sections of pipe. If the bolt enters the cavity freely and dangles, use a hammer to flatten the pipe above and below the nut;
- To hang the pot, one of the steel hooks is put on the lower link of the chain, and its upper loop is clamped with a hammer. This ensures that the hook does not come off at the most crucial moment;
- A second hook is inserted into a chain link located 3–4–5 links from the top and the loop is also secured with a hammer. The design will allow you to lift the pot by hooking several chain links to the lower loop.
The resulting tripod folds easily. Adjustment of the height of the suspension is possible not only due to the chain, but also due to the sliding and spreading of the supporting reinforcement.
Adjustment of the height of the suspension is possible not only due to the chain, but also due to the sliding and spreading of the supporting reinforcement.Another option for a homemade tripod is made from pieces of DIN rail. In this case, it is useful to make the legs consisting of 2 parts, which will allow you to obtain a more compact product. The halves of the supports are fastened with wing bolts, and at the top the legs are connected with metal wire.
A stronger structure will be made from a steel profile pipe. The upper parts of the supports are bent to form a shoulder and fixed between two steel plates fastened with a pin. It is impossible to simply bend profiled steel, so you will have to cut out the corners, bend them at the cut, and then fasten them by welding. The heaviness of the resulting product and the need to think through reliable fastening of the arms between the plates limit its use. It is better to focus on a simpler and more easily implemented model.
A stronger structure will be made from a steel profile pipe.
How to make a stove from a pipe
You can make such a stand yourself from a metal pipe. Due to the fact that its design is quite simple. A cauldron stove consists of a long cylinder, at the bottom of which there is a grate, two holes for supplying firewood and at the very top several petals for holding the cauldron.
An alternative and more sophisticated support product is a portable stove.
It was made in such a way that all the heat emanating from the fire was concentrated inside the walls of the stove cylinder. And it made the cauldron with food heat up faster.
The advantage of the stove over other cauldron stands lies in its design.
Materials and tools
Materials
- A piece of pipe with thick walls for the cylindrical part of the furnace. Approximately 100 cm.
- Narrower chimney pipe. Approximately 12 - 13 cm.
- Metal corners for the arms and legs of the structure. There is no specific size. It all depends on convenience.
- Metal grate.
Bulgarian.
Tools
- Bulgarian;
- drill;
- welding machine;
- hammer;
- building level.
Welding machine.
Important! According to safety precautions, when working with a welding machine, the master must have gloves, goggles and a mask to protect exposed skin.
Creating a Project
The process of creating a stand for a cauldron with your own hands in the form of a stove comes down to three main steps:
- preparatory part;
- creating a design drawing;
- assembly of all parts.
When creating a drawing, it is necessary to accurately indicate the length and number of grates for the bottom of the furnace, as well as calculate the size of additional elements such as handles, legs, the size of the firebox window, etc.
Drawing of a stove made from a pipe.
DIY assembly
When all the elements of the furnace are assembled and prepared, the assembly stage of the product begins. To do this, according to the drawing, you must first mark on the pipe all the holes that will be cut using a grinder, as well as the petals for installing the pot.
Important! To cut out holes for the chimney and firebox, it is better to use circles of different diameters to make the cuts more accurate.
Furnace assembly.
The following actions are carried out using a welding machine. With its help the chimney is welded. It should be installed at an angle of 45 degrees. Next, a door is made for the hole where the coals will be poured, and additional elements in the form of legs and handles are mounted.
In the end, if the structure has successfully passed through the first baptism of fire, namely the firebox, then it can be coated with fire-resistant paint and left to dry.
Cooking in a cauldron on a homemade stove.
Possible difficulties
At the assembly stage, some difficulties may arise that were not taken into account at the time of creation of the project, namely:
- quality of materials;
- is the metal of the pipe suitable for cooking;
- weight of the structure;
- distortion of the shape of structures under the influence of high temperatures, etc.
It is necessary to test the oven.
The finished stove is coated with fireproof paint.
All of them can be eliminated with the help of a preliminary test of all metal structures. Several options of pipes are taken, made of different materials (cast iron, aluminum or steel) and each of them is checked using a welding machine. The material that retains heat best and is not very heavy will be chosen as the basis.
If not one of the metals passes the test, then perhaps the problem lies in the welding machine itself and its current strength.
A stove for a cauldron purchased in a store.
Operating principle of the furnace
The nomads carried a cauldron with them, but they didn’t do any tricks over the hearth: they dug a hole, lined it with clay and stones, made a shallow hole on one side from below for storing firewood, and on the other side from above - a hole through which smoke came out. Such a simple hearth worked flawlessly. A fire was lit at the bottom of the pit, and at the first stage of cooking, the flames only heated the bottom of the cauldron: this was enough to melt the fat and fry the meat. At the same time, the fire heated the stone walls of the hearth, and the rice was cooked in the heat that they slowly released.
A modern stove is the same hearth, only made of metal or brick, on a pedestal, with a chimney and a flat top surface.
Step-by-step manufacturing instructions
When all the preparatory work has been completed, you can proceed directly to assembling the tripod for the fire. It is performed using the following technology:
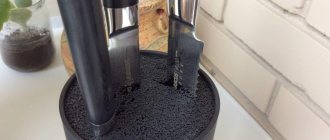
The pipes are cut to the required length. To connect the bolts together, you need to loosen the loop on one of them. The others dress on her. The easiest way to cope with the task is to hold the bolt itself in a vice and use a gas wrench or pliers to loosen the ring. In fact, this part of the assembly is considered the most difficult. Not only the bolts are put into the eye, but also one of the ends of the chain. By using a hammer, the ring with the parts put on it is compressed
It is extremely important that they do not fall out. Now the legs of the structure are attached. To do this, you need to insert the end of the bolt with a nut screwed onto it in advance into one of the ends of each of the pipes. Then you need to put a hook on the chain at the top of the future tripod, which allows you to adjust the height of the pot
It is located on the third link of the chain. Another hook is placed on the last link of the chain. Be sure to clamp its end. It is on this part of the structure that the cauldron will be hung.
If you have the strength and desire, the functionality of the created structure can be expanded. For example, if you drill holes in the legs and fix hooks there, it will be possible to dry shoes or place dishes close to the fire to prevent food from getting cold.
Making a tripod for a cauldron yourself is quite simple. To cope with this task, you do not need to have any special skills or knowledge. To obtain a simple, convenient design, it is enough to strictly follow the step-by-step instructions. Thanks to the efforts made, a practical, compact holder will appear, in no way inferior to store-bought options.
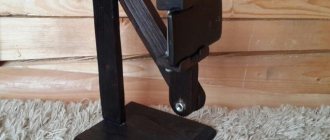
Mark the steel rod, making three blanks for the legs, each 60 cm long
Use a grinder to cut the rod according to the markings
Using a drill and a metal drill, drill a hole with a diameter of 5 mm along the edge of each rod
On all three legs, slightly bend the edge with the hole. Insert a small piece of wire with a diameter of 4 mm into all holes, bending it into a ring with pliers
Cut off excess with a grinder
Use pliers to align the ring in one plane
Weld it in. Make a hook from a wire with a diameter of 4 mm using pliers.
Attach a piece of chain of a convenient length to the hook
Sunny option
If possible, you can make a fireplace for a solar cauldron with your own hands. This model is very convenient and efficient to use.
To make it, it is enough to find cardboard, which should be covered with aluminum foil, it can be ordinary baking foil. Please note that metallized plastic is not suitable in this case, since this material is not dense enough.
Note!
- DIY garden paths - varieties of materials. Step-by-step instructions for DIY installation and decoration
Do-it-yourself sauna stove: types of structures and manufacturing materials, technology and stages of work + do-it-yourself construction instructions
- Do-it-yourself shower stall: types of structures, choice of manufacturing and finishing materials, step-by-step instructions for DIY construction
To assemble a stove for a cauldron with your own hands, you will need to transfer the drawings to the material from which it will be made. Assembling the model is extremely simple, the main thing is to find a good drawing.