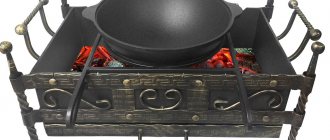
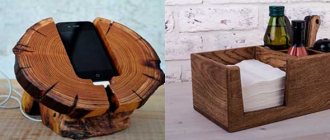
To cook food on the grill using a cauldron, you definitely need a special holder. It can be purchased at a specialty store.
Industrial devices for cauldrons are quite reliable, durable, easy to use and affordable.
Or you can do it yourself. In this case, tools and materials can be improvised objects, old buckets, pipes or remnants of fittings.
Many samples of factory devices can serve as an excellent example for making an analogue with your own hands.
Everything with your own hands
At first we imagined the stove like this:
We make a stove for a cauldron from a pipe:
- We cut the workpiece to size for the oven. Need 450 mm. Parallel, even cuts make the stove neat. If it doesn’t work out smoothly: make the most even cut at the top and straighten the grind. by car.
- We cut a hole for the firebox.
- In the sheet prepared for the grate, mark and drill as many holes as possible. It is convenient to mark the holes with concentric circles in a checkerboard pattern. We drilled with an 8mm drill.
- Weld a grate blank to the bottom end and cut off the protruding parts.
- In the upper part we make even cuts for the smoke to escape. The cutouts are triangular with a side of 10 cm. We make 4 cuts. Special precision is not required, but the more carefully you do it, the more accurate it will be. If you decide to make a chimney, then instead of cutouts, weld a piece of pipe at least 10 cm in diameter on the opposite side of the firebox opening (coordinate the size with the chimney pipe).
- Legs. Legs 3. We select the height of the legs so that the top of the cauldron is somewhere at waist level. We got legs 750 mm long. The legs are welded at an angle of 10-20° outwards (no more than 30°) and cut so that the stove stands level.
- We weld the handles at the top. The handles must support the weight of the oven. A good option would be handles made of 10 mm reinforcement.
The result was a working stove from a pipe for a cauldron. We didn't paint it: it would burn.
What not to do
When working with metal, you must follow safety precautions. Do not neglect personal protective equipment.
Before cutting a metal barrel with a grinder, you need to make sure that there are no volatile explosive substances inside.
There are barrels with a protective polymer or paint coating. They are calcined in a deserted place before use.
Do not leave burrs on cuts, sharp cutting edges, or scale on welds. Place a grinding disc on the grinder and clean out dangerous areas.
It is not necessary to make grates and the ash door like in a real oven. By improving the stand, you will get a classic potbelly stove with a chimney. But to cook dinner for a group, the heat in a simple barrel is enough.
Kinds
A tripod is a simple design common among outdoor enthusiasts. The size of such stands ranges from 60 to 120 cm, and the choice of a specific model directly depends on the goals of the future owner. Let's take a closer look at several types of products.
- Small - a tripod for a cauldron with a height of about 70 cm can be easily and quickly installed above the fire. The hook clings to a chain, thanks to this design it is easy to adjust the height for different types of dishes, as well as control the cooking temperature. The small stand is especially popular among tourists because it is easy to carry.
- Large - such a tripod can be more than a meter high. The main advantage of the design is that you can hang a cauldron of any diameter on it. The dishes should have handles in the form of brackets, with which they can be secured to the support. This durable device is made of steel. The disadvantage is its impressive dimensions, which do not allow transporting the stand to the picnic site. Such models are usually used on personal plots.
- Round is a convenient option for preparing complex dishes. This stand looks like a short cylinder on three legs; a cauldron is placed on top of it. There is a hole in the wall for lighting a fire under the container. This is a convenient option that quickly heats and cooks food using only a small amount of wood or coal. With all its convenience, this is a three-dimensional design: the diameter of the pipe for a cauldron with a volume of 10–12 liters will be no less than 40 cm.
- Folding is the most convenient and easiest design for transportation and storage. When folded, it takes up very little space and is easy to disassemble and assemble. The tripod is assembled from hollow tubes, they are quite reliable, but at the same time easy to carry. The legs usually consist of two parts inserted into each other. This solution ensures compactness; the product can even fit into a bag. Folding tripods often have a hook and chain that allows you to control the height of the utensil. The permissible weight of a full cauldron on such a stand cannot exceed 10 kg.
- With two hooks - the simplest design with a small crossbar on top, which allows you not only to cook food, but also to heat the kettle at the same time.
The last few models are suitable for preparing food while hiking because they take up little space and are light in weight.
Big
Folding
With two hooks
Small
Round
What is a fireplace for a cauldron?
A fireplace is a stationary or portable stove, either factory-made or home-made. This is usually a round structure that looks like a barrel. Such a stove consists of a bowl, a fence around it and a chimney with a grate for continuous air circulation. Such structures are made from any heat-resistant materials that accumulate heated air around the hearth. In a stove that is closed on all sides, the flame is not blown out by the wind or flooded by rain, and the amount of wood needed is much less than for a fire.
They use both factory-made metal hearths and stoves made with their own hands from heat-resistant materials at hand.
The design should evenly heat the walls of the cast iron cookware. It is important that the size of the hole matches the dimensions of the cauldron. In addition to the cauldron, you can cook in other dishes.
Design Features
The design of the stand directly depends on the cauldron itself, which can have a flat or round bottom and vary in size and weight. This explains the division of support into the following types:
- A traditional tripod-tagan, which is a circle into which a cauldron is lowered, and three legs extending from the circle at a slight angle. This design is simple, stable and reliable, and the stands themselves can be monolithic or collapsible. The latter is convenient to take on a hike.
- Podkazannik – a square design with a round hole on top, used on the grill.
- A miniature stand used to stabilize a round cauldron on a gas stove or table.
- Suspended structure - can be made in the form of three metal guides connected to each other at the top. A hook is mounted at the top, on which the cauldron is suspended over the fire. This tripod is suitable for using different sized cookware.
A correctly placed tripod makes cooking convenient, and it is important to follow the rules for using the product:
- It is necessary to consider the possibility of access to fire and coal in order to regulate the heating of the container.
- The weight of a filled cauldron is quite large. If a fire is lit on damp or frozen soil, then under the influence of temperature its density may change, the legs will go into the ground and the tripod will change its inclination. A design without a suspension system can even topple the boiler due to the shifted center of gravity. In order to avoid troubles, you need to place pieces of board under the legs in advance or weld small plates to them.
- You should not place the legs of the product in a fire, since heating the metal can cause its deformation, and touching a hot part will lead to burns.
Varieties
The pot hanger has a simple design. There are several varieties of it. The choice of one or the other directly depends on the purpose of use. It is worth considering each option in more detail:
- Small. It reaches a height of about 70 centimeters. Installation of the structure is carried out quickly. The product is equipped with a hook fixed on a chain. Thanks to its presence, it is possible to easily adjust the height depending on which pot is used and regulate the temperature. The small suspension is very popular due to its ease of transportation.
- Big. The height of the product can exceed a meter. Its main advantage is the ability to hang cauldrons of any size. The main thing is that they have handles. With their help, the dishes are fixed on the support. The large tripod is made of steel and is considered strong and durable. True, it has an impressive size. Accordingly, transporting the product causes difficulties. As a rule, such options are chosen for use on a personal plot.
- Round. This holder is considered the best option if you plan to prepare complex dishes. It is a cylinder with three legs. He is placed on the fire. A cauldron is installed on top. There is a hole in the walls, thanks to which it is possible to light a fire under the dishes. Food heats up and cooks quickly. Consumption of coal or firewood is reduced to a minimum. True, the design is quite voluminous. Accordingly, it is inconvenient to take it with you on a picnic.
- Foldable. It is considered the lightest and most comfortable. When folded, the product takes up minimal space and is quickly assembled and disassembled. The structure consists of hollow but reliable pipes inserted into each other. This ensures maximum compactness of the holder when folded. As a rule, there is a chain and a hook that allow you to adjust the height of the pot.
- With two hooks. It is considered the simplest variety. There is a crossbar at the top that allows you to simultaneously heat water in a kettle and cook food in a cauldron.
When planning to make a tripod for a pot with your own hands, it is recommended to give preference to folding models or products with two hooks. Such structures are lightweight and do not cause difficulties in transportation and the manufacturing process.
Small
Large Round With two hooks
Folding
Preparation of material
Preparatory work and assembly are carried out in the following sequence:
- The pipe sections must be the same size and range from 150 to 200 cm. Using a saw, give them equal length;
- The loop of one of the bolts is slightly loosened with pliers. The loops of the remaining 2 bolts and the top link of the chain are threaded into it. Then the loop is clamped again with a hammer to ensure the reliability of the structure;
- The ends of the bolts with screwed nuts are inserted into separate sections of pipe. If the bolt enters the cavity freely and dangles, use a hammer to flatten the pipe above and below the nut;
- To hang the pot, one of the steel hooks is put on the lower link of the chain, and its upper loop is clamped with a hammer. This ensures that the hook does not come off at the most crucial moment;
- A second hook is inserted into a chain link located 3–4–5 links from the top and the loop is also secured with a hammer. The design will allow you to lift the pot by hooking several chain links to the lower loop.
The resulting tripod folds easily. Adjustment of the height of the suspension is possible not only due to the chain, but also due to the sliding and spreading of the supporting reinforcement.
Adjustment of the height of the suspension is possible not only due to the chain, but also due to the sliding and spreading of the supporting reinforcement.
Another option for a homemade tripod is made from pieces of DIN rail. In this case, it is useful to make the legs consisting of 2 parts, which will allow you to obtain a more compact product. The halves of the supports are fastened with wing bolts, and at the top the legs are connected with metal wire.
A stronger structure will be made from a steel profile pipe. The upper parts of the supports are bent to form a shoulder and fixed between two steel plates fastened with a pin. It is impossible to simply bend profiled steel, so you will have to cut out the corners, bend them at the cut, and then fasten them by welding. The heaviness of the resulting product and the need to think through reliable fastening of the arms between the plates limit its use. It is better to focus on a simpler and more easily implemented model.
A stronger structure will be made from a steel profile pipe.
What is needed for construction. Required materials and tools
A tripod can be easily purchased in a store; the price of a cheap model as of March 2022 is a little more than 200 rubles. Such a tripod consists of three pieces of a hollow profile of rectangular or round cross-section, fastened together with a screw and nut. A steel chain with a hook is put on the screw. Profile thickness is about 1 mm. The tripod weighs a little and is stored in a case.
A more reliable design consists of three legs passed through a triangular plate with cutouts. The fittings are secured with screws. There is a hole in the center of the plate through which the chain for the pot is passed and secured at the top.
The robust design consists of three legs threaded through a triangular plate with cutouts.
The disadvantages of this product include the difficulty of adjusting the height of the pot. Theoretically, this is done by hanging the hook with the pot on another link in the chain. In practice, doing this is hot and heavy. Two people have to work: one lifts the pot, the other hooks the hook at the required height.
Therefore, for those who use a tripod constantly, it makes sense to make the device themselves. A thing made conscientiously will serve for a long time and will not let you down in difficult times.
A self-made metal product will eliminate the need to look for a suitable tree at the resting place. There is no need to cut down young trees. For this alone, it’s worth making a tripod in advance.
To make a reliable support, a drawing is not required. To make a simple but high-quality tripod you will need 3 pieces of aluminum or steel pipe. If steel blanks are used, the walls should be thin to reduce the weight of the finished product.
To make a simple but high-quality tripod you will need 3 pieces of aluminum or steel pipe.
To fasten the tubes together and form a suspension point, you will need 3 steel bolts with nuts and eyes. 2 S-shaped steel hooks and a chain to hang the pot.
From the tools you need to prepare a hammer, a metal saw - hand or grinder - and pliers. The manufacturing process is simple and does not take much time.
Kinds
The cauldrons have a classic hemispherical shape. You can cook a delicious dish in them only if you have a stand. They come in various shapes and types. Let's take a closer look at some of them.
Trivet
One of the most budget-friendly and popular options is a tripod. This support under the cauldron has the shape of a circle with three guides diverging from it. Strong fixation is ensured thanks to the precise shape of the product. The stability of the model depends on the legs, which are located at a slight angle.
Tagana has its own subspecies. The model can be built-in or mobile. It is much more convenient to purchase a collapsible version. Manufacturers did not forget to take care of decorating the device. Sometimes artistic forging in the form of simple patterns is used to decorate supports.
Despite all the advantages, the tripod also has its disadvantages. For a strong fixation, you need to find a flat surface. On hillocks and hummocks the cauldron will rock and there is a risk that it will tip over.
Four-legged design
With additional support, the four-legged stand provides a stronger, more stable fit. The product can be of several varieties: there are prefabricated and dismountable options. The design features allow you to install quite heavy dishes. You don't have to worry about the food accidentally turning over. To knock over a cauldron, you need to really try. The disadvantage of the stand is its high price and heavy weight.
Grill holder
With the help of a cooker, you can slowly simmer food. The product looks compact and miniature. It consists of a square shape and several legs that provide a strong hold. Thanks to its small size, the stand is quite stable. The podkaznik can be used both for the fire and for the table. The disadvantages of this variety include its small height. The cook will not be able to stir the contents while standing; he will need to bend over and squat each time.
From an old bucket
If you don’t have a welding machine, but have a bucket, you can simply use it to make a stable stand for the cauldron with your own hands. The bucket should not be rusty to holes. This will quickly burn out and break.
Advantages and disadvantages
The bucket has the shape of a truncated cone. The wide part rests securely even on rocky soil. It is difficult to overturn such a structure by accidentally hitting it.
It is less fire hazardous than an open fire. It turns out to be a primitive stove from which sparks do not fly.
A bucket stand is a temporary solution during the construction of a summer house or country house. It will not look very aesthetically pleasing when it becomes covered with soot. It will last only a few years, as high temperatures accelerate corrosion processes.
What is needed for this
To turn a bucket into a stand for a cauldron, you only need a chisel, a sledgehammer and physical strength. If you don’t have a grinder at hand, these simple tools will suffice. To punch a circle under a cauldron, you need a comfortable wooden block for support. For a cauldron of more than 5 liters, knock out the entire bottom.
Technology
Step-by-step instruction:
- Draw a circle of the required diameter on the bottom.
- A bucket is put on the deck and struck with a chisel along the marking line.
- A large hole is made on the side for firewood and a number of holes for blowing.
- Holes for traction are punched in the walls along the bottom.
Stand made from an old metal bucket.
Usage
The bucket is turned upside down. They put firewood inside and light it. A cauldron is placed on top. Any metal plate will be suitable as a damper.
This stand will serve for preparing various dishes in a cauldron outside the home. And in order to heat a bowl of water for washing dishes.
How to properly install a cauldron on a stand
Before lighting a fire or turning on the gas, you need to make sure that the cauldron is correctly supported and stable - you will have to stir the food repeatedly during cooking. If food is being cooked over a fire, there must be a possibility of smoke escaping, and if not a tripod is used, the stand should not be placed tightly to the ground.
Before lighting a fire or turning on the gas, you need to make sure that the cauldron is correctly loaded onto the support and is stable.
In nature, first of all, the tripod is firmly installed in the ground, without any utensils
Given the unevenness of the surface, it is important to fix the stand and level it as much as possible. For better heat concentration, the fire ignition area can be lined with bricks or stones
It is worth remembering that the fire must not only be concentrated in one place, but also provided with sufficient oxygen.
When installing a cauldron, it is better to ensure that the flames do not touch the dishes themselves.
Before installing the cauldron, you need to light the fire until it burns steadily. When installing a cauldron, it is better to ensure that the flames do not touch the dishes themselves - firstly, the food will burn in the places where they touch, and secondly, the hot air concentrated inside the stand will warm up the cauldron much better than pure fire. The still cold dishes must be installed in such a way that it is convenient to remove them when they are hot - the handles must be freely accessible.
Operation of the cauldron
I have a 12-liter (Seaton). MNC152, 24 Dec. 15, 14:42
Here is a 12L siton. I have a black painted lid, it looks like cast iron, but it weighs. Lumin (alloy) zeman, 24 Dec. 15, 16:35
And once again about washing the cauldron. Washing with fairy-type detergents seems to be categorically not recommended, but damn, it’s not always possible to wash it immediately after cooking, and sometimes they even forget the remains of pilaf in it for a week and a new life starts there
Is washing with a steel wool really less harmful than fairies?
Which washing method is least harmful to the cauldron? 1. warm water and a soft sponge using fairy 2. hot water and a hard steel wool 3. cold water in a non-contact manner using a Karcher type car wash
Preparing a cast iron cauldron or Teflon frying pan:
- If the item is new, wipe off the oil, heat it up, add table salt, ignite it (
1 hour), salt in the trash.. - If it’s rusty - sandpaper, a drill with a wheel, etc. (May Storm forgive me..) - Then, using a brush or cloth, whichever is more convenient, apply a minimally thin layer of oil (no sunflower. Flaxseed is excellent) and heat further - The more layers you apply, the more durable the coating will be (do not force it and do not apply it in a thick layer) - After 8-10 layers the vessel will shine like a cat's eggs with a beautiful black sheen, does not burn and holds the temperature much better than tefali - You can scrub and with a metal sponge, the coating is very strong, but if it chips or gets severely scratched, it doesn’t matter, the repair is exactly the same as the preparation - fire, oil, a thin layer.
PS. The procedure is quite smelly, I do it in the yard over a fire, although a small frying pan can be used in the oven.
Source
Step-by-step manufacturing instructions
When all the preparatory work has been completed, you can proceed directly to assembling the tripod for the fire. It is performed using the following technology:
The pipes are cut to the required length. To connect the bolts together, you need to loosen the loop on one of them. The others dress on her. The easiest way to cope with the task is to hold the bolt itself in a vice and use a gas wrench or pliers to loosen the ring. In fact, this part of the assembly is considered the most difficult. Not only the bolts are put into the eye, but also one of the ends of the chain. By using a hammer, the ring with the parts put on it is compressed
It is extremely important that they do not fall out. Now the legs of the structure are attached. To do this, you need to insert the end of the bolt with a nut screwed onto it in advance into one of the ends of each of the pipes. Then you need to put a hook on the chain at the top of the future tripod, which allows you to adjust the height of the pot
It is located on the third link of the chain. Another hook is placed on the last link of the chain. Be sure to clamp its end. It is on this part of the structure that the cauldron will be hung.
If you have the strength and desire, the functionality of the created structure can be expanded. For example, if you drill holes in the legs and fix hooks there, it will be possible to dry shoes or place dishes close to the fire to prevent food from getting cold.
Making a tripod for a cauldron yourself is quite simple. To cope with this task, you do not need to have any special skills or knowledge. To obtain a simple, convenient design, it is enough to strictly follow the step-by-step instructions. Thanks to the efforts made, a practical, compact holder will appear, in no way inferior to store-bought options.
Mark the steel rod, making three blanks for the legs, each 60 cm long
Use a grinder to cut the rod according to the markings. Using a drill and a metal drill, drill a hole with a diameter of 5 mm in each rod along the edge
On all three legs, slightly bend the edge with the hole
Insert a small piece of wire with a diameter of 4 mm into all holes, bending it into a ring with pliers
Cut off the excess with a grinder. Using pliers, align the ring in one plane.
Brew it
Make a hook from a wire with a diameter of 4 mm using pliers
Attach a piece of chain of a convenient length to the hook
How to install and use
When choosing a place to place the stove, you need to focus on ease of use, but take into account fire safety rules. An open space away from wooden structures is required. It is also important that there are no flammable items nearby. Keep sand or water nearby to quickly neutralize a fire.
Before the first use, clean the fireplace from machine oil with a sponge and soapy water. Then the product is calcined without utensils. After which the body is cleaned with a metal brush.
Before cooking, put the firewood in a container and leave it to burn out a little. Only then do they install the cauldron. In addition to firewood, you can use charcoal. When igniting the flame, make sure that it does not rise above the level of the brazier above 20 cm. It is advisable that the stove has a high chimney, then the smoke will not get into your face and will not spoil the taste of the food being cooked. Upon completion of cooking, you need to remove the coals and clean the stove from carbon deposits.
Alternative tripod solutions
Stoves for cauldrons are designed so that any cauldron will heat up evenly on all sides.
and stay steady. This is the key to proper preparation of the dish and its excellent taste.
The design of the stove under the cauldron is simple. In appearance, it resembles a cylinder that has special legs. The container fits quite deep into it. This product is coated mainly with heat-resistant paint, which ensures its resistance to corrosion.
Having such a camping attribute as a tripod under a cauldron, any traveler or summer resident will be able to prepare an excellent dinner without unnecessary fuss or any work.
If you are attracted by the romance of camping trips or like to spend weekends in nature, then you probably know that you won’t find the usual pan and stove in the open spaces. You will have to light a fire in a cauldron. It is most convenient to place this vessel (like most others) on a tripod.
What is a campfire tripod?
A tripod is a structure of three (or more) supports that are connected to each other at one point at the top. A small hook hangs from the attachment point on a chain, on which a cauldron, bucket or kettle is then hung. This is one of the most stable structures on which the dishes will not swing. This device also solves the problem of cooking in any conditions - in the forest or mountains, in frost or heat, the main thing is that there is firewood available.
This campfire tripod also has a number of advantages:
Most often it is made of stainless steel, a durable and at the same time fairly light material, which is extremely important for hiking. The tripod is not susceptible to corrosion, which means it is not afraid of precipitation. Thanks to the heat-resistant properties of the material, the device for cooking over a fire will serve you for a long time. On a tripod you can cook in any size container - large or small. It is also easy to regulate the cooking process, because the cauldron can be lowered or raised along the chain to different heights. In addition, the folding tripod for the fire is very compact and mobile - when unfolded, it is stored in a case, and, if necessary, is easily assembled
In addition, the folding tripod for the fire is very compact and mobile - when unfolded, it is stored in a case, and can be easily assembled if necessary.
How to choose a tripod?
Probably the main criterion for choosing this design is the material. As mentioned above, the best option is steel, ideally stainless. There are also cast iron and forged products, but they are not suitable for hiking due to their heavy weight. But for a dacha or at home - a good option
To ensure that the tripod serves you for a long time, pay attention to the thickness of the metal. It should not be less than 8-10 mm, otherwise the device will quickly burn out
Before purchasing, we recommend that you decide on the size of the tripod for the fire. You need to focus, of course, on the volume of the cauldron in which you intend to cook food. The small tripod, about 75 cm high, is an excellent choice for a hike involving up to five to seven people. For a group of up to 20 tourists, you will need a large cauldron and, accordingly, a large tripod with a height of 90 cm and above. By the way, it’s convenient if the tripod is equipped with not one, but two hooks. Then, in addition to cooking the dish, you can simultaneously heat the water in the kettle.
How to make a tripod for a fire?
If you have skillful hands, you can make a tripod for a fire with your own hands. It’s not difficult to make, the main thing is to stock up on the following materials:
When everything you need is on hand, you can proceed to production:
- The mounting rail must first be cut into three different sections of one meter each.
- Then each resulting plank must be divided in half so that you get six slats, each 50 cm long.
- Select three from the slats that will become the upper part of the future tripod. At one end of each batten, drill two holes for the triangle wire that will hold the structure together. So we got a small tripod 50 cm high.
- If you need to cook food for a large company and in a large cauldron, increasing the size of the tripod is easy. You just need to attach the remaining three rails to the lower ends of the slats using nuts and screws. You will get a large tripod 90-95 cm high.
- All that remains is to attach the chain. We shape the end of the nail into a loop and put one link there.
This design is collapsible and universal.
Classification of lesions
Fryers are divided into types according to various characteristics. All these parameters influence the appearance and features of use of the product.
By manufacturing method:
- Industrial. The easiest way is to buy a ready-made model. Such products are preferred due to their attractive design and reliability.
- Homemade. They are distinguished by their originality. Such models take into account any individual requirements and are cheaper.
Variety of fireplace designs
According to their design, the fireplaces are:
- Stationary. Placed in one place. Large and massive products made of stone or brick.
Types of materials
Fryers are distinguished based on the material of the body. The most common:
Thickness
When choosing mobile products, you should pay attention to the thickness of the material, whether the body is made of cast iron or metal.
Hiking methods for hanging a pot
There are many ways to hang a pot over a fire; let’s look at the most common ones.
Using two flyers and a crossbar
This is the most preferred option for hanging a bowler. It is quite reliable and extremely simple to manufacture, since finding a couple of branches with a fork will not be difficult even on the banks of a river or lake. Branches with flyers can not be sharpened, but simply buried in the ground.
The only important condition is that all parts of this primitive tourist structure must be damp, otherwise they will inevitably catch fire
If possible, it is advisable to have several metal hooks of different lengths in stock, on which you can hang the pot at the desired height. Hooks will not only allow you to regulate the degree of heating of the pot during cooking, but will also facilitate the process of removing the pot from the crossbar.
It is noteworthy that you can get by with just one hook with a complex bend shape. It bends easily in two directions, and this allows you to change its length.
Such a universal hook does not take up any space even in a backpack and is useful for many purposes in hiking conditions.
Using one flyer and a long pole
This method is also quite often used by nature lovers, although it is inferior in reliability to the previous option. To hang a pot using this method, you will need a long pole, that is, a fairly thick stick, and only one flyer.
The pole must be sharpened and secured in the ground. To ensure reliability, the pointed end of the stick should be pressed down with a heavy stone.
Naturally, the structure being installed must first be tested without a fire and with a pot, which is still filled with ordinary water.
The necessary stability and the required height above the flame of the fire are achieved by moving the flyer. And in this option, it is raw wood that is needed
Wooden tripod
A wooden tripod for a pot will require a piece of steel cable or metal chain, as well as a hook.
In addition, three approximately identical and sufficiently long poles are needed. A kind of pyramid is built from them, and the assembled structure is installed over the fire. The upper junction of the poles is connected with wire or part of the hanging chain.
The wooden tripod design is extremely stable and quite practical to use.
It should be especially emphasized that the phrase “make a tripod” that is often found on the Internet is absolutely illiterate. It is a tripod and nothing else - this type of tripod with three support legs is called.
In addition to the simplest hanging devices listed above, which are necessary for a cauldron, various stands for this vessel from scrap materials are often used.
Such a stand for a pot can be constructed from stones, driftwood soaked in water, leaky buckets, metal barrels, and so on.
It is also quite affordable to purchase a modern industrial tripod, not only in Moscow, but in almost any city.
But a do-it-yourself tripod for a pot is the most acceptable solution to the problem of hanging a pot.
How to hang a pot over a fire
A tripod acts as an easy way to hang cookware over the fire. However, there are several other options:
- A single rack with several horizontal rods that can accommodate 2, 3 or more containers. This design is also made of metal.
- Two slingshots with a crossbar also allow you to accommodate several vessels.
- A rope stretched between vertical branches.
- A perch located on a slope and supported by a large boulder.
You can also use two tripods, between which you place a pole or stretch a rope. In this case, both the spears and the stands must be stuck or driven into the ground. The tripod is a universal tool because it is suitable for any type of soil. The device can be easily installed even on a rocky surface. This distinguishes it from other designs.
If you are smart, there is one alternative that can replace the hook. Find a branch with a fork and break off one of the branches, leaving a short fragment - you will get a suitable solution.
Share in the comments what is your favorite way to cook over a fire!
Advantages and disadvantages
A homemade stove for a cauldron made from disks with an original design has a number of advantages:
- It is characterized by high heat transfer and mobility. These properties turn it into a universal heating element that provides uniform heating. Compact dimensions allow the product to be transported in the trunk of a car, making a picnic, fishing, relaxing in the country or a long trip comfortable.
- Among the operational properties, durability stands out. A guarantee that the furnace will last a long time will be low-carbon metal 3-4 mm thick made of steel 10 or 15, which is used to make wheel rims for the car. The structure will not burn during cooking pilaf, will not deform when heated, and will not become rusty after the first rain.
- The stove for the cauldron made from disks is resistant to loads and is highly durable. Additional support in the form of a stand or legs will only enhance these advantages.
- This is a fiery combustion furnace. The fuel for it is coal and wood, which are characterized by environmental friendliness and wide availability.
- Manufacturing a stove does not require high qualifications. Labor intensity is minimal. Material costs are low.
Among the disadvantages of a stove made from car wheels:
- Sheet steel cools quickly. You will have to constantly monitor the combustion process, monitor its intensity and fuel supply.
- The oven is too low. For comfortable use it is necessary to build a stand. These are additional labor costs and materials.
Date: September 5, 2015
What to make a tripod for a cauldron from
Before making a fire stand, choose the material. Fire tripods are made from the following metal:
- steel – resistant to heat, but heavy;
- cast iron is high-strength and resistant to high temperatures, its disadvantage is its heavy weight;
- aluminum is lightweight, but fragile, easy to carry.
Hiking can be on foot or by car. For walking, pipes made of light alloys are used, and for long trips, they are reliable. To make a tripod, you will need metal rods or hollow tubes inside. After choosing the type of profile, prepare the following tools and materials:
- three pieces of metal pipe;
- three bolts;
- three hooks;
- steel chain;
- pliers;
- welding machine;
- Bulgarian;
- roulette;
- pencil for marking.
A round tripod for a fire is made from a metal barrel
Determining dimensions and preparing a drawing
To make a tripod, you first need to decide on its size. To make a comfortable holder, there are a few things to consider. You need to decide what kind of utensils will be used in the cooking process. It is extremely important that the device matches the dimensions of the pot. You also need to determine what size the structure will be when folded. After all, if the parameters turn out to be excessively large, moving the product will be problematic.
In addition, you should decide how high the homemade tripod should be. It is noted that it is much more convenient to cook on high stands. True, their weight is impressive. Therefore, for a hiking option, the height should be insignificant.
In fact, a drawing is not needed when making such a structure. You can do without it altogether. True, in order to make the work significantly easier, it is recommended to make a full-size sketch of the future structure. In the future, you will simply need to attach parts to it and take measurements.
Example drawing The height of the tripod is selected individually: the higher it is, the more convenient it will be to cook over a fire