Where to place your creative corner
Before embarking on such a serious task as organizing a needlewoman’s workplace, it is worth deciding how much time will be devoted to your favorite hobby. If you usually spend no more than an hour a week, or even a month, on needlework, there is no point in spending a lot of time arranging your work corner. It's easier to store tools and craft fabrics in several boxes in a closet, pulling them out as needed.
If you devote almost all your free time to embroidery, scrapbooking, sewing, knitting, painting and the like, it is simply necessary to arrange a corner for yourself to work.
Having started planning the future workplace of a needlewoman, you should immediately decide how much space in the house you can allocate for this. It would be better if there is a separate room for this. Unfortunately, most domestic craftswomen live in apartments, where devoting an entire office to needlework is an unaffordable luxury. The most you can count on is a separate corner or closet. However, if you carefully consider the location of everything, even such a small space will be better used than an entire design studio.
Where to begin? From the choice of location. Since any needlework, in addition to talent and skillful hands, requires acute vision, the needlewoman’s workplace should always be well lit.
The best option is to place it near a window. If this is not possible, you will have to use artificial lighting. Today there are a lot of convenient and bright llamas for needlewomen on sale. As a last resort, you can use LED strip. It is important that the light bulbs do not change the light perception of color, as often happens with such devices.
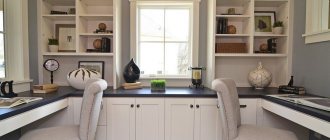
Cabinet for storing materials
Having figured out the light and location, you need to choose furniture that will serve as a workplace. Whatever the needlewoman specializes in, she will certainly need a cabinet to store materials and equipment. That is why closets with built-in folding tables are becoming increasingly popular among craftswomen. They are ordered according to individual drawings, and sometimes they are made by hand.
As a rule, such a cabinet in the center is equipped with a small work table, which can be expanded if desired. On the sides of the central workplace and on the doors, there are many shelves and drawers for equipment, fittings and work materials. Also in such a cabinet there is a lamp or even several.
A huge advantage of such furniture is the ability to close it after use, so that dust and sunlight will not fall on the equipment and fittings.
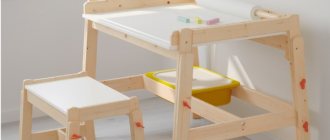
How to make your own universal sewing table
For those who know how to read blueprints, handle a jigsaw, a screwdriver and a tape measure, making a universal sewing table will not be difficult. The model in question will not take up much space and will not require expensive materials. Another advantage of this table is that it is mobile and contains everything you need. To make it you will need:
- 5 furniture wheels;
- 1 latch;
- MDF or chipboard;
- lock (can be taken from an old cabinet);
- shelves (purchase at a hardware store or make from food containers);
- hinges for the top cover and door, which should open more than 180 degrees;
- system for lifting the machine (ask at sewing shops).
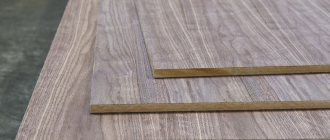
laminated chipboard
Furniture wheels
Machine lifting system
Hinges
Espagnolette
Step-by-step instructions:
- Cut the lumber to the dimensions indicated in the drawing.
- Tie the structure with self-tapping screws.
- Place the hinged lid and door on the hinges, screw in the latch, and install the lock.
- Cut a hole in the lid to fit the size of your sewing machine.
- Install the lift and screw the cut piece to the lifting system.
- If the machine has holes, you can attach the equipment to the lifting system.
- Attach compartments for storing tools and accessories to the inside of the door using self-tapping screws.
- The last step is to bolt the wheels.
The maximum time for such work is no more than 3-4 hours. The cut sides of wood boards must be glued with furniture tape. Otherwise, there is a risk of damaging your hands or damaging the fabric on a rough surface.
A homemade sewing table saves the craftsman’s budget, and in terms of its performance characteristics it is not inferior to factory versions. In addition, the needlewoman still has the opportunity to make changes to the drawing or independently design the table according to her needs.
Drawing
Cut lumber to size
Fasten the structure with self-tapping screws
Cut a hole in the lid to fit the size of the sewing machine
Collect all the parts
Install and secure the machine
Handicrafts desk
Unfortunately, a storage closet is not cheap, even if you make it yourself. And if at the initial stages it is not possible to purchase a much-needed piece of furniture, you can arrange a needlewoman’s workplace with your own hands.
The first thing you need is a comfortable chair and table. The chair can be anything: be it an office chair or a cozy home chair. The main thing is that it matches the height of the owner. It is also desirable that it have a back, on which the craftswoman can sometimes lean, otherwise the spine will become very tired. Based on this, it is not advisable to use stools and ottomans when equipping a needlewoman’s workplace.
The table is the place at which every craftswoman spends the most time. It is worth equipping it in relation to the specialization of the needlewoman. In most cases, it is important that in its normal state it takes up little space, but if necessary, it can be increased. It is advisable to use a computer, writing or dining table as a desktop.
A cabinet table equipped with shelves or drawers at the bottom in which tools and fabrics are stored is becoming increasingly popular among needlewomen.
Wood tables
For handmade work, this option is more expensive, but the furniture design fully pays for all financial investments. Wood is an excellent material for making a table.
To increase the service life of furniture, all parts must be subjected to special treatment with antipyretic, antiseptic and moisture-resistant solutions. This DIY wooden computer desk features beautiful decor and a pleasant natural shade of the surface.
Needlewoman equipment
Although the specializations of craftswomen vary, there is a basic set of equipment, without which needlework for beginners will become not a pleasure, but a real torment, and a very costly one at that.
So, the first tool in the arsenal is a computer. It is with its help that every needlewoman will find information, exchange experiences with colleagues, order the necessary materials, sell her products and develop the design of some of them. In addition, many modern handicraft devices, such as embroidery machines and plotters, require programs that are created on a computer.
In addition, every needlewoman cannot do without a sewing machine, no matter what her hobby is. Handicrafts today are directly related to this device, be it embroidery, knitting or scrapbooking. As for the sewing machine model, if your favorite pastime is not sewing, you can use the simplest machine like your grandmother’s “Podolka” or “Chaika”.
It is advisable that every needlewoman have a printer in her arsenal. Optimally - black and white laser. It will be possible to print details, patterns, layouts and articles from the Internet.
Another device you can’t do without is an iron. With its help, you can not only smooth and steam parts for sewing, embroidery or knitting, but also transfer certain types of pictures and stickers onto fabric, process foamiran products and much more.
In addition to the three items listed above, any needlewoman should have a glue gun in her arsenal, and ideally several, for different types of glue.
The rest of the equipment is selected depending on the specialization of the craftswoman. For example, scrapbooking specialists purchase plotters and machines for cutting and embossing. Amateur seamstresses are sure to equip their workplace with an overlocker and a steam station.
Types of computer desks
Table models differ in their shape. The master chooses the shape of the product based on the size of the room, the location of other interior details, the design style, and the purpose of the table. The following types of structures are distinguished:
Handicraft tools
As for tools, they, like equipment, are general and there are specialized. General scissors include several types: large tailor's scissors, small sewing scissors and curly scissors. You should immediately buy the latter of good quality, capable of cutting not only paper, but also fabric.
Regardless of the type of needlework, there should be a specialized self-healing cutting mat at the workplace, and the larger its size, the better. It is optimal to use a size from A3 (29.7x40 cm).
The rest of the tools are selected individually. Seamstresses, in addition to the usual ones, will need machine and overlock needles, as well as bobbins and presser feet for various operations on the machine. They also cannot do without templates and cutting rulers.
Scrapbookers cannot do without a set of stamps and hole punches, as well as a device for installing eyelets and buttons.
Those who like to make handmade soap or sculpt something from polymer clay or foamiran will not do without a set of molds and modeling tools.
Those who knit will need knitting kits for needlework in the form of hooks, knitting needles, knitting pins and the like.
In addition to scissors, hoops and frames for embroidery, embroiderers will benefit from a construction stapler, because with its help it will be easier to stretch and attach their products to wooden frames.
Most tools are best stored in drawers. However, in recent years, perforated panels placed on the wall have become very popular. It is a good basis for attaching various devices, as well as metal shelves for fittings, fabric rods and other things.
What is a circular saw?
In everyday life and in production, a circular saw is necessary for sawing various materials (wood, slate, plasterboard, soft metal, plywood, etc.). This hand-held electric tool (as standard) is designed to perform straight cuts with a depth of 40 to 140 mm (most models produced by manufacturers allow you to make right angle cuts up to 85 mm, but there is a line of more powerful equipment for construction sites). During the operation, the operator holds the device firmly in his hands and carries out sawing, moving along the workpiece. At the same time, there are no restrictions on the size of the workpieces in terms of length and width. It is possible to cut at an angle to the surface of the part.
Circular saw device
Saw models vary in power. The most budget devices have a power of up to 1.2 kW and are designed for sawing workpieces up to 4.5 cm thick. They are excellent for household needs, carrying out periodic work for short periods of time and are simple and unpretentious. If you need to make a cut up to 6.5 cm, and this needs to be done often and for a long time, you will need a semi-professional tool with a power of up to 1.8 kW . To carry out production tasks, professional equipment with a power of up to 2.2 kW , withstanding long-term loads and capable of cutting parts up to 8.5 cm thick. In addition, tools are produced intended for use in woodworking enterprises, capable of sawing workpieces up to 14 cm thick. 1 cm. Its power reaches 5.5 kW , and weight - up to 100 kg.
A circular saw
Important! For home workshops, devices with a power of about 1 kW are usually sufficient. Before purchasing a model, it is important to take this point into account, since overpaying for the saw itself and for the electricity it consumes, as a rule, is not justified by necessity.
Choosing a modification based on the purpose
When choosing disks for a tool, you need to pay attention to their technical parameters.
- Tooth sharpening angle . Soft materials are sawed with discs that have teeth inclined in the direction of rotation of the disc. To work with metal, models with a negative sharpening angle are required.
- Number of teeth . For sawing different materials, you should select discs with different numbers of teeth: for soft ones - models with a large number of teeth, for hard ones - with a small number. For example, for wood, the minimum number of teeth is 24.
The marking of the blades includes data on its diameter and the size of the seat.
To use a circular saw for a long period of time, it is important that it does not weigh too much, is ergonomic, and has well-sharpened blades. Holding the unit in your hand for a long time is not at all easy. Operator fatigue can lead to poor sawing quality. Therefore, many craftsmen who work with saws practice placing them on a table.
Circular saws are often mounted on a table
The point of such a device is to secure the saw body under the tabletop so that only one sawing disc is above the table. The workpiece moves along the tabletop and is sawed by a rotating disk. Such a stationary device greatly facilitates work and allows continuous work without loss of quality and quickly. Manufacturers offer a large number of models of saws placed on tables. The cost of structures varies from 8 (equipped with the most primitive saws) to 140 thousand rubles. Self-manufacturing of the structure allows you not only to save money, but also to have a unit at your disposal in accordance with your own requirements.
Making a table for a circular saw is easy
Casket for needlework
No matter how well a craftswoman’s workplace is equipped, there is an item that cannot be avoided. We are talking about a box for needlework. Traditionally, it stores small things for sewing: such as needles, pins, scissors and several skeins of thread.
However, today a crafts box can accommodate significantly more items, becoming a full-fledged repository for all the craftswoman’s tools.
For example, a folding box model is quite popular; it can hold not only needles and scissors, but also the entire palette of threads. Such a device is very practical, especially if the craftswoman goes on vacation for a long time, but does not want to be separated from her favorite hobby.
How to store buttons, beads and ribbons
As a rule, needlework for beginners is not yet such an important attribute of life, so inexperienced craftswomen have quite a few accessories. However, over time, needlewomen increase not only their skill, but also the number of auxiliary materials such as buttons, ribbons, beads, etc. What is the best way to store them?
There are several possible answers to this question. Some people sort these small items into glass jars, bottles or paper boxes. Another common way to store buttons is in plastic food containers or coffee cans.
Zipper bags or special albums are also used to store buttons and beads.
Ribbons are a little more difficult to fold as they tend to unravel. Some needlewomen secure their ends with pins or tape. However, the most optimal storage option is special boxes with rods on which skeins of ribbons are attached.
How to fold fabrics best
Craft fabrics, like designer paper, felt, foamiran and other materials, take up more space than other accessories. You can store them by folding them several times. However, such storage can damage particularly delicate tissues.
Another quite common technique is in which fabrics and papers are wound on special rods and stored in the form of rolls.
If they are cut into sheets, then it is convenient to organize them into files in folders.
Whichever option is chosen, it is worth remembering that fabrics can fade in the sun and also do not like excessive moisture. For this reason, in your free time, rolls with them need to be covered with film or the boxes with them closed.
How to choose the right shelf format
Before making shelves, you need to calculate what storage systems they are intended for. Of course, it is more convenient to buy identical or similar boxes (baskets) in a store. This will bring some order.
If symmetry is not your thing, you will have to make a sketch first. I usually use checkered paper for this. Where on a scale of 1 cm (2 cells) is 10 cm of space.
At your leisure, you can see what this or that arrangement of shelves will look like. For example, the width of my glazed balcony is 88 centimeters. This is just enough for the workplace. The shelves are of different heights, made to fit the objects on them.
For example, folders with magazines and boxes with embroidery threads of a certain size. The shelves were designed for them.
At first, all the shelves were triangular in shape. This made it possible to beautifully arrange objects on them. But over time, more space was needed, and the top shelf was replaced with a regular one.
To the left of the table, a new type of pockets made from foam containers recently spotted on the Internet.
To increase storage space for small accessories, glass jars are attached under the shelves. The same cans are attached under the windowsill.
Ribbons for decorating gifts are hidden in homemade boxes. It is more profitable to buy such tapes in reels with a length of 30 to 50 meters, and it is more convenient to store them this way.
Another good way to store ribbons and twine is in round disc containers. But you need to remember about the sun's rays to prevent them from losing color.
Knitting needles and hooks stand opposite the window in a glass cup; they are not afraid of the sun. But I hide the finished patterns from the light . Although they need to think of a more suitable location.
Sewing thread and yarn storage ideas
Threads are a special topic for needlewomen. If we are talking about sewing items, then the easiest way is to store them in craft boxes. However, if the threads are not in spools, but in bobbins, it is best to use special hangers with rods for them. In this form they will always be at hand. At the same time, they also need to be protected from dust, moisture and sun.
Knitting yarn is stored slightly differently due to its larger dimensions. It is best that each skein or set of threads is wrapped in cellophane. Plastic drawers are well suited for storing them - they are inexpensive and very practical.
Storage without bags is impractical, since in addition to the usual enemies (such as sun, moisture and dust), wool is afraid of moths.
How to Store Paints, Pencils and Other Art Supplies
For pencils, markers and crayons, you can sew or buy a special organizer. And if you want them to always be in sight, you should make glasses for them from olive cans. They can be easily attached to the perforated panel using wire.
Such improvised cups are perfect for storing brushes, spatulas and other art supplies.
Tubes of paint can be hung using binders or clips. And if the dyes are in bottles, they can be placed on special shelves or placed in plastic containers.
Organizing a needlewoman's workplace in a small apartment or in a large house is always a difficult task, but very interesting. After all, it gives you the opportunity to show your creativity. As you work on this, you can separate your supplies into separate craft kits, which will make your work easier in the future. The most important thing to remember when decorating your corner for needlework: you need to purchase only what is necessary for work. Don’t waste your efforts and money on unnecessary things; prioritize comfort and expediency.