A pillow under the head of a newborn baby simplifies the process of breastfeeding, reduces stress and provides additional comfort for mother and baby.
Thanks to her, it is possible to avoid discomfort. The baby's head will not sweat, and the mother's hand will become less numb.
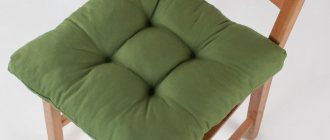
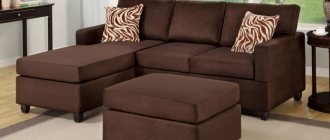
Ready-made orthopedic pillow.
Ready-made orthopedic pillow.
Video
Time codes:
More details
TIMESTAMPS 0:07 – Review of the nursing pillow 0:33- Materials needed 0:41 – Pillow pattern details 0:52 – Making the nursing pillow pattern 2:11 – Cutting the pillow onto fabric 2:52 – Sewing the pillow 4:13 -Determining the length of the tape for fixing 4:38 – Cutting the tape for fixing 5:03 – Sewing the tape for fixing 6:01 – Making a “pocket” for the elastic on the tape 6:48 – Threading and securing the elastic 7:35 – Connecting the tape into a ring 8:56 – Connecting the tape and pillow 9:50 – Stuffing the pillow with holofiber 10:34 – Sewing up the hole for stuffing 11:23 – Review of the finished nursing pillow
[collapse]
Are they necessary for babies?
In Soviet times, newborns did not have pillows. All babies had a diaper placed under their heads and it was folded several times. And on such a pillow the baby slept sweetly. It creates a comfortable position for the baby's neck and spine thanks to the correct elevation of the head.
Children's doctors agree that a healthy and strong baby does not need a pillow , since the baby's spine has not yet formed.
For babies who have problems with the spine and skull deformation, a flat pad called an orthopedic pad is recommended. It will provide a special position for the baby, in which he will feel great for four months. It is not necessary to buy pillowcases with decorations for such a pillow, but this is at the discretion of the parents.
Stores that have children's departments offer a very large selection of pillows for both babies and older children.
Pillow manufacturers claim that many models help the baby’s spine form correctly and also correct the shape of the skull. But, most importantly, they are made from environmentally friendly materials and do not cause allergies in the child. Therefore, anatomical pillows are useful for babies.
Items
To sew a nursing pillow for your arm with your own hands, we will need:
- Piece of paper
- Pencil
- Ruler
- Scissors
- Fabric (Cotton)
- Filler (Hollofiber)
- Elastic band, 2 cm wide. You can use several pieces of simple linen elastic.
- Pattern.
Side braid for a baby crib
For production you will need:
- fabric with elastic properties;
- filler;
- threads, sewing tools.
How to sew bumpers for a crib
The braid is made from strands. For each of them we cut out a rectangular blank. Its width is 13 cm, length is triple the length of the future braid. Then we will turn each strip into a round strand for braiding.
Fold the strip in half, wrong side out, and machine stitch it (preferably using an overlocker), leaving a hole for stuffing.
We turn the part inside out and fill it with filler. Sew up the left hole. We make two more strands in the same way.
If desired, you can make a larger number of strands for braiding. The more strands are used to make the sides, the more voluminous and unusual the braid will be.
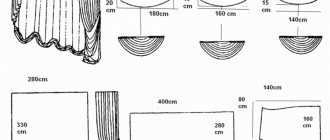
See the pictures below for weaving patterns.
Do-it-yourself braid rim: video master class
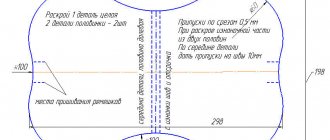
Pattern, construction
We begin sewing a pillow by constructing a fairly simple pattern. The size of the pillow corresponds to the size of an A4 sheet, so we take this sheet of paper.
A4 sheet of paper for creating a pattern. Fold it in half twice and cut off the corner.
Fold the sheet in half, then repeat. From one edge, use scissors to cut off a corner along the radius. Next, we need to cut out a rectangle in the resulting sheet. We unfold a sheet of paper and draw a rectangle in the center with a pencil and a ruler with the dimensions: length 14 cm, width.
An unfolded sheet of paper. In the center we draw a rectangle measuring 14 cm by 6 cm. We cut out the drawn rectangle along the lines. The corners of the rectangle can be rounded.
Cut along the previously drawn line.
The pattern of the pillow for the baby’s head is ready.
Wool fillers
Natural filler has the following positive characteristics:
- convenience in the hot season;
- breathability;
- elasticity.
True, there is one negative point - wool creates favorable conditions for ticks. And this can cause a severe allergic reaction in the baby.
Fabric preparation
Before cutting a piece of fabric from a previously prepared pattern, you need to iron the fabric. A household ironing iron is sufficient. We iron on both sides using steam mode, which will give maximum shrinkage during further washing of the finished textile product. The future pillow will be less susceptible to changing shape and size, in other words, so that it does not shrink. For maximum effect, it is advisable to wash the fabric.
Ironing
Iron with steam on both sides.
Features of the product for children
When choosing pillows you should pay attention to a number of points:
- the product should not cause an allergic reaction;
- the material must be practical, because pillows will have to be washed frequently;
- the pillow should be as safe as possible so as not to injure the baby, so you should carefully examine the fasteners included in the product;
- take into account the height of the pillow; there should not be a significant difference between the child’s back and head when the pillow is placed under the neck.
Modern medicine advises using sleep products when the child reaches one and a half years of age. This is due to the fact that it is by this period that the spine takes on its final shape.
However, first of all, it is necessary to pay attention to the individual characteristics of the baby. Some will need a pillow earlier, others later.
Cutout
Fold the piece of fabric facing inward, apply the pattern so that there is 1 cm of allowance on all sides. pin it with needles, trace the pattern around the edge and then add 1cm along the edge around the entire perimeter.
Attach the template, pattern with an indentation of 1 cm from the edge of the template
An allowance of 1 cm from the edge of the template or pattern.
A piece of fabric is cut with an allowance of 1 cm from the pattern.
Attached pattern to fabric.
Remove the pattern from the piece of fabric.
Cut out piece of fabric and template.
Material requirements
Regardless of which model you choose, there are certain requirements for materials - as, indeed, for any children's things. The material must be:
- environmentally friendly;
- hygienic;
- easy to wash;
- do not be afraid of high temperatures;
- do not cause allergies.
Outer fabric
Suitable for napkin and pillowcase:
- chintz;
- satin;
- flannel;
- linen;
- teak;
- calico
Filler
As for the filler, young mothers now practically do not use down. This traditional “cushion” material has almost fallen out of use for several reasons:
- the cover requires very thick fabric so that the fluff does not get out;
- the pillow must be sewn with a special linen seam, otherwise the fluff will come out through the holes from the needle, and for a novice craftswoman this is quite difficult;
- despite the fact that fluff is a natural material, it causes allergies in many children;
- it clumps into clumps;
- This filler is quite difficult to care for - it is difficult to wash, it must be dried very carefully and periodically sorted out.
Important! If you really like down pillows, use synthetic down, which combines the properties of down and modern synthetic materials.
By the way, about synthetics. The following fillers are ideal for children's products:
- padding polyester;
- holofiber;
- latex;
- polyurethane.
Important! If you use padding polyester, then it is better to take not pieces or a sheet, but a fragment of clothing with this filler. For example, a pillow can be made from an old jacket, in which the filling is already quilted.
Pillow attachment
Rubber bands
Put the pillow aside and cut out a ribbon to secure the pillow to your arm. To do this, measure the circumference of the arm in the forearm area, as shown in the photo.
Add 1 cm to the circumference of the forearm.
Alternative measurement option.
Add 1 cm to the resulting value, and cut the elastic to that length. You can immediately try on the elastic in the same way. The elastic band should fit snugly to your hand, but not press.
Ribbon cut
Use a black - white 1 cm elastic band or 2 regular underwear ones.
We cut a ribbon to secure the pillow to the arm. To do this, take a piece of fabric, put the following dimensions on it, width from 14 to 22 cm. These dimensions depend on the width of the tape. In our case, 22 cm. The length of the tape is equal to the length of the elastic band multiplied by 2.
Dimensions of our work:
- Elastic length 17+1=18 cm
- Tape width 22 cm
- Tape length 18*2=36 cm
We put these dimensions on the fabric, draw lines and cut along them.
Eucalyptus
Eucalyptus filling is used for children's pillows as an alternative to down.
The leaves of the plant do not absorb odors, do not cause allergic reactions, and create an “unbearable” atmosphere for mites and fungi.
Sewing a pillow
All our pillow details are ready, let's start sewing it.
We take the pillow parts and sew them on a machine along the drawn line, along the entire perimeter, leaving a segment 7 cm long, having previously secured the fabric with needles.
Sewing the pattern pieces. (Sewing fabric for a future pillow on a machine)
A section that does not need to be sewn on a sewing machine. In our case, 7 cm.
Cut the fabric in curves. An additional incision is made nearby. Indent 1 cm.
We cut the fabric in curves around the entire perimeter, 4 corners of the pillow. The cut is made twice with an interval of 1 cm, from each other, not reaching the line, as shown in the photo. This is done so that the fabric turns out evenly in places where it is curved.
Wet heat treatment of the product (WHT).
In other words, ironing.
Turn the pillow right side out. Align the seam along its entire length.
We turn the textile product inside out from the earlier cut.
Straighten the seam.
After the pillow is turned out, it must be ironed on both sides.
Iron the pillow on both sides. (WTO)
Orthopedic pillow
We chop off two layers of pillow fabric with needles in several places, place the pattern on the pillow and trace the inner rectangle with chalk or soap, or a water-soluble marker. The pattern can be pinned with needles so that it does not move out.
We stitch along the entire perimeter using a machine and attach fastenings.
Place the pattern on the pillow
Using chalk, trace the cut out rectangle in the center of the pattern.
Stitched rectangle in the center of the pillow
Sewing according to a previously drawn rectangle
Sewing tape (stitching), for fixing on the hand
Let's return to sewing the ribbon to secure the pillow to the arm.
Fold the rectangle in half, with the outer side inward, machine sew along the entire length, the seam width is 1 cm, i.e. It is necessary to make an indent of 1 cm from the edge of the product.
Fold the rectangle and the future ribbon in half.
The seam width is 1 cm, i.e. It is necessary to retreat 1 cm from the edge
Sewing ribbon on a machine from the edge (ribbon stitching)
Stitched textile tape on the edge of the product
Iron the textile tape (vto)
We turn the tape to the outside, so that the seam is located in the middle, as in the photo.
Turn the tape from the inside to the outside
Reversed tape. Shop in the middle.
Straighten the seam using just your fingers.
Straighten the seam. Iron the tape on both sides (WTO).
Pocket for elastic band
For an elastic band 2 cm wide, sew two lines on a sewing machine. Indents up and down 1.1 cm from the middle of the seam of the tape, attaching the pillow. We mark the lines and sew along them, along the entire length of the tape.
If there are two narrow elastic bands, then there will be 3 lines. Along the entire length, the first line is sewn in the middle of the tape, the other two from the sides to the width of the elastic, in most cases, 0.7 - 1 cm.
Elastic band for insertion into the tape, 2 cm wide.
Sew the tape on both sides of the elastic.
If there are two elastic bands, make 3 lines. One in the middle and a line on the sides of the elastic band.
Make an indent from the middle of the seam 1.1 cm up and down
Make a seam on both sides, taking into account the indentations in order to provide a margin of movement for inserting the elastic.
Elastic insert
We pin the elastic on one side with a pin and insert this side into the resulting pocket. The opposite end of the elastic, as it reaches the edge of the tape, needs to be moved inside the tape 0.7 - 1 cm further. Secure the elastic with a needle and sew on a machine, with an indentation, not reaching the edge of the elastic 0.2 cm.
Attach a pin to the edge of the elastic.
Insert a pin with a previously attached elastic band into the ribbon.
Stretch the elastic so that the opposite end fits 0.5 - 1 cm inside the tape.
Sew on a machine, making a 0.2 cm indent from the edge of the elastic.
Repeat similarly with the opposite end of the elastic band. We unfasten the pin and sew it on the machine.
Pull the opposite end of the elastic through, not reaching the edge of the tape by 0.5 -1 cm. Pull out the pin and sew on a machine.
Tape edges
The next step is to fold the tape in half, so that one end does not reach the other, by 1 cm, as in the photo, and sew it on a machine with a seam 0.5 cm wide (0.5 cm indented from the edge of the tape).
Fold the tape in half, not reaching the edge by 1 cm.
The distance between one edge of the tape and the other is 1 cm.
Sew the edges of the ribbon together, to each other.
Sewing the edges together.
We bend the second end 0.2 cm inward and again 1 cm, as shown in the photo, and machine stitch it along the edge.
Fold the edge of the tape by 0.2 cm.
Fold the edge of the tape 1 cm, a second time.
Ready-made type of tape, fastening with an elastic band for an orthopedic pillow.
Sewing the ribbon is finished. All that remains is to sew it to the pillow.
Attaching the tape to the pillow
We apply the ribbon to the middle of the pillow so that the elastic is along the pillow.
Place the ribbon in the middle of the pillow
Unfold the ribbon along the length of the pillow.
We fasten with needles and sew on a sewing machine, not reaching the elastic, approximately 0.5 - 0.7 cm. The length of the line is 6 cm. Sewing along the entire width of the inner rectangle, maybe a little less, but not more .
Pin the ribbon on one side with needles.
Pin the tape on the other, opposite side with needles.
Attached needles. Sewing on one side and the other.
The location of the ribbon on the sewing machine under the foot, for sewing the ribbon to the pillow. Sewing ribbon for the pillow. Seam
Stitch when sewing ribbon to a pillow.
A finished look of a pillow with a ready-made fastening and an elastic band.
Stuffing the pillow
We stuff the pillow with holofiber, tightly filling the corners and placing it evenly over the entire area. We manually sew up the hole; if you use a sewing machine, then firstly it is difficult to crawl up, and secondly, the seam may not be even and noticeable.
Close-up photo. In the hand is holofiber, a material for stuffing pillows. Holofiber filler
We fill the pillow, evenly distributing the holofiber over the entire area.
Knead the pillow to evenly fill the filler (holofiber).
We sew the pillow by hand.
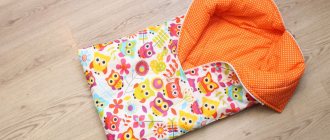
An orthopedic arm pillow for feeding a newborn baby is ready.
For better results, it is advisable to iron the pillow using steam (WTO).
Iron the finished pillow using steam on one side
Iron the finished pillow using steam on the inside and back side
Soft sides made of four parts for a newborn crib
To sew such bumpers for a child’s crib, you need to prepare:
- cotton fabric of three colors - for the outer and inner sides of the product, for ties;
- filler – sheet synthetic winterizer;
- threads, sewing tools.
Description
We measure and write down the dimensions of the length and width of the crib, the required height of the side.
We cut out two large pieces from two colors of fabric. Dimensions – height of the side by the length of the crib. In addition, we cut out two short parts. Their dimensions are equal to the height of the side by the width of the crib. On all parts we provide allowances around the perimeter of 15 mm.
For the ties, cut out 10 stripes (= 3 pieces for each long piece + 2 pieces for each side piece).
We fold each strip in half, iron it, and unfold it.
We fold the sections of the long sides to the center of the strip along the wrong side. Then we fold the strip in half and iron it. We get a folded edge of the strip. Let's stitch it.
Pin the ties to the front side of the outer parts of the bamber at the corners and one tie in the center of the long side of the larger part.
Fold the outer and inner parts of the side right sides together, pin and sew. We sew together the details around the perimeter, leaving an open area. Through it we turn the part inside out.
From padding polyester we cut out the internal parts for the side. Their size should be equal to the blanks for the sides minus the allowances.
We insert the padding polyester inside the pillowcase. Sew up the holes by hand using blind stitches. You can sew it on a machine, it’s faster and easier.
Finished look of the pillow
Ready-made orthopedic pillow.
A finished view of a hand pillow for feeding a newborn baby. Back, inner side.
Latex
Looking at photographs of children's pillows, buyers will definitely pay attention to products with latex filling. Natural rubber material:
- easily absorbs moisture;
- elastic;
- elastic;
- has hypoallergenic properties.
In addition, pillows with latex filling are very pleasant to the touch.
20 photos with ideas for protective bumpers for a baby crib
We bring to your attention a photo gallery of children's crib bumpers for inspiration and ideas.
Useful tips
Almost every expectant mother can sew borders made of cotton fabric and padding polyester into a baby crib thanks to the step-by-step instructions suggested above. Below are tips from experts on making your own crib bumpers:
- When choosing the fabric and design of the future product, it is worth using your imagination, because experiments with the color and shape of the sides have a positive effect on the development of the baby.
- Fastenings such as Velcro and ties often do not withstand the pressure of the baby, who pulls on the side, trying to get up in the crib. Therefore, it is advisable to sew overlays from a single piece of fabric. The edges that have not been finished can be folded. This way they will be in the middle. After this, one seam is sewn along at least part of the ties.
- You can use ordinary rectangles as patterns.
- Holofiber is one of the best fillers for sides, which does not lose its shape even with frequent washing.
Where to buy, prices
Purchasing bedding is not a problem. A wide range is presented in individual retail outlets, shops and shopping centers. Another convenient option is online stores, visiting which does not require a lot of time. The product delivery service will be a pleasant bonus to your purchase.
The average cost of a pillow from a Russian manufacturer: 400-1500 rubles. The price of foreign brands varies between 1500-3500 rubles. The higher cost of imported products does not always indicate better quality. Often the difference in price is due to brand popularity.
An orthopedic pillow is not a mandatory attribute for a newborn without health problems. Its use will help make your baby's sleep more comfortable.
In case of some violations, the product will complement treatment measures.
Article design: Svetlana Ovsyanikova
We sew our own bed linen
Taking into account the standard width of cotton fabrics, a full set of bed linen will require approximately 4-4.5 meters. We measure the specific dimensions of the sheet and duvet cover according to the size of the inner surface of the crib, making allowances for the chosen style and soft fit of the child’s body.
Let's start with the sheet. As the experience of most mothers shows, the best option is the one with an elastic band. This design does not wrinkle and hugs the mattress tightly. To pattern a sheet, you need to add the height of the mattress to the size of the sleeping place and 8-10 cm for folding it inward and creating a drawstring for pulling the elastic through. The total fabric consumption for a sheet for a standard crib will be 150*100 cm.
To ensure that the cover fits the mattress as closely as possible, we cut the fabric on 4 sides and sew it at the corners. We bend the bottom edges and stitch them with small gaps so that you can insert and change the elastic.
Sewing a modern duvet cover yourself is not difficult at all. It is enough to fold the fabric in half to the size of the blanket and cut out a rectangle, taking into account seam allowances of 1-1.5 cm on each side. When sewing the side seams, we leave a hole of 30 cm on one side for threading the blanket.
In the first year of a newborn’s life, pediatricians and neonatologists recommend doing without a pillow or using the flatst possible models with a small amount of filler.
When sewing a pillowcase, we cut out a flap to hold it on the pillow. If you want to do without a valve, you can attach Velcro at the opening.
Care instructions
In order for the product to last a long time while maintaining its beneficial properties, you should follow a few simple care recommendations. The main point is regular washing or cleaning. The permitted washing modes are indicated in the instructions, which must be followed.
Brief recommendations for washing popular materials:
- Latex items cannot be washed. Accessories of this material can be cleaned with detergent and a sponge. After cleaning, rinse thoroughly with cool water and dry indoors out of the sun.
- Synthetic padding can be machine washed in hand wash mode. The water should not be hot (optimal mode - 30 degrees), without spinning. A dryer may be used.
- It is better to entrust washing down, feather or woolen items to professional dry cleaners so as not to spoil them. At home, wash only by hand in warm water. It is important to try to spread the stuffing as evenly as possible before drying so that there are no lumps left.
- Products filled with comforter can be washed in any way and dried without restrictions.
General recommendations:
- It is advisable to wash with special children's powders. After washing, you need to dry it completely, lay it out on a flat surface, and ventilate the accessory well;
- It is recommended to periodically inspect bedding for damage;
- The stray filler should be straightened every day;
- It is better to store bedding in a thick cover.
Option 1
It is better to choose wear-resistant fabric. And the color and texture depend only on your taste or interior. The main thing is that the pillowcases can be removed and washed.
It is better to choose the filler that retains elasticity and softness longer. Down or feather is best. Such pillows can last for decades. If you have old feather pillows that you don't use, you can use a feather from them. But you need to be extremely careful so as not to collect fluff all over the house.
Popular brands
When choosing accessories for a child, you should give preference to proven brands with a good reputation and a large number of positive reviews from customers. Such manufacturers always have documents in the form of quality certificates confirming the environmental friendliness and hypoallergenicity of their products.
The ranking of the best well-known brands includes:
- Ferretti is an Italian brand. The most popular is the anti-choking model, which uses non-woven fabric in combination with perforated fibers. It comes in two size variations with parameters 60/40 and 55/35. The company's pricing policy is within the average range; this model costs about 1,500 rubles.
- Trelax is made in Russia; the top seller is the banana-shaped model. It is multifunctional and comes with an additional removable cover. Stuffing made of polypropylene balls ensures good air circulation and does not float the baby while sleeping. The comfortable parameters of the pillow (135/26) support the entire body of the newborn. Approximate price – 3200 rub.
- Vomar is a Polish brand that produces high-quality inclined devices made of polyurethane. The set includes a second pillowcase made of terry cloth. It has standard dimensions 60/36 with a tilt angle of 17 degrees. Approximate price – 900 rubles.
- Laoma is a Russian-Finnish production. One of the best is considered a model that remembers the shape of the baby’s head and is equipped with a recess that helps maintain the correct position of the cervical spine. The small sizes of the accessory (25/23) are designed for the smallest children (up to 18 months). Price within 1100 rubles.
Drying
You need to dry it carefully, on a horizontal surface. You can put cotton fabric under the product. After the main moisture has evaporated, hang it in fresh air.
It’s enough to dream a little, find out from your child what he likes best, and together sew a suitable bumper for his crib.
Bed dress
To create bedding for a child, it is best to use natural fabrics:
flannel is soft, absorbs water well and is easy to care for; it is most often used for children's clothes;
linen;
chintz;
fleece;
calico
Mattress cover
In order to protect the crib mattress, it is usually covered with a waterproof mattress cover, and it is not at all necessary to buy the latter - it is not difficult to make it yourself. To do this, they use a structure, the bottom of which is often made of oilcloth, and the top of which is knitted, flannel or chintz fabric. Elastic bands are attached to the corners of the product so that the mattress cover does not slip off.
The mattress protector will protect the children's mattress from moisture
Blanket
An undoubted advantage of any hand-sewn product is the ability to choose the size of the item, composition, color of fabric and filling. An interesting solution - a patchwork quilt
Its unusual design will attract attention and delight the baby, and making such a product will take a young mother very little time. You can sew a blanket to decorate a crib with your own hands from scraps of any shape (squares, triangles, stripes or hexagons) and colors
Bright patchwork quilt to decorate a crib
A blanket made using the patchwork technique can be made voluminous. To do this, each individual element is stuffed with any filler (sintepon, cotton wool, padding polyester or other).
Three-dimensional baby quilt
Another successful technique is quilting. To do this, a roll of filler is laid between two sheets of fabric, then the entire structure is stitched around the perimeter, after which the surface is marked and a decorative stitch is applied using a sewing machine.
Quilt for baby crib
Pillow
When making a pillow for a baby, remember that the product should not be too bulky. Infants continue to develop the cervical region, and a high pillow can interfere with this process.
The best option is a butterfly-shaped pillow. Such products have recesses in the center, thanks to which the baby’s head is securely fixed, and the natural curve of the neck is not changed. To decorate a crib with such a pillow, you don’t have to buy it - you can sew it yourself from cotton wool, latex, buckwheat husks or padding polyester.
You can sew a butterfly pillow for a child with your own hands
When using buckwheat, it is important to make sure that its smell and peculiarity (rustling) will not cause concern to the child
Pattern of a children's pillow in the shape of a butterfly
Bed sheets
To make it pleasant for your baby to be in the crib, you should use hand-sewn linen from natural fabrics to decorate it. Sets featuring favorite cartoon characters are suitable for both infants and older children - colorful drawings will stimulate the development of visual perception.
Colorful bedding to decorate a crib
When choosing the color of bedding for a baby, it is worth remembering that overly bright or saturated colors (red, orange, fuchsia) will excite the child’s nervous system and prevent him from falling asleep. It is better to choose sets in soothing colors.
For babies, choose underwear in neutral colors
In order to decorate bed linen, it is best to use embroidery - modern technologies allow you to decorate textiles with paints, but after several washes the design will lose its brightness and begin to peel off.
With the help of embroidery on the corners of a sheet, pillowcase or duvet cover, you can not only decorate linen - according to popular belief, such decor serves as a talisman for the baby. You can choose a simple pattern as a design or perform complex detailed embroidery. The most important thing is to ensure that the decoration does not cause discomfort to the child. Therefore, it is not recommended to use beads - bulky elements can cause harm to the baby.
Children's bedding can be decorated with embroidery