In order to grow, the baby needs to eat well. Modern manufacturers of children's furniture, knowing this, have developed many models of comfortable and multifunctional high chairs. Thanks to them, mothers can not only feed their baby in comfortable conditions, but also leave him for a while without worrying about the baby falling.
Quite often, high chairs are sold with a plastic cover that irritates the baby’s skin. In such cases, it is better to make the case yourself.
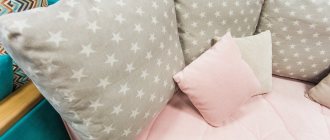
The cover can be called the main component of such a piece of furniture.
After all, it is on it that the baby sits and it is on it that the child’s mood, the state of his health, and, accordingly, his appetite largely depend. Many highchairs are equipped with oilcloth covers, which can cause irritation and peeling of the baby’s skin if it comes into contact with it. Being in a high chair for a long time, the baby may sweat and begin to be capricious.
How to find a way out of such a situation? The modern textile industry offers a large selection of fabrics made from natural raw materials and ideal for contact with the baby’s delicate skin. If your child is allergic or does not like to sit on oilcloth, if the old cover on the high chair has become unusable and you want to update it, buy a suitable fabric and try to sew a cover. This event will require very little material costs, and the result will exceed all your expectations.
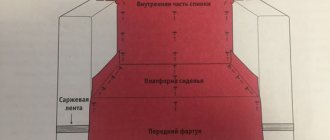
Preparing for cutting
Case pattern diagram.
To make the cover as comfortable as possible, it is better to make it from 3 layers of fabric. For the bottom layer, a rigid fabric is suitable, which will serve as a strong base for the entire structure. The layer is made of padding polyester or siliconized padding polyester, which will give the seat softness. The front part of the chair must be made of soft natural fabric, which will be safe in contact with the child’s body.
If you feel confident and have said to yourself: “I’ll sew a comfortable cover for my baby’s high chair,” prepare the following necessary materials and tools:
- Cotton, cotton fabric for the top layer.
- Sintepon for the layer.
- Rigid cotton or cotton + synthetic fabric for the bottom layer.
- Tailor's scissors.
- Chalk.
- Pins.
- Threads.
- Needle.
- Paper or non-woven fabric without adhesive for the pattern.
- Pencil.
- Sewing machine.
When you decide to sew a cover, you need to have an idea of how the future product should turn out. The most comfortable for feeding a child are covers that are attached with special pockets to the upper part of the back of the chair and armrests. In addition, they must have seat belts to keep the baby from falling. If necessary, the entire structure should be easily removable for cleaning and washing.
The easiest way to sew a cover and create its pattern is to make a pattern from an old cover. This is done as follows:
Straps are threaded through the holes in the case to prevent the child from falling.
- Remove the old cover from the high chair.
- Straighten all its parts and lay them on the floor.
- Attach paper or non-woven fabric to the structure and trace its contours with a pencil. You will get a pattern for the cover.
- On the pattern, mark the locations of the stitches. You can cut them with scissors. These holes will be useful when marking parts for stitching.
- It is also necessary to mark the slots for the seat belts. To do this, the cover is inserted into the high chair. The pattern must be placed on top and pressed, giving it the shape of a chair. The locations of the slots and bends are marked on the pattern.
Additional actions
The cover for the high chair is almost ready. The next step is to remove the hole through which the product was turned inside out. It is best to seal it with a hidden seam, but if you are not an experienced seamstress and do not know how to do this, you can sew up the hole in any way you know. The main thing is that the seam is neat and not conspicuous.
On the underside of the seat of the resulting cover, you can sew a wide elastic band, with which the product will be secured to the chair. If your child is still quite small, it is advisable to equip the cover with seat belts. To do this, cut holes in the marked places, sew them with a buttonhole stitch and pass belts through them that will securely hold your baby during feeding.
Related article: 50 DIY gift ideas for February 23 (35 photos)
It is worth saying that without sufficient experience it is quite difficult to sew a product such as a cover for a high chair, so it is necessary to pay the utmost attention to the process. The finished cover will delight you and your child with its convenience for a long time. And no one will argue: a happy child means a happy mother!
DIY high chair cover - removable option
Why do we make a removable cover for a high chair for feeding a child? This cover is easy to remove and wash. It can be put on top of an old cover. It will be even softer this way. If you plan to use the new cover without the old cover on the high chair, then you need to put more soft filling there. That's all.
Our hand-sewn removable high chair cover will have three layers of fabric:
- The top layer, also known as the face, is an oilcloth-based fabric or other fabric; according to your choice;
- Soft layer filler - batting, or synthetic padding, or even foam rubber, if the machine will accept it;
- The bottom one, also known as the lining, is ordinary hard, strong cotton and/or synthetic fabric, or lining.
The cover will be attached to the back of the high chair using a pocket. The pocket is a short piece of durable fabric, you can use the same one from which the lining for the case is made. It follows the shape of the upper part of the back, and is sewn to the cover from the back. On the sides the cover is attached to the chair using an elastic band or ribbons. High chairs are all different. This means that you yourself will need to look at the place - where and how much to sew so that it turns out well. If you use seat belts, you need to make holes. If you don’t use it, you can leave the cover on the high chair in a blind version.
You can see how to sew a cover for a high chair in the following video. It shows how you can sew a universal liner cover for a high chair. Unfortunately, there is no pocket and it is unclear what will hold the back of the cover against the back of the chair. However, the sewing sequence itself is shown correctly.
Sew a cover for a high chair with your own hands - the work process
To sew a cover for a high chair with your own hands, first make a pattern. Traditionally, tracing paper or just paper is used for this. It is also possible to take ordinary inexpensive thin white fabric for these purposes. A white background will make your marks easier to see. You can use non-woven fabric or cellophane, perhaps it will be even more convenient with them.
Remove the old cover from the high chair. If you need to rip it apart at the seams, then we do it. If it is not required, then you don’t have to spank F). We lay the cover on the pattern material. We press it tightly to the fabric (paper) and draw the pattern according to the material. On the pattern we mark the places of folds and stitching, as well as the places of holes.
After this, we cut out the pattern itself. When cutting, you need to leave an allowance of 2-3 cm in all directions from the pattern for seams. When the pattern for the new high chair cover is ready, you can start cutting out the necessary parts from the fabrics of the cover.
Let’s say right away that as a result of your actions on the do-it-yourself highchair cover, you should end up with a sandwich: a soft filler, the top layer (the main fabric of the cover) facing it, then the lining. If this does not work out, then when you turn out the already sewn cover, you will see for yourself that you did it wrong, and you will have to unrip it. In principle, this can be checked in advance on scraps.
Cutting begins with the lining and lapels. In addition, we separately mark a pocket on the lining fabric for attaching to the back of the high chair. We cut out the pocket and sew it to the lining. The lapels also need to be basted to the lining.
We place the resulting design with the flaps up on the front side of the main material of the chair cover. After this, we baste the finished structure to the main material, and only after that we cut out the cover from it. You can, of course, first cut according to the pattern and then sew it, but then something will definitely warp when sewing.
After this, place the entire new structure made of the main material and lining with the back side of the main fabric on the filling - padding polyester and also baste. And only after that cut out the filler.
When everything is cut out, sew the cover along the edges, leaving one part unstitched, through which the new cover for the high chair will be turned inside out.
The future cover is turned inside out, after which you need to make markings for stitching on it according to the pattern. They can also be basted and machine stitched. Also, if you decide to use it with belts, then you need to make holes for the seat belts. To do this, a stitch is used to make loops.
The hole through which the cover was turned inside out is sewn up, preferably with a hidden seam. You need to attach ties or an elastic band to the back and bottom of the cover.
That's it, you have sewn a new cover for the high chair. He's ready.
A little advice: if the old chair cover was not suitable for some reason, for example, it was too big, then the pattern should be made 1-2 cm narrower.
Do-it-yourself cover for a high chair - there is no old cover or we cover a new homemade high chair
Nowadays it is quite rare to find a high chair without a cover. Still, this is the age of comfort and consumption, so manufacturers take into account all the little things. But if this happens, or you made the chair yourself, then in this case you will have to think about the cover. You will have to make a cover for the high chair with your own hands. The difference from the first option is that there is no ready-made, albeit damaged, sample in front of your eyes.
Therefore, in this case, before making a pattern, you need to hang thin paper or fabric, for example, a white diaper, on a chair (the drawing is better visible on a light one). And directly according to the size of the chair, draw the desired pattern. And it is advisable not to forget about the lines along the intended folds. And if you forgot, so be it. Still, there is no old cover, and it is not known exactly where the stitches should be. The rest is done in the same way as in the first option for a removable cover for a children's high chair.
DIY high chair cover – wooden chair cover
The first two options for high chair covers imply that the cover will be removable. Most often, it is hung on a chair, similar to a mobile high chair. That is, it has a pocket sewn onto the back that fits onto the back of the chair. You can make the case universal, then you can do without a pocket, and use a soft filler that holds its shape, for example, foam rubber. We remind you that here the pocket is a short piece of durable fabric, repeating the shape of the upper part of the back, sewn to the cover from the back. Therefore, such universal covers will fit absolutely any model of high chair, you just need to sew them in accordance with the existing high chair.
For a wooden high chair, the cover is sewn slightly differently. First, let's look at the video, which simply and clearly shows the main points.
Now let’s look in more detail at what and how. The third option for sewing a cover for a high chair with your own hands is designed for wooden chairs. It can be used when making a high chair with your own hands, or even if the old cover is worn out.
The bottom line is that the chair is simply upholstered with a brightly colored oilcloth using a construction stapler. A soft filler is first attached to the hard parts of the chair. For a stronger structure, the filler can be glued to the back of the chair, but it is better to attach the oilcloth itself with a stapler. The process itself is very similar to upholstering the most ordinary chair with fabric. Perhaps this option will be even easier than sewing a cover. It has, perhaps, only one drawback - it will be difficult to remove, unlike the removable cover for a high chair.
Decorating covers
Various techniques and methods of needlework can be used to decorate covers: patchwork, appliques, lace, beads, stitching, embroidery and much, much more. Each housewife can show her skills and imagination.
To make the cover easy to put on and take off, various ribbons, ties, ribbons, and zippers are used; they can also serve as an additional decoration for the cover.
Fasteners made of large buttons, zippers located on the side, and huge bows look very original.
The case, depending on the style, can be decorated with: frills, silk ribbons, beads, rhinestones, metal or plastic rivets, appliques, embroidery.
These and other ideas can be seen in numerous photos of chair covers. However, one should not forget that embroidery and appliques must withstand frequent washing, otherwise they will quickly become unusable.
Photo
Many mothers who have small children have encountered this problem: the child has not yet outgrown the highchair, and the cover on it has already become unusable. Manufacturers of children's tables often use oilcloth material for covers. It is practical, easy to wipe, but cannot be washed, since after several washes the material becomes rougher, begins to crack and becomes unusable. And it’s not very pleasant for a child to sit on a cool oilcloth and constantly has to lay something down; as a rule, it all slides off and causes great inconvenience. Therefore, this master class is devoted to sewing a cover for a child's high chair from one of the famous brands.
Material used and tools for sewing the cover
1) 1 meter of fabric (in this case crepe), 2) 0.5 meter of padding polyester, 3) threads of a suitable color, 4) edging tape, 5) scissors, chalk or pencil, measuring tape, 6) pattern or old case.
Making patterns and cutting material
First you need to start with choosing a fabric. It's up to your taste. You can take raincoat fabric - it is easy to maintain, durable, wear-resistant and easy to wash. But it will not be very pleasant for a child to sit on it, as it slips and is cool to the touch. Corduroy will look very expensive and the child will sit on it pleasantly and comfortably, but cleaning is already a problem. In this case, crepe is used. It is less durable than raincoat fabric, but it is more pleasant to the body, is easy to wash and does not wrinkle. First, let's start cutting out the future table cover. For these purposes, you can use an old cover, or if it is not preserved, you can make a pattern from oilcloth. To do this, take a suitable piece of oilcloth and attach it to the chair. With a marker we outline all the parts and details of the chair where the future cover will be attached. Next, we cut out the template and once again apply it to the chair and check that all the parts fit tightly and coincide with each other. Then we take the fabric and fold it in half. We apply an old chair cover and begin to trace it over the fabric. Next, we cut out the pattern with a small margin for padding polyester and seam allowances. We do the same with padding polyester, only we cut it out strictly according to the pattern. We also make patterns for the rear (1 piece) and side fastening of the cover (2 pieces for each side).
Selection of materials
Textile covers must withstand repeated washing, not cause allergies, be durable, keep their shape, not wrinkle, be pleasant to the touch, and not absorb odors.
Modern synthetic materials such as lycra and stretch satin have increased elasticity, fit furniture well, are easy to care for, and dry quickly.
Materials with Teflon dirt-repellent impregnation are very practical. The disadvantage of such materials is their cost.
Most often, they make their own covers from inexpensive fabrics for chairs for the kitchen or nursery. For this purpose, inexpensive cotton, linen, and denim fabrics are used. These are materials made from natural fibers, they are durable, wash well, and do not cause allergies.
The width of the fabric panel is usually 100-140 cm; it may take 1.5-2 meters to make one cover.
It is not at all necessary to buy new materials for a furniture cover; from old woolen dresses, sweaters, jeans that are no longer worn, very beautiful and practical products are obtained.
Cutting and sewing
When the cover pattern is ready, you can start cutting the product. First, you should cut out the lining and pockets, for which you use stiff cotton or synthetic fabric. With the help of pockets, the cover will be placed on the back and armrests of the high chair. To make pockets, cut out 3 parts according to the pattern: the upper part of the back of the cover and 2 sides. When cutting, do not forget to allow a seam allowance of about 1 cm from the contour of the pattern.
When the details of the pockets are ready, their lower part, with which they will be put on the high chair, should be folded 1 cm and stitched. After this, the pockets should be placed on the front side of the lining fabric with the stitch down and sewn to it using a sewing machine.
Then the lining with the right side of the fabric is applied to the well-ironed and evenly laid out material from which the outer part of the cover will be made. Two layers of material should be pinned and basted. Only after this can you cut out the part from soft fabric. Such actions will avoid distortion of the fabric and, accordingly, the entire product as a whole.
Next, the resulting design is applied to the padding polyester layer with the wrong side of the lining, secured with pins, basted and cut out. Then all the parts fastened together are stitched around the perimeter on a sewing machine. At the bottom of the future product, you must leave a hole large enough to turn the cover right side out.
The previously made basting is removed from the stitched parts, then the product is turned inside out so that the padding polyester layer remains inside, between the layers of the lining and the facing material. The resulting structure should be laid on a table or floor and a pattern should be laid out on it, on the basis of which stitch markings are applied to the material with chalk. All marked stitch lines are first basted and then stitched on a sewing machine.
Wedding covers
This decor option does not require any patterns. To do this, just choose a bright fabric, the color palette of which matches the festive event. To get the desired result, it is recommended to use light types of fabric. They are flexible and hold their shape well.
In this case, we will fix fabric strips between the backrest bars. We will tie the ends into a fluffy bow. Here you can use additional decor in the form of large beads, fresh flowers and airy feathers.
As a result, with minimal effort it is possible to quickly transform the design of the product. You can make large flowers from airy fabric, which will be complemented with various decorations.
An easy way to sew a cover
Now we will share the fastest and easiest way to sew such a necessary product.
Let's take the following materials and tools:
- 2 square-shaped pieces of foam rubber (size depends on the back and seat of the chair).
- 1 piece of any very thick fabric of your choice.
- Bias tape.
- Narrow satin ribbon.
- Threads to match the fabric.
- Needle.
- Scissors.
- Sewing machine.
Let's get started:
- Now we need to measure the length of the baby’s seat in the high chair: the back and the seat. After this, add 15 cm to the bottom and top of the cover - this will serve as pockets for putting on a chair. The end result should be one solid piece.
- We retreat 15 cm from the top and bottom edges of the fabric and fold the fabric along the line. After this, we make a seam on the side, forming a pocket for the cover on the chair.
- We process the edges of the fabric with tape along the entire perimeter of the cover.
- Now we need to make ties to secure the cover to the chair. To do this, take a satin ribbon and cut it into 6 equal sections 10 cm long. We bend and stitch the edges of the strips or process them with an overlocker.
- We attach or manually sew the ties to the cover so that 2 of them secure the back, 2 - the side parts, and the rest - the seat of the high chair.
- To get your baby started using the high chair, place the cut out foam on the seat and back of the high chair.
- Place the sewn cover on top and tie all the ties to a bow.
This beautiful case is ready to do its job!
Which model to choose
The shape of the chair, the imagination and skill of the performer, the type of textiles and fittings used will determine the choice of model for the cover.
For living rooms in a classic style, options that completely cover the furniture legs are suitable. They are usually made from expensive materials and decorated with bows, ribbons, and frills.
Checkered models look great in a small country-style kitchen; you can use the same material to make curtains or a tablecloth for the table. The main thing is not to overload a small room with an abundance of textiles.
For kitchen furniture, you can use a half-cover, which is attached to the seat with ribbons or an elastic band; you get a very practical soft “seat” - a cover for the seat of a chair.
The simplest model is a universal rectangular cape that will fit most furniture models.
The width of the rectangle is usually equal to the width of the seat, and the length depends on how much it will cover the furniture elements. For fastening, ties, ribbons, and elastic bands are used.
It is not very difficult to make a cover in two parts: a separate cover for the back of the chair, another for the seat.
How to take measurements from a chair correctly
As with most things, the first measurement is taken along the longest side: the height of the chair. If necessary, the length of the cover can be adjusted. Next, measure the height from the floor to the seat. If the base of the chair is solid, without legs, the sides are measured, and if with legs, the distances between them, taking into account their own thickness. Measurements should be taken at the widest point, usually on the floor. Many people make the mistake of measuring the width of the backrest and the height between the frames - you need to find out the full parameters. You will have to measure the seat differently. If it is raised above the level of the frame, the markers are taken along the edges of the seat. And if at the same height, then along the edges of the entire structure, however, if the cape needs to be sewn only on the seat, then it is better to measure only the soft part. A seat of this size is enough for comfortable sitting.
Sources
- https://modernplace.ru/chehly-na-stulya-svoimi-rukami/
- https://sdelatrykami.ru/chexol-na-stul-svoimi-rukami/
- https://mebel-expert.info/chehol-na-stul-so-spinkoj-svoimi-rukami/
- https://vdome.club/podelki/mebel/kak-sshit-chehol-na-stul-so-spinkoy-poshagovaya-instruktsiya.html
- https://dnevnikmastera.ru/chehly-na-stulya-svoimi-rukami
- https://idoom.ru/stroim-dom/chehly-na-stylia-svoimi-rykami.html
- https://tkanix.guru/krojka-i-shite/vykroyka-na-chekhly-dlya-stulev
- https://roomester.ru/dekor/mebel/chehly-na-stulya.html
Where can it be used?
It's amazing how a simple furniture cover can radically change the appearance of the entire room, hide annoying color or imperfections in the upholstery, and add a bright accent to a boring interior. It is especially popular to use these accessories on chairs in the nursery, kitchen or dining room. Sewing covers is much cheaper than changing upholstery or furniture. You can’t do without it during special events, for example, when decorating the interior during holidays and wedding ceremonies.
These covers will decorate your interior
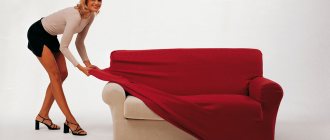
Today in many stores you can find furniture covers of various colors and styles, and order tailoring of the desired model in any studio. But it’s much more interesting to make them yourself, choosing the right fabric and deciding on the style of the future product. It can also save you money, especially if you're decorating multiple pieces of furniture at once.
The cases are distinguished by their beauty and ease of use, as well as ease of manufacture. Even an inexperienced craftsman can sew such an accessory himself.
The ability to radically change the look of an entire room