prom.ua
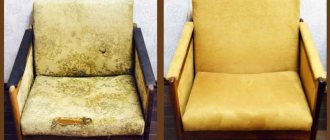
Any armchair or computer chair loses its appearance over time. They do not become less comfortable, so not everyone decides to part with their favorite chair because of the unsightly appearance of the upholstery. In this case, the question arises: how to reupholster a computer chair with your own hands? In fact, the procedure does not take much time and effort. There must be certain tools and materials available. Before upholstering a computer chair with your own hands, you need to select the fabric. It is more difficult to work with leather upholstery, so it is easier to choose a special fabric for furniture.
Hand made: cover for a computer chair
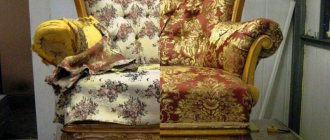
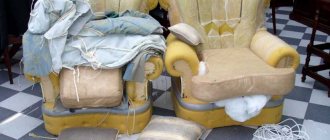
Upholstered furniture is the basis for creating a cozy and homely atmosphere in any room. But no matter how much proper care is taken for such furniture, over time the upholstery still wears out and loses its visual appeal. The same thing happens with a computer chair - every day it does a good deed for its owner, which is why it gets worn out and quickly loses its original appearance. Owners definitely want to extend the life of their favorite furniture as long as possible. And although getting rid of scuffs is quite difficult, don’t rush to look for a new chair! To solve this issue, you can sew a cover for a computer chair.
This cover will help you hide the external defects of the chair and add some zest to your office interior. After all, if you create several variations of a product, different colors and materials, you can change them according to your mood. In addition, the cape is easy to remove and wash in case of stains.
In this article, we will look at the key points of sewing furniture covers, determine the most suitable materials, and also give some universal tips, thanks to which even a novice seamstress can quickly sew a cover for an office chair.
Computer chair upgrade
Hello, residents and guests of the Country of Masters! Today I want to show you how to make a cover for a computer chair using the patchwork technique. If you don’t want to bother with patches, you can sew it from beautiful fabric.
So let's get started...
We will need: a computer chair, main cotton fabric of dark and light colors, lining fabric, padding polyester, threads, elastic band, measuring tape, tailor's pins, graph paper, tracing paper, scissors, pencil, tailor's chalk, sewing machine,
iron.
First we make patterns for the case. Use a measuring tape to measure the back and seat of the chair. We take measurements in the most prominent places.
According to our measurements, we draw two rectangular figures on graph paper (in the photo - the back of a chair). Cut along the marked lines.
We place our paper rectangle (step 3) on the back of the chair and pin it with tailor’s pins.
We fold the paper back at the corners at the top of the back and pinch it with our fingers. Leave the bottom corners straight. Cut along the fold you made.
This is how it should turn out.
We make the seat in the same way. Here we bend all the corners.
Cut along the fold.
Fold the resulting parts in half lengthwise, use a pattern and a pencil to align the edges and cut along new lines
Back pattern. On graph paper, draw a vertical straight line (1). We apply the cut out part of the back (from step 9) to this line with a fold, first on the right side - we trace along the contour, then on the left - we trace. We draw seam allowances: on the sides and top - 1 cm, below - 1.5 cm.
As a result, we get a pattern for the back.
We will have two such parts made of fabric.
Seat pattern. For the seat pattern, repeat steps similar to step 10, making seam allowances of 1 cm along the entire contour of the part.
We will have one such piece made of fabric.
We cut out our patterns. On the smaller part we draw a block diagram for the patchwork.
My outer square size is 30x30 cm, the inner one is 10x10 cm.
We transfer a small square, a large square and a triangle onto tracing paper. Cut it out.
Glue them onto cardboard. Draw seam allowances of 0.6-0.8 cm.
Cut it out.
We cut out parts of our block from fabric.
Cutting for one block: From dark fabric: 24 triangles, 4 small squares, 1 large square.
From light fabric: 24 triangles, 4 small squares.
We should have three such blocks.
Sew all the triangles together in pairs to make 24 squares.
We connect the squares into stripes: four by six squares and four by two.
We sew short strips in twos and connect them to the central square. We also sew long strips in twos.
We connect all the parts into a block. Iron it.
We will need three such blocks.
Making the back detail.
Place one block in the center of the back pattern.
We cut out four rectangles from dark fabric as follows: steps 22-24.
1 and 2 rectangles: green lines – finished fabric rectangles;
blue lines are the measurement locations for them (width = width from the block to the edge of the pattern horizontally at the widest point + 2 cm; length = height of the block).
3 rectangle: orange lines – finished fabric rectangle;
blue lines are the measurement locations for it (width = height from the block to the edge of the pattern at the widest point + 2 cm; length = horizontal width of the pattern, taking into account the indentation from the fabric block 2 cm down).
4 rectangle: green lines – finished fabric rectangle;
blue lines are the measurement locations for it (length = width of the pattern horizontally at the bottom; width = height from the block to the bottom of the pattern + 2 cm).
This is how it should turn out.
First, we sew the side rectangles (1, 2) to the central block.
Then the top and bottom (3, 4). Iron it.
We place the back pattern on the resulting block. We pin around the perimeter with tailor's pins so that the paper does not move when cutting, and cut out the pattern along the contour. As a result, we received one piece of the back of the chair.
We repeat similar steps (items 21-28) for the second part of the backrest and for the seat.
As a result, we got three parts: two back parts and one seat part.
Next we take the padding polyester. We put the back part on it and cut it out along the contour of our part.
We do the same with the lining fabric.
We pin our “sandwich” (main fabric + padding polyester + lining fabric) over the entire area with tailor’s pins and quilt it the way you like, from the center to the edges. Iron it.
I quilted it using a machine stitch using a straight stitch: the central block - in the seam of joining the parts, on the sides - with a mesh. The photo shows the wrong side, the stitch pattern can be read better here.
Repeat steps 30-32 for the second back part and for the seat part.
Cover for the back of the chair.
Using a measuring tape along the edge of the back piece, measure the length on the sides and at the top (red line).
We pin one piece to the back of the chair with tailor's pins.
Using strips of fabric and tailor's pins, attach the second piece as shown in the photo.
Using a centimeter tape, we measure the width of the gap between the parts in several places, grabbing a centimeter of these parts on each side.
We take the BIGGEST value.
We cut out a strip from light-colored fabric: length (1) = see point 34; width (2) = see item 36.
We pin our strip with one side to the back part with tailor's pins, as shown in the photo, and sew a seam with a seam width of 1 cm.
We pin the other side to the second back piece and also sew a seam width of 1 cm.
We process the cuts using an overlocker or with a zigzag machine stitch.
Turn it right side out and sew a finishing stitch along the light fabric with a seam width of 2 mm.
We process the cut of the bottom of the cover using an overlocker or a machine zigzag stitch.
Fold the bottom of the cover to the wrong side by 1.5 cm and sew a stitch with a seam width of 1 cm.
Iron it.
The cover for the back of the chair is ready.
Seat cover.
Place the seat piece on the chair seat. Use tailor's chalk to mark where the chair's armrests and backrest fasteners are located (1).
Using a measuring tape, measure the distance between these marks (2, 3, 4).
We cut out three rectangles from light fabric: width for all = 18 cm; length (see point 44): first rectangle = purple line (2) + 2 cm, second rectangle = blue line (3) + 2 cm,
third rectangle = light green line (4) + 2 cm.
We process the edges of the rectangles on three sides (1) using an overlocker or machine stitch “zigzag”.
We turn each part on the sides 1 cm to the wrong side and sew a stitch with a seam width of 0.5 cm (1).
Then, for each piece, turn in the third overcast edge by 1.5 cm and sew a stitch with a seam width of 1 cm (1).
Iron it.
We pin our rectangles (1, 2, 3) to the seat part with tailor's pins up to the marks we made earlier (step 44).
We measure the distance between them with a centimeter tape, taking 1.5 cm from each rectangle (4, 5, 6).
From dark-colored fabric, cut out three strips 8 cm wide and lengths equal to the measurements from step 48 (4, 5, 6).
Fold them in half lengthwise and iron them.
We place strips on the seat part between rectangles of light fabric with cuts facing the cut of the seat part (1). We pin with tailor's pins.
We sew along the entire length of the seam with a width of 1 cm. We process the edges of the seat part using an overlocker or a zigzag machine stitch.
Fold the strips of dark fabric to the wrong side. We pin with tailor's pins.
We lay a finishing stitch along the edge of the seat part with a seam width of 2 mm.
Iron it.
Place the seat piece on the chair. We insert a linen elastic into the quack of rectangles made of light fabric.
We turn these rectangles down. Let's straighten it out.
Tighten the elastic band and tie it in a bow.
We hide our ponytails.
We put a back cover on the back of the chair.
All! The computer chair upgrade is complete!
Side view.
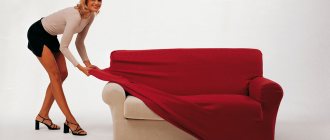
Now, if the cover gets dirty, you can easily remove it and wash it.
It is advisable to wash this product by hand in slightly warm water. In the washing machine, wash on the delicate cycle and do not use the spin cycle.
And this is another chair and a cover solution for it. What will yours be like?
stranamasterov.ru
Tools and materials
Regardless of the brand and size of your chair, the list of tools is almost always the same:
- Fabric (you can select the color and texture based on your own preferences, but it is better to choose a denser material);
- Threads (preferably in the color of the fabric, but not necessary);
- Measuring ruler, pins and scissors;
- A simple pencil, marker or felt-tip pen, chalk - all this will be needed for markings on the fabric;
- Fastener, zipper or elastic depending on how you want your chair to be attached to the seat;
- Polyethylene or tracing paper (you can use old, but preferably clean);
- Sewing unit
An important point before sewing a chair cover with your own hands is to search for and purchase suitable fabric. The modern textile market is replete with choice. So even the most demanding housewife will find a fabric to her liking. Each material, in addition to its aesthetic properties, has qualitative advantages or disadvantages over its competitors. Therefore, we recommend that you familiarize yourself with the technical characteristics of the main materials:
- Velours. This is a soft velvet material. Easy to care for, hypoallergenic. Due to its texture, velor will serve you for a long time, and removing stains will be quite easy.
- Cotton. One of the most important advantages of cotton is its naturalness. This material is made from environmentally friendly threads and “breathes” well. But along with this, cotton is short-lived. In addition, fabric often shrinks after washing.
- Flock. This fabric is pleasant to the body and, at the same time, durable. Flock has a multilayer structure, making it resistant to wear and stretching. It is one of the most popular fabric options for making covers.
Advantages and disadvantages of use
Using furniture covers has a number of advantages.
- Savings in the family budget are obvious. You do not need to pay a tailoring shop for work and choose from the fabrics that they have in stock. You can choose the material you like and do everything yourself.
- You can give free rein to your imagination and decorate the product to your taste.
- Sewing allows you to acquire a lot of new skills in creating patterns, sewing, embroidery, decorating, and even choosing harmonious shades to create an interior.
- You will have an exclusive product that no one else has.
- There is no need to adjust and hem the product, as is the case with purchased covers of standard sizes. You work strictly according to your pattern with individual parameters.
- It's easier to clean upholstery than a chair. You can always soak or throw the covers in the washing machine. This is more convenient than removing stains directly on the chair and worrying about the furniture becoming damp over time.
There are many benefits to making your own chair cover.
Of course, one cannot fail to mention the shortcomings. But there are few of them:
- Time. You will have to invest personal time. Especially if you are new to sewing.
- It may not turn out the way you wanted the first time. But with the acquisition of skills and experience, your cases will turn out better and of higher quality.
The disadvantage is that the result may not be as expected.
DIY office chair cover: pattern
To sew a cover you will definitely need a pattern. These are, in fact, the details of the future product, drawn on paper, tracing paper or polyethylene. The pattern for the chair will become the basis on which you will sew a cover for your chair. To do it, you need:
- Take one or one and a half meters of polyethylene and place it on the seat of the chair;
- Straighten the film so that it follows the anatomical shape of the surface;
- Secure the material with pins along the seams;
- Use chalk or a marker to outline the outline of the seat.
It is easy to check whether these steps are performed correctly. The seat of a computer chair is usually symmetrical, so fold the film in half and check if the drawn contours match. If yes, then the job was completed successfully. If there are small differences, you can circle along the middle edge. And if the drawings are very different, then the pattern was taken incorrectly.
The resulting pattern will become your universal assistant when sewing a cover. It can be used more than once, so don’t rush to throw it away. Determine the required fabric sizes
You can buy cheap fabric in excess and use the leftovers as a rag or use it around the house. It’s a completely different matter when you buy expensive fabric for a cover; in this case, you don’t want to spend a large amount on extra pieces of material. To buy the amount of fabric that is needed specifically for your chair, you need to take all the measurements of the product correctly.
First, you need to measure the length, width and height of the specific seat and back (if you plan to make a cover for the back of the chair too). Use a measuring tape. It is better to write down the obtained measurements so as not to get confused later when you sew a cover for a computer chair. It is also necessary to take measurements taking into account where the seams, clasp or elastic of the future cover will be located.
The next thing to do is to place the finished patterns according to the width of the selected fabric. Also consider the direction of the warp thread when laying out materials to ensure the sewing result meets your expectations.
Creating a pattern, cutting and calculating fabric consumption
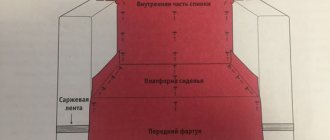
Before you begin the main sewing of the product, you should complete the pattern and cutting. To do this, measure all parts of the chair: the back, armrests, seat, and pillow. You also need to decide on the location of the seams. They can be marked directly on dark fabric or drawn on the upholstery, and then moved to the canvas.
Important! During this work, you should take into account the contour alignment inserts, as well as bends and thickness.
You can sew the cover using the following pattern
To avoid confusion with the sizes, you need to sign them on the wrong side of the parts that have already been cut out. When cutting, it is important to take into account the darts, which allow the cover to fit the chair perfectly without forming folds or lumps. And also do not ignore tucks, folds, frills and hems.
The simplest pattern of a cover for a chair with armrests is made in such a way that, in addition to the seam allowances, there is still twenty centimeters of fabric left, which will be needed to fit the product, bends and overlaps. In the case when some parts of the furniture are made in a non-standard shape, the pattern is drawn in this way: a thin fabric is applied to the silhouette and crimped on each side. And after the measurements are taken, patterns should be developed on graph paper. After this, the patterns must be laid out on the material in such a way that during cutting there is as little unnecessary waste as possible. Afterwards, the patterns are outlined with chalk, taking into account the allowances.
You might be interested in this. Examples of patterns for children's overalls with hoods
Cover for wooden chair
Important! The cut parts should be ironed from top to bottom along the grain line for normal straightening of the seam.
How to sew a cover for a computer chair: step-by-step plan
The pattern is made, the tools are at hand, the fabric is purchased. Everything is ready to move on to the main stage - sewing. This must be done in the following sequence:
- Cutting fabric. To cut the fabric of the future cover, you must first place it on a straight surface - it is better to do this on the floor or a wide table. Lay out the pattern pieces and secure them with pins so they don't move. Next, make small indents from the edge of the pattern by 2-5 cm. Trace the resulting outline and cut out the fabric. It is better to round the corners.
- If you plan to make a cover not only for the seat, but also for the back and armrests, then for convenience it is better to sign the names of all elements on the front side.
- We sew the middle inner section with the ones on the side. This can be done using an overlocker or a standard stitch on a sewing machine.
- We apply the resulting decor to the seat of the chair. Carefully check that the product fits tightly to the base and does not bulge. If there are defective places, they will need to be corrected using darts.
- Remove parts and make adjustments if any. Next, you need to fold the fabric to the edge on both sides.
- We sew the product on a machine before sewing the cover for the office chair together. To do this, you must first make a seam with a straight stitch, cut half a centimeter from the seam allowance from the edge on one side, then fold the cut allowance and stitch along the seam with an indentation of 2-4 cm. It should be remembered that on the front side the seams are made symmetrical .
- Next, assemble the outer parts of the back and sides in the same way. Only now it is necessary to sew zippers on the seams of the union of the central part and the sides.
- We combine all the elements and try on the resulting product on the chair.
- We sew everything in the same way as the side seam.
- We try on the cover below to evenly distribute all the folds. Secure everything with pins and, if necessary, outline the darts with a simple pencil.
- We sew in the remaining darts, sew in a zipper and baste the parts of the cover.
If you plan to make a cover with an elastic band rather than a zipper, the principle of operation remains almost the same. Only in this case, after making the hems, pin a pin to one end of the elastic and insert it into the hole. Next, pass the elastic around the circle and cut it off, leaving tails of 10-15 cm so that you can tie and tighten the cover.
Try the resulting cover on a chair. Please ensure that all seams match the contours of the chair and that there are no folds or irregularities. If everything is in order, then use new clothes for your chair!
Design
To add some color to an armchair worn over the years, you can make a new cover for it, sew decorative pillows or throws in various shades and patterns. If upholstery is necessary, it can be partially made, thereby changing some parts of the upholstery.
A cape designed using the patchwork technique will look original and creative. You can make a unique applique in advance and attach it to the upholstery.
Chair cover options
Useful tips
If you are not an experienced seamstress and are not comfortable with pins and threads, we recommend taking note of a couple of practical tips. They will help you learn the intricacies of how to quickly make a chair cover with your own hands that is no worse than those sold in specialty stores.
Making a pattern is not the easiest thing, so if you have never made one before, it is best to be confident in its execution. For this:
- Transfer the pattern to some unnecessary fabric - for example, an old bedspread.
- Trim off any leftovers and sweep the pieces together.
- Place the resulting cape on the chair. If everything is fine, you can safely start working with the purchased material.
When making a cover for the first time, it is also better to avoid materials with patterns and checkered patterns, since it will be very difficult to fit them. When choosing a material, you should also focus on the presence of water-repellent properties and resistance to direct sunlight. This will allow you to extend the life of the created product.
The purchased fabric can be washed first in the recommended cycle. This way you can check whether it will “sit down”. And make sure what size indentations to make when cutting. If you purchased material that frays, it is better to initially process it with an overlocker or a simple stitch.
Fabric selection
Before purchasing fabric for a chair cover, you should pay attention to some criteria that will help in your choice, namely:
- Strength. You should only focus on materials with high strength;
- Fabric color. In this case, you can rely on imagination and taste, but it is best to select the shade of the material according to the color scheme of the room’s interior;
- Fabric preparation. Immediately after purchasing, you need to wash and dry the fabric; if this is not done, the sewn cover will shrink during the washing process and will no longer fit the size of the chair.
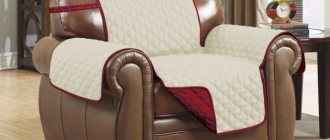
The product can be attached with an elastic band
What types of seat covers are there?
The design of all chair covers is based on the ability to easily put on and remove the product from furniture through the use of ties, zippers and elastic bands. At the same time, it is important to ensure a smooth surface of the fabric and a tight fit so that the case does not change its position during use. The covers should fit the design of the chair as closely as possible, and auxiliary fastenings help to adjust them to the furniture parameters.
The models can use any fabric. Most often it does not stretch, but it lasts a long time. Static products are more difficult to sew; the pattern must be carefully calculated. The covers can be decorated with all kinds of ruffles, bows, rivets, etc.
Stretch covers are also becoming increasingly popular, in the manufacture of which a special, well-stretchable fabric is used - Euro chair covers. The products are designed for bulky pieces of furniture with bulky armrests and high backs, so if you need a cover for a computer chair, this model will not work.
For owners of standard furniture, it is better to choose a universal chair cover, equipped with many fasteners and connections. When used correctly, a cape can completely cover a piece of furniture.