04/05/2020 Category: Do it yourself
- 1 Newborn envelope
- 2 Approximate algorithm for choosing a blanket for a newborn
- 3 Materials
- 4 Fastenings and transformation mechanisms
- 5 DIY transformable blanket
- 6 Types of envelopes for discharge
- 7 Technology of sewing a transformable envelope
- 8 Selection and calculation of the quantity of materials
- 9 For the summer season
- 10 Winter option
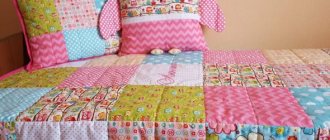
An envelope remains a convenient and practical item for caring for a child; the manufacturing method does not play a special role. It’s enough to simply make a transformable blanket for a newborn with your own hands, sew it from fabric, ready-made textile products, or knit or crochet. An item that combines a blanket and an envelope is needed when the baby is discharged, transported in the car and for walking the baby.
A classic example of an artisanal transformable blanket.
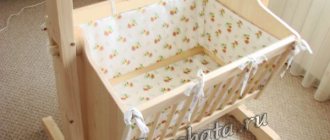
Envelope for newborns
In the first months of life, the child sleeps a lot and does not like to be disturbed. Now that manufacturers offer a variety of clothes instead of diapers, it is more convenient to use a ready-made envelope in the form of a bag or a modified overall instead of a blanket.
The size of the product depends on the age of the baby. A small envelope is needed upon discharge; a format of 80x80 cm is sufficient. For older children, choose models based on height with room for growth.
On a note. Envelopes can be not only sewn. Alternative knitted options available.
Proper Use
Transformer is necessary in the first months of a baby's life. It is usually prepared for discharge from the hospital. The blanket is laid out evenly on the changing table. First, the baby's legs are placed in the pocket. Then fasten the top zipper and form a hood. Lastly, connect the main zipper on the envelope blanket. The bottom is bent outward so that the legs do not blow, they are covered with several layers of blanket.
Putting your baby in an envelope is quite simple.
Caring for textiles is quite simple. When choosing a washing mode, take into account the type of insulation. The growth of children is individual; some children are ahead of their peers. Prematures, on the contrary, lag behind. The transformer is selected according to size so that the newborn or newborn feels comfortable.
The blanket can be washed in a washing machine.
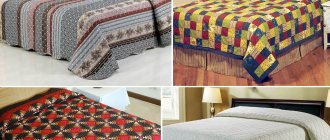
Although manufacturers offer a huge selection of envelopes, transformable blankets of their own production do not lose their relevance.
Multifunctional, bright, comfortable and practical products are easy to sew and wash. You can use them instead of a blanket and for swaddling your baby for a walk.
An approximate algorithm for choosing a blanket for a newborn
It is important to respect seasonality. It is better to immediately choose demi-season options, which can be insulated if necessary. On hot days, you can do without a blanket, replacing it with a thick cloth diaper.
An important factor is age. It is recommended to use transformable blankets for up to 8 months. Now about the size. Products must be designed for growth, with a height margin of up to 20 cm.
Important! The decor should not interfere, be too large and pretentious. Lace, frills, bows quickly become dusty, and cleaning them is problematic.
Elegant decor
When choosing decor, you need to be guided not only by your preferences, but also take into account the gender of the child. It is better to decorate an envelope for a girl with flowers or animal figures. For a boy, it is recommended to choose cars or geometric patterns. The most common options are:
- laying out figures from multi-layered lace;
- creating flowers and bows from satin ribbons;
- decoration with glass or plastic beads;
- fixing decorative fur pompoms;
- beadwork.
If desired, you can simply sew a colored 3D applique onto the top layer. When attaching decorations, it is important to place them in a place that the child will not come into contact with. It is also advisable that the decor is not too voluminous, as this may make the envelope inconvenient to use.
Fastenings and transformation mechanisms
When thinking about how to make an envelope for a newborn from a blanket, they immediately consider several options for securing the edges. Acceptable fasteners:
- Zipper is the most practical and convenient item. You just need to choose products that are difficult to get hurt on.
- The ribbons are beautiful, but not practical, bows take a long time to tie and need to be ironed.
- Buttons – you need to choose reliable ones so that they snap easily and hold well.
- Buttons, for them it is better to provide air ribbon rather than slotted loops.
The choice of fixation depends on the age and activity of the baby.
An original envelope blanket, how to fold it and secure it with buttons.
Cutting and step-by-step instructions for sewing a blanket with your own hands
Cutting the pattern and sewing does not take much time. The main thing is to have good tools and prepare materials in advance so as not to waste time searching for missing parts.
Step-by-step production of a blanket envelope for the discharge of a newborn
- Cut out two identical squares from the fabric for the outer and inner sides, as well as from the padding polyester fabric. They should be 1 cm larger than the intended size of the blanket.
- Place two squares of fabric material on the cut-out synthetic padding square, placing them with their front sides facing each other.
- Sew the fabric on three sides, leaving one part of the edge unstitched. Use it to turn the blanket right side out.
- Insert the padding polyester square into the remaining window and sew the sides of the edges together with a hidden seam.
- To preserve the product in its original form, extend its service life and give additional strength, it is necessary to stitch the blanket diagonally with a fine seam, creating the contours of diamonds.
Sewing a bow to decorate the discharge envelope
- To create a ribbon from satin fabric, cut two strips, the width of which should be 12 cm.
- Place the pieces right sides facing each other. Sew along the edges.
- Turn the strips right side out.
- To increase functionality, you need to insert an elastic band into the resulting tape and sew it with a seam. For decoration, you can sew a large bow or a flower made of ribbons on top. The decor made from lace sewn onto the top side of the lettering square looks beautiful.
Types of envelopes for discharge
Designers have developed several models for infants:
- An envelope bag is convenient for quickly packing for a walk. It is easy to transfer a sleeping baby to a crib.
- A blanket envelope is a practical, multifunctional option. It is convenient to swaddle and cover the baby with the same thing.
- An envelope with sleeves is not the best option for a baby. It is better not to use gloves at first.
- Envelopes with a hard bottom are usually made with a removable mattress that can be easily removed.
Locks
Sew the side front pieces to the middle front piece from the neckline to the bottom. We pin the facings face to face and sew the frame from the wrong side.
Next, we rip the seam, not reaching about 2 cm from the bottom edge of the frame, and cut it to the corners. We cut off the insulation close to the stitching, turn the facing inside out and lay a stitch, removing 1 mm from the edge.
We pin the lock to the wrong side of the frame, having previously made fabric stops at the bottom.
We sew down the windproof strips, cut off the seam allowances close to the stitching, turn them inside out and stitch along the edges.
We pin the bar under the lock. For reliability, we baste the lock and the bar and only then sew along the line of the frame.
We do the same with the second lock.
We connect the parts of the back and the shelves of the upper part of the bag, placing them right sides together, and cut off the insulation close to the stitching.
Transformable envelope sewing technology
To make a transformer, you can use a ready-made blanket or sew it yourself. Depending on the child’s growth, mobility and time of year, the most appropriate option is selected. There are many ways to make an envelope from a blanket yourself. The simplest one is using an internal leg pocket and three zippers. It is better to choose hidden ones with soft edges and a plastic runner.
As part of the review, a small master class is presented:
- Prepare a pattern of fabric according to the size of the child.
- At the top of the blanket for the hood, a zipper is sewn from the center to the edges.
- The second detachable zipper is attached to the blanket so that when fastened, there is the necessary smell.
- The loose ends of the blanket are folded together. They outline how to sew on a third zipper, a detachable one that turns the package into a bag.
The transforming envelope is ready. It can be done within a few hours.
Product for baby according to time of year
The time of year when the child was born is also worth considering when choosing an envelope. If it is winter, you need to insulate the transformable blanket, and you can decorate it with natural or decorative fur. If it’s summer, then you need to buy light but natural material, and you can decorate with anything.
Summer soft blanket for a newborn
For summer discharge from the maternity hospital and summer walks with the baby, a light and soft blanket envelope is perfect, one side of which is made of 100% cotton, and the other is made of warm and soft velsoft (plush, velor are also suitable).
Materials for blanket blanket
So, from both types of fabric we cut out 100x100 cm squares, rounding the corners using a pattern or improvised means (for example, a plate).
We sew a blanket blanket for a newborn.
We sew a blanket envelope for a newborn
We place the fabric on top of each other with the right side inward and fasten the edges with pins (needles).
We sew a blanket envelope for a newborn
We fasten the edges of the blanket with pins
We sew on a machine at a distance of 1.5 cm from the edge, leaving about 15 cm unstitched, so that we can then turn the blanket right side out.
Sew the blanket around the edges
Leave it a little unstitched
In the corners that we made rounded, we make a small cut (so that when we turn the blanket right side out, everything will be even and neat).
Cutting the edges
We turn the blanket right side out and sew up the hole through which we turned it inside out. Then, from the front side, we sew the entire blanket along the edges at a distance of 2-3 cm.
We sew a children's blanket envelope
We sew a children's blanket envelope
I got this blanket for a newborn. The size of the blanket is 95x95 cm.
Baby blanket for newborn
Summer blanket for a newborn
Summer blanket for a newborn
Warm envelope for newborns for cold autumn/spring
We are expecting a new addition to our family and I decided to sew a warm autumn discharge envelope for the newborn myself. Sewing such an envelope is quite simple, you just need to cut out the desired shape from the fabric, sew zippers on the sides and make a hood. Having chosen the color you like, you can sew such an envelope yourself in a couple of evenings.
Discharge envelope for newborn
To make such an envelope we will need: fabric for the top layer (I used raincoat fabric, it doesn’t blow), padding polyester (insulation), warm fabric for the inner layer (I used velsoft, very soft and pleasant to the touch), 2 zippers 50-60 long cm, Velcro. I bought fabric in 0.5 m pieces with a width of 1.5 m.
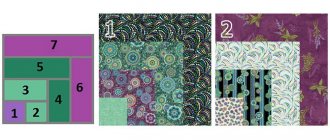
From all three layers we cut out identical parts according to this pattern; you don’t have to cut off the sides at the top (you’ll get an envelope measuring approximately 40x70(75)cm).
Pattern of a discharge envelope for a newborn
Lay out the fabric in order (insulation in the middle).
Layers of fabric for the envelope
Along the edges we sew together a layer of insulation and raincoat fabric (this will make it easier to sew in a zipper).
We sew insulation and raincoat fabric
Then we sew a zipper between the inner and outer layers, bending the edges inward.
We sew an envelope for discharge. Sew in a zipper
Sewed a zipper into the envelope for discharge
It will look like this when unbuttoned and buttoned.
Sewing a discharge envelope for a newborn
Sewing a discharge envelope for a newborn
Sew the remaining fabric along the sides, folding the edges. We sew the hood by bending the edges of the top into a triangle (first one and then the other layer), you can cut off the resulting upper corner of the hood. When unfolded, our envelope looks like this.
Newborn discharge envelope for autumn/winter
Once zipped up, it looks like this.
Newborn discharge envelope for autumn/winter
Now we can improve our envelope a little. We sew Velcro in the appropriate places.
We sew an envelope for discharge
We sew an envelope for discharge
You can make a hood with a tightening rope, this will better protect the baby from the wind. I tied the rope myself, but you can use lace or other rope.
We sew an envelope for discharge
I got this warm autumn discharge envelope for my baby
Discharge envelope for newborn
Selection and calculation of the quantity of materials
When sewing a transformable blanket for a newborn, the height of the fabric should exceed the baby’s height by 30 cm, the width should be the same as the height or 10…15 cm more, depending on the volume of the baby’s chest.
Recommended size for a child up to six months: 80x95. For discharge, a smaller format can be made, especially if the newborn is premature.
If there is no ready-made blanket, sateen, calico, plush, flannel or flannel are used for the lining, depending on the time of year. Preference is given to natural fabrics. Synthetic winterizer is chosen for insulation. The top of the blanket is made from materials similar to the lining. For the winter version, one of the fabrics can be crocheted or knitted. It is better to buy Alize or Puffy threads for children's things.
Note ! For winter options, it is convenient to use felt for needlework. Thin, matted fluff is not blown through.
Children feel comfortable and cozy in knitted items.
Required Tools
To make the work of sewing an envelope for discharge with your own hands as easy as possible, you need to stock up in advance with all the equipment that you will need during the work. To make summer and winter versions, you need the same tools:
- graph paper;
- sharp scissors;
- several needles;
- pins with colored heads;
- chalk for outlining;
- threads matching the tone of the material;
- sewing machine.
The expectant mother is recommended to print out the patterns in advance, which will be used to sew the product. Working with them is much more convenient than with electronic layouts. In addition to tools, for sewing you will need the material itself, accessories (zippers, buttons, Velcro or ribbons), as well as decor. With minimal experience, you can sew a blanket for discharge in a day. If the simplest option is chosen, the work will only take a few hours.
Winter option
For winter, spring-autumn or demi-season options are additionally insulated with sheared sheepskin or knitted fabric. Envelopes should not be made too warm; walking at low temperatures is prohibited.
Ready-made transformable blankets and envelopes are chosen for growth to make it easier to dress the baby.
If you know how to sew, you can make a useful and convenient thing for your son or daughter yourself. When choosing ready-made products for discharge or the first half of life, choose bags with hoods without compartments for arms and legs. A baby at this age sleeps outside, nothing should bother him.
Hood
We make a hood. We connect the side parts of the hood with the middle one, grind them down, and do the same with the lining. We cut the insulation close to the stitching and stitch along the top of the hood. Next, I wanted to make an edge: I measured the length along the hood around the face and cut out a rectangle about 6 cm wide. I placed the edge with the wrong side on the front side of the upper hood. At a distance of 3 cm from the bottom edge of the hood, over the edge, we punch eyelets on both sides in order to insert the drawstring. Next, we connect the hood with the lining, placing it face to face, and lay a stitch, cut the insulation close to the stitch, and turn it inside out. The outer edge of the edge was bent 1 cm and stitched. The hood is ready.