Greetings, dear friends!
There is hardly a needlewoman who would not like to decorate her home with original and exclusive handmade products. After all, such a thing cannot be replaced by any other thing bought in a store, even the most beautiful one!
I decided to dedicate this article to knitted blankets. Knitting a blanket is, of course, labor-intensive. But if you set a goal and do a little, then everything is not so scary.
Let's look at various ideas on how to knit a blanket. The most profitable way, in my opinion, is to make it from squares or stripes, rather than knitting a solid fabric.
With this method, individual small parts are knitted and then assembled into a single whole.
It’s easier on your hands, and you can knit “spare parts” little by little, whenever and wherever you want. Agree that you can always carry a small ball with a small knitted part in your bag, and knit it at the slightest opportunity. Squares can be knitted in a variety of ways and in different sizes. The main thing is to use your creative imagination and figure out how to put it all together beautifully. Or get ideas like others do. And there are a lot of options! I took a look, and now I’ll try to classify them a little.
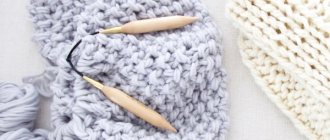
Choosing the right yarn and knitting needles
When choosing a material for knitting, you should first decide for what purpose you plan to further use the resulting product. To work on a blanket for a newborn, you need to make sure that the threads are hypoallergenic and as natural as possible and, as a result, that there are pleasant sensations when in contact with the body.
In this case, merino wool would be the ideal choice. It does not cause allergies, does not prick, is warm, soft and does not require special care. When choosing yarn for a product designed to protect the sofa from wear, it is important to pay attention to the strength and density of the threads.
To obtain a warm, damage-resistant material that can minimize the risk of damage to furniture, the best choice is high-quality acrylic. When knitting a blanket used as a blanket, when choosing threads, you should decide on the time of year when it will be most often used.
If you need to cover yourself with the resulting product in winter, it is best to use wool or cashmere yarn.
The above-mentioned types guarantee not only heat retention during the cold season, but also pleasant sensations when they come into contact with the body. For the summer version, it is better to use cotton threads. It is worth considering the fact that a blanket knitted entirely from cotton may be too stiff.
To avoid getting a product that is not comfortable to use, it is recommended to knit from a combination yarn: cotton + acrylic in a ratio of 50:50. When studying the question of how to knit a blanket with knitting needles, the principle of choosing the tools used may become unclear to beginners. Here again, everything depends on the intended pattern on the product, the yarn purchased, and so on.
The most common patterns for knitting blankets are using circular knitting needles No. 7,3.5,5 and straight knitting needles No. 6,3.5,2.5,3. These types are the most suitable for obtaining the required density of the product and are easy to use even for beginners.
It is important to pay attention to the notes from the manufacturer of the selected threads about the preferred knitting needles for working with them, indicated on the label.
Combination of styles
A crocheted square blanket is such a versatile item that it can harmoniously combine with almost any style in the interior. It is important to choose the right colors, sizes and patterns at the initial stage.
- For modern modernism or minimalism, a bedspread of restrained colors and not too pronounced texture is suitable. You can use synthetic or cotton yarn. Wool next to an abundance of metal and plastic will be inappropriate.
- Textured styles such as boho, Provence or country will perfectly accept a patchwork style bedspread with original floral motifs and fringe. Yarn made from natural and synthetic materials is suitable.
- Classics love luxury and grandeur in everything – the bedspread is no exception. Complex and intricate patterns, the addition of gold or silver threads, beads, beads and other chic are real attributes of luxury. A classic style bedspread will become the central element of the entire interior.
- Simplicity and conciseness are the loft style. Cotton or wool yarn and soft monochrome colors.
Ways to knit a blanket
Before starting work, it is worth understanding the basic statement: a blanket can be a product made on the principle of connecting separately connected elements or be a single piece. Such connecting parts can be the simplest geometric shapes (square, rhombus, triangle, etc.) or unusual details (zigzag, braid, etc.).
For beginning needlewomen, the most optimal in terms of complexity and labor intensity would be to create a fabric from squares or knit a single blanket.
Technique for knitting a single blanket:
- There should be an odd number of stitches on the knitting needles.
- Completely work out the first row using the classic knit method.
- Turn the product over and knit a row of knit stitches again.
- When starting to work on the third stage of knitting, you need to remove the loop intended to create an edge and knit with a knit stitch using the front wall method.
- Remove the thread without knitting from the front of the loop.
- In this way, knit the entire row and turn the knitting over.
- In the 4th row, remove the edge loop and purl the first loop behind the front wall.
- Remove the thread without knitting, leaving the thread behind the loop.
- Knit the fourth row in a similar manner.
- Knit rows 5 and 6 with face stitches.
- Knit the 7th and 8th rows according to the example of the 3rd and 4th rows.
- Alternating the techniques described above, repeat until the product of the required size is obtained.
- Close the loops.
Knitting technique for composite fabric:
- Cast on an odd number of stitches.
- Calculate the size of the side of the square (the side is equal to half the length of the set row).
- Work the entire first row in knit stitches.
- Knit the second and all other rows, multiples of two, located on the front side with front stitches, tying the middle 3 loops of the row together, leaving the one in the middle on top.
- Work the 3rd and all other odd rows (wrong side) face-mi, leaving unknitted the loop obtained from connecting the three in the previous paragraph.
- Continue the algorithm until the last 3 stitches remain on the knitting needle.
- Knit them together with a knit stitch.
- Break the thread, thread the end into the last loop, and tighten.
- Create the required number of squares in this way, then sew them together.
The history of the appearance of patchwork in Russia
From time immemorial, in Rus' they sewed patchwork blankets, potholders, mittens and many other beautiful and useful things. The patchwork type of needlework existed mainly among peasants.
In Rus', at the end of the 17th century, factories for weaving linen appeared. In those days, the width of one cloth was slightly more than 70 cm, which means that after cutting the clothes, small scraps remained. Even today you can see patchwork handicrafts in the Historical Museum of Moscow.
Patchwork first appeared in Russia in the 18th century. At the end of the 19th century, this technique began to be widely used among peasants. Women and girls sewed blankets, runners, and round rugs. After 1917, patchwork became an applied art.
Before the Great Depression in America, quilting was a national form of creativity. Then they forgot about him. And in the 70s of the 20th century it again became fashionable among US needlewomen.
With the advent of sewing machines, this type of needlework moved into another category. It has become easier to create unprecedented patterns. An ancient technique - patchwork, the best needlework for beginner seamstresses and knitters.
Using circular knitting needles
This type of knitting needles is used when it is necessary to obtain a seamless product or in case of insufficient length of conventional knitting needles.
Circular knitting principle:
- Cast on the number of stitches corresponding to the size of the intended blanket.
- The needle with the last stitch cast on should be in your right hand, and the first one in your left hand.
- Knit the loops together, alternating, for example, 2 knits and 2 purls, discarding excess loops that interfere with knitting onto the fishing line between the knitting needles.
- Repeat this knitting algorithm until the required size of the product is obtained.
- Close the loops.
When using circular knitting needles, it is important to consider that, as a rule, only the front side of the blanket is created in this way.
Ancient technology with a modern twist
Despite the appearance of beautiful modern bedspreads and rugs on store shelves, it is this exquisite type of needlework that is becoming popular again. Patchwork is so ancient that it is impossible to trace its origins. Most likely, as soon as people started sewing clothes, they came up with the patchwork technique.
How to knit a blanket for a newborn
The question of how to knit a blanket with knitting needles for beginners will disappear after studying the below diagram for creating a product for a newborn using the “big tangle” method:
- Cast on the number of stitches corresponding to the size of the intended blanket.
- Knit several rows in garter stitch, turning the product one by one (knit rows only).
- Remove the edge loop and knit in an equal number of stitches cast on in the previous step.
- Knit the rest of the row, alternating purl and knit stitches, ending the row with the same number of knit stitches as in the previous step.
- Turn the product over and repeat the above described scheme for creating a row.
- Follow the algorithm until you obtain the required size of the product.
- Close the loops.
Best tool
Typically, needlewomen use one of two tools for knitting.
Of course, there is needle knitting. However, this technique has not become widespread due to the great complexity of execution.
Hook
Crochet hooks come in different sizes and shapes
Knitting with this wonderful tool is very simple, so it is perfect for beginners. They create a variety of patterns. It is small, compact and does not take up much space.
The main disadvantage is the ribbing and rigidity of the products. The row of loops is not tight, creating a simple thing takes a lot of time.
Spokes
Knitting needles of different thicknesses and lengths
Suitable for more experienced craftswomen. Knitting with them is difficult, but when compared with crocheting, the process of creating airy patterns becomes noticeably more complicated. They allow you to knit large projects in a short time (an experienced knitter can make up to four loops per second). Things turn out soft, smooth (all loops, regardless of tension, will be equal to each other), pleasant to the skin.
There are several types of knitting needles.
Open or stocking knitting needles
Sold in sets of five. Relatively short, pointed on both sides. The main purpose is knitting in the round. Suitable for making mittens and socks.
Straight closed knitting needles
Sold as a pair. The longest of all knitting needles. They are convenient for knitting long, straight items, such as a scarf or sweater. Often used to create a blanket.
Circular or ring knitting needles
They are two short sticks connected with a thin fishing line. They are universal and can replace any knitting tool. Disadvantages include:
- the need to accurately select the length of the fishing line;
- complex knitting technique.
When you decide to knit a blanket with knitting needles, use closed knitting needles. They will prevent the loops from slipping from the reverse side and allow you to create a variety of motifs. In addition, they make it easier to change yarn colors.
How to knit a baby blanket
Scheme:
- Cast on 175 stitches.
- Work 11 rows using the garter stitch described above.
- Knit the first stitch behind the back wall.
- Make 11 knit stitches, yarn over, 18 knit stitches.
- Repeat point 4 8 times, continuing with a yarn over, knit 13, yarn over, 7 knit stitches.
- Knit 7 loops on each side of the next row, followed by creating the selected pattern according to a separate pattern.
- Create 264 rows.
- Close the loops.
Symbols used in diagrams
The types of loops used in knitting are indicated by special symbols. Next to the description there is sometimes a transcript; if it is not there, then they are guided by the standard designation of the main loops:
- o or ο – air loop;
- I – single crochet;
- † – double crochet;
- ‡ - double crochet stitch.
The remaining elements are derivatives of the basic ones. The diagram is read from bottom to top, odd rows from right to left, even rows vice versa. The direction of knitting is sometimes indicated by arrows.
Letter abbreviations must be deciphered, because there are no standards for them. A common description is the stitches and their order to complete a particular pattern.
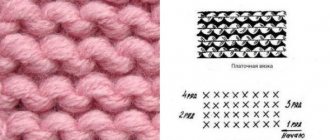
How to knit a plush blanket with knitting needles
Knitting a plush blanket, like creating other products with knitting needles, can be quite a feasible task for beginners who have learned the basics of knitting.
The simplest algorithm for knitting a plush blanket:
- Cast on the number of stitches corresponding to the size of the intended blanket.
- Remove the loop designed to create a straight edge.
- Knit the first row with a knit stitch, finishing with a purl stitch.
- Make 4 knit stitches for the border (repeat in each subsequent row at the beginning and end).
- Purl a row.
- Turn the product over, knit a row with facial loops.
- Repeat the described 4 rows until the required size of the product is obtained.
- Close the loops.
Classic
The simplest way to weave things is to place different sections from the center to the circle. To start, you need to understand how to tie several lifting loops, and then move on to using the throw-on columns. The number of required repetitions of such an operation is determined by the dimensions. Please note: to create smooth edges, you need to connect them with a yarn over.
This option is not the only one. On the Internet you can find many different manipulations that both professional and novice craftswomen can use. Finished products are decorated using all kinds of elements and shapes. Such works differ only in terms of appearance. With their help, you can decorate any items of home textiles, or, for example, knit a cardigan from square motifs or a regular shawl.
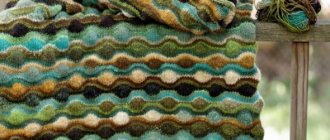
Product made from multi-colored stripes and squares
Knitting pattern for a blanket of multi-colored stripes:
- Cast on 34 loops.
- From 1 to 7, all odd rows of the product must contain: 4 purl and 6 knit loops repeated along the entire length. Complete each row with 4 purl stitches.
- Second and all other rows that are multiples of two: alternate 1 knit stitch, 1 purl stitch. It is important to move the pattern in every 2nd repeat (repeating part of the pattern) by one stitch.
- In the ninth row, knit 4 purl stitches (3 loops should be placed on the auxiliary tool), 3 knit stitches. Knit the stitches left on the “helping” needle.
- Repeat step 4 along the entire length of the product. Finish the row with four knit stitches.
- Repeat the third point. To understand how to knit a blanket for beginners, you need to familiarize yourself in detail with the knitting technique.
- Close the loops.
- Connect several strips using the described scheme.
- Sew the resulting parts together using a knitted seam.
A detailed pattern for knitting a blanket from squares can be found in the section on methods of knitting a blanket.
Choosing the color of the bedspread
A harmonious combination of colors is one of the basic rules of the interior. Therefore, before purchasing yarn and starting to create your masterpiece, you need to thoroughly think through the color scheme.
Several standard combination variations:
- Blue curtains, snow-white tulle and blue-green pillows on the sofa or bed. The color scheme of the bedspread can be any of the above colors or differ by several tones.
- Beige color for pillows and curtains, chocolate carpet with black edging on the floor. A dark bedspread or beige with a pattern to match the edging of the carpet is perfect.
- Contrasts are allowed, but they are appropriate and harmonious. For a white room - blue, red, blue, wheat. For beige - the color of ripe berries and rich shades of fresh greenery.
Patchwork style blanket
How to knit a blanket with knitting needles is already clear enough for beginners to start learning how to create a blanket in the patchwork style (in addition to sewing together the related parts described above, this term also involves connecting elements, usually geometric shapes, made from pre-prepared scraps).
Scheme:
- Cut 2 strips of the same width from pre-prepared fabric.
- Place on top of each other, stitch along one edge.
- Cut a strip of a different color, equal in width to the previous two together.
- Fold the narrower strips face to face and sew a third strip to them on both sides.
- Cut out isosceles triangles, unfolding them to form squares.
- Lay out the resulting parts in any way (zigzag, snake, diamonds, etc.).
- Sew the parts together. Press seams.
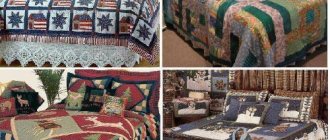
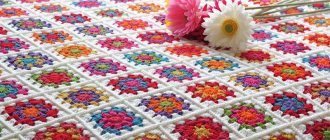
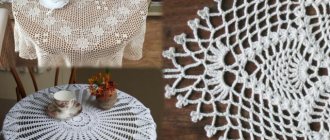
Crocheted bedspreads with patterns
Several patterns of knitted squares for beautiful and original bedspreads.
Knitted patchwork bedspreads look original and fun.
Delicate blanket for a baby crib. It can also be used as a soft, warm blanket.
Pillowcases on sofa cushions, curtains on windows or a tablecloth will look harmonious with the bedspread.
Crocheted pillow and bedspread patterns
Your product will be even more beautiful and sophisticated if you decorate it with knitted flowers and trim the edges with openwork frills.
Don't forget about the reverse side. Of course, if you are knitting an openwork blanket and sometimes plan to use it as a thin blanket, you can leave the reverse side as is. But it is better to sew fabric to the wrong side of the furniture blanket. Choose material with appropriate colors and soft texture. The lining should not deform the product, but look like a natural base.
The entire process of making a bedspread usually takes from one to three months. Spend at least 1 hour a day knitting while watching your favorite movie or TV series. Time will fly by and very soon your home will have an exclusive interior detail created with your own hands.
Of course, such a bedspread can also be purchased to order, but it is much more pleasant to make it yourself - by investing your soul, love and painstaking work.
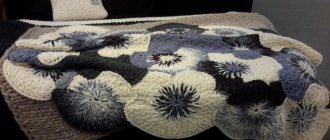
Blanket made from fabrics of different sizes, sewn with contrasting threads
Knitting a blanket with knitting needles is not the only option for beginners to get a unique product made with their own hands. For this work, you will need several skeins of yarn (the number depends on the size and purpose) and 3 skeins of woolen threads, contrasting with the main color, to tie the fabrics together.
Scheme:
- Cast on the loops on a knitting needle.
- Remove the first (edge) loop.
- Knit a row with facial loops.
- The last stitch in the row should be a purl stitch. Pass the knitting needle behind the loop, catching the thread located in front.
- Turn the product over and knit the second row in the same way.
- Knit according to this pattern until the required size of the element of the future blanket is obtained.
- Close the loops.
- Create several pieces of different sizes in a similar way.
- Tie the pieces together using a contrasting thread threaded through a needle. Sew the details along the edge, hooking the loops under the edge row, without tightening too much.
Optimal size
The correspondence between the size of the product and the dimensions of the furniture for which it is intended is very important. The bed should be covered almost to the floor, otherwise the look will be unfinished and even clumsy.
For armchairs and sofas, options are possible when only the back and seat are covered, or the furniture is completely covered, including the armrests and even the back.
The standard bedspread size for a double bed is 220*240 cm, for a chair 130*170 cm, a small sofa 150*210 cm, a corner sofa 240*260 cm, a crib 170*240 cm.
All parameters are strictly individual and depend on the dimensions of the furniture. It is very easy to adjust the size of a blanket knitted with squares. If necessary, you can always add a few more missing squares to the almost finished product.
Methods of knitting in chunky stitch
Seeing a large knitted product, the question immediately arises in your head about how to knit a blanket with knitting needles. For beginners, it is important to know that in addition to using special giant wooden knitting needles, most often sold in online stores, you can also create a large knitted blanket using your own hands.
In addition to knitting tools, in a particular case, the needlewoman will also need special bulky merino wool yarn.
In further three-dimensional diagrams, abbreviations will be used for ease of perception:
- pt (loop(s),
- lpt (facial loop(s),
- kpt (edge loop(s),
- ipt (purl loop(s).
Scheme:
- Dial the number of working points corresponding to the desired size of the product.
- Remove the first classic CP.
- Knit a row of lpt.
- Turn the knitting over.
- Repeat steps 2.3.
- Knit using this algorithm until you get a blanket of the required size.
- Close off knitted stitches.
What does it look like
This is a pattern on textile works, the configuration of which is made up of a color combination of different parts. The central part, as a rule, is decorated with petals diverging in all directions. To produce knitted products using this system, medium-density threads are purchased.
The procedure begins with the installation of four air lugs, which are subsequently connected into a ring using columns. The arabesque continues in circular layers, which also include air loops. Using a simple diagram, you can make a bright, original drawing, the components of which are connected in a certain way. Master classes for beginners, with a step-by-step examination of each stage, are presented below.
Blanket made from leftover yarn
Having figured out how to knit a blanket with knitting needles, the next logical question for beginners will be what to do with the leftover yarn.
Surprisingly, such leftovers can similarly be used to make bedspreads, blankets, and rugs.
Scheme:
- Cast on an arbitrary number of stitches on the needles.
- Tie the strip using any method described above.
- Similarly, make the maximum number of multi-colored stripes - the components of the future blanket.
- Tie the strips together by connecting the edges of the elements with contrasting threads, prying and connecting the existing stitches under the edge.
How to connect
In addition to the skill of creating such an ornament, it is also important to be able to crochet squares and get ready-made knitwear from them. There are several joining methods used depending on the specific parameters and characteristics of the future pillowcase or bedspread. It is recommended to start from a larger area and gradually move towards smaller elements. There are four combination techniques in total:
- With the use of loose columns.
- Use of original half columns.
- Openwork.
- Stitching with a needle.
Plaid with openwork patterns
To create a simple openwork pattern (rapport of 8 loops, including edge loops) on a blanket, you need:
- Cast on 32 pts on needles.
- At the beginning of each row, remove 1 stitch.
- The first row should consist entirely of free points stretched upward.
- You should start row 2 by knitting 5 stitches together (from left to right).
- Without tightening the stitch obtained from joining, put it on a knitting needle and knit a knit stitch, followed by removing the stitches.
- Repeat steps 4 to 5 4 times.
- This is followed by 1 lpt.
- Repeat this algorithm five times, given in the fourth and fifth paragraphs.
- Until the end of the row, alternately knit 1 stitch and five times 5 stitches together.
- At the end of the row there should be 1 lpt, 1 standard kpt.
- Turn the product over.
- Make row 3 completely lpt.
- Row 4, same as 3, knit lt.
- The 5th row must be knitted with elongated stitches, as the first row was knitted.
- At the beginning of the 6th row, as in the previous rows, remove the clutch.
- Knit 2 sts together, placing the resulting st on the left needle. Knit lpt. Remove existing pts.
- The next step is to make 1 st and then recreate the 5 st repeat 5 times. Next, tie 1 lpt and repeat the steps described in steps 4 and 5 again 5 times.
- It is necessary to complete the row with 1 lpt, 3 sts knitted together 3 times and 1 standard stitch.
- 7.8 rows knit completely lpt.
- Repeat the above algorithm until you obtain an openwork pattern of the required size.
- Close created pts.
Popular models
The granny square is a fairly simple pattern, but still, it becomes an advantageous decoration for almost any product.
- Plaids and blankets made using this technique take the crown.
- They look very cute and cozy, and thanks to the name they are associated with grandma’s house and childhood.
- Afterwards, preference is given to light blouses, cardigans, and rugs.
It would seem that this motif is only suitable for large things. But no matter how it is! Now you can even see wallets, bags, homemade slip-ons and toys knitted from small squares.
Using braids and harnesses
When creating a blanket with additional elements, you should use any of the above methods in the main knitting, and in some places adhere to a certain algorithm for creating a pattern (braids, strands).
To decorate the product “oblique”:
- Cast on the number of stitches corresponding to the size of the intended blanket pattern.
- Remove the first gearbox.
- Knit the second stitch first, then the first stitch.
- “Discard” the point of the knitting needle.
- Repeat the above steps to obtain a second thin braid, but knit the lpt not one at a time, but two at a time: first the two farthest ones, then the closest ones.
- Throw the pt onto the knitting needle.
- Repeat point 3.
- Repeat until you get the desired number of braids in the product picture.
- Complete a series of ipt.
- Close Fri.
To create “bundles” on a blanket:
- Cast on 28 stitches on needles, including 2 stitches.
- From the first to the eighth row - 2 purl loops, 2 - opposite stitches alternately throughout the entire row.
- Ninth row: purl 2 stitches, 2 opposite stitches, purl 2 stitches. Drop 8 stitches on the outside needle and leave at work. Work 6 stitches from the left needle: 2 knit stitches, 2 opposite stitches, 2 knit stitches. Return the left stitches to the knitting needle and knit: 2 purl stitches, 2 knit stitches, 2 purl stitches, 2 knit stitches. Complete the row by knitting: 2 purl sts, knit 2 sts, purl 2 sts.
- Rows 10-16: repeat step 2.
- Row 17: purl 2 stitches, knit 2 stitches, purl 2 stitches. Skip 8 sts and insert needle in next 6 sts. Remove all existing stitches from the left needle, picking up the remaining stitches to work with. Complete the row: 2pt, 2pt, 2pt, 2pt, 2pt, 2pt, 2pt, 1pt.
- Rows 18-25 repeat step 2.
- Repeat the above sequence of actions until the required size of the harness pattern on the product is obtained.
- Close the loops.
Unusual knitted square blankets
The imagination of interior designers and craftsmen knows no bounds. New ideas for knitted square blankets are constantly emerging.
Knitted bedspread
Bedspreads knitted with knitting needles look very stylish and beautiful in the interior . A huge number of simple and complex motifs allow you to create unique products.
Original version
A budget and original option is a blanket made from old woolen sweaters. Everyone probably has a couple of knitted items in their wardrobe that are outdated or out of shape. A sweater or cardigan is a bulky item and takes up a lot of space in the closet, and if the family is large, the problem becomes more global.
There is no need to throw things away - sew a blanket. Open up the sweater and cut out squares. The size is not fundamentally important; you can use the same parts or combine small and large ones.
Sew all the details by hand or on a sewing machine. You can carefully sew along the edge, braid, fringe, simply bend it or process it with an overlocker. The bedspread is ready! Minimum investment of time and money.
Bright drawings of animals
When creating a blanket for a nursery, you can deviate a little from the traditional “granny square” knitted in a circle. Use original and fun motifs. For example, squares with colorful animals. All elements are knitted with a single crochet, the color of the threads is selected taking into account the pattern. Plain and patterned squares are sewn together in a checkerboard pattern. Your child will definitely love this blanket!
Blanket blanket with a cheerful face
Design one of the corners of the children's blanket in the form of a cheerful and good-natured face of a bear, kitten or other animal. The product will be an excellent bedspread and blanket at the same time, and the bright convex elements will be very interesting for a newborn baby.
Creating an interior yourself is always pleasant and exciting!
How to knit a blanket with a relief pattern of knit and purl stitches
To create a simple “Chess” pattern on a blanket (pattern repeat of 14 rows):
- Cast on the number of stitches corresponding to the required size.
- The first row implies: 6 knit stitches, 5 purl stitches behind the back wall, 5 knit stitches, 5 purl stitches, 5 knit stitches, 1 purl stitch.
- Switch to the reverse side of knitting.
- The second row should contain: 1 lt, subsequent ip loops throughout the entire row.
- The third, fifth, seventh rows must be worked in the same way as the 1st.
- In the fourth and sixth rows, repeat the sequence of stitches knitted in the 2nd row.
- 8th row: 6 lpt, 5 ipt behind the back wall, 5 lpt, 5 pt, 5 lpt, 1 pt.
- Turn the product over.
- Row 9 should consist entirely of lpt.
- Knit rows 10, 12, 14 based on the pattern of row 8.
- Rows 11, 13 repeat 9.
- Repeat this algorithm until the required size of the pattern on the blanket is obtained.
- Close the loops.
What you will need
People planning to knit such a product for the first time, and who do not have the dexterity, should establish the basic materials used in the process:
- The predominant participant in the process is a set of knitting thread. Any variety of it will do.
- The general equipment of any craftswoman is a crochet hook. For knitting, it is better to choose number three, or number 3.5. We recommend purchasing not a whole set, but a numbered tool.
Oblique knitting technique
To create a diagonal pattern on a knitted blanket, you need:
- Cast on the number of loops corresponding to the size of the product. It is important to keep in mind that this number must be a multiple of four (plus 1 loop at the end for the edge).
- The first row should be worked from the front side: 1 k-ayapt, 3 stitches together, knitted-voypt, yo, 3 pts, knitted together knit-oh pt. Discard all existing stitches from the left needle. Next: 1 knit stitch, 3 stitches together, knit stitch, yarn over, 3 stitches joined together, knit stitch, 1 knit stitch.
- Continue knitting to the end of the row, based on the given algorithm.
- Row 2 should be completely knitted.
- 3rd row from the front side: 2 stitches, 3 stitches together, knitted in a knit stitch, yarn over, 3 loops together, knitted in a knit stitch. Reset all existing pts. Next: 1 pt, 3 pt, knitted together lt, yarn over, 3 pt together, knitted lt, 1 lt.
- Repeat the proposed sequence of stages of bias knitting until there are “extra” stitches left that do not fit the repeat. Knit the remaining pts in lpt.
- Turn the product over.
- Knit row 4 with classic stitches.
- Turn the knitting over to the right side.
- 5th row: 3 lpt, 3 pt, knitted together lpt, 1 lpt. Repeat until the remainder of the points not included in the rapport. “Extra” pt knit lpt.
- Turn the product over.
- Make row 6 completely purl.
- Row 7 (front side): repeat (3 sts, knitted together knit stitch, 1 lpt), repeating until the end of the row. Knit the remaining pt.
- Turn the future blanket over.
- 8 row knit ip.
- Repeat the given sequence of work using the bias knitting technique until you obtain a blanket of the required size.
- Close Fri.
Spanish version
Very different from the typical version.
To create textiles using this technique, it is worth using eye-catching fabrics in bright colors. A plain heel would also work. The “Spanish style” technique does not differ exactly until the moment you finish knitting the 1st stage of the classics. Next, the differences between this technique begin. The introductory column is prepared in exactly the same way - lifting ears are created, then the transition is made to alternating them with columns.
Please note: we recommend that you remember and memorize this sequence of actions. This will help you make your work on any textile product easier. With this skill, you will forget about problems with patterns or the use of knitting needles, with which it is difficult to knit beautiful openwork patterns.
After completing the fourth line, it's time to start using another layout: you have to perform broaches. At this stage, it is better to choose a different color, if the format allows. The broaching is performed as follows - three lifting buttonholes are created, then two columns are knitted and again a pair of loops. Next, the actions are performed in a circular manner: the initial semi-column is tilted, forming a semicircle, the tool is also located below the loop, and then broaching is carried out. When performing it, it is important to knit the ornament using two ears.
Note!
- Patterns for knitting overalls for a newborn: step-by-step master class
- How to crochet a mouse and a rat: video master class on crocheting the 2020 symbol
- How to knit a warm hat with ears for a newborn boy and girl - video tutorials with patterns, instructions for beginners
When weaving using various patterns, it is important to remember that the corner parts of the image must be knitted using a typical technique. After the first stretch, there will be a transition to the next phalanx, which is fifth in a row. The stage is performed in a similar way, with one difference: the ears are extended to a higher level - this allows for a shift of exactly one border. After completing 3-4 lines, you can start using another skein. No one limits you in the number of circles: use effective combinations.
How to knit a large blanket without seams
To obtain a seamless seamless fabric, you can use the rapport described below:
- Dial the required number of points (multiples of 5 + 65).
- Row 1: slip 1 edge stitch, 4 knit stitches, slip 5 stitches on the back thread, 4 knit stitches, slip 5 stitches on the back thread. Repeat the sequence until the end of the row. Finish the row with 4 knit stitches and 1 purl stitch.
- Turn the product over.
- Row 2 should consist entirely of ipt.
- Row 3: slip 1 stitch, 4 stitches, slip 5 stitches on the back thread. Repeat this pattern until the end of the row. Finish the series of classic items.
- Turn the knitting over.
- Row 4 is knitted entirely from IPT.
- Do the 5th row in the same way as the 1st and 3rd rows.
- 6th row: 4 lpt, 1 ipt, 4 lpt, i1ipt, 4 lpt. Repeat the sequence to the end of the row, ending with pt.
- Starting from the 7th row, repeat the sequence given above from the 1st to the 6th row. Continue knitting, based on the rapport description given, until you obtain a seamless blanket of the required size.
- Close existing pts.
The step-by-step diagrams in the article will be useful not only for novice needlewomen learning the basics of elementary patterns on knitted items, but also for professionals wondering how to knit a blanket with knitting needles using an unusual technique (bias, coarse knitting, patchwork).
Classic version of the granny square
The principle of knitting is from the center, in the circle. Cast on several chain loops, connect them into a circle, and then use chain and double crochets. The pattern can be single-color or multi-colored.
Note ! Many shades in the motif increase the time it takes to create a product.
Pattern and order of knitting motifs
Calculate the required number of elements and get to work. Example of a standard scheme. Step by step description:
- air chain of 6 loops;
- 3 for lifting *3 double crochets, 2 aerial ones* 2 double crochets, connecting post;
- all subsequent ones: start with 3 for lifting, in arches - 3 columns with crochets, corner - 3 columns with crochets, 2 air, 3 columns.
Important! All parts of the composition are the same size.
If the product requires elements of different shades or patterns, then prepare them as many as required.
How to connect
The elements are created by crochet or knitting. The main question is how to combine squares knitted or crocheted for a blanket into a single fabric.
Several ways to connect crocheted squares for a blanket:
- Sew with a needle - preferably with a large eye. Regular or knitting threads. The seam is made invisible.
- Knit with single crochets. It is original to use a thread of a different color or an openwork connection.
Note! Round elements are connected by a square border, turning them into a rectangular canvas.
Perimeter tying
The product becomes complete after tying it around the perimeter. Simply perform two rows in a crab step or knit with a patterned finish. The choice remains with the performer.
Masking thread ends
Inside or at the end of each part, the free ends of the threads must be hidden. There are several ways:
- in the center - tied together with the ring;
- outside - crocheted under the previous row;
- transition from one color to another - connected with a needle.
Before starting work, choose the desired method and use it all the time.
Non-square square
Classic involves knitting a square motif. However, you can also knit triangles (two types of patterns are used), rectangles, hexagons and even circles! And although their shape is strikingly different, they are still called granny squares. Why?
The answer is simple! The granny square tells us not about the shape, but about the principle and method of knitting: the stitches must be knitted strictly in the spaces between the air loops, or, if they are missing, between the stitches of each previous row.