DIY floating bed
Do you want to make changes to your bedroom interior? How do you like the idea of making a floating bed with your own hands ? It's not too difficult, even if it's a big project. A floating bed can be a fresh addition to your bedroom design as it presents a minimalist modern aesthetic while adding a feeling of spaciousness to the room. Our article presents several wonderful examples of how to make a bed with a floating effect , which will allow you to acquire original furniture even on a limited budget. Here there are projects of a floating bed with lighting , on wheels, with a beautiful solid wood headboard, and even an example of a floating bedside table. You can use links to primary sources, read instructions on how to make a floating bed with your own hands with drawings and detailed master classes with step-by-step photos.
Shapes of floating beds
The choice of bed shape depends on a person’s personal ideas about comfort.
- Round. A round bed has a larger sleeping area compared to a rectangular one. A round hanging bed can be installed not only against the wall, but also in the corner of the room. In this case, a corner structure for fastening is formed behind the headboard.
- Rectangular. A rectangular bed is installed either with the headboard against the wall, or with both sides in the corner of the room. Rectangular shapes are universal for use in rooms of any size.
The photo shows an interior in ethnic style. The round shape of the bed softens the design of the room with a predominance of geometric patterns.
Functional Features
Flying beds have taken their rightful place among both professional designers and people, due to their originality and unusual appearance. We can’t help but mention its functionality:
- Even the most classic look of a bedroom, thanks to such a bed, will acquire originality;
- the sleeping place is quite spacious, cozy, designed for two;
- LED lighting serves as additional lighting at night and creates a romantic mood;
- due to the strong fastening of the bed to the wall, a floating effect is created;
- The flying bed can be used by both adults and children.
Manufacturing stages
There are many videos and articles on how to make a floating bed with your own hands. They will help even a beginner understand the intricacies of assembling individual parts. Installation consists of several stages.
Construction of a frame made of wood and metal
Creating a frame requires special responsibility, since the service life of the product and its strength depend on its quality. Manufacturing stages:
- Preparing the premises. Usually the creation of a bed takes place in the bedroom. Before starting work, you should remove all objects from the room and cover the remaining ones.
- Start assembling the support from metal parts or thick boards. The frame on 3 sides should be less than the edge of the sleeping bed by a maximum of 30 cm.
- Along the frame, inside the contour, transverse components are installed, the distance between which is 30-50 cm.
- At the bottom of the structure you can install overhead elements for the legs.
- Brackets for bolts are fixed on the support.
- At all corners located inside, posts are installed connecting the supporting part and the bed.
When the frame is built, you can begin to manufacture the next element.
Bed support box
Furniture corner
Cross members
Connection between support and stock
Metal frame Strengthening corners
Creating a Frame
The frame is needed to place the mattress on it, and the headboard is also fixed here.
- The outer part of the structure is assembled from wood.
- The frame is complemented by longitudinal and transverse parts to strengthen and maintain its shape.
- If you plan to use LEDs, then install a power supply.
- The frame and support are connected.
- Both parts are sanded and then varnished.
- A wooden panel or plywood is laid on the frame.
- External sides are fixed on all sides of the frame, treated with stain or painted.
When making a metal structure, the principle of operation is the same, only with the use of other tools and fasteners. In this case, welding, cleaning of products from deposits, and grinding of sharp corners will be required.
Bed frame
Connection between frame and support Plywood sheet External sides
Floating bed made of wood
Arrangement of the headboard
The algorithm for performing all the work looks like this:
- A piece of plywood or OSB board is fixed to the frame, onto which markings are applied.
- Foam rubber and synthetic padding are fixed to the plate with glue, and holes are made for buttons.
- A material is stretched over the filler, the size of which is taken with a small margin.
- Buttons are inserted into the holes and sewn tightly with strong threads.
The finished headboard is connected to the frame and frame.
Installing LED lighting
To enhance the flight effect, an LED strip is laid around the perimeter of the product. Its installation steps are not difficult.
- Check the tape for defects by connecting the power supply to the network.
- If during assembly of the product the area for installing the block was not equipped, then it should be placed in an inconspicuous place.
- The protective film is removed, the LEDs are glued under the frame.
- The power supply is placed in a specially prepared place.
A floating bed with lighting, made with your own hands, requires patience, time, and experience. The result is a strong, comfortable, beautiful product that will decorate the bedroom and create a special aura in the room.
Installing LED lighting
A good decoration for a floating bed can be LED lighting placed under the frame. Let's take a quick look at how to do this.
Step 1. Unpack the LED strip, unfold it and connect the power supply to the network; check if it works and if there are any damaged areas. If the tape is shiny and changes color, try all of its additional features.
Checking the LED strip
Step 2. Prepare a place for the LED strip power supply under the bed, if you did not do this during the frame assembly stage.
Step 3: Peel off the protective film from the adhesive part of a small section of the LED strip and stick it under the bed frame so that the LEDs are not visible from the outside. Check if the tape is holding well. If yes, continue with the installation. If not, use glue for this. Mount the LED strip around the entire perimeter of the bed.
LED strip is attached around the perimeter of the bed
Types of bed designs with a floating effect
Floating furniture hangs in the air thanks to specific mounting methods.
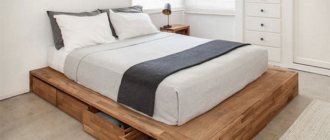
- On one leg. A floating bed can only have one support in the center of the base. Decorative lighting distracts attention from the leg, which is already almost invisible due to its location. Sometimes rays radiate from the central support, which allow the weight to be evenly distributed. With this fastening, the product will withstand a load of up to 300 kilograms.
- On magnets. The author of floating magnetic furniture is the Dutch architect Janjaap Ruijssenaars. The designer's idea is based on the principle of magnetic levitation. Magnets are built into the frame of the product and into the floor, which keep it in the air. The floating sleeping bed stays in place thanks to four cables. The magnetic bed can support a weight of up to 600 kilograms. It is not suitable for people with pacemakers due to the magnetic field.
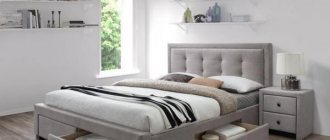
- On a metal frame. The main advantage of a metal frame is the reliability of the fastenings. The metal frame must be powder coated to prevent corrosion. Usually the metal frame is covered with a body made of MDF or solid wood.
- Suspended from the ceiling. The bed can be attached to the ceiling with strong ropes. This design has increased safety requirements. For a child's room, it is recommended to use steel cables instead of rope ropes.
- Attached to the wall. A headboard attached to the wall will give the structure additional stability.
“Flying” furniture looks weightless, as if challenging gravity.
The photo shows a hanging bed in an oriental style. Strong ropes hold the bed made of solid wood with layers of polymer resin.
With invisible legs
These models are the most popular and affordable. The peculiarity of a bed with invisible legs is that there is only one support located in the center of the base. In addition, such beds are distinguished by the presence of decorative lighting, which is designed to divert attention from the legs and thus provide a floating effect. Some beds have rays radiating from the central support, which help distribute the mass evenly. It is thanks to this that the bed is able to cope with enormous loads.
Dimensions
Today in the store you can find a bed with a floating effect of any size. The most common are the standard options with a length and width of 160x200 cm, 180x200 cm and 200x200 cm. The “royal” models are more spacious, their dimensions are 200x220 cm.
Such beds should be purchased only from trusted and high-quality manufacturers, so as not to run into a weak and unreliable design.
Many furniture stores make “floating” beds to individual measurements. Such a bed will be expensive, but it will be ideal for your bedroom.
Wall mount
The wall mount gives the hanging bed a mysterious look. If you look at it from a certain angle, the attachment point is not visible, and the stock appears to be floating in the air. Wall fixation provides the same stability as the ceiling option, but is less common.
The low popularity is explained by the more complex design of the supporting structure; you can’t do without supporting beams and massive corners. The following life hacks allow you to add stability to a wall mount:
- The design is equipped with a central leg against the wall. Sometimes it is made of transparent plastic, and then the detail does not catch the eye.
- The product is fixed according to the principle of a berth on a train: with the help of side supports that create the effect of a folding bed, and metal cables. In this way, you can place two beds one above the other and save space, which is important if you need to arrange a hanging children's bed.
- The bed is mounted in the corner of the room. The load is distributed over two walls, which increases reliability.
- The main feature of the structure attached to the wall is that it does not swing.
With frame
The main advantage of a floating bed on a metal frame is the reliability of its fastening. Such models are able to cope with any load, which has a positive effect on their durability. When choosing such beds, you need to make sure that the metal frame is additionally treated with powder paint, which is designed to provide reliable protection against corrosion. In most cases, the metal frame is covered with a wooden body, which gives the product a more elegant appearance.
Creating a metal frame
Making a base for a mattress using a metal profile or rectangular pipes is similar to working with wood, but for joining you will need a welding machine and the ability to handle it. Bolted fastening of components has the right to exist, but it will require a lot of labor and time. This type of installation is more difficult to implement.
The process of securing the slats under the mattress will also differ. First, a metal corner with drilled holes in 15 cm increments is welded inside the finished frame. Then slats or lamellas are screwed to this corner. In another way, the support frame is assembled, which most often has one connection in the center and branches back and forth in the form of a trapezoid. It is better to fasten the frame (leg) to the base using a bolted connection so that it can be removed during transportation.
It is important to know: at each stage it is necessary to clean the cuts and welds with an angle grinder.
How to make a wood frame
Let's look at the process of how to make a floating bed with your own hands. First, you need to purchase solid wood, carefully inspecting each board for chips, cracks, and the presence of knots. It is advisable to purchase sanded and dried boards. You need to let them lie in the bedroom for several days so that they absorb moisture from the environment and do not become deformed after cutting and fastening.
For the base of the frame, wooden blocks 50 mm thick are suitable, from which 2 blanks are cut out, equal to the length of the mattress and its width minus double the thickness of the block. It is necessary to additionally cut 3 more short boards, from which the supporting transverse mesh will be twisted.
The 4 main blanks are connected using metal corners and self-tapping screws. The cross beams are secured with long bolts into ready-made drilled holes through the side board. Additionally, all connections are treated with glue.
To control the correct assembly of the frame, I advise the master to use a long stick placed diagonally. A slight shift will immediately disrupt the length of the two lines relative to each other. Then it is necessary to add reinforcement in the form of thinner planks in a checkerboard pattern between the transverse beams.
After the base for the mattress is ready, you need to make a support frame. Its dimensions should be one third smaller than the frame and allow placement under its central part. The process consists of the steps of creating a square or rectangular wooden box with one cross reinforcing board.
The final stage of manufacturing is fixing a solid sheet of plywood or chipboard on which the mattress will directly lie. You can create a slatted or slatted base.
Ceiling mount
This is the traditional and most common method of fixing an air bed. The ceiling mount has the following features:
- The bed is secured at one or several (usually 4) points. Fasteners are mounted in the ceiling or open ceiling beams if they are provided for in the style and are part of the structure and not decor.
- The most important task is to calculate the load and select reinforcement based on it. The height above the floor is chosen according to your taste; The optimal height is 30 cm.
- Typically, durable metal anchors are chosen for ceiling mounting. Four attachment points are needed for a classic rectangular bed. Round hanging beds from the ceiling are usually fixed at one point.
- The bed is suspended using nylon ropes, metal chains or cables fixed in the corners of the furniture.
- You should not choose a place for furniture close to a window or wall. After installation, the structure will remain mobile and will swing. To reduce the range of movement, the place is chosen so that the bed is leaning against the wall on one side; then one of the surfaces is protected with soft material (for example, felt).
- If you want to get rid of swinging, cables and chains can be replaced with crossbars or metal poles. To fix a static structure, do not choose anchors, but round or corner elements made of metal.
With drawers or cabinet
Bedside tables and bedside tables have become an invariable attribute of a comfortable bedroom. Bedside furniture hung on the wall will look organic next to the floating bed to enhance the illusion of levitation in the interior.
With ropes
Such models are attached to the ceiling using strong and reliable ropes. It should be noted that the installation of this bed requires strict safety measures. If we are talking about a children's room, then it is best to use steel cables, which can guarantee the safety and immobility of the bed even in the case of increased load. The fact is that children often jump on the bed, which can cause rope ropes to break, so it is best to use steel analogues.
Double
The levitating bed, thanks to the reliable design of the fastenings, can easily support the weight of two adults. The length of the sleeping place is calculated based on the height of the one who is taller in the pair plus 10 centimeters.
On magnets
Such beds first appeared in the Netherlands and immediately became popular throughout the world. This idea is based on the principle of magnetic levitation, which allows you to create the effect of a bed floating in the air. The bottom line is that powerful magnets are installed in the bed frame and floor, which ensure floating in the air. In addition, additional pipes are used here to ensure the bed is still and secure. This combination allows the product to cope with a weight of up to 600 kg. The only limitation applies to people with pacemakers, since the magnetic field can create some interference.
You can also find other models on the market that differ in their lifting mechanism, carriage tie or upholstered headboard. The choice of a specific model depends on the personal preferences of the owners and the layout of the room itself.
With soft headboard
The floating bed itself is laconic, so designers actively use the headboard to realize their original ideas. The most popular decor option remains soft upholstery made of tapestry, leather or textiles. The upholstery is made in the form of a carriage tie, decorated with rhinestones and photo printing. The role of the headboard can be performed by a wall with soft volumetric panels.
Combined method
The combined fastening is considered the most reliable and safe, and therefore is often used in children's rooms. It is also chosen if there are doubts about the strength of the ceiling. The method combines fastening the product to the ceiling with simultaneous fixation to the wall or floor, which eliminates swaying. For installation, the following scheme is usually used:
- Fastenings are attached in the corners of the headboard for fixing it near the wall.
- Cables or chains are attached to the legs, which are suspended from the ceiling with hooks.
- Sometimes a window sill or podium serves as additional support for the bed.
With lifting mechanism
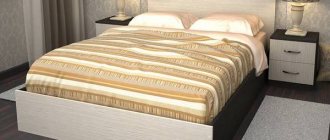
Thanks to the lifting mechanism, storage space appears at the base of the sleeping bed. Unfortunately, this design makes the product heavier and requires additional strengthening of the supports.
The photo shows a floating bed in a modern style with additional storage space.
Materials and tools
To make a bed yourself, materials are used that must have a high degree of wear and tear. First of all, this is wood, which is the main raw material for the production of any furniture.
| Wood type | Characteristic |
| Pine | It is resistant to rotting due to the large amount of resins. Pine is easy to work with and lends itself well to processing. It is used for power parts – legs, frame. Not suitable for decorative elements as it does not paint well. |
| Spruce | Its characteristics are similar to pine, but its strength is less and the wood can crack. Serves for parts that are not subject to high loads. |
| Beech | The tree is light yellow or pinkish in color and has good flexibility. It is suitable for load-bearing parts and decoration. It will take enough time and effort to process the wood. |
| Oak | Durable material that will last for a long time. It is ideal for creating strength and decorative furniture parts. Oak is difficult to process. |
| Larch | Popular wood has strength, durability, and resistance to decay. Suitable for the production of supports and frames of the product. |
| Red tree | Has many varieties of varieties. Rare expensive wood, used for finishing external elements and decorating the bed. |
To save money, instead of natural wood, you can use chipboard panels for external elements.
Not only wood is used to make furniture frames. Steel pipes with a square cross-section are perfect for these purposes. They are durable, light, easy to process and connect to each other. Since the bed is subject to heavy loads, it is better to use steel pipes that are quite thick.
If you plan to create a soft headboard, then in addition to wood and metal, you will need filler and upholstery material. In the first case, foam rubber is used, as well as similar materials. In the second, different types of leather and textiles are used.
To manufacture the product, you need to prepare the following components:
- sheet of wood measuring 200 x 20 x 2 cm;
- metal steel pipes or wood bars of the required parameters;
- a sheet of plywood for the base of the frame;
- LED strip, which will require approximately 7 m;
- boards with locks, they are installed on the side of the frame and headboard in the amount of 4 pieces.
The process of creating a floating bed with light requires the following tools:
- drill;
- hacksaw or jigsaw;
- screwdriver;
- self-tapping screws for assembly;
- level;
- plugs;
- rubber mallet;
- roulette;
- marker;
- hammer;
- screwdriver;
- painting supplies.
All fittings are selected in accordance with the colors of the future floating furniture.
We are drawing up a project
A “flying” bed is an incredibly beautiful accessory. The sleeping place floats in the air, giving the whole room a futuristic and unusual look. It's all about the design of the stock support. This bed does not have regular legs. They are replaced by a base, which is smaller in width and length than the frame.
The floating effect can be enhanced by equipping the lower surface of the furniture with lighting . Attach the LED strip along the frame and enjoy an additional original source of night light. LED strips also allow you to create a unique design using different colors and lighting modes.
Fastening such furniture eliminates loosening over time, as can happen with ordinary legs. In addition, being raised above the floor makes cleaning much easier. For example, a robot vacuum cleaner can do all the work for you.
To begin, select the look you want. Search the Internet for photos of models and draw your own design based on the images you like.
Don't forget to take into account the dimensions of the future bed. Measure the installation location carefully. Think about what the headboard will be like, whether you need a footrest, soft upholstery or an additional drawer. Once you have the image of the future bed in your head, it’s time to draw up an assembly plan.
Material of manufacture
The floating beds that manufacturers offer today are quite diverse in their design, design, size and, of course, material. Most often you can find three furniture options:
- wooden - most of the floating beds are made of solid wood (cherry, walnut, oak, pine, etc.). Accordingly, the cost of such models is high. A more accessible alternative to them is a sleeping bed with a frame made of chipboard and MDF. The main advantage of wooden products is their high strength. The maximum load they can withstand is 100 kilograms or more. Also, such beds have an aesthetically attractive appearance and are environmentally friendly and safe.
- metal - floating beds, which basically have a metal frame that is attached to the wall, reliably fixing the sleeping place in the desired position. The main thing in this design is the reliability of the fastenings, which is ensured using special fasteners or welding. The metal frame is powder coated to protect against corrosion;
- combined - beds in the design of which there is also wood and metal. Usually the metal frame is covered with MDF panels.
Choosing a bed design
A double bed, which seems to hover above the surface, can itself decorate the bedroom and create a full-fledged interior without additional pieces of furniture and decorative ornaments. Therefore, it is difficult to choose the design that will fit well into the existing environment.
Illumination of the under-bed space creates a special feeling of floating and highlights the area that always remains hidden. For this reason, designers advise purchasing a bed immediately after renovation and before the bedroom is furnished, so that it is possible to organize the space around it.
If you plan to make it yourself, you need to be especially careful when choosing a design so as not to encounter insurmountable difficulties during the creation process.
Tools
Have you purchased all the necessary materials? If not, then we recommend turning your attention to a tree of strong species. It will last a long time and will support the weight of sleepers from 120 kg. Ideal tree species: oak, cherry. Prepare your tools:
- Screwdriver and screws.
- Hammer and nails.
- Paint, varnish, brush (if the wood is not treated)
- Wood glue.
- Tape measure, marker, drawing.
Want a larger, heavier design? Take metal fasteners.
Helpful Hint: Apply wood glue to all seams and joints. With active use, metal connections, screws and nails can weaken. But the glue will keep the sleeping place, namely the places of their fastenings, safe and sound for a long time.
Since the flying bed is very popular and expensive, most foreign TV stars use it. On Will Smith's Instagram, you can find this design in his bedroom.
Drawing of a floating bed
Drawing - assembly will not work without it. It’s better for us to see what and where to attach than to do it blindly. The drawing will simplify and speed up the entire manufacturing process, and the floating bed will come out just right.
Drawing of a floating bed
Drawing of a floating bed
We recommend that you familiarize yourself with the drawing in advance:
- Dimensions;
- Quantity of material;
- Scheme of the finished bed;
- Necessary tools.
Floating bed, options, photos
Making a floating bed with your own hands in a step-by-step master class
Such furniture looks very elegant and unusual, and before you make a floating bed, you will need to decide on its dimensions and drawings. For example, in this master class a mattress 1.6 m wide was taken.
The base is a 200x50 board, 6 meters long. To create the base, one such board was needed, divided into 4 parts along the required length. The board marked into parts is sawn, and the cut is sanded with sandpaper. With a bed size of 1.6 m by 2 m, a bed base was made, which should not be visible. Its size is 1m by 1.6m. The base is screwed together using self-tapping screws like the rest of the bed parts.
To make the base for the mattress, a planed board with a section of 80 by 50 was needed.
At the head of the bed, where the pillows should be, there was a shift in the sleeping area. Thanks to it, the bed can be moved to the wall without removing the baseboard. The structure in the photo above was reinforced with beams for greater strength and rigidity, as well as for weight, and therefore better stability.
Without weighting, only the area for the drawer remained. Later, a metal profile will be taken to weigh it down.
Now the bed needs to be painted. Since the bed itself will not be visible later, black color was chosen. In this design, it already looks quite solid.
Now you need to take care of the area on which the mattress will be placed. It must be strong and reliable material. In our case, 2 OSB sheets were selected. They are cut exactly to the base area. But since a drawer was also planned, a hole was made in the sheets for it.
The preparatory work has now been completed. You can begin to install the bed in the place where it will always be. In our case, the bed had to be disassembled again because it did not fit into the doorway, and then reassembled.
It is important to add supports to the legs of the bed because it will not sit on a perfectly level surface. These can be pieces of thick plastic, as in this example, or wooden blocks. To install the storage compartment, metal bars 20 by 20 were screwed on.
When everything is ready, the base can be placed on the attached legs, and the bottom of the glove box can be placed, not forgetting to allow for the thickness of the screwed corner. For example, the base can be a sheet of chipboard, 2 cm thick, which has been previously coated with transparent varnish.
Now you can assemble the bed. The base under the mattress is screwed to it. Sides are also made so that the mattress does not move and is stable. A 150 by 20 board is used under the sides. All parts must be sanded so that they are safe, and then painted. The bars are screwed opposite each other into the opening of the glove box. They will serve as a support for the metal profile, which will need to be attached to the lid of the box.
The sides of the bed are painted black, after which they are covered with several layers of varnish. And to make the storage box convenient to use, two barn-type hinges and a small handle are screwed onto it, which makes it quite convenient to pull the door towards you. The handle should not be convex, otherwise it can be felt through the mattress.
This is what the bed looks like after the work has been done.
All that remains is to make the bed even more unusual, namely, to connect lighting to its bottom. This creates a floating effect and looks great in the dark. Making a bed with lighting is also not difficult.
All you need to do is order or buy LED strips and attach them to the bottom of the bed. Here you can experiment with the color of the light bulbs.
Stages of work
When all the materials and tools are prepared, you can begin making the bed. Its manufacturing process is simple, the main thing is to do everything correctly. It is better to measure everything in advance so that there are no unforeseen problems with assembling the product in the future.
Bed making process:
- First of all, we make the frame of the product, it is installed from below. Its size is selected independently, depending on how many people the sleeping place will be designed for; if for two, then make the frame larger. It needs to be made of wood. At this stage you will need the help of a jigsaw and a screwdriver. Everything is held together with self-tapping screws;
Frame manufacturing process
Finished wooden frame
- then we make a base from the boards on which the frame will rest, making it smaller in size. If the frame measures 2.5x2 meters, then the support should be about 1x1 meter;
- At the bottom of the frame we install an LED strip around the perimeter, which will later serve as a backlight;
LED strip is installed inside the frame
- After the LED strip is fixed, we complete the arrangement of the frame by laying large plywood on its surface. We attach it with self-tapping screws, for better fixation we use PVA glue or wood putty;
Cover the frame with plywood board
- On the sides of the frame we make a frame from boards. The boards should be installed on the sides, attached using self-tapping screws; we first lubricate them with PVA glue or putty, this will ensure a strong fixation of these elements. We install plugs at the corners; they will hide unsightly cracks;
Frame made of boards
- you can make a headboard yourself from a board, it will give the product a rich look;
Headboard
- when the product is ready, use sandpaper or a grinding machine to clean all the wood so that it can later be coated with paint or varnish;
- after cleaning, we decorate the bed with varnish or stain;
The wood needs to be cleaned and varnished
- when everything is dry, you can lay a mattress on the frame, tuck in sheets, a blanket;
- Additionally, you can lay beautiful textiles. An original bedspread, unusual pillows, capes will give the sleeping area an original style;
- the headboard can be upholstered with beautiful textiles, leather, and decorative elements. This will give the bed a rich look.
- the finished product can be used for its intended purpose.
A floating or flying bed will become a unique place in your living space. It will make the bedroom unusual, but at the same time stylish and practical.
It is not at all necessary to buy this product; you can make it yourself. After looking at the photo first, you can easily do everything yourself. The main thing is to draw up the drawing correctly from the photo, choose the dimensions and fasten everything well.