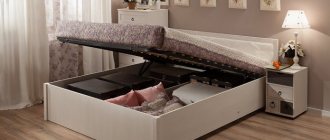
bed with lifting mechanism photo
For a small living space, the most pressing issue is the availability of free space. In this article, we offer you ideas on how to make a bed with a lifting mechanism with your own hands, with step-by-step photos and instructions that you can read on the source website. The bed frame is quite a voluminous design that can be used to store a large number of things. In addition, we have examples of how to make a bed cabinet with a lifting mechanism , which will significantly save space in a small room and are ideal for a guest room. For your home project, you can use drawings of beds with a lifting mechanism and collections of photos in galleries. We hope our article will be useful to you and help you solve the problem of saving space in your home.
Step-by-step instruction
We will make a children's bed from natural boards; the lifting mechanism is attached to the headboard and footboard and ensures the side tilting of the mattress. It is much easier for children to use such a device; we have already talked about its advantages. The dimensions of the parts are not given intentionally; let everyone make according to their own sketch. The main thing is to understand the technology; everyone can use roulette.
Drawing a bed drawing
Preparing the bed parts
Step 1 . Prepare panels for making backs and sides. The boards must be smooth and passed through a double-sided thicknesser; it will make the surfaces smooth and even out the thickness of the lumber. Spread the boards with glue and press them tightly with clamps. Leave the glue in this position for about a day to dry. The last operation is grinding the surfaces. This is much easier to do with special electric grinders.
The boards are glued together into panels and clamped with clamps until dry.
Step 2 . Prepare bars for the legs and supports of the moving element of the mattress, suitable with dimensions of 30x40 mm. The surfaces must also be sanded; before this, the lumber is passed through a surface planer.
Bars for legs and shields must be sanded smooth
Step 3 . Draw a sketch of the back, if you don’t like it, consider several options. Transfer the drawing to the furniture board, check all the dimensions again. Cut out the outline with an electric jigsaw. Make sure that the saw is sharp and does not leave burrs on the back of the furniture panel. They then need to be removed, and this will take a lot of time. In addition, marks may be left on the front surface.
Transfer the sketch to the boards
Sand the edges and go through with a hand router. Choose the cutter profile at your discretion.
The edges of the workpieces are processed with a milling cutter
Step 4 . Place decorative sticks between the two back pieces. The parts must be cut from a 20x20 mm block, the connection is made with Ø 10 mm dowels. Place the elements precisely; they must be completely symmetrical both with respect to the axis of the backrest and on the backrest and headboard.
Decorative elements are attached using dowels
Important. Do not forget that the bed is for children, carefully round off all sharp corners to eliminate the possibility of injury.
The dowels must be strong; great forces are exerted on the nodes. Be sure to lubricate dowels and holes with wood glue.
Step 5 . Prepare two sides of the bed according to the dimensions. They are easy to make; cut them from previously prepared furniture panels. All corners must also be rounded and surfaces sanded.
Two sides of the bed are made from boards
Step 6 . Cover the bed parts on both sides with a special protective and decorative agent. It is odorless, does not cause allergic reactions and at the same time reliably protects the wood from pests, mold and gives a very interesting shade. You need to apply two layers, the first is almost completely absorbed, the surface is matte. The second one already remains on the surface of the parts and gives them shine.
All parts of the future bed are covered with a protective and decorative composition
The bed elements are ready, you can begin installation.
Frame assembly
The work is easier to do with the help of metal corners; they are bought at a furniture store at the same time as the lifting mechanism. You already know the quantity and range of fasteners and the optimal type of lift.
Step 1 . Step back 10 cm from the top edge of the sidewalls. Our mattress crate will be made from 5 cm thick bars; the mattress is recessed by this amount. The rest of it rises above the frame. Make markings for the metal corners. Take your time, check the correct placement of the fasteners several times.
Perform markings for corners
Step 2 . Attach the corners to the two sides.
Screw the corners with self-tapping screws to the sides
Practical advice. To avoid a gap between the sides and backs, do not screw the corner near the very end, but step back 1–2 mm from it. When tightening the self-tapping screw, the back will be strongly attracted to the ends of the sidewalls, the design will be durable and beautiful. Stability is increased due to the large contact area of the two loaded parts.
Step 3 . Place the sides on stands and screw them to the headboard and footboard.
Connect the corners of the side panels with the headboard and footboard
Step 4 . Make the bottom of the bed. You can use 20x30 mm slats; you need three in total: two on the sides and one in the middle. The bottom is covered with thin slats.
The bottom is made of longitudinal bars and thin crossbars
Step 5 . Make a frame for the mattress. The bars are suitable, the length depends on the size of the bed.
The base for the mattress is made directly into the bed frame
Important. Due to the fact that the bed frame is liftable, it should be approximately one centimeter smaller than the body around the entire perimeter. To ensure that this parameter does not go astray during the manufacture of the element, use ordinary templates.
Step 6 . Attach lifting mechanisms to the grille and backrests. Adjust their position and check functionality.
Screw lifting mechanisms to the sidewalls
When choosing a lift, remember that your mattress rises to the side. This means that the effort is reduced by about half. The specific value depends on the ratio of the length of the bed to its width.
Installing a gas lift on a bed
Video - Do-it-yourself bed with a lifting mechanism
A bed with a lifting mechanism is an excellent solution for small apartments; now you know not only its advantages and disadvantages, but also detailed manufacturing instructions. All that remains is to install it correctly; the comfort of sleep and, accordingly, your health depend on it. There are many different tips on the Internet with methods for choosing where to install a bed in bedrooms, but most of them have nothing to do with scientific research. On the pages of our website there is a very interesting article on this topic, we strongly recommend reading it.
Types of bed lifting mechanisms
The comfort of using the bed largely depends on their functionality and reliability. There are three types of devices: manual, spring and gas. Due to the presence of a huge number of shortcomings, the manual mechanism is currently not used for the manufacture of furniture. As for the other two, the dimensions, arrangement of levers, mechanical design and method of fixation do not have any fundamental differences. The difference is in potential energy storage.
Table. Types and characteristics of lifting mechanisms
| Type of lifting mechanism | Brief description of the design, advantages and disadvantages |
| Traditional design, time-tested and proven by numerous consumers. A very reliable mechanism, the lifting energy is accumulated by ordinary coiled springs made of special high-alloy steel. Depending on the calculated weight, the parameters and number of springs are adjusted. In addition, the designers have provided for the possibility of changing the tension of the springs by the consumers themselves; this advantage greatly improves the comfort of using the furniture. You can precisely regulate the potential energy of the stretched spring by changing its attachment points - the weight of the specific mattress is taken into account. The spring lifting mechanism is practically unbreakable, cheap and easy to use, there are special stops for fixing the selected position. The only drawback is that sometimes the springs creak a little during lifting. But at this time no one is sleeping on the bed and, accordingly, the sounds do not bother anyone. |
| A fairly new mechanism, the potential energy of compressed gas is used to lift the bed. The main element is a special cylinder with gas pumped under high pressure. When raising/lowering the bed, the cylinder rod with the piston increases or decreases the volume of the cavity, which leads to a change in the amount of potential energy. This mechanism has a number of disadvantages. The first is high cost; its price can be several times higher than its spring counterpart. The second is the complexity of manufacturing. It is necessary to ensure high precision machining of the surfaces of the piston and cylinder, oil seals and cuffs. Designers know that the more different parts a mechanism has, the lower its reliability. The explanation is simple - each of the numerous parts can break, and this has a negative impact on the device. The third drawback is the inability to independently regulate the amount of kinetic energy. Air is forced during production; you cannot increase or decrease its pressure yourself. During operation, the kinetic energy constantly decreases slightly due to the leakage of the connection, the drops are minimal, but they are always present. The energy is indicated on the cylinder body, this data allows you to know how much weight gas mechanisms can lift. |
Experienced furniture makers recommend using spring lifting mechanisms; over a long period of work, they have not yet encountered mechanical breakdowns due to physical wear. Gas lifts do not have such positive characteristics.
Manufacturing stages
Assemble the base frame to which the lifting mechanism, supports for the base of the mattress, headboard and lower back will be attached. Next, a folding base is made and the lifting mechanism is attached. After adjustment, the structural parts are finished.
Andrey Peregubsky
Furniture handyman
Ask a Question
If you have doubts about the correctness of the calculations, then you should start assembling with the lifting base of the mattress and, based on the resulting result, mark and assemble the bed frame.
Frame
The base is made of wood or chipboard. For installation, provide legs or support on side parts.
Manufacturing procedure:
- Prepare the sides of the base, attach legs or gaskets to them.
- On the inside, stops are installed for the movable base of the mattress. The stops are made in the form of jumpers or longitudinal linings on the sidewall.
- The side panels are connected to the headboard and lower backrest. For fastening, furniture corners, self-tapping screws or confirmats (Euroscrews) are used.
- Turn the resulting frame over and screw on the plywood bottom. It is not advisable to use fiberboard; over time, the edges will collapse and the bottom will be squeezed out.
The final finishing of the sidewalls is best done after adjusting the lifting mechanism.
Lifting base
The lifting base can be purchased assembled or made independently from wood; planed timber with a section of 50x50 mm and a board 25x100 mm, plywood are used.
It is important to take into account that the lifting part of the structure must be 1 cm narrower and shorter than the base box, so that it falls into place when lowered without friction on the sidewalls.
Operating procedure:
- The beam is sawed off to the required length: two longitudinal and two transverse.
- The parts are connected into a single structure using furniture corners and self-tapping screws.
- The top is fastened with plywood or cross boards.
Check the correctness of manufacture by attaching the lifting base to the lower frame.
Installation of the mechanism
The lifting mechanism takes on heavy loads when lifting the mattress, so it is important to choose the right installation location and fastening method.
Single and one-and-a-half-size mattresses can be raised to the headboard. Wide, double models are better along the sidewall, this reduces the load.
Due to the heavy load, the mechanism cannot be installed on self-tapping screws. Be sure to drill a through hole in the longitudinal bar and mount the lift with a bolt, washer and nut. The base of the mattress is secured in the same way.
To hide the head of the bolt, you can use an additional strip mounted parallel to the end one.
Another option is to hide the bolt with sheathing so that it does not turn when the nut is unscrewed; they use furniture bolts with a boss on the rod that fits into the through hole.
The installation diagram of the mechanism is necessarily indicated in the instructions, and the dimensions of the indents for drilling holes are also given there.
Before screwing the lifting mechanism, it is advisable to experiment with unfolding the part, making sure that the mattress will be raised to the desired height. At the same time, make sure that there is enough space left for the slight rise of the mattress, which is necessary to unlock the locking mechanism.
Common mistakes
The most common mistakes:
- Ignoring manufacturer's instructions.
- Before drilling holes for fasteners, measurements were not taken or it was done very carelessly.
- The master did not prepare all the tools in advance.
- The workplace is not organized properly.
- Ignoring gaps in furniture. The parts must fit together perfectly.
Installation Tips
A very important point when making beds. All advice is given based on an analysis of the practical experience of professional furniture makers.
Installing a lifting mechanism is a very responsible process.
Lift installation location
Industrial bed models have only one place for attaching the mechanism - near the headboard to the sides. This arrangement creates more inconveniences than benefits. Why?
- In the raised position there is a very large distance between the mattress and the floor; not everyone is that tall. Especially big problems arise for women and children.
- The position fixing device is inserted into the mechanism body and consists of one or more levers. When the bed is raised to its maximum height, the mechanism automatically activates and locks it in place. Removing the fixation can be done in two ways: by further slightly raising the mattress and manually by pressing the lever. Both methods cannot be considered convenient. We have already looked at the first one a little; it is already difficult for people with short stature to lift the mattress. And the second method is even more difficult - you have to hold the bed with one hand and turn off the thrust mechanism with the other.
The location of the mechanism at the head creates certain inconveniences - The bed linen slides towards the headboard, making it difficult to get it out of there.
- To lift the mattress you need to have powerful lifts. The fact is that in this case the laws of force distribution are triggered; the size of the lever is large (equal to the length of the bed), which significantly increases the load at the other end.
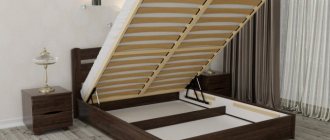
In connection with such problems, experienced furniture makers strongly recommend installing lifting mechanisms not to the sidewalls at the head of the bed, but one at the head and foot of the bed - the bed rises to the side, all performance indicators are significantly improved. But there is one new problem: depending on which side the mechanism is mounted, the bed cannot be placed close to the wall; there must always be a passage.
Raising the mattress to the side increases the comfort of using the bed
Manufacturing stages
The work must be planned in advance; this is the only way to achieve high final quality.
- Model selection. Decide on the size and material of the bed. Approximately calculate the amount of materials, additional elements and hardware, find out their cost.
- Draw a detailed sketch indicating the overall dimensions of all main elements and assemblies. Make details, prepare working drawings.
- Check the tools and special devices; if you have a workshop, clear the workbench.
You need to start by drawing up a drawing and calculating the materials for making a bed.
When choosing a bed model, we strongly advise you to soberly evaluate your practical experience in furniture construction. In practice, doing everything is much more difficult than reading about it in articles. Experienced carpenters recommend first making a few simple pieces of furniture with your own hands, and only then taking on complex ones.
DIY double bed. Dimensions, drawings, assembly instructions
Walking around furniture stores and showrooms, you can often be horrified by the price tags presented there. The most annoying thing is that a simple bed made of the cheapest material (not wood at all, but ordinary chipboard or MDF with an ordinary mattress board made of rough chipboard, i.e., even without slats) has an exorbitant price for such a product. Having seen enough of this, we are starting to look at other options: some are looking for used furniture on bulletin boards, others are taking something simpler and are content with a cheap analogue, and some are simply postponing the purchase of the product for an indefinite period.
But in this article we will take a different route. We will make a double bed with our own hands.
The advantage of this approach is that the furniture salon and you will pay almost the same for the materials. And by assembling this double bed yourself, you will save at least half the cost of the design (i.e., exactly the same amount as the markup on the cost price for the design, design and assembly of this piece of furniture).
Photo of a double bed that we will make with our own hands:
This article presents a master class on the manufacture and assembly of a double bed from chipboard + MDF lining on the frames, overall dimensions 2032 * 1692 * 800 (length/width/height), size of the sleeping area for the mattress 1600 * 2000 mm, i.e. quite a standard bed for two people.
At the very bottom of the article you can download a file with assembly drawings of a double bed, as well as its configuration.
What difficulties may arise during assembly?
In the absence of experience in this matter, as a rule, you may encounter the following difficulties:
- sometimes it becomes necessary to drill an additional hole;
- installation of a gas lift, this stage of work is one of the most difficult and requires accuracy and precision in actions;
- incorrect markings on the furniture frame, a mistake made will not allow you to assemble the bed, so it is important to check all the measurements several times;
- excessive pressure on the sheets during installation is unacceptable;
- tightening the fasteners too much;
- wearing fasteners of inappropriate length.
Tools, materials, working diagram
Any assembly or manufacture of furniture starts with the preparation of the necessary drawings, as well as the selection of the necessary tools and materials. The choice of material begins at the base of the box. The most common and cheapest is chipboard sheets. But you can also use other materials: OSB, wood, etc. Much will depend on the preferences of the owner and his capabilities. The upholstery material is being prepared, the choice should match the design of the room.
You need to prepare the tools in advance:
- Required set of screwdrivers, screwdriver.
- Hexagon for tightening self-tapping screws.
- Level.
- Roulette.
- Pencil.
In what cases is specialist help needed?
Installing gas lifts has many nuances. If you are new to the mechanisms and the cause of the breakdown is not clear to you, you are not sure that you can perform the installation efficiently, then you should entrust it to an experienced specialist. The best option is to entrust the assembly or repair of furniture to specialists. They will select the style, size and design of the furniture. Also determine the optimal characteristics of the lifting mechanism.
Products from German companies are considered the best fittings. However, many domestic products also have good user reviews.
Sources
- https://OmkMebel.ru/krovat/ustanovka-podemnogo-mehanizma-na.html
- https://mblx.ru/kojka/drugie/1013-sborka-krovati-s-podemnym-mehanizmom.html
- https://remoskop.ru/krovat-s-podemnym-mekhanizmom-svoimi-rukami.html
- https://novamett.ru/krovat/s-podemnym-mehanizmom
- https://SvoimiRukamiMebel.ru/krovati/dvuxspalnaya-krovat-1600×2000-mm-s-podemnym-mexanizmom/
- https://uripomoshnik.ru/nalogi/kak-sobrat-krovat-s-podemnym-mehanizmom-instrukcziya-po-sborke-dvuhspalnoj-krovati-160200-s-podemnym-mehanizmom-svoimi-rukami/
- https://okcomfort.com/mebel/krovati/kak-sobrat-podemnuyu.html
- https://severdv.ru/mebel/krovati/sborka-krovati-s-podemnym-mehanizmom/
- https://mebelarity.com/krovati/kak-sdelat-krovat-s-podemnym-mehanizmom-svoimi-rukami/
- https://divanguru.com/couch/kak-sobrat-krovat-s-podemnym-mexanizmom-svoimi-rukami
- https://hozzi.ru/obustrojstvo/sborka-krovati-s-podemnym-mehanizmom