assets/from_origin/upload/resize_cache/iblock/bbe/600_450_2/bbe5555275fec262c53e1ae864ef5f3b.jpg From this article you will learn:
- What are the benefits of hanging bathroom cabinets?
- How to choose a quality sink with cabinet
- What type of cabinet with sink can be called the best?
- What to look for when purchasing this piece of furniture
- How to properly install a cabinet with a sink with your own hands
As a rule, bathrooms in our houses are small, so furniture fits in them with difficulty. An important quality of the interior of a small bathroom is functionality. In this case, along with aesthetics, you should try to make the room feel spacious. A wall-mounted cabinet is a godsend for a small bathroom. The compact model takes up little space, and in the cabinet under the sink you can store household chemicals, cosmetics or bathroom accessories. From our article you will learn how to install a wall-hung cabinet with a sink.
Pros and cons of wall-hung vanities
These systems are popular today for many reasons. Among them:
- Easy installation. For such work, the help of professionals is not necessary. Anyone can install a wall-hung cabinet with a sink in the bathroom with their own hands if they read the instructions and prepare the necessary tools.
- Ease of maintenance. The accessibility of the floor area under the wall cabinet simplifies cleaning. By installing a hanging cabinet with a sink, you don’t have to worry about flooding your neighbors below, since there will be a convenient approach to communications.
- Durability of the structure. Air freely circulating under the cabinets helps eliminate dampness inherent in the bathroom. Therefore, the furniture will not deteriorate from moisture.
- Freeing up additional space in the bathroom. Moreover, this is not just a visual effect, with such furniture the room really becomes more spacious. Also, this bedside table can serve as a cabinet in which many things will be stored.
- Aesthetics and practicality. Installing a functional hanging cabinet under the sink will help you properly organize the space in your bathroom. In addition, this piece of furniture is suitable for storing household chemicals. And also, using such stylish furniture, you can hide ugly communications in the room.
- You can choose such furniture to suit any interior; there are many design options. For example, by choosing an elegant wall-mounted bedside table, you can successfully disguise a bulky washbasin.
- The installation height of the hanging cabinet and sink is determined individually in each case. You can place it in a way that is convenient for you.
This piece of furniture has many advantages. But what are the disadvantages of the mounted model? The main drawback is that this design needs to rest on something. For example, concrete and brick walls are ideal as a solid foundation. But plasterboard partitions will require a reliable frame in the area where the wall-hung cabinet with sink is installed.
Take the test
In the interior, such a piece of furniture looks good only if the communications are securely hidden. If a sewer pipe is visible in the bathroom, a luxurious wall cabinet next door will look out of place. It is advisable to disguise unsightly communications before installing the sink. Otherwise, all the beauty will be spoiled by the appearance of pipes and valves.
Design Features
Such kits must meet several requirements.
Among them:
- ensuring the safety of things inside;
- moisture resistance of the material used in their manufacture;
- stability of the stand itself, as well as shelves, drawers and other contents;
- tightly closing doors;
- minimum occupied space;
- compliance with the overall design of the room.
Types of hanging cabinets
There are many types of wall cabinets on sale. Before purchasing and installing a wall-hung cabinet with a sink, you should take into account that not only the design of the model matters, but also its functionality. Wall cabinets are classified according to the following parameters:
- Size. For a spacious room, it is advisable to choose large-sized furniture. Also in a large bathroom you can install a hanging cabinet with two sinks. Compact products are more suitable for miniature bathrooms.
- Washbasin drawer shape. The rectangular standard model with an original finish fits any interior style. And if you choose a corner version of the cabinet, you can save space in the bathroom. In addition, inside such a cabinet, despite its small dimensions, many useful things will fit.
- Functionality. Product configurations vary. Models may differ in the number and dimensions of drawers, shelves, towel holders or laundry baskets.
There are several options for installing a wall-hung cabinet with a sink.
- Purchasing a cabinet for an existing sink.
This choice is the easiest way to aesthetically transform a room. The main advantage of this design is that it does not require much work. First, the sink is hung, and then the cabinet is installed under it. It is not difficult to select a ready-made cabinet for an existing sink. Of course, you will be pleased with such an economical investment. But this option also has disadvantages.
- We'll have to replace the old sink and pipes. You should not install a wall-hung cabinet if your bathroom sink is old. Yes, in this way it will be possible to hide large domestic communications, but there is not much functionality in this.
- Sometimes, when installing a purchased hanging cabinet, it turns out that the model does not quite fit the utilities or sink. Then you will need to make the necessary holes in the cabinet with a file, adjusting the furniture.
- The ends resulting from sawing need additional protection from moisture. It is recommended to use special silicone seals or cover the edges with furniture edges.
Of course, such additional efforts are a necessary measure. But true professionals in their field are not afraid of this. Real specialists can create miracles from everything that is at hand.
- Installation of a wall-hung cabinet with a built-in sink.
This design consists of elements precisely adjusted to each other. There are models in which the sides of the sink are recessed or located on the same level with the top of the cabinet. There is also an option when the edges of the sink are raised above the countertop. This is convenient because you can also use the upper part of the bedside table, in addition to the inner one. It is only necessary to hermetically seal the joints between the countertop of the hanging cabinet and the sink during installation. Otherwise, water will get into the cracks.
- Wall-mounted cabinet with countertop sink.
The scheme of this design is simple. The sides of this sink are sufficiently wide; it itself plays the role of a countertop. What is good about such a sample? In this case, it is not necessary to additionally seal the joints.
- Installation of a wall-hung cabinet with an overhead sink.
A non-standard option is to install a sink on top of a hanging cabinet. This model looks very stylish. With a glass washbasin, the design looks especially elegant. In addition, the product is very easy to install. Another advantage of the model is that inside the bedside table there is free space that can be used to store all kinds of things.
Preparing the sink
Once you have a cabinet on which the overhead sink will be installed, you should first prepare it for the installation process.
Before installation, the sink must be prepared.
To do this, you need to perform the following manipulations:
- Unpack the metal product. The packaging film must be removed very carefully so as not to scratch the surface. Especially if it is glossy.
- Carefully try it on the cabinet and make sure it fits snugly enough. It is important at this moment to analyze whether the sink fits too tightly on the sides and, conversely, whether it is wobbly. If it doesn’t fit, you will have to sharpen the sides a little in the place where it is necessary. If, on the contrary, it dangles too much, then you will have to glue thin wood chips onto the sides.
- After this, to ensure long-term operation, care should be taken to ensure that the ends of the lumber are protected from moisture. To do this, they are treated with special materials that repel liquids or covered with a special edge film.
How to choose a quality wall-hung vanity unit with sink
Having summarized the experience of numerous users of suspended models, we can derive a number of rules that take into account the pros and cons of such equipment.
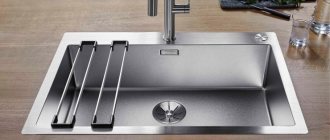
Wall-hung cabinets with sinks differ primarily in their installation schemes. The most popular washbasin is in the shape of a tulip. It is a sink mounted on a pedestal. There are also overhead structures with a pipe. Another group includes mounted models.
It doesn't matter what type of wall mounted vanity unit you choose. The sink can be any: oval, square, triangular or rectangular. Its edges are most often rounded. This is more practical, and the ergonomic characteristics of such a model are much better than those whose geometry has pronounced angles. This type of washbasin is easier to keep clean compared to the sharp-angled version.
The most common models of cabinets with sinks are oval or rectangular. Such products have many advantages. One of them is that the laconic shape of the bowl leaves no hard-to-reach areas. These sinks don't take up much space. In addition, when used, splashes do not scatter around.
In a spacious bathroom with an elite renovation, you can install a large hanging cabinet with a sink. Of course, the price of such a product is high. But in a small bathroom of a typical panel high-rise building, such a design cannot be used due to its impressive size.
The dimensions of the selected sink directly depend on the area of the room. It is not always possible to successfully fit such a model into the interior. This piece of furniture may lose its individuality, since a large-sized product is difficult to combine with other furnishings.
Recommended articles on this topic:
- Renovation of a combined bathroom in Khrushchev
- Stages of renovation in an apartment
- Apartment renovation services
If you decide to install a wall-hung cabinet with a sink, you can choose any model that is available in a wide range on the market. The most common types of sinks are ceramic, acrylic or glass. Steel, cast iron and granite models are also available for sale. But for now, traditional earthenware products continue to hold the palm, as they are suitable for any design. The colors of the sinks are also varied, which allows you to choose the desired shade to match the existing interior. Earthenware models are incredibly durable because their surface is treated with a special glaze.
Sales consultants at hardware stores, when describing the products they offer, usually point to their impact resistance. Of course, for metal sinks this figure is much higher than for ceramic or marble ones. But the latter, falling from a not very great height, also do not break. They are saved by a special coating. Although cracks may form on it over time. But the tiles on the floor will also be damaged if the sink falls on it. Therefore, point impacts during installation and operation of a sink built into a cabinet should be avoided. This point must be taken into account during installation.
Dismantling of old equipment
To remove an old sink, follow these steps:
- The water supply to the apartment is stopped. Unscrew the fastening elements of the mixer. The device is disconnected from the water supply. Make sure that the shut-off valve is not leaking.
- They are dismantling the drain. The lower part of the siphon is removed from the fixing nuts. Disconnect the flask from the outlet, pour out the water, and remove contaminants. Unscrew the fastening nut by turning it to the left.
- If the drainage device needs to be replaced, it is disconnected from the sewer pipe. At the junction of the flexible tube and the common line, unscrew the nut, lift and move the siphon. Before removing the device, you need to move the spacer washer and remove the outlet with the water seal from the sewer pipe. During work, a basin is placed under the sink, which prevents flooding of the room.
- The sewer socket is closed with a plug or rag.
To remove a sink attached to the wall, you need to loosen the fastenings located on the sides. If the washbasin does not have a pedestal, one hand of the master should hold the device so that it does not fall.
Removing an old sink.
Methods for installing a wall-hung cabinet with a sink
The methods of attaching the sink are not affected by its size or shape. It also doesn't matter who the manufacturer is. There are only two ways to install a washbasin with a cabinet:
- First, a cabinet is attached to the wall, after which a sink is installed on top of it.
- Both the sink and the bedside table are attached to the wall surface at once. But each of them has individual attachment points.
Installation of a hanging cabinet with a sink is carried out using the following types of fasteners:
- To hang the cabinet, special brackets are used, the configuration of which may vary. Each manufacturer has its own fasteners, suitable only for a specific model.
- Plumbing fixtures are secured with standard studs.
Possible installation problems and methods for solving them
If the water supply and sewerage come out of the floor or are in an inconvenient place, resort to sawing the furniture from below (if necessary, then in the shelf) and from behind in the right places using a jigsaw or an ordinary hacksaw, after which the connection will be made without problems. It also happens that the sink cannot be attached to the wall, since there are no corresponding holes or a pipe runs in a place suitable for drilling holes. This problem is solved by gluing the sink to the lining using silicone. The washbasin will hold quite firmly.
Installing a wall-hung cabinet with a sink: step-by-step instructions
To install a hanging cabinet with a sink in the bathroom with your own hands, you need to prepare the following tools:
- Hammer or drill (drills suitable for each type of wall are used).
- Bubble level.
- Pencil (used for marking).
- Various keys and screwdrivers.
- Roulette.
Before installing the wall-hung cabinet with sink, be sure to check the contents and carefully read the installation instructions. Usually the cabinet, sink and hardware are included in the kit. A siphon with a mixer will most likely have to be purchased additionally.
Important point! Please note: as a rule, the hardware included in the package is intended exclusively for concrete walls. For gypsum, gas and foam block structures, special dowels are needed. They should be screwed into the wall after the hole is drilled. To install a wall-hung cabinet with a sink on a plasterboard partition, you will need special fasteners in the form of Molly dowels.
The technology for installing a hanging cabinet with a sink consists of the sequence of operations described below.
Stage 1
First, markings are applied to the wall surface. According to SP, it is advisable to install the sink at a height of 800 to 850 millimeters from the floor surface. Slight deviations from this size in one direction or another are possible depending on the height of the residents. The good thing about wall cabinets for washbasins is that they can be mounted at any distance from the bathroom floor.
How are markings done when installing a wall-hung cabinet with a sink? The steps are as follows:
- First, marks are made at the level of the top of the bowl and washbasin.
- Then the sink mounting points are marked. It is important to perform all actions carefully; there should be no errors during marking. First, you should measure the distance between the centers of the holes, which will subsequently be the fastening points.
- This work is carried out using a building level. The washbasin must be installed strictly in a horizontal plane.
Stage 2
Next, using a drill of a suitable diameter, holes are drilled in the wall where plastic dowels will be installed in the future. Later, wash pins are screwed into them.
Stage 3
The bowl is hung on studs and secured with special nuts equipped with plastic eccentrics. This will help prevent the sink from twisting or over-clamping.
After fixing the washbasin, check the horizontal position of the installation. You can easily adjust the position and correct the misalignment by loosening the fasteners one and a half or two turns. The level is set even more precisely when turning the eccentric at the nut. This is usually done with a wrench. Having achieved a strictly horizontal position, the nuts are finally tightened.
It is advisable at the same stage of work to connect the sink to the water supply and secure the siphon with the mixer. Since after installing the hanging cabinet, approaching the sink will be difficult.
Stage 4
Installation of a hanging cabinet under the sink is carried out in the following sequence:
- Before starting work, remove all drawers from the bedside table to ensure free access to its interior.
- Then mark the fastening points.
- After that, holes are outlined in the mounting brackets with a pencil (hardware will be installed in the center of them).
- Next, holes are drilled along the marks where the dowels are installed. Mounting brackets are secured using self-tapping screws.
- On the side surfaces of the cabinet there are anchors covered with special covers. They need to be turned out as much as possible. In this case, the fasteners should not fall out.
- Hanging a hanging cabinet under the sink. Installation is carried out using anchors and fastening brackets that have special projections with grooves. As a result, fixation and adhesion are very strong.
Stage 5
The final adjustment of the location of the installed hanging cabinet in relation to the sink and the wall is made using the screws located on the anchor caps:
- The bottom screw aligns the bedside table horizontally. It is also used to check the connection of the cabinet to the wall surface.
- The screw located on top adjusts the vertical installation of the cabinet. Using it, you can finally level the height of the cabinet and the tightness of its fit to the sink.
Stage 6
After the installation of the hanging cabinet with sink is completed, everything is secured and adjusted, you can insert the drawers. If necessary, the smoothness of their movement and position relative to the vertical are adjusted using screws located at the end of the drawers. When the work is completed, the adjustment devices can be covered with decorative elements.
Materials
Furniture with a washbasin should be functional and beautiful, but if it is made of low-quality materials, then all its benefits are reduced to zero. Since the quality and service life of the entire structure depend on the materials. The main requirements for cabinet materials are their ability to withstand sudden drops in temperature and moisture resistance. Materials that have such qualities are MDF panels, chipboard, artificial stone and wood. The surface of furniture made from MDF is usually processed using two methods:
- By painting. First, a primer is applied to the surface of the material, and then it is painted with paint in several layers. This makes the furniture highly protected.
- Treatment with a special composition. The material, both outside and inside, is treated with a special moisture-resistant liquid, which prevents the process of reproduction and spread of fungi, mold, etc.
A cabinet made of chipboard is cheaper, and it is not afraid of various mechanical damage. The surface of this material is covered with sheet plastic, which prevents delamination and swelling of the material. There is no doubt about the reliability of furniture and sinks made of artificial stone
The only thing that is very important is that there is no damage to the surface of the furniture, including scratches that could destroy the integrity of the material. If the furniture is made of wood, it must be coated with a special moisture-resistant product
In terms of cost, furniture made from natural wood is slightly more expensive than those made from MDF or chipboard.
The quality of the fittings is of no small importance. Over time, the doors may begin to creak and become loose.
Therefore, the more firmly they are installed, the longer they will serve you.
As for the sink itself, it can be: ceramic, porcelain, earthenware, cast iron, steel, stone and glass. In this case, the materials of the cabinet and sink must be combined.
Depending on what materials the entire structure is made of, its cost changes. At the moment it ranges from 1,050 to 325,600 rubles.
Installation of a wall-hung cabinet with a countertop sink
How to install a wall-hung cabinet with an overmount sink? This type does not have a fixation to the wall surface, since the bowl is installed directly on top of the cabinet. The fastening diagram is similar to the previous one. Basic steps:
- First, mounting brackets are attached to the wall using self-tapping screws and dowels. The fasteners must be strong to support the weight of the cabinet along with the sink.
- Next, the cabinet is hung on the installed brackets. You can align the cabinet horizontally by adjusting the top screw; The bottom screw aligns the fit of the cabinet to the wall surface. It may be necessary to make additional holes in the cabinet for plumbing or drainage when installing a wall-hung cabinet with a sink.
- After adjusting and finally securing the bedside table, a sink is installed on top of it.
Sometimes, after installing a hanging cabinet, a wide gap of more than five millimeters forms between the sink and the wall. Of course, the gap can be sealed with sealant, but this will be obvious. It is better to slightly trim the edges of the back of the sink if they are in the way. For this manipulation, a grinder with a disk is used to cut tiles. But this creates a lot of dust, so you will need a respirator for such work.
It is recommended to seal the end surfaces of the wall-hung cabinet and sink before installation. Then the washbasin will be securely fixed. Usually, to seal the seam between the wall and the sink, a sealant containing antiseptic ingredients is used to prevent mold from forming. Before starting work, cover the edge of the bowl with masking tape to facilitate subsequent cleaning of the sink from remnants of building material. You can make an even seam with your finger, having first wrapped your hand in polyethylene. When the sealant has dried, remove the tape. Then install the siphon and mixer.
Anyone can install a wall-hung cabinet with a sink in the bathroom with their own hands, since the technology is very simple. It is enough to have basic knowledge of a minimum set of tools and strict adherence to the manufacturer’s recommendations, which take into account the individual installation features of each model.
Components
Installing a sink with a cabinet in the bathroom requires understanding and ability to understand the main components of this furniture.
So, the main elements of a sink with a cabinet are:
- sink or washbasin, or sink (wall-hung, built-in, surface-mounted or on a pedestal);
Sink
- vertical mixer with flexible or rigid connections;
Mixer
- drain siphon;
Siphon
- fastening the sink (brackets or anchor screws, bolts, rubber gaskets, nuts, FUM tape, metal corners, screws, dowels, metal-plastic pipes, as well as polyurethane foam or silicone sealant);
- cabinet.
Cabinet
In this case, from the tool kit you will need to purchase the following to install a sink with a cabinet in the bathtub:
- screwdriver;
- perforator;
- hole saw or circular saw;
- roulette;
- wrench;
- putty knife;
- pencil and ruler;
- building level.