/Furniture/Set, wardrobe, rack/
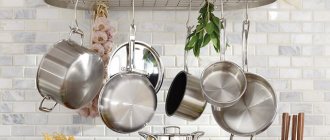
Railings for the kitchen are a practical solution for storing any items - from ladles to glasses. Even the simplest crossbar with hooks can solve many problems:
- Free up counter space so you can comfortably knead dough, cut and prepare food.
- Literally out of nowhere, carve out additional storage spaces and free up space in cabinets. This is especially necessary in small kitchens - here roof rails work wonders.
- Always have essentials on hand (for example, spices, spatula, ladle, scissors, etc.).
The challenge in planning a kitchen railing system is choosing the right hanging accessories, getting the most out of wall storage without creating a feeling of clutter and clutter.
- By the way, visual clutter is often a side effect of roof rails. However, a properly planned wall organizer can not only not spoil, but also embellish the interior in both classic and modern styles.
From this article you will learn how to choose roof rails for the kitchen, what accessories can be added to them, how, where and at what height to hang them. Also here you will find 50 photo examples of wall rails in the kitchen interior.
What types of roof rails and hanging accessories are there?
The railing system includes the following basic elements:
- The roof rails themselves are most often in the form of a pipe with a diameter of 16 mm or in the form of a flat strip. The length of one rod/bar can be 40, 60 (see photo below), 80, 100, 120 cm or 3 m.
- Wall holders - most often they are sold complete with a bar, their number depends on the length of the rail. The holders can be standard or end-mounted (for fastening the crossbar between two walls).
- Caps - installed at the ends of the rails to make them look nice and be closed on both sides.
- Corner adapters (if necessary) - are used to combine two adjacent rails, while couplings are inserted into them at the junction points, then the joints are closed with holders. Of course, it is not at all necessary to connect adjacent rods; they can simply be closed with plugs.
- Coupling (if necessary) - is inserted into the holes of two pipes, then they are connected under pressure. A holder is always placed at the joint.
In addition to the basic elements, hanging accessories are a must - they must be selected based on individual needs.
- S-shaped hooks - they can be large or small, as well as double. You can hang not only ladles and potholders on them, but also any utensils, dishes, cutting boards, graters.
- Mini-shelves - you can put anything on them, for example, cans of bulk products, sauces, oil, etc. Shelves are small and large, regular and corner, single- or double-tiered, with or without additional holders.
- Baskets and glasses - designed for storing utensils, whisks, spatulas, and even for growing plants, such as herbs.
- Drainer.
- Drying rack for appliances.
- A towel holder - for example, may have a crossbar and several hooks.
- Paper towel holder.
- Holder for lids from pots and pans.
- Knife holder.
- Board holder.
- Holder for tablet or cookbook.
- Hot stand.
- A shelf for spices – as a rule, it is narrow and can be two-level. You can often purchase “original” spice jars for your shelf.
- Shelf for wine glasses.
- Bottle shelf.
- Holder for mugs and glasses.
- Breadbox.
- Holder for rolls: towels, foil, film, baking paper.
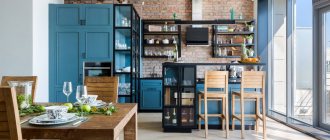
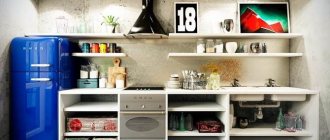
Railing system in a small kitchen
All these elements can be combined in one design, for example, a bottle holder with a glass holder or, say, a board holder with a knife organizer.
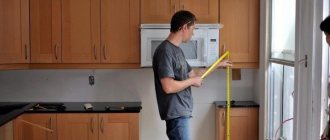
Marking the walls
The fastening of the roof rails in the kitchen should be carried out strictly along a horizontal line. If one side is uneven, the accessories simply won’t stay on the hooks and will begin to slide to one side. As a result, you will have to re-mark the level and redo all the work.
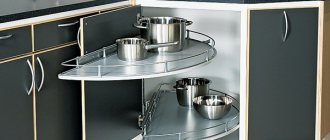
Metal railing with stands for different utensils
Therefore, the first thing to do is to determine the “horizon” for the railing. To do this you will need a building level. There is no need to measure the distance from the ceiling, cabinet, floor to the railing. You risk receiving false and inaccurate information.
Important point. Before hanging the railing in the kitchen, pay attention to its length. Short systems are attached at two points, rails with a length of more than a meter - at three and four. Multi-tier systems require multiple horizontal openings.
The marking is done. Now you need to drill the holes using an electric drill. The drill must be selected based on the material of your walls. For concrete and ceramic tiles, as a rule, drills with a Pobedit tip and diamond coating are used.
A few more life hacks
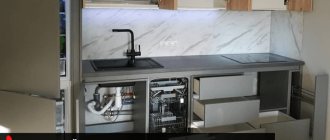
- If there is not much space in the kitchen, you should not spend money on a separate holder for lids, because they can be conveniently stored as shown in the photo below.
- To save space on the kitchen rail, you can not hang the appliances and kitchen utensils on hooks separately from each other, but put them in one hanging glass.
- Store kitchen utensils, food, dishes and textiles on rails strictly according to categories. We often forget this simple and obvious rule, but meanwhile, its observance guarantees you order in the kitchen. For example, it is more convenient to place paper towels next to kitchen towels and oven mitts, because they perform approximately the same function.
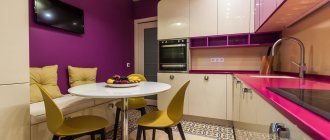
- If you choose cutlery, dishes, potholders and other “wall” items in the same color scheme, you can avoid the feeling of disorder and diversity. This advice is more relevant for those who are arranging their kitchen from scratch. Here are some photo examples of such wall storage.
Install bushings and fasten supports
The holes are drilled. Next, you need to remove dust from them and prepare dowels and screws.
- Take a plastic dowel and a small hammer. Drive the dowel into the hole by tapping lightly with a hammer. The latter must enter the hole with force so that the pipe does not accidentally fall during operation;
- Now insert the self-tapping screw into the bushing;
- Take a screwdriver and screw the self-tapping screw into the dowel that is already fixed in the wall. This will secure the bushing firmly and firmly.
Everything is ready for the final installation of the railing. Now you need to secure the supports, since installing roof rails in the kitchen without them is simply not possible. What is a support? This is a rectangular or cylindrical part that has two holes.
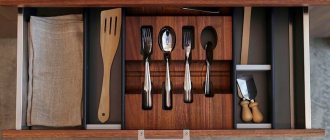
Railing kit
It is included in the railing system kit. A small device will have two supports, a long one will have three, and a multi-tier system will have several supports for each pipe.
- The support is equipped with two holes - one for the bushing, and the second for the metal tube. One hole will be larger - it is intended for a pipe;
- The support must be placed on the sleeve (you have already installed it in the wall) and secured with screws using a hex key. Screws are included with the roof rail system.
Now you need to insert the rail itself into the prepared supports and secure it with screws. An important point is that the pipe should be fixed so that the ends protrude evenly beyond the support on both sides.
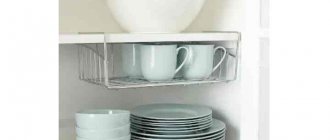
Metal railing on tiles
You have completed the main and main stage of installation and now you know how to attach the railing in the kitchen. All that remains is to take the plugs and carefully hammer them into the ends of the railing pipe. Next you can place kitchen items and accessories.
If you need to increase the length of the system, you can connect the two railing pipes using a special plastic coupling. To ensure that the system is securely fixed, you can install an additional support at the junction of two pipes.
At what height should you hang roof rails in the kitchen?
The standard height is 40-50 cm above the tabletop and at least 5-10 cm from the wall cabinets. It is also convenient to place rails with shelves at eye level. The minimum permissible installation height for kitchen rails is 90 cm from the floor. Maximum – 170-180 cm.
However, there are no strict rules at what height to hang roof rails. It all depends on the intended composition, your height and personal preferences.
When choosing the height and installation location, the main thing is to observe the principle of symmetry.
Subtleties of placing kitchen items
Since you can attach a roof rail in the kitchen in literally 10 minutes, it is important to think about not only the location of the system, but also look at the design features. It is also worth taking into account such a moment - what kind of utensils and where you want to place them.
Railing over the kitchen work area
There are several tips for optimizing space using roof rails.
- If you need to place cutting boards or a holder for saucers and plates, choose rails with hanging mesh shelves;
- Install rails above the hob that will hold potholders and lighters for the stove. It is best to place a system above the sink where holders for towels and glasses will hang;
- Above the tabletop, it is best to place rails with hooks that will hold skimmers, ladle, and ladles;
- If you don’t have space above the work surface or where you plan to place rails for dishes and towels, cutlery, skimmers and ladles, you shouldn’t hang them above the stove. Since here they will get dirty with steam and fat that is released during the cooking process. It’s better to place them separately in a stand or hang them on standard hooks;
- You can hang rails above or next to the stove, which have a shelf or grid for spices;
- It is better to hang rails with bottle holders and fruit bowls on the far edge of the kitchen, because these things will be rarely used. If you have a long system, move the fruit net and bottle holder to the far end of the system;
- If an accessory such as a holder for paper towels, parchment paper or film is important to you, additionally install a special device with sharp edges on the railing. It is needed in order to conveniently and quickly tear off part of the film or paper;
- For cookbooks, there are inclined shelves that are attached to the railing. You can hang such a system, if, of course, you use the book while cooking.
Now you know how to hang the railing correctly and rationally use each of its hooks and holders. Such a system will fit perfectly into any kitchen design direction - be it a room in a high-tech style or in a romantic Provence.
Five color options for roof rails
Metal roof rails are considered the most reliable and are the most common. Plastic models are more affordable. True, they are designed for storing light spatulas, oven mitts and ladles.
When choosing a roof rail, pay attention to its design.
- Long systems are best suited for large and spacious kitchens. They can be equipped not only with standard hooks for spatulas, but also with bottle holders and a towel storage device. This type of railing will be convenient for those who do not have a lot of cabinets in the kitchen. The longer the pipe, the more additional holders can be placed on it;
- Multi-tiered roof rails are a whole system for storing all kinds of kitchen utensils. It can have from two to five floors. Such railings are placed on a free kitchen wall or between cabinets. Installation of a multi-tier system is carried out in the same way as installation of a single pipe. First you need to think about where and what tier will hang, then measure and drill holes. Multi-tiered railings can consist of a separate shelf for cans, spices, paper towels, potholders, and cook utensils. You can also place decorative items here, such as a flowerpot and bright towels.
You can also choose small roof rails that optimize the space of a small kitchen. The length of the pipe will not exceed one meter, but you can place spatulas, towels, and the necessary spices here. When purchasing, pay attention to the package so that you do not have any difficulties during the installation process.
Extended set with two hangers
The kit usually includes a support, screws, plugs, the pipe itself and additional railing brackets. Separately, you can choose a shelf for towels, dishes, a stand for lids, a bottle holder and decorative plugs.
The railing will become a universal storage system that you can supplement with holders and shelves.
Decorating a room with roof rails
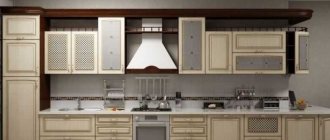
Modern fashion dictates its vision of the design of the room and requires adherence to stylistic direction. You can find the perfect guide for every style.
Technical high-tech accepts strict, metalized designs. They organically match the color of the wall covering and have an attractive appearance.
Romantic Provence, complemented by shiny steel slats, will become more practical and functional. They will softly fit into the classic style of slats with coating, matte or glossy.
Imitation of water pipes is more suitable for an urban loft, which is extraordinary and technologically advanced. Black roof rails for the kitchen will be appropriate for a futuristic style.
Features of accommodation
The railing and all the utensils hanging on it are convenient to use only when a suitable place has been chosen for the holder. It is customary to hang it on the wall, covered with an apron - just between the stove and the sink.
The optimal height for installing the railing system is from chest level to the eyes. Only holders with hooks for large-sized utensils, such as frying pans and ladles, can be mounted higher. If the housewife does not have specific wishes on this issue, it is enough to hang the crossbars 5-8 cm below the edge of the wall cabinets.
In an island kitchen, it is better to use special hanging rails that are attached to the ceiling.
Kitchen accessories
Having organized a modern system of crossbars in the kitchen, it’s time to start selecting the necessary accessories - shelves, nets, holders, which are either attached to hooks for the railing or directly hung on it with brackets.
Accessories create an individual storage system and, when positioned correctly, increase the ergonomics of the space. The main structural element is hooks. You can hang ladles, chopping scissors, graters, skimmers, and measuring cups on them. In addition, hooks serve as fasteners for all kinds of nets and shelves, containers and dryers.
Vertical installation system
Vertical railing is more substantial, since it stores the main heavy kitchen items. It can occupy the entire height of the room, but most often its upper end rests on the ceiling, and its lower end on the countertop or bar table. It all depends on the style of the kitchen. The railing should fit into the overall design concept, creating the atmosphere of a homely, cozy cafe. This design looks stylish in the kitchen interior.
How to install it yourself
One of the main advantages of railing systems is their mobility - you can reinstall and change the configuration an unlimited number of times. Installation and dismantling is very simple.
Installation Tools
For installation you will need the following tools and materials:
Horizontal rails should be installed at a height of 40–50 cm from the surface of the tabletop. If there is a kitchen cabinet or shelf above the railing, then the distance from the bottom of the hanging furniture should be at least 8 cm. Remember, if the length of your railing is more than 1 m, you will need to secure it with an additional wall mount so that the railing crossbar does not bend under the weight of the fittings. Additional fastenings are installed every 50–60 cm.
We hang a corner corner with our own hands (with video)
The general scheme for attaching the corner rail looks like this:
Railing fastening scheme: 1. Screw. 2. Connecting coupling. 3. Plug (available in “modern” and “classic” versions). 4. Holder (available in “modern” and “classic” versions). 5. Bushing. 6. Holder support. 7. Screw. 8. Pipe (railing). 9. Hex key
You need to install such systems like this:
How to position vertical
If the vertical railing is mounted on special spacers, then you do not have to drill into the ceiling, floor or countertop. It will be enough to simply install it according to the attached instructions in the selected location. The next step will be to secure all the hanging elements.
If the vertical railing fastening system requires drilling, then the algorithm here is almost the same as for installing a horizontal railing system.
At what height and how is the hanging
All suspended structures attached to the ceiling must be installed very securely to ensure maximum safety! The hanging rail, along with all its contents, must be hung in such a way that it does not inadvertently fall on the owner of the kitchen during the process of culinary creativity.
A suspended roof railing structure is usually attached to chains, which, in turn, are attached to the ceiling using anchor bolts, which are often in the form of hooks.
In conclusion, I would like to say that caring for railing systems is quite simple - parts and accessories of the railing should be periodically wiped with a damp cloth, and in case of significant contamination with steam released during cooking - with the usual means that you use when cleaning the kitchen. Accessories for roof rails are unified, so if you want to make a small rearrangement of elements over time, you can easily add to your collection in specialized stores.
For those who love to cook and get a lot of pleasure from this activity, the railing system will help them have a good time doing what they love and keep the kitchen in perfect order!
Source
How to choose a roof rail
The railing system is a long tube (crossbar), complemented by various accessories (hooks, shelves, holders, etc.).
Kitchen systems
Installing kitchen rails allows you to:
- Free up as much space as possible on your desktop;
- arrange small accessories according to the housewife’s preferences;
- swap kitchen utensils without additional labor costs;
- have all the necessary items and products at hand when preparing food.
Significant advantages are also low cost, original appearance and ease of maintenance.
To choose a roof railing system for your kitchen yourself, it is recommended to consider:
- type of kitchen fittings;
- equipment manufacturing material;
- overall dimensions, color, shape and so on, which are selected in accordance with the preferences of the housewife.
Varieties by shape
Railing systems can be:
- horizontal (picture above). The most common type, characterized by maximum functionality. Do-it-yourself installation of roof rails can be done between the countertop and wall cabinets, above the sink, inside cabinets, on the side walls of cabinets, and so on;
- vertical. The equipment is best mounted on the edge of a bar counter, table or other piece of furniture, as well as inside corner cabinets, which allows for maximum use of the internal space;
Vertical kitchen fittings
- hanging. The equipment is intended for large kitchens, with the work area located in the center of the room.
Hanging type railing system
Which option should I choose? The type of design is selected depending on the presence/absence of free space in the room for installing additional equipment, the overall design and the preferences of the housewife.
Variety of materials
In addition to the type of railing system, it is important to select the most optimal material for kitchen fittings for users. Rails are produced:
- made of metal. The most commonly used materials are brass, stainless steel and nickel. The systems are distinguished by their durability, aesthetic appearance, long service life and relatively high cost;
- made of plastic. Plastic systems are less reliable and cannot withstand heavy loads, so they are most often used to place paintings and other decorative elements;
Plastic system
- made of wood. Wooden rails are quite durable, but as a result of exposure to moisture (steam), they quickly become deformed, rot and become unpresentable. It is recommended to use it as decoration and install it away from the sink and gas stove.
Wooden hanging system
Equipment
First, let's talk about what types of furniture rails for the kitchen there are, and what such a system usually consists of.
It cannot be said that there are any specific standards about where and what kind of roof rails should be placed in the kitchen. There are a lot of options on sale, and some characteristics are standardized.
Typically, installing roof rails in the kitchen involves the use of systems consisting of the following components:
These are all basic elements found in most standard roof rail configurations.
But the systems can also be supplemented with various hanging accessories.
These include:
They are combined in a combination that is required by a particular client. Here everyone chooses for themselves what they need.
Preparation for installation
After selecting the desired height, markings are made on the wall using a horizontal level or marks are set at the same distance from the bottom of the wall cabinets, which are installed according to the level. Depending on the size of the railing, the number of points for attaching it to the wall is selected. When choosing tubes, you should also buy supporting components: holders and plugs. If the pipe is no longer than a meter, two supports are sufficient for it. It is fastened either using the fastening method, or using the spacer method, if we are talking about installation in a recess in the wall.
If the tube system has a significant length and angle, it is necessary to purchase corner railing and fixing components based on the installation of holders every 50-70 cm. Do not forget about the junction of the corner part of the tube with the straight one. Docking is done using a coupling.
Railing mounting diagram
During installation, questions often arise regarding the quantity and list of fittings that must be used to install kitchen rails. Therefore, we ask you to read the article carefully - this will help you avoid mistakes and unnecessary expenses.
- Measure the walls in the kitchen where the railing system will be installed. Pay attention to the protrusions of the walls, the placement of sockets, and the height of the water faucet. And other possible elements that may interfere with access to them or prevent the installation of a two-tier shelf.
- Transfer everything onto checkered paper at a scale of 1:10. For example, 2 cells are 10 centimeters. Draw all the sockets and protrusions on the diagram, also taking into account the distance from the rails and the table: height, width.
- Divide the entire length by the required number of rails according to standard sizes: 600, 1000, 1200, 3000 millimeters. Pipes can be quickly cut with any hand or electric tool and connected to each other. We will describe this below.
What is a railing system
So, what is a railing system? In English, the word “railing” means “railing”. In the kitchen, a roof rail is nothing more than a long tube or crossbar. Complete with wall mounts and all sorts of accessories, which will be discussed a little later, these tubes make up the railing system.
One of the options for a horizontal railing system and its location in the interior
For the first time, railing systems began to be used in public catering. In the kitchens of cafes and restaurants, some storage cabinets have been replaced with rails. Thus, the cooks always had in front of them the kitchen utensils that they used most often. There is no longer any need to waste precious time and look for the knife or frying pan you need at the moment in numerous drawers and cabinets, which most often have opaque doors. Railing systems have also begun to be used everywhere in bars. And if in kitchens these were most often horizontal and hanging rails, then in bars mostly suspended and vertical railing systems prevailed, in which it was very convenient to place a variety of glasses, tumblers and shot glasses.
Tips for choosing roof rails
Traditionally, roof railing systems are made of chrome-plated or nickel-plated steel. But manufacturers try to take into account the wishes of consumers, so they produce roof rails in several colors and modifications.
In modern kitchens, it is appropriate to install shiny silver rails, and for a classic interior with a wooden kitchen set, pipes in gold, copper or bronze shades are more suitable.
Above the island part, railing structures are attached to the ceiling directly above the work table. All the necessary kitchen utensils are hung on them, including teapots and pots, as well as bunches of onions or garlic. The housewife will need to reach the nearest wall, so a suspended structure will come in handy here.
When choosing kitchen accessories, experts recommend not to chase the latest fashions and not to listen to the advice of your neighbors. In this matter, you should rely solely on your preferences and tastes. Only then will the kitchen become cozy and comfortable.
Accessory locations
Experienced housewives recommend not to be zealous when making a kind of clothesline out of the railing. You shouldn’t hang out everything you need and everything that might come in handy. There must be moderation in everything. For example, near the hob you need to have only the necessary tools for cooking: a ladle, a spatula, a slotted spoon, and oven mitts. On the shelf you can put frequently used spices, oils, vinegar, seasonings that can be stored outside the refrigerator.
The part of the rail located near the sink can be set aside for a mesh in which you can put a sponge, brush and dishwashing detergents, and on a narrow shelf with a side or on hooks it is convenient to place cups that are often used in everyday life. You can also find a place on the hooks for cutting boards. It is better to place shelves designed for drying several plates closer to the sink.