How to hang kitchen cabinets on the wall is a question that worries those who do the renovation themselves. In fact, installing kitchen furniture is a simple task that even an inexperienced craftsman can handle if he has the necessary tools.
However, this applies only to the simplest fasteners (corners, furniture hinges). Currently, many other types of furniture fittings have appeared, which we will consider in more detail.
It should be remembered that improper installation can lead to wall cabinets falling, and this, in turn, poses a danger to the health of household members and the safety of the repair. Therefore, we recommend that you act without haste and follow the instructions so that everything works out.
How to Hang Kitchen Cabinets on the Wall
Requirements for kitchen furniture
When deciding on the location of cabinets in the kitchen, you need to consider the following nuances:
- wall cabinets should be located at such a distance from the floor that residents have free access to any kitchen utensils;
- they should not cover the ventilation openings or interfere with the location of other kitchen items - for example, a refrigerator, and it is worth thinking about proper placement in advance.
- all fastenings must be as reliable as possible, because some cabinets are designed for heavy loads, and kitchen utensils sometimes weigh a lot.
All wall cabinets should be securely secured to prevent them from collapsing.
Method number 1: on a wooden beam
In cases where you install plasterboard partitions yourself, you can mark out your future kitchen in advance and lay a wooden beam at the location of the mounting rail before finishing work. Choose a beam of medium width, about 8-10 centimeters, so that later you can slightly adjust the height of the cabinets. The timber is laid in the spaces between the vertical guide profile to a width equal to the width of the kitchen unit, and is attached to the main wall of the room. Subsequently, choose the fasteners for your cabinet so that its length is enough to sew through the plasterboard sheet and secure it in a wooden block. This method is usually chosen in cases where main walls are leveled with sheets of plasterboard.
Selecting fasteners and preparing walls
Before you begin the process of installing cabinets, you will need to decide on the type of fittings that will be used during the work. After all, factory-made furniture does not have any special hanging hooks or other devices, because it is assumed that the installation will be done by qualified craftsmen.
Table 1. Types of fastenings
| View, illustration | Description |
| Rail | This is one of the most popular and modern mounts. It consists of the following components: a mounting plate in the form of a metal strip and a canopy in a plastic case, which has a hook for attaching to the rail. The bar can be of various lengths (up to three meters). It is attached to the wall using dowels and screws at a certain distance from the floor. Canopies are installed in the interior of the structure so that the hooks protrude beyond the wall. The hangers provide the ability to adjust the position of the hooks. Fittings of this type have the following features:
|
| Furniture hanger | This is the most common fittings, which has been known to everyone since the times of the USSR. It is a type of metal plate with holes for screws. The hardware is attached to the cabinet back or side and then hung on an anchor in the wall. Features of fastenings of this type:
|
| Ikea mount | This type of fittings has appeared quite recently; it is used in almost all cabinets from Ikea. The fittings have the form of a corner, which is attached to the side of the cabinet from the inside, and its other part with a voluminous round slot for installation is located in the hole in the back wall. Next, markings are placed on the wall and a screw is screwed in, after which the cabinet is hung on it. When the screw head goes through the hole, you will need to attach a plastic attachment to it. Thus, the cabinet is securely attached to the wall. Its location can be adjusted as far as the slot in the corner allows. |
| Hanging corner | This method of installing wall cabinets has been known for many years - our grandparents’ furniture was attached to such corners. It is worth noting that hanging corners are the same furniture hinges, only in a bent form. Their main difference is that they can be fixed to horizontal walls through slots. This system is reliable, and the suspension can be adjusted if desired. |
Preparing uneven walls
Wall cabinets can cover any surface defects, and sometimes they don’t even have wallpaper behind them. In some situations, preparing walls before installing cabinets is not necessary, but professional craftsmen still recommend not skipping this step - sometimes unevenness is so noticeable that it becomes impossible to perform a high-quality installation.
If the wall is wavy, you can’t hang cabinets on it
The process of further work will depend on the degree of deformation of the walls. Most often, preparation is needed for “bare” surfaces where there is no layer of plaster, but this happens very rarely, because all pieces of furniture are usually transported after finishing work is completed.
The most common method of finishing walls is called beacon plaster. It is suitable for any brick, cinder block, concrete floors. The technology is as follows:
- First of all, the wall is thoroughly sanded to remove any build-up of mortar.
- Next, a primer is applied to the surface in several layers, each layer being dried.
- Next, beacons are installed on the walls. They are a type of metal or plastic slats. They are fixed with plaster. To begin with, two longitudinal strips are placed, and ropes are stretched between them, and the rest of the beacons are already secured along them.
In the process of fixing beacons, a building level is used - Next, they begin to apply a solution on top of these beacons on the wall, and then level it.
- Typically, metal beacons are removed from the walls after a few hours, when the solution has hardened a little. The remaining holes can be plastered. At the same time, plastic beacons are often left in the walls.
This is what the whole process of decorating walls looks like using lighthouses.
If there is already a (albeit uneven) layer of plaster on the wall, then such work is not worth doing. It will be enough to level the surface using finishing plaster.
Important point! Despite the fact that the technology of wall finishing may seem simple, it has some important nuances that not every beginner can understand. Therefore, if you doubt your skills, it is better to turn to professional craftsmen.
Finishing walls is a rather painstaking job that requires care.
If you don’t want to putty the wall and lay tiles, there is another interesting way to prepare the surface for hanging cabinets. To test the method in action, you will need to screw two wooden planks to the wall in a horizontal position.
These wooden planks will serve as tires on which the fittings are attached. Thus, all hanging parts of the furniture do not come into contact with the walls, but are supported by slats.
The only negative is that you have to install a solid apron on the same slats, which is located between the wall and floor cabinets, otherwise an unsightly gap will be visible.
Using wooden planks you can hide various wall irregularities
Installation instructions
When finished, you need to attach the strip using dowels or self-tapping screws.
Fixing cabinets on fastenings.
Test doors must be closed and opened several times to determine whether adjustment is needed or whether they are attached smoothly.
Installation of cabinets: stages of work
After completing the preparation of surfaces, it is necessary to proceed to the stages of installation of structures. First, we need to apply markings at the optimal height.
Choosing the height of the cabinets
According to the standard, many manufacturers recommend leaving a distance from the table to the beginning of the top cabinet of about 45 centimeters. At the same time, many repairmen and designers consider this arrangement to be incorrect, and call another, the most optimal distance - 50-60 centimeters.
In fact, there is no single rule - cabinets must be installed in such a way that a person can easily reach the highest shelf. Since the height of all people is significantly different, during installation you need to do the following: raise your hands up and mark on the wall the point where your fingers end - the top cabinet will begin from this point and this calculation will allow you to have free access to all other shelves.
Calculations must be carried out based on your height and the growth of other family members
There are also general principles for installing upper cabinets depending on the height of the residents. If the average height of household members is up to 160-165 centimeters, then the cabinet is installed at a distance of approximately 175 centimeters. If you are taller than 170 centimeters, the top shelf should be located at a height of about 185 centimeters. In some cases, cabinets are installed even at a distance of two meters from the floor.
When determining the exact height, it is necessary to calculate the distance from the floor to the highest shelf
Marking
The exact marking height will vary depending on the type of fittings chosen. However, the principle of performing the work will be identical in all cases:
- After you calculate the exact location of the cabinet, you will need to draw a transverse line along the entire surface.
- If the headset is located at a corner, you will have to start from the corner. If the cabinets are located in one line in the middle, then marks should be left from the beginning of the outer cabinet.
- During the process, you must use a measuring tape and a water level. First you will need to place one point, and then determine the location of the second using a level.
A water level is a convenient, but at the same time cheap, tool that allows you to make markings on the wall in the best way.
After determining the location of the points, they will need to be connected to each other to get a line. For such purposes, you can use a ruler or any flat bar.
Important point! The most technologically advanced and accurate tool is a laser level. Thanks to this device, you can quickly apply markings, which is why experienced furniture makers prefer to use it. The only drawback is that such a tool is too expensive compared to other analogues.
Tools
During the work you do not have to use a large number of tools. The main thing is to prepare an electric drill with an impact mechanism, or it is better to immediately purchase a hammer drill. In addition, we will need the following:
- measuring tape;
- water level;
- hammer;
- screwdriver;
- screwdriver;
- a simple pencil;
- square;
- knife;
- metal knife.
It is necessary to prepare all the tools in advance
Why are roof rails needed?
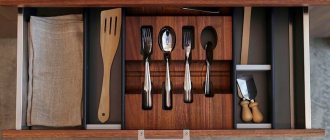
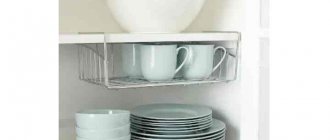
Railing translated from English means crossbar, which reflects the essence of the entire system. That is, the railing system is several tubes with holders for dishes and shelves that are attached to the wall.
The system is convenient for storing utensils that should be at hand at all times: ladle, measuring cups, colander, pasta spoon, textiles. All this is very convenient, because if you need to take something while cooking, you just need to extend your hand.
If you have a small kitchen, every centimeter counts and the issue of optimizing the functional space is urgent, believe me, you cannot do without a railing system.
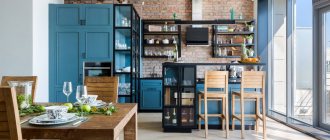
In addition to their functional load, modern railing systems are also a stylish element of a modern kitchen interior. Fashionable flat roof rails will fit perfectly into fashionable hi-tech, minimalism, sleek and modern.
There are several types of roof rails
1. Traditional and most common - horizontal. They can be arranged in a row or section upon section. Shelves and containers are located on hooks.
2.Vertical systems can be installed on the side wall of a cabinet or along the wall between the floor and ceiling. Shelves are most often installed on this system.
3. Hanging systems are suspended from the ceiling. Usually, housewives of very spacious kitchens with an island-working area in the center come to this decision.
Installation of upper cabinets
There are two main ways to attach cabinets to the wall. The first - using various hinges, corners, branded Ikea fasteners, the second - using a metal strip and hinge.
The easy way: step-by-step instructions
Step one: we need to place the fasteners on the cabinet wall and mark the location of the screw. Thus, if the loop is attached to self-tapping screws, then it is necessary to prepare holes of the appropriate size for them. If you use confirmants, you will need to purchase a special set of drills.
First we outline the location of the fasteners
Step two: now we need to secure the hinges to the cabinet wall. Upon completion of installation of all hinges, you should check their correct location. In addition, it is necessary to measure the space between the fittings. Too massive structures are hung on screws with a cross-section of about 10 millimeters. Small cabinets can be secured with hooks. It is worth noting that if you use large screws, you must first drill holes for them, hang the cabinet, and only then tighten the fastening.
Self-tapping screws for fixing hinges to the sides are 5 centimeters long
Step three: under the small hooks you only need to hammer plastic dowels into the wall and then insert them there. Only then can you hang the cabinet.
Self-tapping screw in the form of a hook
Installation using a mounting strip: step-by-step instructions
This is a universal way to install wall cabinets, in which it is difficult to make a mistake. That is why this mount is very popular among both experienced craftsmen and beginners. Before starting the installation, we will need to detach the back wall of the cabinet. Anyone can handle such actions, because usually it is a thin sheet with small nails.
Step one: secure the hitch. Attach the canopies to the corners of the cabinets, leaving a gap of a few millimeters. If you align it to the wall, then when installing furniture there will be an unsightly gap between the rail and the cabinet. In the case of too massive structures, the planks are screwed through the holes with studs and bolts. In the case of weightless cabinets, self-tapping screws will be sufficient.
Be sure to leave an indent
Step two: make a hole in the fiberboard. After installing the awnings, it is necessary to make openings for them in the rear wall. The size of this hole will be 3.2x5.5 centimeters, so it will be possible to return the back wall to the main frame.
Important point! Some inexperienced craftsmen believe that fiberboard is a very thin material that can be cut with an ordinary knife, but this is not entirely true. In order to make the most even opening, it is recommended to use a metal knife.
Carefully cut a hole in the wall.
Step three: make markings for installing the plank. The upper edge of the mounting strip should be 3-5 centimeters below the top plane of the structure. Now we need to mark and draw a horizontal line.
We mark the place of fastening of the rail
Step four: cut the desired length of the strip. According to the standard, the length of the slats is on average 200 centimeters. In order to use only a certain length, we do not need to use metal scissors, because the bar already has break lines.
It is necessary to place the bar on a flat surface so that the edge remains suspended and break off, as shown in the image
Step five: make a hole in the wall. Now you need to make holes in the ceiling, and they already exist in the plank. If the wall is brick, then the gap between the fastenings should be about 3.5-4 centimeters. In a foam block wall, the gap between fasteners is 15 centimeters. In the case of drywall, the gap will be 10 centimeters.
A hammer drill will be used during the work process.
Step six: secure the rail.
It is screwed to the wall using large self-tapping screws for plastic dowels
Step seven: install the cabinet.
The last step is to hook the canopy hooks to the edges of the mounting strip
The canopy is adjustable if necessary. To do this, you only need to use a screwdriver.
Canopy adjustment method
Video - Installing cabinets on mounting rails
Useful drilling tools
You can never have too many tools, but in a city apartment, a home craftsman has nowhere to put a full-fledged machine, but he needs to work, and here the problem will be solved by special attachments for an electric drill.
| Illustrations | Recommendations |
| A circular saw . A convenient device that allows you to unravel relatively small bars with a cross-section of up to 50 mm at home. | |
| Fraser . Attachment for milling small blind holes. With it you can easily cut out a bed for a door lock, handle or hidden canopy. | |
| Stand for corner and straight drilling . This stand makes it easy to create precise holes at the desired angle. Working depth is up to 150 mm. | |
| Lathe . The power of such a machine depends on the engine power and the maximum speed of the drill, but most models are suitable for working with soft wood. | |
| 90º collar . An indispensable thing for working with furniture, especially for repairing it, when it is not possible to drill a straight hole in some narrow compartment. | |
| Pump . Summer residents will appreciate a unique nozzle that replaces a garden pump. Its productivity is 2500 l/hour, which is quite enough for a country house of six acres. | |
| Engraver . For small engraving work there is a flexible “sleeve” with the ability to connect a set of special attachments. | |
| Grinding and sharpening machine . This is perhaps the simplest and most accessible device. The drill is attached to the table with a clamp with a special holder, after which the attachment with the desired circle is inserted into the chuck. | |
| Metal scissors . A whole series of such attachments is produced. The configuration of these devices is different, but the task is the same everywhere - to quickly and effortlessly unravel the sheet of metal. | |
| Cord brush . Such nozzles are available in 2 versions - with metal and synthetic bristles. | |
| Drilling machine . Here the drill is already used for its intended purpose, but the rigid frame with a feeding mechanism allows you to make precise holes with a fixed depth |
How to hang a cabinet on a plasterboard wall and other complex floors?
The “complex” group of materials includes cinder blocks, foam blocks, and drywall. The last one is considered the most difficult, so we will look at it in detail.
Of course, it will be much easier to install if there is a small plasterboard structure on the main wall. Thus, we can fix the fasteners by drilling through this box. It turns out that the presence of drywall does not play a special role here, because all fastenings will be installed using studs to the main wall.
It is much more difficult to install if it is an empty plasterboard wall with the finishing already completed. In this case, we will have to find the location of the metal frame parts and attach the fastening bar to them.
Fastenings for plasterboard frame
Important point! Any, even the strongest drywall will definitely not be able to withstand the weight of the cabinet, so you shouldn’t even try to install any structures just on the panel itself.
With ceilings made of foam blocks and cinder blocks, everything is much easier - they are very durable and can easily withstand the cabinet. Only in this case will it be necessary to use special screws during the installation process. They are inserted into the wall according to the standard principle, through a prepared hole.
The screws look like this
Despite the fact that cinder blocks themselves are very strong, they are empty inside. Therefore, it is better to use special long screws here.
Screws for multi-chamber units
If there is only empty space inside the block, you will need to make a through fastening with studs. However, it is not recommended to install too massive products on such floors.
Method number 2: on drywall
If it is not possible to lay the timber in advance, then fastening the kitchen cabinets to the plank can be done directly on the drywall. In this case, be sure to use special screws and screw them into the bar in a checkerboard pattern at least every five to eight centimeters. It is advisable to screw the outermost screws not into the material itself, but into the joints of the plasterboard sheets, trying to get into the metal vertical guide. In this way, it is better to hang not single cabinets, but a series of cabinets, so that the rail is held in place by as many screws as possible.
Let's sum it up
You should not be afraid of installing kitchen cabinets yourself, because if you follow all the nuances of the instructions, it is impossible to make a mistake. The most important thing is to have free time, the necessary tools and an assistant who, if something happens, will hold the cabinet, hand you the necessary items, and look from the side to see if the furniture is hung evenly.
Buying a ready-made kitchen set today is not a problem. The industry offers consumers a huge selection of sets made from various materials - from cheap laminated OSB boards to expensive natural wood or artificial stone. But for several reasons, the purchased option cannot be considered optimal for everyone. In a special article we will look at how to make a kitchen set yourself, which designs are the most convenient and reliable.
Preparatory actions
Before starting work, you need to prepare the walls on which installation will take place. They should be even. If you are going to install a corner kitchen unit, you should make sure that the angle formed by the walls is exactly 90°.
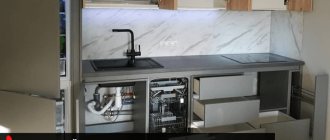
Before installing furniture, you need to carry out all electrical work, mark sockets, lamp terminals, etc. It is necessary to complete the finishing of the wall on which the cabinets will be placed. It should be wallpapered or painted in advance, and a kitchen apron should be installed. After installing the furniture, repair work will be much more difficult.
Color spectrum
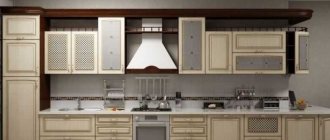
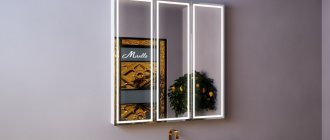
A kitchen decorated with shelves in white or gray shades, which are especially appropriate for creating a minimalist interior, looks truly stylish and modern. Also very impressive are designs in black or wenge colors, which most often complement both modern design and furnishings in a classic or English style.
The photo shows a two-level tabletop shelf made in chrome.
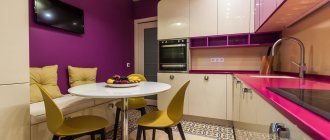
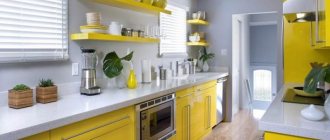
For interiors with light finishes, interesting contrasts are often used in the form of products in rich colors. No less expressive interior solutions are chrome-colored models, which favorably emphasize the overall design of the room and highlight its accents.
Glass aprons
The vast majority of glass sheets for finishing applications are tempered before installation. These manipulations are carried out for safety reasons: tempered glass breaks into many small fragments upon impact, and not into large pieces that are dangerous to people. Unfortunately, material subjected to this procedure cannot be drilled.
You can know that your glass is tempered by the markings that the manufacturer usually puts in the corner of the sheet. Thus, the only option for drilling holes in a glass apron is to carry out all the work before tempering the glass. To do this, you will need to have the exact dimensions and location of all drilling locations.