how to make a children's table
Children's tables and chairs have many benefits and are a great addition to a child's room. Every child loves his own furniture that suits him, where he can do what he loves and which he can call his own. , making a children's table with your own hands is easier than making an adult table - it is small in size and assembly is usually simple. On the other hand making tables and chairs for children is a big responsibility. We often forget how unpredictable children can be, and they certainly won't sit quietly and obediently at the table. Therefore, children's tables and chairs for children are not just furniture, but a risk zone. The 15 examples of children's tables and chairs presented in this article were made by hand, taking into account all the features of children's furniture. If you're ready to start your project, this information will be helpful.
What materials can it be made from?
Depending on the purpose of the children's product, it can be made from:
- Natural solid wood.
- Plywood.
- Chipboard or MDF boards.
Also, foam rubber sheets, dermantin, oilcloth or thick fabric can be used as additional materials. High chairs for feeding babies are especially often covered with such fabric or oilcloth fabrics.
Sometimes children's furniture is covered with additional materials.
Naturally, it is better to create children's furniture from more expensive materials, the quality of which is higher. This is definitely a tree, and a hard one at that. But softer types of wood, such as pine, for example, are also suitable for a high chair and table for a child.
It is best to make children's furniture from natural wood.
But various other types of materials can be used along with them. Although, in this regard, there is an important recommendation - to take only those that can be checked for quality from the manufacturer itself. Only these have a standard certificate indicating that the materials do not emit toxic substances. Otherwise, during operation, toxic elements will constantly be released into the room, which will negatively affect the baby’s health.
Care should be taken to ensure that other materials do not release toxic substances.
Always remember that the cheaper the material, the higher the chances that it is of poor quality.
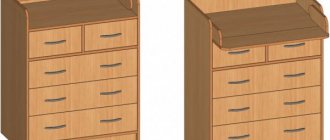
Drawings and diagrams of a high chair with a table
Before you start making furniture products yourself, you need to prepare a detailed drawing, which should include all dimensions. A short diagram will not work in this case - only experienced carpenters can make a wooden chair and table using it.
For everyone else, before making a children's table and table with your own hands, you must either select detailed drawings or complete them yourself, taking into account the anthropometric data of the dimensions of the child's body, taking into account age.
Collapsible
A collapsible easel is created from wood, bolted together with wings so that they can be easily unscrewed and screwed back together when needed.
To make it, a person must take the following steps:
- Prepare a beam 40x20x170 mm, a piano hinge, bolts 6x50 mm, wings - 5 pieces.
- At a distance of 25, 35, 45, 55, 65 cm, make holes on two bars. They will be needed to attach the frame that will hold the canvas and determine its dimensions.
- Make holes on three bars at a distance of 25 cm from the top and attach a 40 cm beam to them. This beam should also be attached to the rear leg with a piano loop. This will make it collapsible in addition to being collapsible.
- The bolts on the rear side are tightened with wings for easy assembly and disassembly.
- The bottom strip is attached to one of the holes made on the bottom of the supports.
- Now the artist can place his canvas on the easel and start creating.
Such an easel can be placed in the far corner of the room and covered with a cloth if there is no need to use it. Or put it on the mezzanine of the closet. Collapsible parts and dimensions allow you to do whatever you want with it.
All of the easels presented above, which you can make yourself using drawings with dimensions, are extremely simple and versatile. By adding certain components to them, you can get an upgraded, portable or stationary easel. The main thing is not to be afraid to experiment.
Article design: Natalie Podolskaya
What size should it be?
It is important to remember that a children's furniture set must meet the following conditions:
- Be completely safe - therefore, you need to attach the elements securely, avoid sharp corners and rough surfaces.
- The child should be able to sit comfortably at the table and table. It is important to consider that changing body size will require changing the design after a certain period of time.
Children's furniture should be comfortable and safe.
In this connection, an essential subtlety in making the right homemade furniture is maintaining certain dimensions that correspond to the dimensions of the child’s body at a certain age.
So, you should listen to the following instructions:
- For a child whose height has reached 1 m, the height of the chair should be 26 cm, and the height of the table top should be 46 cm. As a rule, these parameters are suitable for a child aged 3 to 5 years.
- The second height group, when height ranges from 115 to 130 cm, the height of the seat of a chair or stool should be 40 cm, and the height of the table 52 cm.
- If we talk about a high chair, then in this case the height will depend on the surface to which it will be installed.
Most often, this parameter has a value in the range from 350 mm to 527 mm. Everything will depend on the design option. At the same time, a perfect modern high chair should not only have the correct overall dimensions, but also be completely safe. Among its elements there should be a folding small table; it is quite problematic to do without it when feeding. Therefore, it is worth thinking about it immediately.
It is important to understand from the presented dimensions that you will have to remake children's furniture every 2 years. This is due to the rapid growth of the child.
The only way to avoid this is to make transformable furniture, which will adapt to the growing size of the child over a longer period of time.
Transformable furniture can be changed to suit the parameters of a growing child.
Folding
A folding easel is useful in painting studios. It is convenient to carry or hide in a closet. Such stands for an artist’s canvas will accommodate no more than 70 cm of paper in height and about 40 cm in width.
But this is quite enough for portrait painters, as well as for those who perform small works.
Manufacturing steps:
- You will need timber - 40x20x170 mm, plywood 10 mm thick, M6 bolts with washers, a fabric strap.
- Created in the same way as a tripod. On the bars, measure and mark with a pencil segments of 95, 105, 115, 125, 135, 145 cm and drill holes. Then put it together.
- Cut the beam to 70 cm. Measure the beam 1 cm and 13 cm on both edges. Drill holes so they can connect.
- Fasten the resulting part to the supporting legs.
- Attach one end of the strap to the leg of the support, and the other end to the middle beam.
- Attach the sliding frame to the canvas support and to the leg.
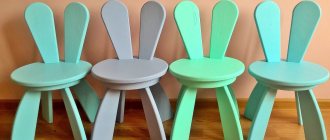
Choice of color and decor
An important factor is the selection of the right design and color scheme. Here, first of all, pay attention to:
- Gender of the child – for a girl, light shades of warm colors are suitable. A selection of pastel colors will help determine the final result.
- For boys, you should prefer cool shades or warm colors of greenery.
As for the design itself, the choice of ideas here is small. Most often they choose from two types:
- Classic design - it is often a wooden product constructed from individual beams and slats that have linear shapes or carved elements.
- Modern types of products - in this case, a stool, table or chair should have a unique appearance that will be more unusual. True, to make it you will most likely have to resort to more complex templates.
To choose the right model, it is worth considering a selection of children's products.
Stage 5: Bench
Turn the table upside down. To attach the bench support it will be convenient to use scraps of boards, as can be seen in the photo. We fasten 4 screws to each of the legs, I recommend distributing the screws as shown in the photo.
Table manufacturing process
In order not to make a mistake when making a table, you should follow a certain plan:
- First, a review of existing structures is carried out. This is done with one main goal - to choose the most suitable product in terms of shape and functionality.
- Then, in accordance with the available dimensions and drawings, purchase the necessary materials.
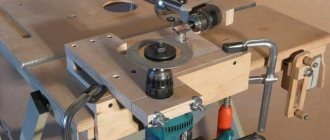
- Prepare the necessary tools - a saw, a hammer, a plane, self-tapping screws, screws, angles for fastening perpendicular elements, as well as a number of measuring tools.
- Then make blanks in accordance with the existing dimensions of the drawing.
- Process them, first with a plane, then sand them so that they become as smooth as possible if the structure is made of solid wooden beams.
- Then fasten the elements together in accordance with the chosen pattern. It should be remembered that fixation must be carried out simultaneously with glue and self-tapping screws to ensure reliable fixation.
Thus, to make a table and a children's high chair with your own hands - drawings, dimensions, diagrams - are indispensable when working. Further, it will only be a matter of quality and thoroughness of development.
Finishing
The table should have an attractive appearance, which is ensured by the finishing. First of all, the end is processed. To avoid scratching on a sharp edge, it is recommended to remove a small chamfer.
The end itself is ground to eliminate the risk of splinters. The entire surface of the tabletop is also processed. It should be perfectly flat, horizontal and smooth.
Important: the most common finishing methods are painting and varnishing. After sanding the surface, the wood can be impregnated with tinting compounds that will create a certain shade and emphasize the wood structure
A layer of varnish will seal the finish. Using alkyd paints you can provide almost any color of furniture to combine with other interior elements
After sanding the surface, the wood can be impregnated with tinting compounds, which will create a certain shade and emphasize the wood structure. A layer of varnish will seal the finish. With the help of alkyd paints, you can provide almost any color of furniture for combination with other interior elements.
Another common option is self-adhesive film. It is often used to finish chipboard countertops. With its help, you can imitate various natural materials - wood, natural stone, marble, metal, etc. Inlay or veneering adds special sophistication to the table.
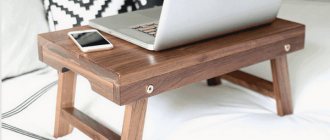
Advice: if the issue of free space is acute for you, also take a closer look at the designs of a folding table, a laptop table, a coffee table and a children's table.