The cost of furnishings directly depends on the material they are made from. Laminated chipboards are widely used in furniture production - the products are inexpensive, have a wide range of models and a variety of shades and textures.
To increase strength, moisture resistance and decorativeness, particle boards are covered with a laminated front layer in the form of a film based on melamine resins.
You can make furniture with your own hands from laminated chipboard, but it is worth considering that if you cut it yourself, you can get chips on the front surface. Experts recommend making a drawing of the future product and ordering cutting of parts in a store or furniture workshop using special equipment.
DIY furniture from laminated chipboard
Features of the material
Laminated chipboard contains natural wood - in structure it is chipboards that have undergone high-quality sanding and covered with melamine film. It is this coating that distinguishes the two types of slabs. Laminated chipboard has high moisture resistance and greater strength than conventional boards.
The laminated surface exhibits greater resistance to mechanical influences, as well as to chemically active substances - acetone, gasoline, alcohol, acids, solvents, coffee. Therefore, furniture made from chipboard can often be found in public places: in reception areas, in offices, in multifunctional centers, in educational institutions, in cafes, in kindergartens, in playrooms and children's rooms, in the kitchen.
The advantage of the material is the variety of its shades and textures
The film not only gives the material excellent performance characteristics, but also allows you to give it a unique appearance - from any shades and textures of natural wood, to images applied according to individual sketches. The ability to choose any shade allows you to produce cabinet furniture for any interior. This is especially true for children's rooms, where bright, rich colors are welcome. Bright furniture is also used for advertising and trade stands, as a body for reception desks with the possibility of being manufactured in the company’s colors with a logo.
Multifunctional cabinet furniture
Note! The laminated layer makes the surface of the chipboard monolithic and does not allow harmful substances that may be contained inside its structure to pass through.
The formation of the laminated layer occurs by pressing paper, which acquires properties comparable to plastic, filled with melamine resin under pressure (up to 28 MPa) and high temperature (up to 210 degrees). Decorative paper impregnated with resin is pressed into the top layer of chipboard.
The surface of such a plate, among other things, is heat-resistant, which allows you to place hot dishes on it - this has made laminated chipboard a popular material for making kitchen countertops.
Cutting laminated chipboard
Working with Bottom Elements
The assembly of floor-standing cabinets is carried out similarly to the upper elements, the only difference being that the tabletop plays the role of the top, and you also need to install legs in the bottom, which come in different designs, including adjustable ones.
Once the cabinets are assembled, it's time to install. Installation should begin from the corner.
Installation:
- We put cabinets in the planned places.
- Adjust the legs to the desired height. We use a bubble level to properly install the cabinets.
- We hang the doors. Let's regulate them.
- We tighten the cabinets with a corner tie, which allows you to install the set perfectly evenly. The tie is inserted into the drilled holes; if there are none, you need to drill them yourself, having first secured the adjacent sections with a clamp. Two ties are used per section. Holes are drilled in the hinge area closer to the front of the cabinets.
- We place the tabletop in its regular place and fasten it according to the design and the supplied fittings.
Pros and cons of using laminated chipboard for making furniture
The advantages of laminated chipboard include the following:
- Low cost.
- Easy processing.
- Ability to cut parts of any shape.
- The presence of a safe edge at the ends.
- The ability to create furniture with rounded corners, which is especially important for children's furniture.
- Excellent performance properties: mechanical, thermal, chemical resistance, moisture resistance.
- Preservation of operational properties throughout the entire life of the furniture.
- Wide range of colors.
- Easy care, possibility of daily wet treatment.
The laminating layer protects the boards from the negative effects of moisture, which makes it possible to make furniture from them for rooms with high humidity.
Kitchen set made of laminated chipboard
The disadvantages of laminated chipboards include the fact that they contain formaldehyde, however, the laminating layer and the sealed edge at the ends of the furniture completely neutralize the release of harmful substances into the environment. The edge also protects the slabs from moisture, which can cause them to swell.
Edge
As noted earlier, any part made of laminated chipboard must have an edge that will protect the material from moisture and the environment from the harmful effects of formaldehyde. Having a drawing of the product in hand, you can order sawing and edging from a specialized company that has special equipment. In the future, you can assemble the finished product yourself.
Melamine edge
Table 1. Types of edges
| Edge type | Description |
| Melamine | The budget option is not of very good quality. Using an iron, you can glue it yourself. |
| This edge is fixed using special equipment during the cutting of individual parts. It is made with a thickness of 0.4 mm and 2. A thin edge is made on the invisible ends, and a thicker one on the outside, where more serious impacts are possible. |
| T-shaped mortise | A rare type of edge in use, which has a T-shaped section and is fixed into a groove at the cut. |
| A significant disadvantage is that the edges protruding a few millimeters are vulnerable to contamination. The advantage will be the ability to hide a poorly executed cut. |
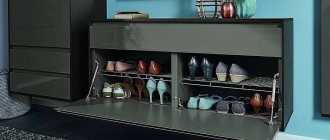
Drawers and slides
There are many ways to make furniture boxes. The simplest of them is to assemble a perimeter from laminated chipboard. If a beautiful facade is required, it is screwed onto the main frame from the inside (like the tabletop). The façade can also be secured to eccentrics as the fourth wall of the drawer.
But the main thing is not to assemble the drawer, but to secure it correctly.
Drawer guides are divided into roller or ball guides.
- Roller guides are usually attached to the bottom of the drawer. He will ride on them on two rollers. A pair of such guides costs about 150 rubles, but it is highly not recommended to use them. The main disadvantage is that they do not allow the drawer to be pulled out completely; a heavy drawer in the more than half-open position may simply fall.
- Ball guides, or as they are also called, “full extension telescopic guides,” can exactly double the length. They have many balls inside, like bearings, so they provide a smooth ride.
Roller and ball guides for drawers
- In addition, Blum has metaboxes and tandemboxes. These are ready-made side walls of drawers with installed guides. All that remains is to install the façade, back wall and bottom.
Types of laminated chipboard structures
The use of laminated chipboard is widespread in various industries, one of which is furniture production. Laminated chipboard is used not only for the manufacture of simple furnishings, but also multifunctional furniture structures.
Kitchen set in modern style
Manufacturing of facades
The material from which the visible parts of the furniture are made, forming its decorative appearance - facades, must have an aesthetic appearance, match the style and color scheme of the interior, and also be moisture- and wear-resistant. If you need to make a drawer inside the cabinet, you can use a simpler material - 16 mm thick laminated chipboard with a 2 mm PVC edge. If this is the façade of a kitchen unit, then it must be made of beautiful and reliable material.
Minimalist facade of a kitchen unit made of laminated chipboard
The size of the standard facade is 2 mm smaller than the cabinet dimensions on each side. That is, if the cabinet is 60 cm wide, then the front will be 59.6 cm wide.
Dependence of furniture parameters and human anthropometric data
Kitchen furniture, first of all, should be ergonomic - convenient, comfortable and safe to use. Thus, floor and low wall cabinets have a height of 71.5 - 72.5 cm (it is worth taking into account the height from the floor to the top of the tabletop - at least 82 cm), and high wall cabinets - 91.5 - 92.5 cm. When manufacturing furniture according to an individual drawing, the anthropometric data of the apartment owner are taken into account when developing the latter.
Basic parameters of the kitchen set
Laminated chipboard facades differ from MDF in that it is not possible to create a relief pattern on their surface. However, this material is perfectly used to create sets in a modern style, the appearance of which requires minimal decor and conciseness. You can increase the decorativeness of the set by using fittings and inserts made of colored or embossed glass.
How to make a kitchen set yourself, what designs are the most convenient and reliable? More details in a special article.
Hidden elements – bottom and walls
To make the back wall of the box and its bottom, laminated fiberboards with a thickness of 3 to 5 mm are used. Their shade is selected to match the color of the chipboard used and fixed with the smooth side inward.
LDVP
Fastening LDVP is most often done using nails or self-tapping screws with a press washer. To prevent the plate from cracking, you must first make a hole for the screw and only then screw it in. When making drawers, a sheet of HDF can be fixed into a groove.
If it is necessary to increase the load-bearing capacity of the product, then the bottom is made of laminated chipboard.
Manufacturing of countertops
A horizontal work plane intended for preparing and eating food, performing activities related to reading books, writing, drawing, using a computer is called a tabletop.
Edge cutting
To design the working surface of the kitchen set, special laminated chipboards with a thickness of 28 to 38 mm, characterized by increased moisture resistance, are used. On their surface there is durable plastic, which is fixed using the “postforming” technology.
This technology consists of lining a chipboard slab with thin-thick laminated paper plastic under pressure and exposure to a temperature of 90 or 180 degrees. The difference is that in the first case, the slab is covered with plastic on the main side and at the ends, and silicone sealant is used to treat the joint of the coating.
Drip evacuation
In the second case (at a temperature of 180 degrees), the plastic completely covers the stove, going around the end of the tabletop, and sticks to it from the bottom, forming a drip tray. This is an important detail that protects the inside of the stove from moisture.
Note! For the manufacture of kitchen countertops, moisture-resistant chipboards are used - they are green when cut.
The most vulnerable point of a laminated chipboard kitchen countertop is the end cut, which must be hidden. In conditions of high humidity and intense operating load, a regular melamine edge will quickly cease to cope with its task. Therefore, aluminum end strips are used to protect the ends of kitchen worktops. There are also corner and connecting strips used to connect several modules that form a single tabletop - they cover the joints, protecting them from dirt and moisture.
Types of aluminum strips
Also, for protective and decorative purposes, a special plinth is used at the junction of the table top with the wall, when a decorative element of the required shade is attached to the guide.
From below, the tabletop is fixed to the floor cabinets using short self-tapping screws and horizontal spacers - this allows you to maintain the integrity of the smooth front surface.
Method of fixing the tabletop
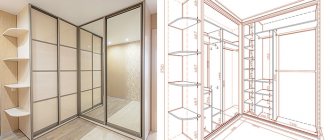
Manufacturing of sliding doors
The sliding wardrobe is very popular - this method of opening the door allows you to save free space, which is important for small rooms. There are many models of sliding wardrobes: straight, five-walled, corner, trapezoidal, radius. Also, the main difference lies in the type of construction - stationary or built-in. In the first case, the cabinet is a box with two side walls and a back wall. In the second case, the side walls may be absent if the cabinet is built into a niche. If it is built into a corner, then you can dispense with one side wall. In this case, part of the load is distributed to the walls.
Basic elements of a wardrobe
The main element of such a cabinet is a sliding door, which, when opened, moves using rollers along guides. A sheet of laminated chipboard is inserted into a profiled frame; to achieve a decorative effect, it can be combined with other materials, separating them using an aluminum profile. The width of one door should not exceed 1 m.
Operating principle of roller guides
The guides along which the canvas moves are installed from below and from above. The upper guide is needed to fix the blade, and the lower one is needed for its smooth movement.
Plastic is used to make the lower rollers. The device is equipped with a shock-absorbing spring and an adjustment screw for adjusting the height. The upper rollers have a rubberized surface.
Accessories for sliding doors
In a special article, we will look at the advantages of sliding wardrobes, the main nuances of their installation, and give detailed instructions on how to independently assemble a spacious wardrobe for a small hallway.
Video - Stages of assembling a sliding door at home
Making a drawer
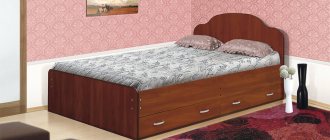
A drawer is a convenient storage element, which is present in cabinet furniture models made from chipboard for any purpose - in a kitchen set, in a desk and office cabinet, in a closet, at the bottom of a bed.
Chipboard chest of drawers with drawers on roller guides
The main element of the design is the guide, which ensures smooth opening of the drawer. There are two types of guides: roller and ball.
The roller guides are fixed to the bottom of the box. Movement occurs using rollers. The peculiarity is that the drawer will not extend completely. If it is heavy, then there is a risk of the drawer falling out when it is opened more than halfway.
The situation is different with ball guides, which allow you to safely pull out the drawer to its full length, while the structure moves smoothly and there is no risk of it falling out.
Ball guides
Table 2. How to assemble a simple roll-out box on roller guides
| Illustration | Description |
| Step 1 | One drawer will require two slides on each side. One will be attached to the side wall of the drawer, the second to the inner wall of the cabinet or cabinet. |
| When attaching the guide to the cabinet wall, 2 mm are removed from the edge. |
| Fix the guide with self-tapping screws so that their head does not protrude. |
| The back wall and sides have an edge on one side and holes for Euroscrews on both sides. |
| There is a groove on the facade for attaching HDF. |
| Step 6 | The drawer front is fixed to the side walls using an eccentric tie. Screw a “Twister” screw into the hole until it stops |
| Step 7 | Wooden dowels are inserted into holes with a diameter of 7 mm, which can be lubricated with PVA glue for reliable fixation. |
| The eccentric is inserted with an arrow into the outlet hole at the end. |
| Step 9 | The part is installed and tightened clockwise. |
| The rear wall is secured using Euroscrews. |
| The HDF sheet is inserted into the groove on the reverse side of the facade and aligned. |
| Guides are screwed through the HDF. |
| The LDVP is fixed to the back wall with several self-tapping screws. |
| At the final stage, screw the handle. |
Scheme and drawings
In order to independently assemble any furniture structure, the craftsman needs a drawing on which the technological process of installing the assembly unit is “outlined” in detail and clearly. The presence of schematic images simplifies the task. It is worth noting that the manufacturer is not responsible if customers damage wood chips, mirrors, or plastic parts during the assembly process, so the work must be done carefully, use mechanical equipment, and carefully study the attached diagram and instructions. What useful information does the drawing contain:
- instructions for assembling the unit (kit). Typically, the manufacturer indicates that the order’s complete set of parts, fastening, connecting, mounting, and decorative fittings must be checked upon receipt of the goods;
- the assembly of Italian furniture or a regular set from a furniture supermarket begins in the same way - with studying the specification, which indicates the number of parts, their name, size, code;
- a separate table shows the specification of fittings, consumables, and fasteners. For ease of use of the drawing and assembly diagram, the name and size of the fittings are given - screw, bolt, clamp, confirmat, clamp;
- The craftsman needs text instructions to correctly assemble the product - the specification and assembly order are indicated for each unit, and the design details and fittings are marked on the drawing - a template for drilling holes.
The diagram on how to hang a mirror deserves special attention. There are several options for installing mirror panels. To choose the appropriate installation method, you need to consider the weight of the mirror and the strength of the base plate. Technology for hanging a mirror:
- use double-sided tape - place glued strips of tape on the surface of an MDF or chipboard, “try on” the mirror, remove the protective film and fix the glass. The work is carried out with the part in a horizontal position so that the glue on the mounting tape sets. You can hang the mirror vertically, increasing the consumption of adhesive tape;
- acrylic glue - necessary to hang the mirror without damaging the amalgam. The sealant can be applied dotted or in separate strips, distributing the adhesive over the surface indented from the edge of the mirror. It is recommended to glue the slab to the mirror part in a horizontal position. Equipment for work – glue gun, glue dries in 24 hours;
- colorless construction silicone is quite suitable for securely hanging a mirror on a cabinet door. To firmly glue the parts, it is not necessary to apply silicone to the entire back surface of the mirror; it is enough to distribute the substance in thin transverse stripes, attach the mirror glass, and fix the decorative frame to the glued mirror.
As an alternative, you can use fastening hardware made according to the principle of clamping tabs. But the disadvantage of this method is the presence of visible parts of the mounting hardware. To avoid drilling mirrors and glass parts, accessories such as clamps are widely used. There is a large selection of products in terms of construction, design, and material of manufacture - the gluer can be made of plastic, have a transparent structure, round or rectangular shape. A clamp is a universal device that acts as a mirror holder or glass shelf holder. Installation option - fixation with a self-tapping screw or drilling under the clamp.
An example of a diagram for assembling a children's wardrobe according to the manufacturer's drawing: place the right side on a table for assembling furniture, install the rod holder, guides, hinge counters, rods. Place the bottom on the dowels, secure the left side panel using eccentric fasteners. Insert the back wall into the groove, secure the connecting beam, and secure the left side panel. Next, the box is assembled according to the diagram - the rods are screwed in, the sides of the box are mounted, the unit is secured with eccentrics, and the bottom is secured with euroscrews - confirmats.
After hammering in the thrust bearings, the children's closet is placed in a vertical position on the furniture assembly table, and the door hinges are mounted on self-tapping screws (the size is indicated in the drawing). The final stage of assembly is the installation of doors, rods, handles, then a drawer and shelves are inserted into the cabinet. Using such a simple and understandable diagram, which is attached in the drawing to the furniture structure, you can assemble any cabinet unit - a table, a chair, a wardrobe, a bed.
Nuances of assembling the main parts
Cabinet furniture made from laminated chipboard consists of individual elements - lids, tabletops, walls, facades, shelves, which are called parts. Parts can be nested or overlaid depending on the type of assembly, which is chosen based on the upcoming loads. The service life of the structure and its safety depend on this.
So, in a floor-standing cabinet, the load is distributed from top to bottom - from the lid towards the legs, as shown in the first “correct” picture. The lid and bottom of the cabinet are overhead. If they are fixed in a nested manner, as shown in the second figure, then the correct distribution of the load will be hampered by a confirmat - a furniture screw, which will sooner or later pull out under tension, and the part itself will receive damage, which can only be eliminated by completely replacing the element.
Features of fixing parts in the manufacture of a floor cabinet
The situation is different with a wall cabinet. The load falls on the bottom shelf and if it is fixed in an overhead way, then sooner or later the tension screws will tear out and the bottom of the drawer will collapse. Here it is better to fix it using a nested method, when screws screwed in perpendicularly will resist the load.
Features of fixing parts in the manufacture of wall cabinets
Step-by-step furniture assembly technology
Some may think that assembling furniture is a trivial matter. However, this is a common misconception. Such work must be approached with the utmost seriousness to avoid mistakes. After all, furniture can even be damaged if you do not adhere to all the rules during work and forget about caution.
In general, the entire assembly stage can be divided into several stages for greater convenience.
- Unpack all the details of the ordered furniture, check the set of fittings and fittings. Check that the fasteners match the color of the furniture. Be sure to compare the stated number of parts with the one actually available. Perhaps some detail is missing.
- Find the assembly instructions, which the manufacturing company must include with your order.
- Take out all the necessary parts, prepare tools for assembly.
- Check that the mounting holes are the correct size. Pay attention to the correctness of their location.
- It is better to start installing large furniture after its small elements have been assembled. This is extremely important if the master has no experience in such work.
- After installing the doors, shelf supports, hinges and strips, the step-by-step assembly of furniture with your own hands involves the installation of shelves and drawers. If decorative hardware is present, it should be installed last.
- At the last stage, it is necessary to adjust the facades and check the quality of the assembly.
It is important to remember that cabinet furniture can be completely assembled at once and then installed in a pre-selected place in the room. But when installing a wardrobe, this is unacceptable. You must first install the sliding system and only then fix it to the wall.
Types of fasteners
Modern fasteners that are used when assembling furniture ensure the strength and durability of the structure, as well as its aesthetic appearance, since parts are fixed in a hidden way whenever possible, and those fasteners that remain outside are masked using special plastic linings to match the furniture .
Table 3. Types of fasteners
| Name of fastening element | Description |
| Dowels made of wood are used for preliminary fixation of two parts. After this, the structure is fastened with hardware. |
| Furniture corner | Serves for fixing parts located at an angle of 90 degrees. This method is popular, but somewhat outdated and has its drawbacks - the element is not hidden, looks bulky and becomes loose over time. Corners come in plastic and metal. |
| Modern furniture in most cases is assembled using confirmats - furniture screws, the threads of which, compared to conventional self-tapping screws, are larger, which ensures better fixation in the solid slab. After the screw is screwed in, the visible metal part is masked using a plastic plug to match the furniture. |
| Hidden fasteners used in the assembly of modern cabinet furniture from laminated chipboard. The holes for it are made in the factory using a Forstner drill. Considering that the thickness of the slab is 16 mm, and 12 mm must be selected for fasteners, the drilling accuracy must be ideal. |
| Pinch bolt | Used to tighten two parts together. For example, bed bases and headboards. |
List of required tools
Tools needed for work: tape measure, hammer, hex keys, hammer drill, jigsaw, building level.
You will need some tools to make this process much easier. Let's start with what may be useful to you when assembling simple structures. This list includes:
- tape measure - it is needed to take measurements of furniture parts, as well as measure free space when determining the location of the future structure;
- do not forget about a screwdriver, or even better, a screwdriver, a drill will also work - the last two tools will significantly speed up the entire assembly process;
- hammer - it will be necessary when it is necessary to drive in fasteners such as eccentrics, etc.;
- hex keys may also be needed;
- regular wrenches, preferably in different sizes.
If the furniture you bought is quite simple, then this list of tools will be quite enough for you.
https://kuhnyamoya.ru/youtu.be/M9ENF6-m9OM
But in the case of assembling furniture of complex design, it is necessary to take care of a wider range of tools. To complement the first one you will need:
- hammer drill - it’s very good if you prepare a set of different drills along with it;
- jigsaw - this tool must be equipped with interchangeable files of different sizes and tooth locations;
- a device for detecting electrical wiring - it will be necessary if there is no wiring diagram;
- building level - his help will be needed when it is necessary to check the level placement of furniture or markings on the wall for subsequent fastening;
- a set of drills designed for processing glass and ceramics;
- A stapler for furniture can come in handy, but much less frequently than all of the above tools.
Selection of furniture fittings
In addition to fastening elements, there are other furniture fittings, without which the product will lose its decorative and functional qualities.
Table 4. Types of furniture fittings
| Name | Description |
| Pen | A necessary element that provides convenience when opening doors and drawers. Fixed with screws. Selected in accordance with the color scheme and style of the furniture facade. |
| For the stability of the structure, especially when the floor surface is not too flat, choose products with height adjustment. The material must be practical and durable, moisture-resistant and resistant to mechanical stress. The appearance is also selected according to the design style. |
| Silicone damper | An inconspicuous but important detail that ensures silent closing of the doors. Fixed from below and from above on the door or end of the cabinet. |
| Loops | An important element that ensures the opening of the sash. Equipped with a mechanism for adjusting the height and depth of the door. |
| Used for comfortable operation of roll-out drawers and cabinets. |
| Stubs | Masking fasteners. Matched to match the body. |
| Used for fixing additional shelves in wardrobes and racks. |
| Hooks | They are used inside wardrobes and on panels in hallways. |
| They may have different cross-sections and radii. Used in wardrobes. |
| Used for doors and drawers in cabinets and office shelving. |
Video – Furniture fittings
Furniture finishing
If desired, you can improve the appearance with original inserts. These can be mirror panels, dividers, various patterns or stencils, or ornaments. Spot lighting is also a practical addition. In addition, it looks quite stylish, especially if there are glass or frosted inserts.
When installing furniture, make sure that it is not exposed to direct sunlight.
When using natural wood, it is recommended to coat it with varnish. Finding the right shade is not difficult. To fix, apply the coating two or three times, then the surface will look smooth and even. Drying time is required after each coat is applied. This will make the surface resistant to abrasion and fading. The panels should be coated before assembly, not after, to avoid smudges.
Repeated parts of the future product must be symmetrical to each other, otherwise misalignment is likely
The popular design with craquelure varnish makes the facade of the cabinet look original and expensive.
With the help of decoration, you can not only add style to a new piece of furniture, but also elevate an old product.
With the help of decoration, you can not only add style to a new piece of furniture, but also elevate an old product.
Tip: when installing furniture, make sure that it is not exposed to direct sunlight. This will avoid fading of surfaces and drying out of the wooden base.
To create cabinet furniture, you can choose inexpensive parts or use materials available in the house.
How to assemble a cabinet from chipboard with your own hands
Even a beginner can assemble a simple cabinet; to do this, you need to follow the following steps sequentially.
Table 5. Instructions for assembling the cabinet
| Illustration | Description |
| First, you need to make a sketch of the future product in order to have a clear idea of the size and number of parts, fasteners and accessories. |
| Step 2 | The cutting of parts is ordered from a specialized company or in a furniture shop, whose specialists must be provided with a clear list of parts with dimensions and designation of the sides to be edged. Where laminate edges will be made, subtract 2 mm. For example, if the length of the part in the drawing is 1085 mm, in fact it is necessary to cut out a part with a width of 1083 mm. |
| Step 3 | Important! When calculating the distance of the walls on both sides of the box, take into account 13.5 mm on each side per rail. |
| Step 4 | It is recommended to make the top cover of the cabinet 3-5 cm wider than the base. This will allow you to install it so that from below it does not rest against the baseboard or sockets on the wall. |
| Step 5 | After the guide location line has been drawn and the element has been attached, using an awl, a mark is made at the locations of the holes where the self-tapping screw will be screwed in. |
| Step 6 | Guides for drawers are screwed to the side walls according to the markings. |
| Step 7 | Markings for confirmations are applied to the side walls. |
| The drilling point is marked using a sharp awl. |
| Step 9 | The hole is drilled so that the screw head is subsequently hidden under a decorative rivet. |
| To fix the top cover, wooden dowels with a diameter of 8 mm are used, holes for which are drilled using a metal drill, onto which contrasting electrical tape is wound, indicating the drilling depth (12 mm) with a plate thickness of 16 mm. |
| Step 11 | The distance from the edge is 8 mm. |
| Step 12 | The dowels are fixed with PVA glue. |
| Step 13 | To install the central partition, measure the length of the dowels installed in the lid array. |
| Step 14 | Drill holes for dowels to the required depth according to the markings. The drill must be kept strictly horizontal. |
| Step 15 | The dowels are lubricated with PVA glue and a partition is installed. |
| Connect the table top to the side walls. |
| Step 17 | A shelf is fixed to the confirmations. Using a clamp, fix the shelf and crossbar at a right angle. |
| Step 18 | According to the markings, fix the shelf with a confirmation to the partition in the center. |
| Using the method described above, another partition and shelf are installed. |
| Step 20 | The decorative edge should be located on the outside of the product. |
| Step 21 | At the next stage, partitions with guides and shelves are installed. |
| Step 22 | To protect the floor covering, felt pads with a self-adhesive backing are used. |
| When assembling the box, the distance from the edge under the confirmation is 8 mm. It is enough to retreat 30 mm from below and above. |
| The bottom of the LDVP box is fixed with furniture nails. |
| Step 25 | After the box is assembled, check its diagonals. |
| Guides are fixed to the ends of the box. |
| A handle is screwed to the front of the drawer. |
| Drill holes for screws. Fix the facade. The screw heads are masked with decorative rivets to match the furniture. |
Common mistakes
Each private furniture maker has his own secrets on how to quickly and accurately assemble furniture. Some professionals use a table to assemble furniture, while other craftsmen can mount a large tall cabinet on the floor and install the finished structure, measuring the diagonal of the room and the product.
Difficulties may arise with inserting sinks into kitchen countertops, making radius curves, for which you need to use special equipment, hanging mirrors with glue, tape, or adhesive.
To become a professional assembler, the future master must be able to draw up a project, calculate the consumption of materials, perform detailing and cutting of chipboard, MDF boards, use equipment, tools and have some design skills. Then the finished product will be distinguished by its impeccable quality, durability, and long service life. Frequent mistakes that novice craftsmen make when assembling furniture:
- start work without first checking the availability of the mounting kit, basic structural elements, and without studying the manufacturer’s instructions;
- Universal prefabricated furniture begins to be assembled by connecting large parts - you need to decompose all the elements into units (drawers, cabinets, tables), and try to assemble a small structure;
- they don’t pay attention to the specifications in the instructions - in vain, at first glance the parts are similar, but there are left and right elements, fronts of upper and lower cabinets, and other assembly nuances;
- ignore the need to assemble the product on a hard, clean surface. For work you need a sufficient amount of free space; you can use a device for assembling furniture;
- panels made of MDF material can be damaged by using an electric tool (drill, screwdriver) - use screwdrivers until you acquire the necessary assembly skills;
- do not change the diagonal of cabinets (compartments, bedside tables, chests of drawers) before installing the back wall made of fiberboard - this leads to distortion of the part and the entire structure;
- do not take into account the assembly order specified by the manufacturer in the instructions. The result is low quality assembly, dismantling and re-installation of the product;
- they do not check the holes for fixing the fasteners, do not measure the distance between them to ensure compliance with the drawing - as a result, they have to cover the defects with plugs.
There are craftsmen from whom you can hear that they violate assembly technology in order to quickly complete the work - for example, “I hang the top of the kitchen unit before installing the lower cabinets.” Technically, this is not true - the assembly of a complex kitchen structure begins with the installation of the lower corner cabinet (often a sink), then install the remaining floor units, connect them together with self-tapping screws or intersection ties, cut in the sink, install the countertop, and only then proceed to install the upper tier of the kitchen headset There are many such subtleties in the process, and to do the job accurately, watch the video on assembling furniture.
When the master has assembled a furniture structure using simple equipment, fasteners, tools and accessories, he must make adjustments, check that there are no visible technological gaps, and that the doors are diagonal. Distributing and assembling furniture is not an easy task, but after acquiring the appropriate skills, everyone will be able to gain valuable experience in assembling furniture units of various designs. To make furniture assembly easier, the video below will help you understand the process.
This activity can be used as a business option in several steps - ordering factory furniture, delivery to the consumer in your car, installation at the installation site. Presenting photos of assembled furniture will expand your customer base if the furniture assembler is interested.
Door system installation
Sliding sliding wardrobe doors are convenient for owners of small apartments. In order for the door to work and open smoothly, the guides must be well selected and properly prepared: upper and lower.
They bear the main load when using doors, so you should not skimp on parts. We immediately assemble the upper guide, then the lower one. For doors, choosing the right profile is important.
Installation of guides
The size of the guides must correspond to the width of the cabinet; deviations of only up to 3 mm are permissible. The guides are installed using screws or self-tapping screws.
First, holes are made in the profile. The mount is then leveled and secured. The door must be installed clearly vertically. You can check the accuracy of the work by moving the lower guide profile and checking the line with a building level.
Door installation
For coupes, it is recommended to use a latch so that the door fits tightly to the body when closed.
To install the stopper in a suitable place, you need to close the doors, find the center of the wheel on the guide below and install the stopper along the mark.
Door adjustment
To adjust, you will need a special hex wrench. With its help, the angle and wheels are trimmed. To do this, turn the adjusting screw. Door closers are used to quickly slide doors and close quietly.
A DIY wardrobe is convenient, practical and original. Only when the furniture is made and assembled yourself can you be sure of the quality and safety of the product. Such an item is always made in accordance with the taste of the owners.
Consumables and replacement attachments
For normal operation of any type of tool, periodic replacement of various attachments, working parts and other attributes is required. Therefore, for normal, rhythmic operation, it is advisable to provide a certain supply of them, so that if replacement is necessary, you do not have to promise the store.
Jigsaw files designed for working with chipboard and MDF boards are available in several varieties. Blades for fast, rough cutting have a large tooth and are designated "T101B". For shape cutting you will need blades designated “T101AO”. Other types of files (hacksaw blades) are also produced for cutting plexiglass, metal and other materials, but they are used quite rarely and do not require frequent replacement.
Sanding belts of various abrasiveness are used for rough and finishing of edges and surfaces. However, the most popular sanding materials are those with an abrasiveness of 80 (rough grinding) and 120 (finishing work) units per inch. Tapes with diagonal gluing are more reliable. When purchasing a belt, you should check its unfolded length, which is suitable for use on a specific sander.
jigsaw sanding belt
Bits for tightening fasteners have different tip shapes.
Today, to distinguish them, the following marking has been adopted, under which they are commercially available in the form of single samples or sets:
- the profile “PZ” (“Pozidriv”) or “PH” (“Phillips”) is designed for fasteners with a cross-shaped slot - for self-manufacturing furniture you will need standard sizes “PZ1/PH1” and “PZ2/PH2”;
- bits designated “T” (“Torx”) or “HEX” are intended for screwing European fasteners (confirmed) - the latter type, despite its higher cost, is preferable;
- bits with a straight slot do not have a designation, but they are quite easy to select visually;
- There are combination bits, one end of which has a “HEX” profile and the other “PZ/H” profile, but their use is only possible in devices equipped with a chuck.
The magnetic holder is an optional accessory that comes with some screwdrivers. It can be purchased separately, checking the possibility of installation on a specific model. The use of a magnetic holder greatly increases the ease of use of this power tool, especially when working with bits.
In addition to the accessories described above, when making furniture you will need a set of twist drills, straight and edge rebate cutters.
To perform specific operations for drilling recesses for hinges, drilling stepped holes, countersinks, you may need:
- confirmation drill;
- Forstner drill;
- bimetallic core drill.