Beds BOSS
MnogoMebeli.com © 2009-2021 MnogoMebeli LLC;
OGRN 1126432002135 MnogoMebeli.com © 2009-2021 MnogoMebeli LLC; OGRN 1126432002135
I hereby give my consent to Mnogo Mebeli LLC, registered at the address: Russian Federation, Saratov region, Saratov district, s. Kleshchevka, Liter G2 1 building for the processing of my personal data (hereinafter referred to as “PDN”), which is specified in this form, as well as other personal data that became known to Mnogo Mebeli LLC.
The purposes of providing PD to Mnogo Mebeli LLC are:
- processing and execution of orders placed by me;
- providing customer support;
- processing messages from the client sent through the feedback form;
- promotion of goods, works, services presented for sale;
- conducting customer marketing research;
- provision of distance trading service;
- carrying out promotions and campaigns to increase customer loyalty, notifying customers (SMS, WhatsApp, etc.), managing access to the client’s personal account;
- other purposes permitted by the current legislation of the Russian Federation.
This consent is given to carry out the following actions in relation to my personal data: collection, recording, systematization, accumulation, storage, clarification (updating, changing), extraction, use, transfer (provision, access), blocking, deletion, destruction of personal data, in the manner as automated and non-automated processing of personal data.
The procedure and conditions for processing personal data are regulated by the Policy of Mnogo Mebeli LLC regarding the processing of personal data; additional information on the processing of personal data can be found in the Site Rules.
This consent can be revoked by sending me a written application to revoke consent to the processing of my personal data, but subject to the verification of my identity.
Source
The procedure for assembling a bed with a lifting mechanism, video instructions and diagrams
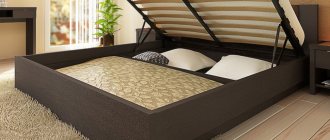
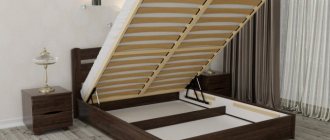
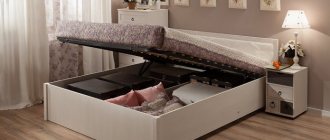
The advantages of a bed with the ability to lift the mattress are well known to many users - in conditions of limited space, it allows you to conveniently store bedding and other things. The main drawback of this model—the high cost—can be partially mitigated by refusing the services of professional furniture assemblers. To do the work yourself, you will need a set of available tools. The diagram supplied with the manufacturer will tell you in what order the bed with a lifting mechanism is assembled, and the video instructions will explain in detail all the difficult points. In most cases, to obtain a stable, reliable structure, it is enough to simply follow a step-by-step algorithm. Deviations from the standard pattern when connecting parts of such beds are rarely observed.
Types of lifting mechanisms
In modern models, a gas lift or spring mechanism is more common. The manual hinge system was popular several decades ago; now such furniture is rare.
The mechanism can be made of different materials.
Manual
The simplest mechanism without auxiliary devices that simplify lifting the base. But at the same time, it is the most durable. It works due to the movement of furniture hinges. During lifting, all the weight rests on the hands, so not everyone can access the internal contents.
The French folding bed transformation mechanism has become widespread.
For a child, this task will be difficult to accomplish. If handled carelessly, the housing may become deformed. Especially if the bed is made of inexpensive chipboard that does not withstand frequent use.
Spring
This is a budget option that is installed in economy class beds, as well as in some mid-price models. When lifting, the weight of the body partially falls on the springs, thanks to which even a person who does not have developed physical strength can cope with it.
A double bed with a lifting mechanism on springs costs significantly less than its counterpart on gas shock absorbers.
However, it will be difficult for the child to lift the base. A serious drawback of the mechanism is its short service life. Typically, manufacturers claim 5 years during which the device remains usable. The springs are then stretched.
On gas shock absorbers
Gas lift is the most advanced mechanism. Lifting the bed requires virtually no physical effort: the bulk of the weight falls on the device. It works silently, the base lowers and rises smoothly, and is securely fixed in a vertical position.
Lifting mechanisms can be manual, with springs or with gas shock absorbers.
The mechanism can be installed in any bed. Manufacturers claim a 10-year service life for the device. The only drawback is the high cost compared to other models. But in the long term, the purchase will be profitable.
Everyone chooses their own bed transformation mechanism.
Required tools and fasteners
All actions begin with studying the instructions for assembling a bed with a lifting mechanism, checking the declared configuration with the actual number of elements and assessing their condition. As a rule, all the necessary fasteners, fittings (screws, hardware or nails, euroscrews, ties or bolts for fastening drawers, a rope or any other lifting handle) are supplied in the basic kit. After checking their quantity, in order to add all the small parts, it is worth taking 2 boxes. One for the lifting mechanism, the other, if possible with different compartments, for the remaining fasteners.
A hex key for tightening bolts is also usually supplied as standard. In its absence, this instrument is prepared along with the others. Basic list:
- screwdriver, screwdrivers with different attachments, ring wrench;
- measuring instruments: tape measure, level, pencil;
- hammer for adjusting lamellas.
Materials
I purchased the materials needed to make a bed with a lifting mechanism at a building materials supermarket according to the list:
- confirmations – 8 pcs.;
- self-tapping screws 25 mm – 20 pcs.;
- furniture corners (50 × 50 mm) – 4 pcs.;
- metal corner (32 × 32 mm) – 1.4 m;
- MDF sheet 2440 × 1830 × 30 mm;
- fiberboard sheet – 2440 × 1830 mm;
- edged board 1600 × 150 × 20 mm;
- inset frame for a mattress (orthopedic base on a metal frame);
- furniture legs – 6 pcs.;
- edge furniture tape – 10 m;
- gas shock absorbers (425 mm from 800 N) – 2 pcs.;
- metal strip (50 × 3 mm) – 1.3 m;
- PVA glue - tube;
- bolts, washers, nuts – m 6;
- metal bushings (10/16 mm) – 8 pcs.
The entire process of assembling a 160 x 200 bed with a lifting mechanism with your own hands is outlined in the following instructions.
Stages of work
The main reference point is the manufacturers' guidelines. With the right approach, work begins with studying it. It will also be useful to watch video instructions for assembling a bed with a lifting mechanism. For each specific model, the algorithm of actions may differ slightly.
Assembling the base and box
Work on the formation of the base box is carried out according to a simple scheme:
- The front and 2 sides are connected first.
- The central crossbar is fixed to the U-shaped structure (it also serves as the main support of the body).
- The backrest is attached to the sides.
- The bottom is fixed to the box.
For models with an additional drawstring belt, the bed assembly scheme is a little more complicated. In such cases, the drawers are connected separately and mounted on the inside of the body. The same applies to products with additional power elements, fixed with screws after assembly and checking the evenness of the body.
Assembly of the base is completed by fastening the bottom, checking or adjusting the angles and carefully tightening the screws without pressing.
Installation of legs and installation of corner ties
Not every model has free-standing supports; in a number of modern beds, these functions are performed by solid sidewalls. In other cases, the legs are connected to the base with screws and nuts. Experienced furniture makers carry out this stage, following the manufacturers' recommendations, namely, before installing corner ties (the most common option) or, conversely, as a last resort. The exact sequence of actions depends on the model and is specified in advance.
Corner ties that strengthen the bed structure are fixed with nuts with external and internal threads and countersunk bolts. In addition to screwdrivers, you will need an Allen wrench to assemble the bed. As a rule, these elements are mounted on 2 fasteners on each side; in order to avoid distortions of the ties, their installation is carried out after checking the evenness of the markings.
Installation of the lifting mechanism
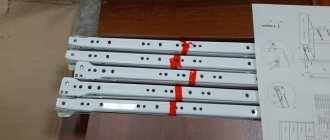
Lifting mechanisms are usually supplied assembled, requiring only proper fastening - with the cylinder facing up, taking into account the asymmetrical design of the parts and the inadmissibility of errors. For most models, they are first mounted on the bottom of the frame with screws, then the lower part of the lifting mechanism is screwed to the inside of the base body. To simplify this work, most manufacturers make special marks or pins on the boxes.
After this, the gas shock absorbers are inserted into the lifting mechanism and tightened with nuts. These elements are fixed using fluoroplastic washers and nuts with a locking mechanism. At this stage, any risk of backlash is eliminated - the fasteners are tightened all the way, loosening at the end by half a turn, no more.
The operation of the lifting mechanism is checked several times; the presence of gaps or distortions between the body and the bed frame is not allowed.
Attaching the frame and mattress supports
At the final stage of assembling a bed with a lifting mechanism, a central leg is attached to the correctly installed frame, which acts as a limiter, and handles that simplify the lifting process. Installing lamellas requires care and a considerable amount of time. The plates are driven into the holders with a hammer or by hand with sufficient flexibility. It is impossible to hammer both ends at the same time; with the correct approach, one edge of the plank is tightly inserted into the holders, after which the lamella is slightly bent upward and inserted with the other end (if necessary, knocking it out with a hammer). The process ends with laying the mattress, re-checking the work, and tightening the cover. Furniture may be put into operation if there are no distortions, creaks, wobbles or any similar defects.
For a bed with an orthopedic bottom or a large number of slats, it is worth purchasing a hard or semi-rigid mattress.
Algorithm for assembling double beds
Each type of furniture has its own individual nuances; it is imperative to study them. But there are several universal tips that must be followed in all cases. Attempts to simplify the process and neglect some actions will cause extremely negative consequences.
Table. Sequence of assembly steps
| Stage | Short description |
| The double bed is large in size and it is not always convenient to carry it through narrow interior doors. The best option is to assemble the furniture in the bedroom, but this requires quite a lot of free space. Hardware and various additional mechanisms must be stored separately. Almost none of their manufacturers include spare parts in the delivery package; at best, they can add a few simple hardware, which you can buy in any store. Check your tools right away. Responsible manufacturers of beds with complex engineering solutions provide special keys for assembly work. But in any case, you will need a set of screwdrivers of various widths with one slot and a star, hex keys of various sizes, pliers and a hammer. |
| As mentioned above, the instructions are not always helpful, but you should read them. Don’t try to remember all the steps at once; consider each point in detail. You should find the parts of the bed in question, find out what hardware they are connected to, what function they perform, and what they should withstand loads. Such a study makes it possible to understand not only the assembly principle, but also to recognize the most critical components and in the future pay increased attention to them. |
| A very important stage. The instructions must have a detailed drawing of the bed with the designation of each element. The drawing is accompanied by a list of the assortment and quantity of bed elements, special mechanisms and fasteners. Check all the points. If a shortage is detected, it is better to file a complaint with the sellers or manufacturers. If possible, to speed up the solution to the problem, it is recommended to purchase some hardware yourself. |
| As with most things, assembling a bed starts with the frame. Only the number of frame parts can be different, it all depends on the model and complexity of the product. Remember that the headboard and footboard of double beds are heavy and must be assembled with the sides carefully. When parts fall, in most cases the fixation points are torn out, this is a big problem. To solve it, you need to have significant practical experience as a carpenter and have special tools. Take your time; if possible, use the services of an assistant. |
| Quality checking | After assembly, clean the work area and check the quantity of hardware. There are times when not all of them are inserted into place. If you have such a situation, then you need to inspect all the nodes, find and fix the problem. After assembly, the bed must be tested for structural stability. Jump on it, push it in different directions, etc. Make great efforts, do not spare the furniture. It is better to find weak points immediately after assembly before using the bed. Fresh problems can be easily eliminated by simply tightening the hardware. If the bed begins to wobble during use, repairs will take longer. If the components are loose, this indicates that the holes have increased in diameter and the fastener threads no longer hold the parts. There are two repair methods. The first is to completely redo the fixation points and drill new technological seats. The second is to repair old holes, seal them with wood putties, use various wedges, etc. Both methods are quite labor-intensive and do not restore the original strength of the joint. |
If you are fully prepared theoretically, then you can begin to practically assemble the bed.
Common problems and errors
Possible problems or violations of the assembly technology include:
- Errors in marking or the need to drill holes. Some models come with pre-made holes, but in most cases you prepare them yourself. The backrest requires special attention; the slightest mistakes when attaching it lead to distortion of the entire structure.
- Errors when installing gas lift. Replacing the right side with the left or lack of symmetry makes the load on the lifting mechanism uneven, which ultimately leads to its rapid breakdown.
- Excessive pressure on the slats during installation.
- Strong tightening of fasteners.
- Assembling a bed on an uneven place or fluffy carpet.
- Using fasteners of the wrong length. The supplied kit may contain hardware of different sizes similar in appearance or purpose. Accidentally replacing long fasteners with short ones is considered a mistake; as a rule, assembling a bed with a lifting mechanism will not work in such cases.
Tools
First I prepared the tool. Everything you need to make a bed with a lifting mechanism with your own hands is included in the following list.
- Screwdriver for fastening furniture base frame parts.
- Tape measure and metal ruler for marking MDF sheets.
- Drill for drilling holes in metal parts of lifts.
- Pencil for marking.
- Drills for wood and metal.
- Drill and key for confirmations for assembling fragments of the bed frame.
- Iron for edging furniture tape.
- Jigsaw for cutting MDF.
- Clamps (2 pcs.) for fixing housing parts when assembling the housing.
- Hacksaw for cutting boards to required sizes.
- Knife for removing protruding parts of furniture edge strips.
- Set of wrenches and sockets.
- Hammer.
Bed BOSS chenille Soro gray
Loan from 48 ₽/day | Installments from 150 ₽/day
The calculation of the payment amount is approximate and is for informational purposes only. More details
Loan from 48 ₽/day | Installments from 150 ₽/day
The calculation of the payment amount is approximate and is for informational purposes only. More details
BOSS bed is an elegant bed with a discreet, minimalist design. Thanks to the soft headboard with a geometric pattern, the bed becomes the center of any bedroom. Comfortable upholstery gives a feeling of unique coziness.
Material advantages
- Soft and pleasant to the touch texture
- No finger effect
- Aesthetic appearance
- High abrasion resistance - 35,000 cycles
- Hypoallergenic material
- Breathable and hygroscopic material
BOSS bed is an elegant bed with a discreet, minimalist design. Thanks to the soft headboard with a geometric pattern, the bed becomes the center of any bedroom. Comfortable upholstery gives a feeling of unique coziness.
Labor and cost
The amount of working time spent on making the bed is shown in the following table.
Taking into account the time spent on purchasing, transporting materials and work interruptions, the production of this furniture took me 3 days.
I recorded all the costs for purchasing the necessary materials in a notebook. They made up:
- hardware (confirmations, bolts, nuts, washers, bushings, screws) – 100 rubles;
- furniture corners - 20 rubles;
- steel corner 32 × 32 × 1400 mm – 20 rubles;
- MDF sheet 2440 × 1830 x 30 mm – 2800 rub.;
- fiberboard sheet 2440 × 1830 mm – 200 rubles;
- furniture legs (6 pcs.) – 60 rubles;
- edge furniture tape (10 m) – 70 rubles;
- two gas shock absorbers – 2000 rubles;
- edged board – 50 rub.
I took this bed to the dacha. And for my bedroom I made another model, slightly different in the width of the body. I assembled a new bed with lifts with my own hands, measuring 180 × 200 cm. This time I made the body from laminated chipboard. I placed thin foam rubber and covered the outer surfaces of the body with eco-leather. I did this using a stapler. It turned out very beautiful and inexpensive.
For many people, purchasing furniture is a significant event. Headsets are not purchased every day; you want them to last longer and be comfortable. Most people try to assemble furniture at home on their own, but not everyone knows how to do it correctly. To better understand how to assemble a double bed, the instructions will help, which describe all the nuances, without which this process can become quite problematic.
Still have questions? We are ready to help.
Seven days a week from 08:00 to 22:00 Moscow time.
Seven days a week from 08:00 to 22:00 Moscow time.
Send us a message
Checkout
We will call you back and clarify the details.
Application sent
Wait for the operator to call
Buy in 1 click
We will call you back and clarify the details.
Application sent
Wait for the operator to call
MnogoMebeli.com © 2009-2021 MnogoMebeli LLC; OGRN 1126432002135
MnogoMebeli.com © 2009-2021 MnogoMebeli LLC; OGRN 1126432002135
I hereby give my consent to Mnogo Mebeli LLC, registered at the address: Russian Federation, Saratov region, Saratov district, s. Kleshchevka, Liter G2 1 building for the processing of my personal data (hereinafter referred to as “PDN”), which is specified in this form, as well as other personal data that became known to Mnogo Mebeli LLC.
The purposes of providing PD to Mnogo Mebeli LLC are:
- processing and execution of orders placed by me;
- providing customer support;
- processing messages from the client sent through the feedback form;
- promotion of goods, works, services presented for sale;
- conducting customer marketing research;
- provision of distance trading service;
- carrying out promotions and campaigns to increase customer loyalty, notifying customers (SMS, WhatsApp, etc.), managing access to the client’s personal account;
- other purposes permitted by the current legislation of the Russian Federation.
This consent is given to carry out the following actions in relation to my personal data: collection, recording, systematization, accumulation, storage, clarification (updating, changing), extraction, use, transfer (provision, access), blocking, deletion, destruction of personal data, in the manner as automated and non-automated processing of personal data.
The procedure and conditions for processing personal data are regulated by the Policy of Mnogo Mebeli LLC regarding the processing of personal data; additional information on the processing of personal data can be found in the Site Rules.
This consent can be revoked by sending me a written application to revoke consent to the processing of my personal data, but subject to the verification of my identity.
Source
Step-by-step instruction
The work was divided into several stages:
- preparation and assembly of MDF parts,
- installation of an inset frame under the mattress,
- production of lifting mechanisms,
- Assembling a bed frame with a lifting mechanism with your own hands.
Preparation and assembly of MDF parts
- On a piece of paper I drew drawings of a bed with a lifting mechanism.
- On a sheet of MDF with a pencil, using a tape measure and a metal ruler, I marked the future parts of the body.
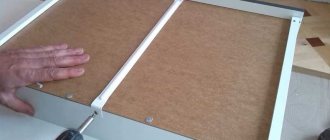
- The MDF sheet was cut into pieces convenient for cutting.
- On the workbench I secured parts of the MDF sheet with clamps.
- I used a jigsaw to cut out elements for assembling a bed frame 1600 x 2000 with a lifting mechanism.
- The ends of all parts were wiped with a damp cloth.
- Pressing the edge tape with an iron, I ironed all the ends except those facing the floor.
- I set up a headboard (1664 × 772 mm), two side drawers (2054 × 296 mm), a back wall (1664 × 296 mm) and a cross board (150 × 1608 × 20 mm).
- On the outside of the corner joints I drilled 2 holes for confirmations.
- Installed the fastener using a Phillips screwdriver.
- The heads of the confirmations were covered with plastic plugs using PVA glue.
- Inside the 4 corners, I installed plastic corners with a screwdriver.
- To ensure additional rigidity of the frame, I installed a transverse board, connecting it to the sidewalls with metal corners on screws.
- The fiberboard sheet was cut with a jigsaw to dimensions of 2054 × 1664 mm.
- The assembled frame was placed on its side. I secured the fiberboard bottom sheet with screws around the entire perimeter of the bed.
- I drilled holes in the bottom corners of the frame and in the middle of the frame. I inserted legs into them. Plastic supports ensure easy movement of furniture on the floor. When cleaning a room wet, the legs prevent the MDF from coming into contact with the wet floor.
Installation of an inset frame under a mattress
I bought the insert frame disassembled, which is convenient for transporting it in transport. Following the instructions, I assembled the retractable base without much difficulty. To do this you needed a wrench and a screwdriver.