Rome wenge wardrobe 150 assembly instructions
They will need to be secured strictly level, and they should be parallel to each other. First of all, you will need to secure the upper rail using self-tapping screws and press washers, then the lower one. You will need to insert stoppers when the doors are not open.
- When the guides are level, you will need to insert the door. The first step is to insert the far door into the upper track, and then lift it to install the door in the lower part. The front door is inserted in the same way - the upper part is inserted first, followed by the lower one.
- In order to adjust the doors, you will need to tighten the bolt at the bottom with a hexagon. If the bolt is tightened, the door will lift. If he unscrews, then the door lowers. If the doors are parallel, they will open easily.
Some of the boards were chipped, and despite the good build quality, this is precisely why a star can be removed. It was very lucky that all these chips and imperfections ended up on the sides of the cabinet that were invisible to prying eyes, but still, a very unpleasant moment.
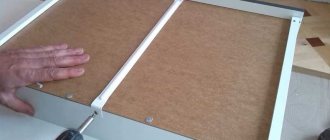
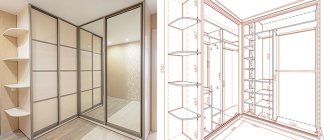
The boards are packed in cardboard boxes, stacked in order, panels facing each other. There were no particular problems with the assembly, it assembles like a construction kit. This time the instructions were included, but be prepared for the fact that you won’t find them in your possession, I’m attaching a photo of the assembly.
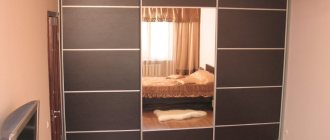
One of the three compartment doors is mirrored, be sure to check it at the delivery stage to ensure it is smooth, without chips or scratches, without any distortions or anything else.
- the circuit is designed;
- all necessary tools are prepared;
- all purchased parts are purchased and adjusted;
- the structure is assembled.
Tools needed to assemble the structure:
Assembly diagram of a wall cabinet for tools.
- an electric drill, which will be used to tighten screws and drill holes;
- a hammer to make it possible to hammer in dowels;
- roulette;
- building level;
- a simple pencil to take measurements and make marks;
- glue, which is needed to glue the pile;
- a hacksaw for wood so that it is possible to adjust all the elements to the required dimensions;
- a large number of screws and dowels.
First of all, you will need to check the quality of each element.
very comfortable, roomy.
It is also important to follow the assembly sequence indicated in the diagram.
I bought Rome -150. I was attracted by the design, spaciousness, and of course the price!
The problems started during assembly.
This one is assembled from the base. The base, as a rule, is connected to furniture corners and confirmations.
It is also important to follow the sequence indicated in the diagram.
I bought Rome -150. I was attracted by the design, spaciousness, and of course the price!
The problems started when. I bought Rome -150.
And immediately after this we screw the lowest connection onto one front confirmation, which we unfold with an edge and rest its end against the bottom.
Sergei quickly figured out where they could be found, went and bought them. In addition, I glued the front part of the drawer frame, as it did not hold well.
Thank you very much for the assembled cabinet and table!” — Svetlana, October Avenue.
“We bought a bookcase from Ikea and decided that it should be assembled by a specialist.
Tried to find out the truth when they will bring it? The seller is me - I am not me, I am the seller. They will call you.
Assembly of cabinet Rome 150 assembly diagram Otherwise, it may be necessary to disassemble the previously fastened parts and reassemble them in the required sequence.
When assembling a cabinet, a simple mistake is often made, which is costly - they confuse the top and bottom of the parts.
As a result, sometimes it is necessary to disassemble a practically assembled device and reassemble it again.
Make sure that the holes in the vertical rack for fasteners and shelf supports match the opposite rack.
The cabinet is assembled using minifixes. Briefly about the main problems: - if the order, except.
Disadvantages: the rest is a minus. rudeness. Our production is certified in the European Union, and our products comply with GOST. Assembling the cabinet Place the bottom of the left section not far from the destination, pressing the back end against the wall.
Screw on the left side panel.
I bought a mirrored wardrobe 180 from a lot of furniture.
It turned out inexpensive, compared to the prices of sliding wardrobes in other stores. Supporting Information. (all links open on a new page).
When installing the cabinet, use a level to check how evenly the kitchen apron is laid. Dismantling cabinets with such fastening is also easy and quick. Comments are closed, but trackbacks and pingbacks are open.
Step-by-step video instructions for assembling a wardrobe with your own hands. This video will allow you to save up to 15% off.
Uglich Furniture Company UMKA. We have been producing furniture since 2006. Today I will show you how to assemble. The spacious and at the same time compact wardrobe Grant is suitable for any room, even small ones.
Full detailed video instructions for assembling a sliding wardrobe.
The cabinet is perhaps of the best quality, which can be realized within a budget of up to 10,000 rubles.
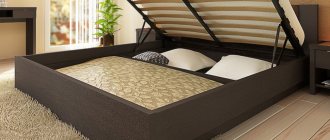
First I prepared the tool. Everything you need to make a bed with a lifting mechanism with your own hands is included in the following list.
- Screwdriver for fastening furniture base frame parts.
- Tape measure and metal ruler for marking MDF sheets.
- Drill for drilling holes in metal parts of lifts.
- Pencil for marking.
- Drills for wood and metal.
- Drill and key for confirmations for assembling fragments of the bed frame.
- Iron for edging furniture tape.
- Jigsaw for cutting MDF.
- Clamps (2 pcs.) for fixing housing parts when assembling the housing.
- Hacksaw for cutting boards to required sizes.
- Knife for removing protruding parts of furniture edge strips.
- Set of wrenches and sockets.
- Hammer.
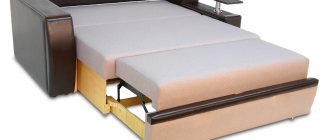
In the Mnogo Furniture store, the transforming table is usually sold assembled. In order not to spend money on the work of a master, you can assemble it yourself. As expected, instructions for assembling the table come with each model, but sometimes it can be difficult to understand it without outside help. Therefore, it is better to use photos and videos that describe each stage of the work in detail.
Table assembled Disassembled
Table assembly diagram
The transforming table from “Much Furniture” should be assembled in stages, starting with the legs. The drawings show in detail how the parts are twisted. It is worth noting that assembly must be carried out according to technology, otherwise the furniture will not be able to serve you for the required period. In general, the tables are assembled according to the following plan:
- Legs.
- Table top lifting mechanism.
- Table frame.
- Additional shelves and drawers (if available).
Knowing how to assemble a transforming table from “A Lot of Furniture” using a video, you will cope with this task in a few hours. To simplify the process, you can use a screwdriver and a ruler with a pencil to make marks. It may not be very convenient to do this alone; the help of a friend will not be superfluous, at least to hold some elements of the table.