Home » Rooms » Hallway
FurnitureHallway
Alyona
33397 Views
Wall-mounted key holders fit perfectly into the hallway - plus you don’t have to look for keys throughout the house. This is the main advantage of any key holder: saving time. In a couple of weeks, you will develop the habit of hanging the key on it in the evening when you come home from work, and taking it off in the morning when you leave for work. As a result, you no longer need to search your apartment for missing keys, and you always know who your family members are at home - just look at the key holder and see if all the keys are in place.
The practical side is not the only advantage. There is also aesthetics, because the key holder can be decorated in any style. Do you have an eco-friendly hallway? Nothing will fit into it better than a key holder made from a tree branch. High tech? A small stylish metal key holder will go well with it. Provence? Decoupage with flowers or birds. Classic? Wooden varnish board of strict shape.
Wall-mounted key holder will easily fit into any interior
You can find something that suits your needs at any home improvement store. But there is another approach: make a key holder with your own hands.
It has advantages:
- Originality . A thing made with your own hands will always be different from a similar one, but produced on an assembly line. Features of processing inherent in each master, interesting design solutions - even when making a key holder according to the instructions, you will know for sure that no one else has the same one.
- Variety . At home, even without experience, you can make more than a dozen different key holders. From a cut of wood, from a box, from wire, from a branch, even from forks - there will always be material, you just need a little patience to handle it carefully.
- Harmony . The key holder you bought may be perfect for your hallway, but you need to find it first. If you made it yourself, it will fit like your own - after all, you will work on it, coming up with a design and knowing how it will fit.
- Interesting experience . Making something with your own hands is not only useful, it’s also fun. If you have kids, you can team up with them, turning the simple act of making a key holder into a real adventure. And if you don’t have children, you can just enjoy the process.
Easy to make yourself
Homemade key holders come in different varieties - from different materials, different designs. Before you get down to work, you need to figure out what kind of work you need.
Advantages of making your own key holder
Having a housekeeper for the hallway with your own hands has the following advantages:
- Its size, shape and number of hooks - all these parameters fully correspond to your taste.
- Its creation requires a creative approach and the absence of restrictions in actions.
- Its production will cost much less than buying a store-bought product.
- Possibility of adjusting the accessory if you decide to change the style of the corridor.
- The ability to give the interior of a room an unusual and interesting look.
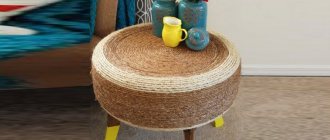
Plywood key holder
Obviously, plywood is more convenient to work with. After all, this is already processed material; you just need to cut out the desired shape. Lightly sand the edges of the product, paint and attach the hooks.
- DIY polymer clay jewelry: master classes with photos
- DIY decorative candles: master classes with photos
Decorating a vase: ideas and master classes on how to make a vase with your own hands (80+ photos)
The good thing about plywood is that it allows you to create a wide variety of shapes in a variety of styles.
Types of key holders
As you can see in the photo of handmade key holders, there are a lot of possible options. The choice of a specific solution must correspond to the interior style of the hallway.
The product can be made:
- from sawn wood;
- from unnecessary trash;
- from branches;
- from wine corks;
- from plywood sheet;
- made of wire;
- leather.
Metal plates
Sheet iron is great for making a homemade key holder. The metal is resistant to moisture and mechanical deformation. The structure of the material is strong enough to withstand significant weight. The hooks are mounted by welding.
If desired, the surface of the main plate can be painted in bright colors.
Popular ideas
Nowadays, a large number of different ideas for making key holders have been invented. Let's look at the most popular models:
- Shelf. It is in greatest demand among the population and is suitable for standard housing.
- Box. Installed mainly in private buildings.
- Key holder for large farmsteads. Allows you to store keys in whole bunches.
- Organizer. Organizes other small items in addition to house keys.
Requirements for wall key holders
Wall-mounted models are the most common options. All models must meet the following requirements:
- Durable material, safe for humans.
- Reliable fastening.
- A sufficient number of hooks with edges turned up (the metal ring of the keychain will not be able to slide off the hook).
The key holder should have bright decor so that the original plate can be seen on the underlying wall.
Required materials and accessories
To make such a useful piece of furniture, you will need a number of different materials. Below is a sample list:
- wooden or cardboard structure as a base;
- leather or textiles;
- holder;
- key hooks;
- pendants;
- picture frame;
- branch of non-standard shape;
- acrylic lacquer.
You may also need:
- plywood sheet;
- branch of non-standard shape;
- cork;
- MDF or chipboard sheet;
- tree.
Tools worth preparing:
- drill;
- jigsaw;
- screwdriver;
Picture frames for the key holder
You can also make a key holder from a picture frame. Using a stapler or glue, you need to attach a piece of hardboard to the back of the frame, which will be used as a base.
The inner surface of the frame can be treated as you please: paint it, glue one-color paper or a drawing. Depending on the type of keys, the hooks must be attached either to the frame itself or to its inner surface.
Selection of design and construction solutions
The appearance of the accessory depends on where it will be used. For an office, the best solution would be a sleek steel cabinet with a lock.
For your home, the best option would be a model that fits harmoniously into the interior. It can be either luxuriously decorated or simple.
Note!
- DIY feeder - step-by-step instructions for creating a feeder + detailed diagrams with photo reviews
- Do-it-yourself rugs - TOP 120 simple patterns with master classes on how to make them yourself + photo reviews of finished rugs
- Do-it-yourself dolls: a master class on making a beautiful doll. Simple instructions with photo examples of ready-made options
If you are not going to focus on such a product, you don’t need any particularly magnificent appearance from the key holder.
If you want to make the process of creating such a product as easy as possible, it can be made from an ordinary birch or oak branch.
No special skills are needed here. You just need to clear the tree of bark, drill the required number of holes and install hooks. The finished accessory should be varnished.
Decorative and stylistic design
Decorating is a fascinating creative process. Thanks to him, a boring and faceless product can turn into a work of art. By decorating your creation, you will be able to show remarkable imagination and discover hidden talents in yourself and acquire new skills.
If the craft has a wooden or plastic base, you can decorate it using the decoupage technique. It is quite simple to implement. A thin layer of PVA glue is applied to the surface, then a selected fragment of a napkin with a beautiful pattern is fixed and secured with transparent varnish. The napkins consist of three layers. For decoration, use the top one, on which the image is applied. There are many options for such napkins. There are products that imitate stone, granite or wood. Using this technique, you can quickly decorate it and give it an interesting, original look.
There is another technique, the name of which is similar to the first. It goes by the name – cardboard. To successfully use this technique, you will have to find a variety of pieces of cardboard and fabric. By combining them randomly or according to a drawing, you can create a unique pattern. The good thing about this technique is that it doesn’t require any money, just a little patience and accuracy.
Wooden products can be decorated using a burning device. The image is transferred using tracing paper or simply drawn on the lid of the cabinet and then burned out. The same tool will help you create unique embossing on leather or foil.
Stickers, paint, glitter, beads, shells, miniature decorative elements and even figurines are often used for decoration. Such decorations will make the accessory unique.
Conclusion
Fill your interior with unique things. If you are a creative person, standard accessories are not for you. Handmade work into which people put their souls always attracts glances and collects admiring comments. An original handmade key holder will become the highlight of your home and will give you ideas for further creativity. It can be accompanied by an original lamp, a mirror in an unusual frame, a decorative panel, an umbrella stand or a shelf for newspapers. Having mastered one of the manufacturing techniques, you can fill your home with cute little things that will fit together perfectly.
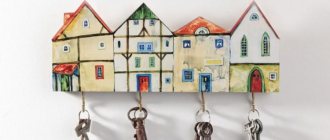
Key holder made from sawn wood
The style and originality of a wooden key holder will not go unnoticed by your guests. This is an ideal option for anyone who loves working with wood. Order of steps:
- Process the cuts using sandpaper.
- Remove dust, moisten the workpiece with water, dry it and sand it again.
- Cover the wood with several layers of stain.
- Print any picture, go over it and the base with acrylic varnish, put the image on the cut, roll it with a roller.
- After some time, roll up the paper layer, after moistening it with water.
- Make holes for fastenings and secure the finished product to the wall.
What types of key holders are there?
There are two ways to classify key holders.
The first is by design:
- Open . These are usually made by hand because they are easier to make. They are any kind of hooks on which you can hang keys driven into anything. Board with nails? Open. Branch with twigs? Open. Leather cut with pockets? Open.
- Closed . These are more difficult to make - some carpentry skills will be required. They are a cabinet that is closed by a door. The door will have to be hung on hinges, otherwise it will quickly fall off. They allow you to hide what exactly is inside and protect the keys from prying eyes. You can build in shelves for useful little things, hang a mirror on the door and otherwise expand practical use.
A convenient way to avoid losing your keys
The second way is based on the materials that were used.
- Cardboard . Cheap and easy to process, it has low strength. It is easy to work with and is well suited for the first key holder made with a child. But it wears out quickly, plus it doesn’t look too solid.
- Plywood . The material is also cheap, but more difficult to work with - scissors are no longer enough, you will need a large knife or jigsaw. In addition, plywood is bound to crack if you apply too much force. And if it is done in violation of technology, it will smell unpleasant. Plywood is easy to decorate; it withstands temperature changes and humidity. Lit.
- Metal . There is not enough home equipment to work with real thick metal sheets, but it is quite possible to make a key holder from thick wire or a thin layer of metal. The metal looks beautiful, can serve for decades, and is impervious to mechanical stress, temperature changes, and high humidity. But it is difficult to get, difficult to decorate.
Multifunctional option
- Tree . A beautiful, pliable material that can also last for decades if treated with stain and varnish. Suitable for most interiors, plus the search can be carried out in nature - you can pick up a branch in the nearest park, for example. Burns, sensitive to moisture. It may dry out and become infected with parasites.
- Leather _ It wears out over time and does not provide much room for imagination. But it is easy to process and will appeal to those who like to sew more than sawing with a jigsaw, working with a knife or large scissors. Does not require additional processing. Lit.
Model with door
Wine bottle corks can be considered a type of wood - they can also be used to make a beautiful key holder. But you can’t make it out of paper - it will wear out too quickly. It also won’t come out of glass or stone - the material is difficult to find and even more difficult to process.
Advice When choosing a material, focus on three indicators: what will be easiest for you to work with, what will fit best into your hallway, and what you will definitely be able to get. Once you have decided, proceed.
Model with shelf
This is a combined piece of furniture, since in addition to the key holder it includes a shelf for storing various small items. Most people are captivated by the simplicity of its creation. Need to:
Note!
- DIY satin ribbon bows - step-by-step instructions for creating unusual bows + detailed diagrams with photos
- Do-it-yourself furniture restoration: step-by-step master classes on restoration at home (120 photo ideas)
Do-it-yourself rack: step-by-step instructions with photos and descriptions on how to make an unusual rack
- sand the prepared wooden block;
- fix the suspensions in its rear part, and make openings 10 mm deep in the front part;
- attach the block to the base board.
If necessary, you can connect a couple more bars to the structure and get several ergonomic shelves.
Master classes on creating a key holder
There are many ideas you can use when creating a key storage container. Let us highlight the most successful and interesting of them.
- A shelf is one of the most popular designs that is suitable for an ordinary apartment.
- Locker - usually installed in private houses with a large number of rooms. Only household members will have access to it.
- Key holder for houses with outbuildings and services - holds a large number of keys and rings.
- Organizer - provides the opportunity to organize not only keys, but also any miniature objects - small figurines, lanterns and other small things.
Required materials and tools
To make this much-needed item, a variety of materials will be useful. Here's a rough list of what you might need. Choose from the proposed list or invent an original design - everything is in your hands:
- a box with a door or box - used as a base;
- leather;
- textile;
- plywood;
- cork - the material has an attractive softness and warmth, although it is used quite rarely;
- photo frame - you can insert a family photo into it and admire it every time you get ready to leave the house;
- dry branch of a bizarre shape;
- MDF boards, chipboards;
- wood - both to create the base of the key holder and for the keychain.
In addition, you will need:
- holder - you can buy it at a hardware store, or make it yourself;
- hooks for placing keys;
- pendants;
- drill;
- acrylic lacquer;
- crosshead screwdriver;
- electric or regular jigsaw.
A variety of materials are suitable for making a key holder. The choice is limited only by the artist's imagination.
Deciding on design and construction
To decide on the appearance of the product, you need to know in which room it will be used. The best choice for an office is a metal box with a smooth base. Such lockers are usually locked. For an apartment, the ideal option would be an object that fits well into the interior. It can be ornate or elegantly simple. If it is not an accent element of the design and special pomp is not required from it, then it may well limit itself to performing its direct duties. Similar simple and concise products can be found in factories, hospitals or schools. Equally modest and uncomplicated are the organizers for open-end wrenches and wrenches, which can often be found in the garage.
If you want to simplify the manufacturing process as much as possible, you can make this accessory from an ordinary birch or oak branch. You don't need any special professional skills for this. After clearing the tree of bark, holes are drilled in the body, into which hooks are then installed. Next, the entire product is varnished.
From a cut tree
Such a solution will attract the attention of all visitors to your home and will become a stylish and original accent. If you love working with wood, this option is for you.
Master class on creating a key holder from cut wood:
- We process the cut with sandpaper along the grain. We remove the resulting wood dust and moisten the surface with water. After drying, reuse sandpaper.
- We pass the stain along the wood fibers several times.
- The next step is optional, but doing it will make your work unique. We print any image. We cover the base and the picture with acrylic varnish, after which we place the image on the cut and roll it with a roller.
- After a couple of hours, roll the layer of paper from the surface, having previously moistened the material with water.
- All that remains is to drill holes for fastenings and fix the panel on the wall.
From the thread
If desired, you can even make a “house” for keys from a branch or driftwood. To do this, you just need to find a suitable specimen in the forest and follow these steps:
- Before work, you need to saw off all excess from the branch, wash it and dry it.
- Use a jigsaw to cut down one of the sides.
- We apply stain to the saw cut in several layers and leave to dry, or cover the entire product with acrylic paint.
- We finish the work with a layer of furniture varnish.
- We drill holes for fastenings and insert fittings.
An element of this type looks very good in country houses, dachas and other buildings located in the lap of nature or simply designed in eco-style. If you want to decorate your restaurant in this way, the branches will fit perfectly into the interior.
From wine corks
A suitable method for those who have accumulated a lot of corks, but don’t want to throw them away. Now your reserves can be put to good use:
We cut out the base from fiberboard. We cut the wine corks in half and glue them close to each other on the plate. Next you need to install the hooks. Their role can be any object that can be screwed into the cork well. After that, all that remains is to hang the decor on the wall. This option for using traffic jams is practical and original.
From a picture frame
To make a key holder from a picture frame, you need:
- Pre-prepare the frame and, if desired, apply paint to it;
- choose a box of a suitable size and cut off its top half so that you can attach a frame;
- screw the hinges;
- cover the inside of the box with multi-colored, white or shiny paper of your choice;
- make holes for the hooks and screw the hanger to the wall.
The appearance of the product depends only on the taste of the master and his imagination. You can attach a small handle to easily open the door.
Sawing from plywood or chipboard
This method is for those who have had a sheet of plywood on their balcony or garage for a long time, but never get around to throwing it away. Luckily, you can now put that stale material to good use.
- We print a picture from the Internet with a silhouette of an animal, plant elements, a person or any other object.
- We transfer the drawing to chipboard or plywood and cut it along the contour with a jigsaw.
- You can apply paint on top if the design requires it.
- We make recesses for the hangers and drill holes for the screws.
- Attach the hooks.
Such an item will look natural in any home.
Leather
A key holder covered in leather is an expensive status accessory. But why spend extra money if you can create it yourself. All you need is a piece of leather of the required size, scissors, special glue and a little time.
If you are choosing a pocket-sized, handy key holder, then the following guide is exactly for you. Decide on the size of the case, but do not forget that it must fit in your pocket.
Prepare a piece of leather, a zipper, and a carabiner to attach the key. Make a template for the future cover. Circle it, making holes, with an awl along the contour of the workpiece. Cut it out. Secure the zipper with glue and then sew it on with a sewing machine. Glue the two parts of the product. All that remains is to sew a seam along the edge and attach a carabiner to the inner seam. All you have to do is add decor to your liking, and the pocket accessory is ready.
In this simple way you can make gifts for your parents and friends.
From planks
This object is a small structure made of planks. In order to make a similar piece of furniture, select several boards of any color, size and shape, combine them into a single composition. Sand the surface using sandpaper or a grinder. Paint with paint or stain. If desired, you can apply a finishing varnish or impregnate the material with oil.
Want to give your accessory a rough look? Use a wire brush and remove some of the soft fibers. After this, go over the surface with stain or pigmented varnish. A clear wood pattern will appear.
Key holder with shelf
Such products can also be called “organizer”. This is a combined accessory, which is complemented by a small shelf for various small items. The process of creating it is simple.
Sand the prepared wooden block. Fix it and go over it with a rough sanding disc, and then with a smoother one. Mark a place for the hangers on the back of the block, make a small notch. Secure the hangers with screws. On the front of the block, mark the locations for the openings, make recesses about 10 mm deep using a cutter attachment. Attach the block to the board that will serve as the base. If desired, you can add a couple more blocks and get several convenient shelves.
Made from thick wire
To make such an accessory you will need thick wire, wire cutters, pliers and a hammer.
You need to prepare in advance a drawing of a hanger, which can be easily constructed from wire. If you are a beginner, choose something simpler - geometric shapes, flowers, an umbrella. Craftsmen with “experience” can make complex figures and inscriptions. We bend the wire according to the pattern using pliers and get the base. We attach small hooks made from the same wire. If the drawing has sharp corners, use a hammer - just press them down. Use pliers to create wavy lines.
You can make individual hooks of fancy shapes from wire and attach them to a wall or a wooden base.
Key holder without hooks
This model will appeal to anyone who values speed and doesn’t like to have to “aim” every time to hang the key on a hook. To build such a structure you will need a base of a suitable size from any material and magnets.
- We apply markings for magnets.
- We drill holes in the wooden base to such a depth that the magnets protrude a couple of mm.
- Glue the magnets.
- We attach it to the wall.
You can also make an organizer with flat wooden keychains, in the form of puzzles, which are inserted into a wooden base. Removable elements can be made in the form of geometric shapes or repeat the outlines of animals, trees, little people.
This simple technique will get rid of hooks and make storing your keys more comfortable.
Key holder made from unnecessary improvised means
If you are a bright and creative person, free from stereotypes, you can make this design detail from any available materials. Any unnecessary items will do, and outright junk will not be an exception. Turn “throw away” items into useful and convenient things that will serve you faithfully.
For example, using aluminum spoons or forks in the form of hooks will add extravagance to the decoration. Bend them into the desired shape and attach to any ready-made base. A flat piece from a children's construction set with holes will be an excellent basis for placing hooks attached to Lego pieces.
The choice of materials for manufacturing is unlimited. The most unexpected things can come in handy.
Leather key holder
A leather-covered accessory for keys is considered a status item, the purchase of which will cost a pretty penny. Therefore, it would be more advisable to make it yourself. To do this you will need three things: a piece of leather, scissors and glue.
If you decide to make a pocket key holder, here are the instructions:
- Take a piece of leather of the required size, a zipper, and a carabiner for attaching the key.
- Make a template for the future product, apply it to the skin and outline it with an awl.
- Cut out the workpiece. Attach the zipper, having previously fixed its position with glue.
- Install the carabiner.
- Decorate the craft to your liking.
This item can be a great gift for a colleague or friend.
Types of key holders
There is no clear distinction between the types of key holders, but according to the type of location they are divided into pocket and wall-mounted. These types will be discussed in detail below.
Pocket key holder
A pocket key holder is a bag-cover that is made from various soft materials. Special loops are attached inside such a case, on which the keys are placed. Loops are made of metal or various ropes, pieces of leather. The keys are secured in the loops.
Using this type of key holder allows you to carry all your keys in one place, and also virtually eliminates the possibility of damage to your pockets, bags and things.
Wall key holder
Wall-mounted key holders are the most common. They are divided into open and closed. The simplest design of an open key holder is a rectangle made of some material and fixed to the wall, with nails, screws, and various metal tubes inserted into it. Any design on which the key is placed can be used.
A closed key holder is a kind of safe that is closed with a lock or latch. This design will protect your keys from prying eyes and limit access to them. This is a more bulky design, but it can be organically placed in the interior of the house.
Making a wall-mounted key holder does not require much skill. Most people can easily make all the necessary parts with their own hands and assemble a beautiful product.
Variant of their traffic jams
If you have wine corks lying around your kitchen, don’t rush to throw them away. They can serve as material for a key holder. Here are the instructions:
- Cut out the fiberboard base.
- Cut the corks in half and glue them to the plate, maintaining a minimum distance.
- Install hooks.
- Hang the accessory on the wall.
Note!
- Corrugated paper flowers: TOP 100 photos of ready-made options + instructions on how to make them yourself
- DIY family tree: instructions for creating a family tree + DIY design ideas
- Do-it-yourself sun lounger: photos with instructions for creating sun loungers + detailed diagrams of the stages of work
The key advantages of this type of cork decor are functionality, originality and environmental safety.
Key storage is a practical and useful thing. There is nothing complicated in creating it yourself, because the Internet is full of detailed master classes on making key holders with your own hands.
In addition, the design process will take very little time, and the end result will fully repay the invested effort and money. Therefore, if you are free, then it makes sense to organize a similar solution in your corridor.
Key holders can be without hooks
Strange as it may sound, there are key holders without hooks. To make one, natural wood is taken and slots are made in it using a milling machine or a circular saw.
If this is not the case, then you can use a regular file. This must be done carefully and stopped in time so as not to spoil the workpiece. It is advisable to treat the cut well afterwards. The cuts themselves can be made both horizontally and at an angle.
- DIY hats for newborns. Several types of knitted winter hats for every occasion in a baby’s life
- How to prepare essays on physical education
- How to crochet beautiful napkins: tips with video lessons and patterns
DIY key holder photo
Plastic key holders
Plastic is a unique material in its structure. It tolerates high humidity well and is easily mounted on the wall.
The surface of the plastic key holder is very easy to wash with a damp cloth, removing dust. Plastic hooks for the base can be found at any hardware store.
Interesting ideas for key holders
The presented options are far from the only ideas for independent work. Original ideas on how to make a key holder:
- Housekeeper with an opening door.
- Key holder-box.
- Key holder combined with correspondence holder.
- Honeycomb design. Each key in this case has an attached block, which is inserted into the corresponding groove.
- Stenciled animal figures that hold key rings and key rings.
This could be an original applique of miniature umbrellas, on the handles of which key rings are hung. Making a key holder is a real field for original ideas and creative ideas that even an inexperienced craftsman can bring to life.
Buying a wall-mounted key holder, prices for popular models
| Model | Photo | Material of manufacture | Dimensions, cm | Cost, rub. |
| Collage key holder with clock | Metal | 29*5*13 | 360 | |
| "Home" in your home | Tree | 18*12 | 420 | |
| Small holder "Squirrel" | Plastic | 18 | 400 | |
| Wall-mounted key holder “Joy” | Tree | 14*13 | 250 | |
| Storage for keys and letters | Tree | 20*38*1,7 | 1700 | |
| Multifunctional house | Tree | 18 | 1400 | |
| "Big Horseshoe" | Metal | 20*16*25 | 1390 | |
| Model in Provence style | Tree | 22*7*27 | 1100 | |
| Key holder "Tobacco" | Tree | 20*25*5 | 1800 |
Before you buy a wall-mounted key holder in an inexpensive online store, check out the prices and models provided to decide on your purchase.
Ideas for decorative key holders
Let's reveal a few more secrets of making a decorative masterpiece.
Using dry branches will add uniqueness to your creation. It is enough to place them on a wooden board. You should not choose thin branches, because they may break under the weight of the key. Be sure to treat the wood!
For decoration, you can use previously dried mushrooms - boletus, for example. They are highly durable and can “please the eye” of the owner for a long time. To make a decorative design, just bend the fork in the desired direction.
This is just the beginning of the journey! Having gained experience, you will be able to realize all your fantasies and completely decorate your room with masterpieces.