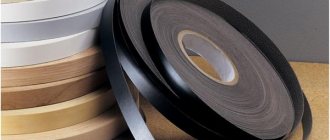
Veneer edge trim
The edge is a strip of veneer with heat-sensitive adhesive on one side. With a rolled edge and a few simple tools, you can cover raw plywood edges so that the plywood looks virtually indistinguishable from solid wood. Iron edge is wood veneer with hot glue applied to one side. You simply press the edging tape against the raw edge, heat it with a household iron to warm up the adhesive, then let it cool and trim. We'll show you how to do it and share some tips for getting perfect results.
On sale you can find edges for oak, birch, cherry and other types of wood. If you need a more exotic-looking edge, we recommend looking for it in online stores.
Tabletop connection
Required Tools
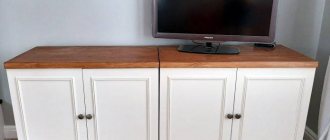
Whatever the type and color of the plank for the countertop and the countertop itself, it will have to be carefully installed. Connecting a pair of chipboard panels together is the only option for obtaining a corner structure. For work you will need, in addition to the bar itself:
- a pair of clamps (ties) for the tabletop;
- silicone-based sealant (colorless composition is recommended);
- household electric drill;
- metal saw;
- metal drills;
- Forstner drills of various sections;
- Phillips screwdriver or screwdriver;
- 10mm wrench;
- pliers;
- stationery pencil (the hardness of the lead is not important);
- a soft scrap cloth to wipe off excess sealant.
Technology
Let's say you need to join a pair of chipboard panels at an angle. In this case, a “no segment” connection can be practiced. Simply place 2 sections on the kitchen cabinet at right angles. But docking “through a segment” can also be made. This solution is more cumbersome. They resort to it so that they can install a corner cabinet.
In any case, the joint should be as tight as possible. The smaller the gap separating the ends, the better. Of course, it is difficult to achieve such a result on oval or rounded countertops. But even in this case, it is not necessary to call installers. You can simply install a special corner connector - its cost is much lower than the cost of the services of a specialist (who, moreover, will most likely buy a similar product).
A more aesthetically pleasing option for installing prefabricated countertops is to attach them using the so-called Euro-sawing method. This approach is suitable for products regardless of the edge shape. In such a case, the plank will have a more auxiliary and decorative role. It will only provide additional reliability for the connection of elements. The main fixation will be done by sealant and wood glue.
But euro saw is rarely used due to its high cost. In most cases, functional joining profiles are still used. Before marking the positions of the clamps, you need to make sure that the fastening will not interfere with the installation of the equipment in the countertop. And not only appliances, but also built-in sinks.
Another circumstance is that even if there are several ties, the prefabricated product will definitely be inferior in rigidity to the monolith. Therefore, the tabletop at the bottom will have to be firmly supported. After marking the screed points, the connecting strip will need to be attached to the end of the tabletop. Next, future new slots are marked with a pencil. A metal saw will help you make cuts along the lines.
Next, the internal excess is broken off with pliers. Using a hacksaw, saw off the plank to the desired size, leaving only a margin of 1-2 mm. The last thing to worry about is the reliable immersion of the screw heads. They should fit flush into the bar; if this is not ensured automatically, resort to additional countersinking. Next steps:
- using a 35 mm Forstner drill clamped in a drill, knock out blind holes to a predetermined depth, which guarantees the placement of the clamp pin exactly in the middle of the thickness;
- Having prepared blind holes, make 8 mm holes in the tabletop for studs;
- for the sake of increased accuracy, this hole is passed sequentially with a pair of drills;
- open longitudinal grooves are prepared in the countertop;
- tighten the connecting strip on the tabletop with self-tapping screws;
- cover the strip with sealant;
- insert the pin into the groove and into the hole of the mating part;
- evenly (one by one) tighten the parts of the tabletop with a wrench;
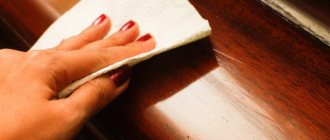
- As soon as the sealant begins to stick out, stop tightening and wipe the stain with a cloth.
Features of connecting strips for countertops in the video below.
Tip 1: Clean up the edges
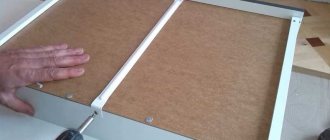
Sanding guide block
Screw the guide block to the sanding block to ensure smooth edges.
Saw marks or other roughness will prevent a strong bond between the edge and the plywood. To avoid a loose edge, sand the edges of the plywood before edging it. To avoid rounding the edges while sanding, wrap a quarter sheet of 120-grit sandpaper around a small 3/4-inch block. plywood and screw another crowbar to it as a guide. When the sandpaper begins to show signs of wear, remove the screw and reposition the sandpaper. After you sand the edge. Vacuum it to remove all the dust.
Edging laminated chipboard
The company’s specialists will answer all your questions, select the necessary equipment and prepare a commercial offer.
alt="Edging laminated chipboard" /> alt="Edging laminated chipboard" /> alt="Edging laminated chipboard" /> alt="Edging laminated chipboard" />
alt=”Edging laminated chipboard” />
alt=”Edging laminated chipboard” />
Tip 2: Iron on the edge of the strip
Using an iron
Iron the edge to adhere it to the plywood edge.
Use a regular clothes iron if you wish, but be aware that you may get glue on the iron. To avoid ruining your iron, buy a cheap one second-hand or at a discount in a store. To prevent the iron from steaming, do not pour water into the tank and set the “cotton” mode. Use scissors to cut the edge three inches longer than the edge you are hemming. Starting at one end, center the edging tape with equal projections on each side and place the preheated iron on that end. Move the iron along the surface, keeping the edge centered with your other hand. Move the iron at a speed of about 6 cm per second. The goal is to melt the glue without burning the wood.
Don't worry if you damage or dislodge the strip during application. Just go over the iron again to soften the glue and remove the strip. Cut a new piece and start again.
What are they?
In the assortment of modern manufacturers, corner profiles play an important role. Of course, they are used to connect parts of the tabletop mechanically end-to-end at a certain angle. The name “docking” is usually assigned to an element that is mounted at a right angle and plays an increased decorative role. The end product covers the initially uninsulated end and prevents negative impacts on it from the external environment. The thickness and radius of a particular option always play a key role in selection.
But it is always necessary to clarify what exactly the manufacturer or supplier means by a certain item in the catalogue/contract, receipt or price tag (label). So, slotted strips are just an alternative name for connecting profiles. It’s just that the terminology in this area is not yet well established, and one cannot count on uniformity of names. Another example is that the concepts of wide and narrow bars have little to say to the consumer.
The T-shaped model has an important specific feature - it ensures the most accurate and careful connection of the parts of the tabletop. Even if these parts are very heterogeneous in terms of geometry and mechanical qualities, the creation of an integral composition is guaranteed
Most often, profiles are made from aluminum alloys, since this particular substance - not ferrous metal, not plastic or stainless steel - has a number of important advantages:
- chemical inertness;
- ease;
- strength;
- reliability;
- pleasant appearance;
- resistance to high and low temperatures, water vapor, fats and organic acids;
- hypoallergenic.
A very relevant characteristic is the size of a specific bar. You can often find designs with a thickness of 26 or 38 mm. Such products in many cases have a length of 600 mm - and this size ratio was chosen by engineers based on familiarity with the practice of use and reviews.
But many companies are ready to offer profiles of other sizes. Thus, planks with a thickness of 28 mm are regularly found in the catalogs of furniture companies. These can be simple connecting, end, and corner structures. But models with a size of 42 mm usually need to be ordered additionally - they are a rarity in manufacturers' catalogs. However, with the modern variety of furniture workshops, this, of course, is not a problem.
What is important is that a rounded bar, regardless of its dimensions, is the safest. This property will be most appreciated by those who have small children at home.
However, even for the most brutal adults, an unnecessary collision with a sharp angle is unlikely to evoke positive emotions.
Finally, it is worth considering the topic of painting the connecting strips. Like the countertops themselves, in most cases they are black or white. But the choice of users naturally does not stop there.
Thus, in interiors that are neutral in spirit, many users consider a beige tone to be the best solution. It perfectly suits the “kitchen” mood and does not excite the nerves too much. Sand color is suitable for rooms with light wooden facades. It is also good where the design is different, but there is a lot of light.
Other main options:
- metallic - for practical people who love to cook in their kitchen;
- dark brown color - an expressive rich contrast in a very light interior;
- green (including both herbal and light green) is an excellent choice for romantics, for families with children, for those who are not used to being discouraged and upset;
- red - a bright accent against a white or moderately dark background;
- orange is an excellent combination with brown or other moderately saturated colors of furniture;
- pink - creates a spectacular and at the same time devoid of any aggression mood;
- oak - expresses traditionalism, solidity and respectability;
- A milky white shade is suitable for diluting a very dark-looking kitchen.
Tip 5: Use an edge trimmer
Photo 1: Make a shallow groove first
Trim the pushed side first. Since less veneer is removed from this side of the trimmer, the likelihood of spreading cracks is greatly reduced. Start at one end and squeeze the trimmer until the spacers rest against the plywood. Then press and run the trimmer along the edge. Thin strips of veneer will peel off from both edges.
Photo 2: Flip the trimmer over for the final pass.
Turn the trimmer over and use the untreated side for the final trim. When you're finished, the edge should be almost perfectly aligned with the plywood. If you miss any areas, just make another pass or two with the trimmer. A final sanding will remove the sharp edge and any remaining overhang.
The fastest and easiest way to trim an edge that is flush against plywood is with a dedicated edge tool, such as the FastCap trimmer shown here.
Fastening
In the vast majority of cases, the installation of countertop slats is carried out during furniture assembly. But sometimes people try to save money or there is a need to replace products. Then you should install them yourself. For work you will need a sealing agent and self-tapping screws. Please note: if there are no holes for fixing, drill them yourself.
The sealant must be applied around the entire perimeter of the installation. The standard installation method implies that the strip will be secured with self-tapping screws last, when the sealant has already set tightly
Important: do not confuse left and right products, as in this case they will look unaesthetic. Another subtlety, which, unfortunately, is often forgotten, is cleaning the surface before applying sealant.
You should not categorically cover the joint between the apron and the tabletop using a flexible plinth. This approach immediately reveals very greedy people with poor aesthetic taste. The best option is to order the baseboard along with the tabletop itself. If for some reason this is impossible, you should at least contact the same company where it was made with such an order. Then no problems can arise. There are also other options:
- medium-length plinth ("apron without apron" system);
- an improvised side from the apron itself;
- use of epoxy-based grout;
- use of sealant (helps when joining products from a variety of materials).
The end of the bar often needs to be modified. This is expressed in the removal of a hard rib. It can be very annoying later on. Screws and self-tapping screws should be screwed in carefully, but all the way. If this is not possible, you will have to enlarge the hole or change the hardware.
Tip 6: Modify your trimmer
Add plywood to your trimmer
Veneer spacers reduce the chance of the trimmer's first pass ruining the edge.
Trimming overhanging edges flush with the plywood without damaging the edge can be a tricky process. If the blade gets caught in the wood grain, it can split the thin veneer and you'll have to start over. Prevent this headache by adjusting one side of the trimmer with edge strips so it doesn't cut as deep. Simply attach the spacers with an iron, leaving a gap where the blades are. Since this trimmer has two cutting sides, you can leave the spacers on one side to make the first pass and then simply flip it over to make the final pass.
Description and purpose
From time to time, when arranging their homes and during major renovations, people try to update their furniture. In this case, it has to be modified frequently. This also applies to kitchen sets and their components. You can do this work yourself without any problems. Of course, for this you will need just the connecting strips for the countertops.
Such products are designed, as their name suggests, to connect dissimilar parts of the structure with each other. It should be noted that the docking assistant, along with a purely practical function, is no less responsible for the aesthetic filling of space. Where they are installed, the edges do not crumble or swell from drops and water vapor. Similar products are placed at the joints; They are also usually used to decorate the corners of furniture.
You should purchase the planks in the same place where the furniture itself was purchased. This significantly reduces the risk of error and technical failure. It is recommended not only to get acquainted with the catalogs, but also to consult with specialists. In favor of special connecting products they say:
- attractive appearance;
- excellent resistance to corrosion and mechanical damage;
- long period of operation;
- Suitable even for wet conditions, for contact with sharp objects and caustic, aggressive substances;
- compatible with postforming countertops.
Assembling the underframe
The underframe is assembled using self-tapping screws. The upper drawers are additionally tied with bars cut into them.