Assembly and installation of an interior door frame made of MDF is a complex process consisting of several stages. In order for the installation on your own to be carried out efficiently and without errors, it is necessary to carry out all the work in the correct sequence.
It is recommended to assemble an MDF door frame on a flat surface.
Door selection rules
If you decide to install the door yourself, the first thing you need to do is take accurate measurements of the doorway, preferably without the old frame. The main parameters are its depth, width and height.
- The depth of the opening is the thickness of the wall according to which the door frame (frame) is selected;
- The width of the opening is the width of the door + approximately 8-9 cm for installing the door.
The standard door size for a bathroom is 60 cm, for a kitchen – 70 cm and for interior doors – 80 cm. Thus, to install, for example, a kitchen door, the opening width should be about 80 cm.
The MDF box itself has a standard thickness of 2.5 cm, multiply by 2, it turns out 5 cm. We add the necessary allowance for free movement of the door - approximately 3 mm on each side. The remaining distance of 3-4 cm will be needed to adjust the correct position of the loot in space and its additional fixation using polyurethane foam;
- Opening height. This parameter plays a role not so much when choosing the height of the doors (the standard height of modern door leaves is 2 meters), but when choosing the design of the frame. It can be with or without a threshold. Calculation of the height of the door with a threshold is carried out according to the same scheme as the calculation of the width of the door. And if the door is installed without a threshold, then another 1-2 cm is added to the 3 mm margin for free movement of the door at the top (depending on the thickness of the floor covering).
Based on the data obtained, the door and fittings for it are selected. The final set should look like this:
- Door leaf;
- box (2 vertical beams and one or two (if a threshold is provided) horizontal beams;
- vestibule slats (vertical and horizontal);
- additional trim strips (in case of non-standard opening width);
- fittings (handle, hinges, lock (if necessary).
Installing a door frame for an interior door
Never install knurling carriages with plastic rollers.
To connect the slats of an accordion sliding door together, use piano hinges. Their strength is quite high, and the cost is lower than the hinges that you will be offered in door manufacturers or stores for doors, the weight of which is similar to the weight of your door leaf, in door production campaigns.
The old door frame is broken inward to avoid destruction of the wall slopes.
To fix MDF boxes in the opening, self-tapping screws are practically not used. In this case, special mounting plates and anchor bolts are used. The number of such fasteners depends on the weight of the door leaf. If it is made of MDF, it will be sufficient to use such fasteners at a distance of 35-40 centimeters from each other.
If you do not use anchor loops, but self-tapping screws, then before screwing them in, you need to drill holes in the frame beam.
If you nevertheless decide to fill the gaps between the frame and the walls with foam immediately, without hanging the door leaf, insert spacer bars or expansion devices with devices in the form of special screws between the sidewalls.
Filling the gaps between the wall and the frame parts with foam is a very important point in installing the door. An excessive amount of foam, since it expands when hardening, can tear out fasteners and bend the door frame. Therefore, try not to overdo it, based on the rule “you can’t spoil porridge with oil.”
When deciding to install interior doors made of MDF, pay attention to the statements of furniture makers who constantly work with this material. According to their observations, MDF cabinets last an average of 15 years. How long will your doors last?
A set of necessary tools
Installing interior doors with your own hands is, although not particularly difficult, but a responsible and painstaking process that will be very difficult to carry out without the appropriate tools. To carry out all work accurately and quickly you will need:
- electric drill or hammer drill (depending on the material from which the walls are made);
- drills or drills 4 and 6 mm;
- hand saw with fine teeth;
- wood drill with a diameter of 4 mm;
- chisel;
- screwdriver or screwdriver with a Phillips head;
- tape measure and building level;
- miter box;
- quick installation dowels with a length of at least 75 mm and wood screws 3.5x60mm;
- polyurethane foam.
The working process
We will divide all the work into three parts: collecting the necessary materials and equipment, setting up the box and fastening the structure.
Materials and tools
This is what a set of everything you need looks like
All information on the components we need is presented in the table.
| Name | Description |
| Doors and frame | Everything is clear here: it’s impossible to install doors if they don’t exist. I don’t recommend assembling the box yourself without skills and special tools, so immediately order the assembly of the structure and the insertion of hinges and handles |
| Polyurethane foam and a gun for it | We will mount the structure using polyurethane foam; it is better if it is a professional option. It is much more convenient to apply the composition from a pistol, but if you need to install 1-2 doors, then you can get by with a household version with a straw |
| Jigsaw and hacksaw | If you need to cut something during the process, you can use a hacksaw or jigsaw |
| Measuring devices | This includes a pencil, a square and a building level; most often we will use the latter device |
| Screwdriver | It can also be used for various jobs, for us it was mainly used for installing handles and screws |
| Flushing | In order not to spoil the gun and, if necessary, quickly wipe off the foam, we will need a special composition |
| Wedges and plates | Used to position the door and frame in the desired position and fix the elements before fastening them |
Do-it-yourself door installation: step-by-step instructions
The complexity of the process of installing a door with your own hands will depend on the initially selected model. More expensive options already come with hinges and a handle and have parts sizes ready for installation. Their assembly resembles a construction set, because the structural elements do not require adjustment, it is enough just to fasten them in a certain sequence, install the frame in the opening, put the door on the hinges and decorate the finished structure with platbands.
We will consider a more complex option, when the door leaf is equipped only with blanks for the future door and has neither hinges nor a handle. The first thing you need to do is dismantle the old door and door frame.
Assembling a new loot
This process is performed on a flat horizontal surface, i.e. on the floor (to avoid damage to the elements of the box, it is recommended to first lay a soft substrate).
First of all, the top crossbar of the frame is sawn off, taking into account the width of the door, allowances for freedom of its movement (in total ≈ 6 mm) and the thickness of the door (2.5 x 2 = 5 cm). Next, the vertical elements of the tray are mounted. They are laid out on the floor perpendicular to the top crossbar. All elements are in the “edge” position. When joining horizontal and vertical parts, a right angle should be obtained.
The door strips are temporarily inserted into the mounting grooves and the door is placed on them. Gaskets ≈ 3 mm thick (for example, even strips of cardboard) are inserted between the door leaf and the frame around the perimeter.
Taking into account the possibility of splitting MDF elements, it is strongly recommended to pre-drill the places for future screwing in of self-tapping screws with a wood drill of a slightly smaller diameter.
The attachment points should be located closer to the center of the parts. Two screws are enough to connect each side of the box.
Having received a U-shaped base, it is necessary to cut off the excess vertical elements along the length. In this case, we must not forget about the threshold (if it is planned) or the required distance from the floor (taking into account the thickness of the floor covering). Having measured the required length and trimmed the excess, the lower part of the box is fastened with a threshold part of the same width and according to a similar pattern with the installation of the upper crossbar, or a mounting strip for temporarily fixing the correct contour of the tray (attached to the lower end sections of the vertical posts). The assembly of the box is now complete.
Insertion of hinges
This process requires maximum precision and accuracy in work. The easiest way to do this is with a hand-held milling machine, but if you don’t have one, then you’ll have to use a hammer and a carpenter’s chisel.
Having inserted the folded hinges into the gap between the door and the frame, and placing them at a height of ≈ 250 mm from the upper and lower edges of the door, it is necessary to make appropriate markings on the door and the end of the door on the side where the hinges will be placed (taking into account the right or left opening of the door) .
Having removed the door from the assembled structure, using available tools it is necessary to cut out recesses in the sash and end of the door that correspond to the thickness and contour of the hinge plates. Next, the hinges are installed in the prepared “sockets” using self-tapping screws (usually they are included in the kit with the hinges).
Do-it-yourself loot installation
The assembled structure must be inserted into the doorway, monitoring its correct horizontal and vertical position using a building level. The box is fixed using wooden wedges and self-tapping screws.
Door leaf installation
The next step is to install the door leaf with embedded hinges on the inserted frame. At the same time, the correctness of the vertical and horizontal gaps is checked. If the door opens and closes without interference, and all gaps are the same, then the installation was done correctly.
Final fixation of the box
Gaskets (for example, strips of cardboard of appropriate thickness (≈ 3 mm) must be inserted into the gap between the door and the frame along the entire perimeter of the structure. The next procedure is to fill the remaining space between the doorway and the frame with foam.
After the foam has completely dried (≈ 12 hours), the protruding excess foam is cut off and the lower fastening strip is dismantled.
Installation of platbands
The easiest and best way to carry out this procedure is with a miter box and a saw with fine teeth. Having measured the required dimensions of the horizontal and vertical trims, they must be carefully sawed off at an angle of 45º.
Installation is carried out using thin self-tapping screws, followed by decorating their heads with special overlays in color with cash, nails without heads or mounting glue.
Lastly, handles and locks are installed on the door leaf. For a detailed video on installing interior doors, see below:
Installation, namely assembly, is a rather painstaking process that must be thought out in advance and each stage must be approached responsibly. A person with minimal knowledge of installing interior doors can install such a product. However, there is no room for error here. Otherwise, you will have to either redo everything or correct it, which can lead to the unsuitability of the assembled door structure in the hands of a novice - you will have to install the door product again. Therefore, the master must stock up on enough time and nerves. The whole process must proceed in stages.
- At the very beginning of the work, before assembly is carried out, it is necessary to determine the dimensions of the MDF product. It is necessary to make an exact calculation, down to the millimeter, of the length of the sluice posts and the top lintel.
- In order for the measurement to be most accurate, after dismantling the old box, you need to remove excess building materials - remnants of foam, plaster, etc. You cannot take measurements without the floor covering. Installation begins on the finished floor.
- It is worth considering the distance from the wall to the frame: the platband must fit entirely - if cut, it can spoil the positive impression of the interior. When taking measurements, it is worth considering that there must be gaps between the door itself and the frame. If the gap is large, the door will lose its attractiveness, and if it is insufficient, the door simply will not close.
- To measure the racks, you need to measure. The racks must be equal to the height of the entire product. The standard height is 2,000 mm. Leave a gap between the core and the MDF sheet - 4 mm. You need to add a gap of 1 cm at the bottom so that the floor does not interfere with the use of the canvas.
- As a result, the following indicators should be obtained: the height of the doors and pillars will be equal to 2000 mm + 4 mm of the gap between the leaf and the door + 10 mm of the gap from the floor = 2014 mm.
- from MDF
- In order for the assembly of all components to be carried out correctly, first of all you need to saw down the door frame to the size of the opening. Features of the undercut - the top is at 45 degrees, the bottom remains flat - it will be installed on the floor. You can use a wood saw, but for smoother and more accurate work, it is better to cut the corners with a circular saw.
- The sides sawn at 45 degrees need to be pulled together. To assemble you will need wood screws with a length of at least 55 mm and a drill with a drill bit. To prevent the MDF from cracking, you first need to make holes with a slightly smaller diameter than the screw that is being screwed in, approximately 2-3 mm. Self-tapping screws are screwed on the two outer sides of each corner - on top 2 and on the side in the center 1.
- If, when trying on screwed parts, the height of the opening does not allow you to accurately position the structure, you can do this - knock down the plaster on top of the opening and saw down the beam located in the middle of the opening.
- Before attaching the door structure to the opening, you need to check the horizontal and vertical levels with a building level.
- To ensure that the installation does not subsequently disappoint the owners and inadvertently not disturb the aesthetics of the box when attaching it to the opening, you need to make holes for self-tapping screws in the places where the hinges will be attached and the latch will be attached.
- Insertion of hinges
- The insertion of hinges begins with choosing the side on which it will be decided to install the handle, and in which direction the door is planned to open. Both of these factors determine the location of the loops.
- Two loops for an MDF product at the top and bottom will be enough.
- When measuring and marking, you will need a protractor. Place the loop along the end side and trace it with a pencil. Next, use a chisel to make a recess along the resulting contour to a depth equal to the thickness of the loop.
- Ideally, the hinge markings should be installed at a distance of 200–250 mm from the bottom edge of the door and 150–200 mm from the top edge.
- After marking the hinges, we screw them to the door with self-tapping screws.
- Installation
- The next step is to level the structure horizontally and vertically.
Use a drill to drill the required holes for the anchors. To securely fix it, make three holes on the left and right; in addition, you can also drill one more hole on the top and bottom.
- The most crucial moment is securing the box in the opening.
When trying to install, you may encounter a problem - if there is a thick layer of plaster in the opening, the screws may not fit into the wooden part of the wall. To avoid this, you need to make a lining - a wooden block so that the screw is secured, but it will not damage the plaster. A board of the required size is carefully drilled into the problem areas, onto which the stand will subsequently be placed. After this manipulation, we install and secure the structure in the wall. Now it is important to set the vertical level. To do this, take a building level and adjust the first and second sides. Next you need to wedge the door frame: take regular wooden wedges and hammer them under the top of the wall. Check the level again on both sides for inclination.
- Installation of door leaf
- After making sure that the assembled “frame” is firmly installed, you can begin hanging the canvas. In order not to hold it suspended when fastening it, place a small wooden beam under it, it should be 1 cm in size. And thus this trick will help to carefully secure the canvas.
- If the door is assembled and installed correctly and evenly, then the door leaf will stand as needed in any position, and will also open and close without hindrance.
- After completing the installation of the entire assembly, you need to fix it - eliminate the gaps and foam it with foam. In this case, the gaps under the MDF door frame should be 4 mm, since the coating of this material absorbs moisture and can expand. To ensure that the door still closes when it dries, you need to leave at least 4 mm. You need to place liners in them, because when foaming, the foam begins to expand and the gap may decrease.
- Before this, the dusty surface must be moistened with water so that the PMP adheres better. Then leave to dry for 30-45 minutes.
- Installation at the final stage - . They are secured with self-tapping screws or decorative nails. Assembly and installation is complete.
Repairs are a costly undertaking, so apartment owners do everything to reduce costs by doing the work themselves. For many, installing an MDF door frame does not cause any difficulties. Having prepared a standard tool, you can complete the installation in the shortest possible time.
Box and canvas
Hinge installation
- detachable or permanent hinges;
- chisel;
- carpenter's hammer;
- drill;
- self-tapping screws
Door frame assembly.
Before starting work, choose which direction the MDF door will open, i.e. towards or out of the room. Then door hinges are purchased, which have different types and, because of this, their own characteristics when inserting. To install interior doors you will need 2 hinges. And if this is an entrance structure, then to increase its strength, 3 loops are used. In this case, an additional element is mounted just above the middle of the door to distribute the load.
Next, 20 cm are measured from the lower and upper edges of the structure, and marks are made at these places. After this, the products are applied to the end of the MDF door, aligned with their beginning and traced along the contour. Then, using a sharp knife, cuts are made along the marked lines. The place for installing the hinge is cut out using a chisel and a carpenter's hammer. To do this, a recess is carefully made in the marked area with tools, the depth of which should be equal to the thickness of the loop, i.e. on average 3-5 mm. This is necessary to ensure that the loop is securely fastened and does not protrude beyond the structure.
The work of installing the loop is carried out in stages. First, small notches are made along the perimeter of the structure, of which there should be several pieces. Then excess material is removed from them. Cutting is not carried out in 1 approach. It is necessary to apply the loop to the structure each time to check, with this it is easier to achieve an ideal recess. After this, markings are applied to the places where the hinges will be secured using self-tapping screws. Then the second side of the hinges is secured to the door frame in a similar way. At the end, the MDF box is laid horizontally on the floor, and a door leaf with already embedded hinges is inserted into it. Next, using a 3 mm thick school ruler, the canvas is aligned inside the box so that there is an equal gap on all sides.
Preparatory stage
Before starting, carefully measure the parameters of the opening, which are determined after the old box is completely dismantled.
Attention! The quality of installation depends on how correctly the dimensions are taken.
Determination of geometric parameters
You will need to know:
- Depth. This parameter is equal to the thickness of the wall. The thickness of the box directly depends on it;
- The width, on which the dimensions of the box and canvas depend. 8-9 cm are allotted for installing the door. A standard MDF box has an average thickness of 2.5 cm. Considering that it is mounted on both sides, it turns out to be 5 cm. A minimum allowance is provided to ensure free movement of the sash (about 3 mm on each side ). The width of the door leaf depends on the dimensions of the opening. A door with a width of 60 cm is purchased for the bathroom, and 90 cm for residential ones;
- Height. This is the distance from the floor surface to the top of the doorway. This parameter affects the dimensions of the structure (standard height 2 m) and the design features of the box itself. The box can be mounted with or without a threshold. In the first case, the dimensions are calculated by analogy with the calculation of the width of the box. In the absence of a threshold, a 3 mm gap is provided between the upper end of the sash and the frame and 1 mm at the bottom.
When determining dimensions, first check the verticality of the walls. Considering that the thickness of the wall can vary in height, measurements are taken at several points. Based on the obtained dimensions, they make a choice in favor of one or another door design and suitable fittings.
In the most general case, an MDF door frame consists of two vertical beams and at least one horizontal one. If a threshold is installed, then two horizontal bars are provided.
The structure consists of the following elements:
- Door leaf;
- Boxes;
- The narthex slats;
- Additional strips;
- Accessories.
Installing hinges: work progress
- Choose the direction in which the door will open.
- Suitable loops are selected. For interior doors, a couple of hinges will be enough. If the frame is installed for the front door, then to make the structure stronger, purchase a third hinge, which is attached just above the middle of the door leaf in order to properly distribute the load.
- Measurements are taken from the edges of the door structure. At a distance of 20 cm from the bottom and top edges, marks are placed for the loops.
- The parts are tried on by applying them to the end of the door and the outline is outlined. Using a well-sharpened knife, make a neat mark for cutting out the space for the loops.
- Places for installing hinges are cut using a carpenter's hammer and chisel strictly in the marked area.
- In this area, a recess is made for the loop, the depth of which should correspond to the thickness of the loop (as a rule, this value is 3-5 mm).
- Several shallow notches are made along the perimeter of the structure and the excess wood is gradually removed. It will not be possible to correctly cut out the places for the loops in one approach. To achieve the desired recess, you need to apply the loop to the cutting site each time to check.
- When the recesses are ready, mark the places for fixing the hinges with self-tapping screws.
- The second side of the hinges is installed on the door frame using exactly the same principle.
- The MDF frame is laid horizontally on a flat surface, then a door leaf with embedded hinges is placed inside and, using a regular school ruler, the door leaf is aligned inside the box so that the gap is the same on all sides.
After the MDF box is prepared and assembled, it is installed in the doorway and aligned vertically in the direction where the hinges are installed. Self-tapping screws are used for fastening. Then the canvas is hung and securely fixed. To secure the post with hinges, the door leaf must be stationary. Next, fix the rack from the lock side. When installing the structure between the door leaf and the uprights, a gap of three millimeters should be taken into account so that the door leaf has easy and unimpeded movement.
How to install the box?
Before proceeding with the installation of the structure, prepare the installation tools:
- Roulette;
- Laser level;
- Pencil;
- Square;
- Chisel;
- Hacksaw.
In addition to the tools, you will need materials, including polyurethane foam and timber for the box itself.
How to assemble a door frame?
To assemble the box correctly, prepare a flat horizontal surface. It is preferable to carry out work on the floor, laying a soft substrate to avoid damage to the box elements during assembly.
When installing an MDF structure with your own hands, first saw off the top crossbar depending on the selected door width. Be sure to provide an allowance for free movement of the sash. Then all the elements of the box are cut off.
To make the structure perfectly level, all the elements from which the MDF box is made are laid out on the floor. First, the vertical elements of the trap are placed, next to them is the top crossbar. There should be a right angle between the top crossbar and the vertical beams. All elements are laid “on edge”. If the angle differs from a straight line to a greater or lesser extent, it will not be possible to install an MDF door frame into the opening.
To prevent accidental displacement of elements relative to each other, counter strips are inserted into the mounting grooves. After all the planks are in place, the door leaf is laid. To ensure an even gap between the frame and the door leaf, cardboard of the same thickness is placed in it.
After the box has been given the required shape, the top crossbar is connected to the vertical posts. For this purpose, special self-tapping screws are used, designed for fastening wooden elements. When choosing a mounting location, you should choose points as close to the center as possible. To connect two adjacent elements, two screws are enough.
Advice! Considering that during the process of fastening individual elements, MDF may split, small diameter holes are pre-drilled into which screws are then screwed.
Having assembled the U-shaped base, control the width of the structure. After this, excess material is cut off to ensure that the height of the mounted structure matches. When determining the height of the box, the presence or absence of a threshold is taken into account. By cutting off the vertical posts of the required height, the spatial position of the box elements relative to each other is fixed.
Box assembly
If a structure with a threshold is mounted, it is placed in the right place and fastened to the vertical posts. If there is no threshold, when assembling the box, use a mounting strip, which will help temporarily fix the relative position of the elements. The frame assembled in this way should fit perfectly into the doorway. Having securely fixed all the elements, you can install it in place.
Methods of connecting elements
The vertical and horizontal strips are connected to each other in three different ways:
- On the thorn;
- At an angle of 45 degrees;
- At right angles.
The tenon connection method is the most labor-intensive option of all possible. To implement it, you will need special equipment to mill a groove of the desired shape. But in terms of strength characteristics, the formed connection is the most reliable. Before assembly, spikes and depressions are cut out at the ends of the mating parts, with the help of which they can be ensured to fit tightly together.
Tenon connection
The elements are assembled onto the tenon using glue. To ensure rigidity and strength, additional fasteners are used by screwing self-tapping screws into both parts simultaneously. When choosing this connection method, please note that after connecting the vertical and horizontal parts, their linear parameters will decrease by the thickness of the panel. This nuance is important when adjusting elements.
The option with connecting the crossbar and vertical bar at an angle of 45 degrees is a little simpler. To ensure a tight fit between the horizontal and vertical strips, part of the material is removed at an angle of 45 degrees at the junction. For work, it is better to use a breadboard knife, which allows you to cut even thin layers. The crossbar and vertical post are positioned at right angles and connected with self-tapping screws. As an additional method of connection, glue is used, which allows the elements of the box to be more reliably fastened together.
45 degree connection
The option of connecting the crossbar and vertical slats at right angles is the simplest. For those who are assembling their own box for the first time, this connection method is best suited. In this case, the horizontal bar is attached to the ends of the vertical posts with two or three through screws, having previously drilled holes.
Right angle connection
What should the room look like?
For the installation of interior doors to be successful, it is necessary to carry out preliminary preparation of the room. To do this, perform the following operations:
"Pie" of MDF panels.
- leveling walls;
- puttying;
- applying plaster.
After completing wet work, the room is thoroughly dried. Drying must be done. Otherwise, the door may “lead”. The future thickness of the main floor must be known exactly. Do-it-yourself installation of interior doors will be done taking into account the dimensions of the threshold and its height. If only the doors are being replaced, then the work can be done immediately, since these conditions will not have any effect on the installation of the door. For the most part, designs are divided according to the principle of operation:
The most commonly used doors are swing doors. They are very easy to install, but some of the usable space is lost. Today there are several types of sliding doors:
MDF doors can be either single-leaf or double-leaf.
- single-leaf;
- bivalve;
- right-sided;
- left-sided;
- directed along the wall;
- walls directed inward.
These models save space as much as possible. The disadvantage is the need to install a door frame; the doors have poor sound insulation. The presence of several leaves is typical for a folding door that moves along guides. Such doors are divided into several types:
Accordions can replace the screen. The book is distinguished from the accordion by two sections, higher strength. A characteristic disadvantage is the rapid breakdown of fastening fittings under heavy loads. There are a lot of different offers of interior doors on the modern construction market. Each model has individual technical characteristics and differs in its shape and dimensions. The main materials from which interior doors are made are:
The hinges must be cut to a depth in the same plane with the end surface of the leaf and door frame.
- wood;
- plastic;
- metal;
- glass;
- MDF panels;
- various combinations of materials.
When choosing a model, it is advisable to take into account the interior of the room and the functionality of the door. To make the right choice, you must first measure the dimensions of the doorway. Based on this data, you can choose the right door, but you need to know a few nuances. Installation of interior doors is carried out so that a gap is maintained between the door block and the base of the opening. Usually it is 10 mm. To prevent the door from jamming, especially when there is a change in humidity, you need to create an additional gap between the door leaf and the parts of the block. The gap should be no more than 5 mm. The future door should not interfere with the finishing work of the flooring. When choosing an interior door, you must make sure of its quality. Must not be:
Door installation
Once the box is ready, installation begins. If it is a swing door, then hinges are screwed to the door leaf. The insertion is carried out as carefully and accurately as possible, otherwise the operation of the installed door will be difficult.
Determining the position of the loops
It is advisable to make the insertion using a special tool. To do this, folded loops are applied to the canvas, departing approximately 25 cm from its ends, and traced along the contour. At this point, excess material is removed to a depth sufficient to ensure that the hinges are flush. When determining the location of the hinges, take into account the direction of opening of the sash and the type of fittings used. Loops are inserted into the prepared sockets and screwed with self-tapping screws.
The prepared box is inserted into the doorway, while necessarily monitoring its spatial position. Even a slight deviation in the vertical or horizontal plane is unacceptable. This will cause the sash to open or close spontaneously. Having decided on the position of the box, it is temporarily fixed using wooden wedges.
Fixation with polyurethane foam
Next, hang the canvas. Control the size of the vertical and horizontal gaps between the canvas and the box. If everything is done correctly, there should be no problems when opening or closing the sash. To prevent accidental displacement of structural elements relative to each other, cardboard of the same thickness is inserted between the canvas and the box. After this, the space between the box and the wall is foamed, and when the foam dries, it is secured with special hardware. After this, all that remains is to install the platbands.
Installation of MDF doors can be done in-house. It is enough to prepare the tool, familiarize yourself with the sequence of work, and then perform the installation according to all the rules. In this case, the installed structure will be beautiful and durable.
The key question in the process of arranging a doorway yourself is how to install a door frame with your own hands. With proper skill, this work is completed quite quickly. If you are doing this for the first time, first you need to become more familiar with the structure of this structure and its main types.
To install a door frame yourself, you need to know all the nuances of this process.
Errors during assembly and installation
The main mistake that entails all other problems when assembling and installing the box is incorrect calculations. A person who does not yet know how to properly install a door frame can easily make mistakes in taking measurements, confuse them or not write them down carefully. “Shoals” lead to unnecessary waste of time and additional increase in costs. If you do not redo everything correctly, interior doors will only cause inconvenience in the future, and they will not last long.
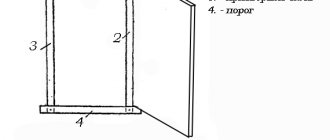
Types of boxes
What is a door frame and why is it so important to install it correctly in the opening? The door frame is a load-bearing element of the door structure that holds the leaf and consists of two vertical and one horizontal strips with protrusions. It is fixed directly in the opening itself, adjacent to the wall. This structure forms a smooth portal and ensures reliable fastening of the door. Hinges are cut into one part of the frame, onto which the canvas is hung. On the opposite side, drill a hole for the lock and fix the counter plate.
Since the position of the door leaf depends on this element, correctly positioning the door with the frame is a priority during installation. If there is the slightest misalignment, the parts will rub and prevent the door from moving freely. If you do not calculate the weight of the canvas in relation to the strength of the box, more serious problems may arise.
What types of door frames are there? A classification can be made according to several criteria. For example, assembly may be a determining factor. In this case, the most popular boxes are:
- Straight
- elements are connected perpendicularly. The most reliable method is “tenon and groove”. - Diagonal
- the edges of the planks are cut at an angle of 45 degrees.
Two types of connection of door frame parts
Also, the types of door frames are distinguished by the material of manufacture:
- tree,
- plastic,
- metal.
In apartments, metal structures are mainly used for entrance doors, and metal-plastic boxes are used for balcony systems.
How to correctly and consistently assemble a door frame
In order for the result of the work to be of high quality, the assembly and installation of the frame must take place on a flat horizontal surface. There are several ways to assemble the box:
- Assembly using the tenon joint method. The technology is as follows: you need to make spikes in adjacent beams in such a way that the horizontal and vertical beams are connected to each other. The height of the spikes should be the same as the thickness of the beams.
- Assembly at an angle of 45 degrees. From the side of the vertical beam, in the place where it joins the horizontal beam, a cut is made at a given angle. For a horizontal beam, such a cut is made on both sides. Here it is important to correctly determine the length of the vertical bars - you need to take into account the height of the doorway, the necessary gaps and the thickness of the bars themselves. The length of the bars on the vertical side should be the same. For the dimensions of a horizontal structural element, the width of the opening, the thickness of the beams and the dimensions of the gaps are taken into account. Before cutting the beams, it is better to carefully and carefully measure everything again. The structure is installed using screws that are screwed in at an angle of 45 degrees.
- Assembly at right angles. This method involves attaching a horizontal structural element to vertical beams at an angle of 90 degrees. This is the easiest way to assemble a door frame. On the vertical parts, before applying the horizontal component, it is necessary to cut out the rebates and then secure the structure with self-tapping screws. To prevent installation from causing damage to the surface of the material, it is necessary to prepare holes for screwing in advance, the diameter of which should be two or three millimeters less than the diameter of the self-tapping screw. To make the structure rigid and stable, each mounting point is connected with two self-tapping screws.
Preparatory work
Before installing a new door frame, you must check that you have all the necessary tools and auxiliary materials. Depending on the material of the product, their list may vary. In most cases, do-it-yourself door frame installation is done using the following tools:
- roulette,
- corner,
- pencil,
- level and plumb,
- wooden wedges,
- auxiliary bars,
- spacers,
- nails, screws and self-tapping screws,
- screwdriver,
- jigsaw, hacksaw or file,
- polyurethane foam,
- chisel,
- miter box.
The necessary set of tools for installing a door frame
Installing a new door frame with your own hands begins with preparing the surface. First you need to clear the opening from the old door and frame. If there are significant unevenness or deviations from the dimensions of the new box, the walls need to be adjusted. To do this, use plaster, and the protrusions are cut off with a grinder.
In order to correctly install a new box, it is recommended to make it to the specific dimensions of a pre-prepared opening.
Before you start assembling the door and frame, clear the floor surface, since preliminary assembly should be carried out in a horizontal plane. Installation takes place in several stages. Let's look at each step in order.
Possible difficulties
Since it is not always possible to correctly assemble and install a frame for an interior door, we should also talk about possible difficulties. Most often during the installation process the following situations may arise:
- The box is wider than the wall. Of course, this situation is undesirable, but it happens. It is possible to correct the defect by increasing the thickness of the wall using plaster. To avoid smearing the door, use masking tape.
- The box is narrower than the wall. This often happens, so correcting the defect is very simple; special accessories are used for this; they are connected to the frame and platbands.
- Skewed loot. This defect is quite difficult to eliminate; visually the situation can be corrected with the help of telescopic extensions and platbands, but in technical terms there is often only one way out - to file the door in those places where it rubs against the floor or the structure itself.
- The height of the frame is less than the door leaf. If such a problem occurs, there are two ways to fix it. The first is to dismantle the structure, increase the height of the doorway, and replace the missing frame elements with wooden parts and cover them with plinths. The second is to file the door, however, this can ruin its appearance.
- The height of the frame is greater than the door leaf. This problem is quite easy to fix; if after installation you notice such a defect, a threshold will help, it will close the large gap between the floor and the door. Before installation, it can be eliminated using overlays made of beams.
For the first time, installing a door frame may seem like an impossible task for a beginner, but if you thoroughly understand the process itself, everything will fall into place and the direction of work will become more clear. The final understanding of the essence and sequence of work will come only in practice, so don’t worry, pull yourself together and bring the matter to a victorious end with the maximum amount of diligence and scrupulousness. The skills acquired will become indispensable experience for the further arrangement of your home.
Assembly
At the second stage, you need to correctly adjust the dimensions of the parts. To do this, you need to measure the height of each side and the width of the opening. To visually assess the situation, you can place the planks against the wall and mark the places where you need to shorten them.
If the box is installed using a diagonal connection, you need to trim the edges of the planks. Since it is quite difficult to correctly determine the degree and cut down the door frame, be sure to use a miter box, then assembly will not be difficult.
Before placing the door frame in the opening, you need to check its dimensions with the dimensions of the door leaf. To do this, you need to secure all the parts to the floor.
Since it is possible to assemble the door frame as correctly as possible only in a horizontal position, lay the slats and canvas on the floor. Assembly begins with an assessment of the size match. To do this, place the parts around the perimeter of the door. If everything fits, you can start fastening the elements.
Assembling a door frame requires precision and accuracy
How to assemble a door frame depends on the type of connection. If straight is used, you need to match the protrusions with the grooves. With a simple diagonal, the planks are connected using nails. If you know how to correctly and quickly assemble a door frame with your own hands, there should be no problems with the rest of the work. Check that the dimensions match and that there is a small gap for the blade to move freely. Only after this can the actual installation of the box be carried out.
Features of installing a box with a threshold
Such a frame is required for bathrooms and toilets and to a lesser extent for other rooms. The floor level in bathrooms is often higher than that of the adjacent room, so installing a box with a threshold is necessary, among other things, to protect against water getting on the parquet, linoleum or other covering. Fastening the parts of the box to the threshold should be done with galvanized self-tapping screws. The gap for opening the door leaf is made an additional 4 mm larger than that of the option without a bottom strip.
Door frames with a threshold are more durable, so they can be installed in places where there is a high level of vibration, for example, next to railway tracks. Installing a frame with a bottom strip may be required in rooms with high levels of noise pollution. In addition to the soundproofing function, the threshold can act as a seal: prevent the outflow of air and, as a result, heat loss.
Advantages of door frames with a threshold:
- partially solve the problem with drafts;
- protect from dust and smoke.
Installation
After preliminary inspection, you can put the box in place. Installation is carried out using bolts and foam.
Wedges are used to adjust the height of the door frame
How to properly install a new door frame with your own hands:
- To make it easier in the future, it is recommended to cut the hinges into the frame in advance.
- Then you need to carefully place the U-shaped structure in the opening.
- Use bolts and wooden blocks to secure its position.
- Insert pegs into the gap between the wall and the frame and adjust the level.
- After the position has been fixed, you can foam the gaps between the wall and the slats. In this case, it is necessary to secure the structure with spacers, since the elements may move. Simply foaming the door frame is not allowed by technology.
- Once dry, remove the spacers.
Main stages of door frame installation
Measurements
To take measurements of the opening accurately and correctly, you will need a good tape measure. Specialists often use laser technology, eliminating the possibility of errors associated with the human factor.
The first step is to measure the height and width of the opening. Very often its geometry is not ideal, especially in old houses. Therefore, dimensions are measured at several points.
The largest values are selected as a sample - the box is selected based on them. At the same time, it is taken into account that the box should be 5-6 cm smaller than the opening in all respects. Only in this case can reliable installation be made to the wall - gaps are needed for installing wedges and polyurethane foam.
Some recommend leaving a gap of only 1-2 cm. In this case, there will be no need to attach an additional wooden beam to the wall.
When the opening is significantly larger than the door, a metal frame can be made in the wall, followed by plasterboard or MDF sheathing. Various types of extensions are used from a variety of materials, the most common of which is MDF.
Opening without box
Not in every case is it necessary to install a box. For example, you can do without it if you install a sliding system or an accordion door. But how can you install a door without a frame? All parts are attached directly to the wall in the opening or above it, depending on the mechanism used.
When installing the door frame, special mounting spacers are used
To make the passage look neat, it is necessary to level its surface in advance. Typically, plaster is used for this or combined with plasterboard sheets. Instead of a box, you can install decorative panels. They look almost the same, and the installation method is practically no different. Another option is to mount the slats on a slatted frame.
Which finishing method to choose is up to you. If you decide to follow the traditional approach and install a swing door with a frame, carefully follow the technology to avoid significant flaws.
A few tips for novice carpenters
People say that “the first pancake is lumpy.” Therefore, those who have done the work of installing the box themselves for the first time should not be upset by the mistakes made, which in most cases can be easily corrected.
- An unsightly joint between the laminate and the door threshold can be hidden with a plinth or metal trim.
- If the doorway turns out to be smaller, it is easier to trim the posts and crossbars of the frame, but on the condition that you can adjust the size of the door leaf. Otherwise, you will have to widen the doorway.
- If the width of the casing is not enough for the gap between the frame and the wall, the latter is plastered and then finished with the same material that was used before the door was installed. Therefore, in new buildings, doors are installed first, and then the walls are finished.
- When installing a box made of wood or MDF into walls made of concrete or brick, first drill a hole in the rack with a drill or screwdriver, and then drill the wall with a hammer drill.
- Special mounting systems simplify the process of installing the box - there is no need to use wedges. Detailed instructions for their use are included in the packaging.
- In new houses, the door cannot be attached directly to the wall due to possible shrinkage. Here, first a wooden block is attached to the opening, and a door block is attached to it.
In conclusion, installing a door frame in an opening is not such a difficult job that can be done by yourself in just a few hours. But the effect of this is significant - the family budget will save approximately 3,000 rubles on each door (the average price for installing a door frame by professional builders is indicated).
Structural parts
The door frame consists of the following parts:
- Canvas. Most often, solid wood, chipboard or MDF are used in home-made structures.
- Vertical bars – 2 pieces.
- Horizontal bars - 1 or 2 pieces. All bars are made exclusively from good natural boards. The lower one is often not used and is replaced by a threshold.
- Platbands – 3 pieces. These elements are usually made of MDF.
Installing the assembled product into the opening and securing it is not difficult. The most important thing is to maintain the plane. The structure is inserted into the opening and fixed with wedges, after which the evenness in all axes is checked. This problem is solved using a level and a plumb line. Correction of the position is carried out by the same wedges. Further installation is carried out in the order described below.
Securing the door in the opening
Since the MDF door does not have much density, it should be blown out with foam. Before you start this stage, it's worth cutting and pasting the doors into the door. They will allow the door to fit snugly against the loot when closed and will close the gap between the door and the loot. Blow foam on doors while they are closed. Before using the foam, read the instructions and pay special attention to the drying speed of the foam.
It dries on average within 12 hours. After 12 hours, remove the cardboard and safely open the doors. The gaps between the door and the doors should have the same distance, since the foam compressed the box, and the cardboard became a kind of layer that prevented the doors from wedging close to the door. All that remains is to trim the foam and nail the trims.
Next, you should think about how to paint an MDF door and whether it is worth doing it or is it better to buy already painted ones. Another question that owners who have installed doors with MDF panels with their own hands are faced with is what can be used to paint them. In this case, the best choice is a roller, which is not only convenient to use, but also can significantly reduce paint consumption.
As you can see, installing MDF doors with your own hands is not such a difficult job, and you can see this by watching video 2. If some parts break during the installation process (this happens), you do not have to buy the entire door frame together . All parts are sold separately. When working with MDF doors, it is worth noting that you need to work with them quite carefully, since the compressed and glued wood is quite fragile when installed.
On average, installation of MDF doors lasts 2-4 hours. Remember that correcting errors takes twice as long as the work itself, and therefore it is better to watch the corresponding video in advance.
Source: sdelaydveri.ru