Most people think that installing a door handle is a very simple task and does not deserve serious attention. But when it comes to installation, these “literate” craftsmen are often lost. So that such a misunderstanding does not happen to you, let's figure out together how to install a modern door handle on a metal entrance door and a light interior door.
When installing door handles, the main thing is to understand the principle.
Requirements for door hardware
A significant misconception is that the design of the door has a great influence on the quality of the door. All of them are necessarily equipped with a handle, which provides not only ease of use, but also gives them a complete appearance. Considering this factor, the appearance of the product is not so important.
Door handles are available in different sizes, as are door leaves. For a large door, this element of fittings of small dimensions and low quality is not the best solution, since such an option will quickly become unusable and require repair or even complete replacement.
In addition, it is important for each owner that the product provides a high level of security against unauthorized entry by third parties and prevents the cylinder from being knocked out. To solve this problem, you can give preference to a handle with a special protective lining made of a steel profile.
Technology for repairing a handle attached in the form of a bracket
In this situation, you will have to purchase a screwdriver or screwdriver. It is worth knowing that Phillips screws are screwed better and stronger than straight screws. Therefore, it is recommended to replace them immediately.
The door handle is moved in such a way as to cover the previous recesses. Then, on the opposite side, two pairs of screws are screwed into the places of the new holes. There is no need to press hard to avoid twisting.
The overhead parts are also mounted using screws - self-tapping screws, by drilling new recesses. The overlay can be attached either as a square or as a diamond. Upon completion of the work, the overhead element is secured.
Door handle material
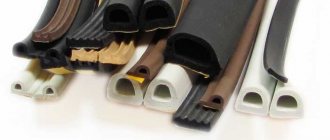
Modern models of door handles are made from a wide variety of materials. The store's assortment includes numerous products made of glass, wood, PVC, as well as the most common and popular fittings made of metal.
In the manufacture of handles for entrance doors, various alloys are also often used, of which a large number are often preferred to brass and stainless steel, since models made from them have a number of advantages. Such fittings are distinguished not only by a significant level of strength, but also by resistance to negative environmental influences.
If a chrome coating is additionally applied to the surface, then not only does the strength increase, but also the tactical qualities that can be noticed during use when touched are improved.
On the market it is also increasingly possible to see handles made of aluminum and steel that are installed on iron doors. A nickel or chrome-plated coating is applied directly to the exposed metal of such models, which prevents the possibility of premature crack formation and preserves the original attractive appearance of the door handles for a long period.
Note! It is advisable to avoid purchasing handles made of silumin, since this material is quite fragile and fittings made from it do not have a long service life. Previously, in most cases it could be easily identified by its weight, which was noticeably less in comparison with other alloys, but now the situation has partially changed and it should be taken into account that some modern models produced from it are heavier and are not much inferior to high-quality analogues.
Features of replacing small parts
In case of replacing the spring part, the new part is strongly compressed on top, a veneer washer is placed, then a veneer ring is attached and the whole thing is connected with a screwdriver. Then the rotating mechanism is delicately screwed in, followed by inserting a spring element into it. The handle is tightened with a wrench or nut.
Sources:
- https://furni-info.ru/zamena-ruchki-dveri.html
- https://dveridoma.net/remont-dvernyx-ruchek-vxodnyx-dverej/
- https://evrostroi.by/blog/remont-dvernyh-ruchek-vhodnyh-dverej-kakie-byvayut-polomki-i-kak-ih-pochinit
- https://www.bloomhuff.com/dveri-i-vse-o-nih/8900-kak-remontiruetsya-ruchka-na-vhodnoy-dveri.html
- https://u-news.org.ua/8832-kak-pomenyat-dvernuyu-ruchku-na-vxodnoj-dveri/
- https://dver.club/materialy/zamena-metallicheskojj-dveri.html
Types of handles for entrance doors
All products for entrance and interior doors present in the store’s assortment are classified according to the following criteria:
- According to the material of manufacture. Regardless of which one is preferred, it must be durable and high quality.
- According to the size of the decorative strip of the product. Its dimensions must be such that it can fully close the latch together with the well.
In addition, depending on the location of the product, there are pressure and stationary ones. The peculiarity of the second is their stationary position.
Fixed door handles
Products of this variety are simple handles that do not have a complex design and are not connected to the locking device. Installation of such handles is carried out directly on the plane of the door and they are often made in the shape of the letter “P”. In some cases, these models are made in the shape of a ball, cone, torus or curl.
Stationary door handles have a convenient design for gripping with the palm, as well as for the implementation of original design ideas, which is why they are often preferred for this very reason and when a product is selected that matches the style of the exterior.
Such fittings are characterized by an increased level of reliability, since they have no moving components and do not have any effect on the structural strength of the doors. They function according to the following principle: to open the door you need to push or pull it towards you. Quite often, stationary handles are installed in public institutions and government institutions with a significant number of visitors.
Latch handles on rosette
They have a latch-shaped locking mechanism that begins to move when the handle is pressed. The return spring present in the design helps return the handle to its original position. The base, made in this form, provides an additional lockable socket. The disadvantage of this design is that the installation process is quite time-consuming. The advantage is that if the lock or handle breaks, you only need to remove one base.
Latch handles on bar
These models have a similar principle of operation as the previous version, but their distinctive feature is that the lock and latch are a single mechanism. If the bar is not supplied, then it is necessary that the interaxial distance from the center of the handle fixation to the lock cylinder be with the same distance between the holes made on it.
In cases where the handle and lock are installed separately, it is necessary to select them in such a way that this value from the end of the door to the lock cylinder and to the square of the product is the same.
Handles for metal doors made in China
In addition to the latch and lock, they are additionally equipped with a latch from the inside. Under the decorative base, Chinese manufacturers place linings that protect the mechanism from dust.
Handles for entrance doors made of plastic
Basically, they are double-sided, and their mechanism resembles the design of push handles, but without the presence of a return spring, as a result of which the handle does not independently return to its original position. Basically, the installation of such doors is carried out in offices, as well as in places where there is access to the terrace.
Hole preparation
At this stage we do the following:
- Using a chisel, we hollow out a 3 mm recess under the face plate of the latch, corresponding to its width. It is better to mark the center in advance with an awl so that you do not have to apply the markings again.
- Using a half-centimeter crown, we drill a through hole. It is better to do this on both sides of the door leaf so as not to damage the door coating at the exit of the crown.
- Now let's move on to the side edge. Take a wood drill (about 24 mm in diameter). They need to make a hole in the marked center for the latch. You shouldn’t go too deep, otherwise you can make a hole in the canvas all the way to the panel.
Tips for choosing hardware for your front door
In order for it to last for a long period of time, when purchasing you should pay attention to the following criteria:
- Material. It is better to give preference to models made from durable alloys of aluminum, brass, steel and other materials in accordance with personal wishes and means. It is advisable to avoid purchasing handles made of silumin, due to its fragility, which negatively affects its service life, which is often extremely short.
- Coating. Models that have been exposed with paint or varnish are susceptible to abrasion and it is better not to purchase them.
- Match the lock and handle if the structure is to be mounted on a plank.
- Price. Pens that are too cheap cannot be of high quality. In general, models with a long service life cost at least $30. When purchasing a low-quality product, you must immediately be prepared that after about a year of use a replacement will be required.
Note! If there are children living in the house, then you need to purchase handles with no sharp protrusions so that the child does not get hurt.
Useful tips
- It is first necessary to carry out careful calculations and then carry out any actions.
- When creating a through hole, you should be extremely careful and do not drill the door on only one side. This can cause chips on the back side of the door leaf. As soon as the drill begins to appear, passing through, you need to continue working on the other side. After completing the installation, it is necessary to double-check the tightening force of the bolts or screws used so that poorly fixed parts do not soon damage the handle.
Installation of different models of door handles
Before installing a door handle on the front door, it is necessary to take into account that each type of product has its own characteristics, which is why the process of fixing it on the canvas is different and you should first familiarize yourself with which one will be used.
Installation of a stationary handle
Its installation does not take much time. If the handle is overhead, then you just need to screw it to the door leaf using self-tapping screws into the holes in the base. For a through model, in which a threaded pin is placed and then the handle is screwed on both sides, they must be prepared in advance. If such a handle breaks, you simply need to replace it.
Installing the Latch Handle
When carrying out the work, you need a drill, a set of feather drills, a pencil, a chisel and a tape measure. The process itself is carried out in the following order:
- Marking. Initially, you need to select and mark on the side and end of the door leaf the optimal height for the handle, which is usually installed at a distance ranging from 80 to 120 cm from the floor. Further, at the end of the canvas at the intended mark, you should additionally place another one in the center, which will indicate the place to make a hole for the halyard latch. On the side of the door it is also necessary to mark the area in which the handle itself will be installed. To do this, you need to measure the distance from the boundaries of the latch to the middle of the hole intended for inserting a square of the product and transfer these dimensions to the door leaf. As a result, it is possible to mark 2 points for drilling.
- The next step is to make a hole. To do this you need to use a drill and a feather drill. For the end hole, a tool with a diameter of 22 mm is used, and for one located on the side, 25 mm. To avoid damage to the decorative coating of the door leaf, the first step is to drill the side, which is best done on both sides. Initially, you need to drill on one side, and when you reach the edge of the drill on the opposite side of the blade, you can proceed to work on it. After making this hole, you should replace the tool and start making the second one, which should be at the end of the door.
- Next, you need to mark and create a hole for the decorative strip of the latch. To do this, first of all you need to insert the latch into the end hole and trace the contours of the lining using a sharpened pencil. Next, you need to remove it using a hammer or chisel, or better yet, using a manual milling machine, select a groove of insignificant depth to place the decorative strip of the latch into it.
- After this, you can begin installing the handle. The process itself is not complicated, which requires assembling the product inside the door leaf.
First of all, you need to insert the latch into the hole from the end and screw it in using two self-tapping screws. In this case, one nuance must be taken into account in order to prevent the latch from jamming, which sometimes occurs due to the penetration of wood dust into it. In view of this, before starting installation, the hole should be completely purged with air. - Installation of a square. The process is extremely easy, since it is enough to place it in the square-shaped latch hole through a hole on the side.
- Initially, you should put one handle on the square. During work, care must be taken not to confuse the left and right handles. To install it, you need to put it on a square and then screw it to the door leaf using three self-tapping screws.
- Similarly, a second handle needs to be installed on the door. After its installation, you should make sure that each of them is functioning correctly. If the latch they control works properly, then you can proceed to the next step.
- It is necessary to screw decorative caps onto the handles, masking the places where the fasteners are fixed. In addition, below the handle, use a hex key to tighten the hidden screw.
After completing the installation of door handles, it is also necessary to carry out one more procedure - to cut the mating part of the latch into the frame. If you have the appropriate knowledge, the process is quite easy. The first step is to draw the center of the door when the doors are not tightly closed. Next, in this place you need to make a hole to a small depth (10 mm) in the middle of the door frame from the same part where the door leaf is closed, on top of which you need to install a decorative strip, which is usually supplied with the latch included. There is no need to cut it into the body of the door frame. To do this, simply screw the element and then make sure it is functioning correctly.
Installation of handle-lock
Its installation has some differences from products of the previous type:
- At the end of the door you need to outline the side contour of the lock, for which you can simply outline it.
- Using a drill and a feather blade of a suitable diameter, round holes should be made close to each other. The depth must be made in accordance with the width of the lock. The outline must be removed using a chisel. As a result, the lock should fully fit into the hole.
- Next, use a chisel to recess the face plate.
- Next you need to make a hole for the handle and keyhole.
- It is necessary to install the square pin and screw the handle.
- If the base looks like a plank, then it must be slightly recessed.
- Installation of the strike plate should be done in the same way as for the latch handle. The difference is that an additional hole is needed for the lock latch.
Installing a handle on a metal door and replacing the existing one
If the lock has already been inserted into the metal door, then there will be no difficulties during installation. The process looks the same as when attaching a product to a wooden canvas. The difference lies in the need to use a special tool designed to make holes in the iron. If you need a circle of up to 20 mm, a metal drill is optimal, but if it needs to be larger, you will have to use a conical one.
Note! When fixing stationary handles to metal doors, it is necessary to screw in a minimum number of fasteners.
If there is a need to replace the old handle, then the work must be performed in the following sequence:
- Initially, you need to unscrew the fasteners of already installed products and remove them.
- Next, you need to install a new square. If the previously installed element is not damaged and has the optimal length, then it can be left.
- Next, you need to replace the internal linings that protect the middle of the lock. They, like the handles, are fixed with two bolts.
- Then you need to insert plastic spacers into the base of the handle, which should fit into the grooves. The smooth side should press against the door leaf.
- The next step is to install the handles in place, holding them with your hand and tightening the bolts a little. Once all the fasteners are in their intended places, you can tighten them all the way.
- When finished, tighten all bolts.
Note! If the handle is supplied with the lock, it will have to be replaced together with it.
Installation of a double-sided handle on a plastic door
Plastic structures are usually initially supplied for sale with technological holes intended for attaching handles. To disassemble the product, turn the decorative plug horizontally and unscrew one of the handles.
The first step is to install a square with a handle fixed on it, and fasten a second one on the opposite side. There are fixing bolts at the top and bottom that need to be screwed in. Upon completion of tightening the fasteners, it is necessary to rotate the plug to a vertical position to hide them.
Having figured out how to install a door handle on the front door, you will be able to efficiently install it yourself and save on hiring specialists.
Video:
Marking
The procedure begins with marking the door leaf.
- Use a pencil to mark the location for drilling. Diagrams are usually included with the product.
- If there are no explanations, you can apply the dimensions yourself. To do this, mark with a pencil a distance of 60 mm from the door edge, the height of the location is from 90 to 1100 mm.
- We mark the central point for drilling on the side edge of the door leaf. Dimensions are drawn along the center line.
Height and distance from the edge of the door
The internal element (latch) is uniform, so it is installed the same for different handles with a latching mechanism. The height from the bottom of the door and the distance from the edge are standard.
For latch handles, there are two options for inserting into the canvas: 60 or 70 millimeters from the edge. The rotary latching mechanism can “move” to the right or left by about 1 cm, and this also needs to be taken into account.
- If the handle has a spherical shape, and the distance from the edge of the door to the decorative element of the door (for example, glazing) exceeds 140 mm, it is better to fix the mechanism 70 mm from the edge. If you install the handle at a distance of 60 mm, when closing the interior door from the inside, you can hit your hand on the door frame.
- When installing a pressure product, the indentation must definitely be 60 mm.
The standard handle installation height (distance from the floor to the center of the latch) is 900–1100 mm. If the door is usually used by one person, the optimal height will be located at the level of his waist.
Installation of the product on an interior door is carried out on the right or left side. For round handle models, you only need to reverse the latch design. The tongue should point towards the closing of the interior door. If the device is asymmetrical, the elements simply need to be swapped, focusing on the opening side.