It is impossible to imagine a stylish, modern bathroom without a cabinet under the washbasin, which hides communications, expands functionality, and ennobles the interior. Many people buy this item, but there is an opportunity to make it yourself. Then a logical question arises: “How to make a cabinet under the sink yourself?”
The bathroom space is not always up to standard, so it is not so easy to fit all the necessary items
Buy or make it yourself?
The bathroom space is not always up to standard, so it is not so easy to fit all the necessary items. It is not easy to select furniture among ready-made options according to individual sizes. Trying to cram in what you managed to acquire is stupid. Any non-standard situation requires an extraordinary solution. It is impossible to do without targeted furniture manufacturing.
Ordering individual execution of items from professionals is not affordable for everyone.
Making a bathroom vanity with your own hands is not difficult.
Ordering individual execution of items from professionals is not affordable for everyone. In addition, workshops are often loaded with orders; you will have to wait quite a long time for your small bedside table. In this case, a DIY sink cabinet will be the optimal solution. You will be able to save time and money.
In this case, a DIY sink cabinet will be the optimal solution.
The main thing is the desire to achieve results, accuracy, and possession of basic skills in working with tools and selected materials.
Making your own bedside table is worth it to those who have the skills to work with furniture. It’s always a pleasure to receive an original item and create a unique interior. Moreover, decorating a sink with your own hands is not particularly difficult.
Making your own bedside table is worth it to those who have the skills to work with furniture.
If the sink is mortise, you need to make a hole on the top wall of the future cabinet.
Which one to choose?
Based on the market assortment, today it is represented by a wide variety of shapes and sizes. There are sinks for small baths, and others for large ones. As for the shape and type of the cabinet, it will largely depend on the shape of the sink. She may be:
- figured invoice,
- rectangular invoice,
- mortise of different shapes and sizes.
There are exclusive shell shapes, such as round/oval. Of course, in each individual case the cabinet will have certain design features.
How to decide on the parameters of a cabinet
There are many options for making a bathroom vanity. It is advisable to select parameters based on financial capabilities, the intended functions of the item, style, dimensions of the bathroom, and personal preferences of the owners. Main selection criteria: type (location of the cabinet, option for installing the bowl), material from which it is made.
It’s always a pleasure to receive an original item and create a unique interior.
To make a bathroom vanity cabinet with your own hands, you will need tools.
Style and design
A huge plus of designer sinks is that you can adapt them to any style. And the variety of ideas is simply off the charts. And not only in terms of shape, but also color. I would like to dwell in more detail on several options for overhead structures.
Let's start with something simple. A round shallow sink with a translucent bottom that seems to float above the surface of the countertop. This is a mixture of conservative ideas about plumbing with the desire to emphasize the originality of the owner of the bathroom.
Another small bowl in the shape of a cup. Its sides are quite high, but there is not very much usable space. Calmly and easily fits into a classic style and pastel-colored bathroom.
Not only the forms can be original, but also additional options. As, for example, in this sink: a classic polygon made of natural stone, illuminated. It is installed separately, on its own pedestal, but is also an overhead.
A sink in the shape of... a shell. A spiral-shaped overlay bowl made of artificial stone, as if carved from the countertop.
An excellent design solution for those who find it difficult to wake up in the morning, for lovers of coffee, tea and other warming drinks. The tall and deep bowl is made of earthenware, has a pleasant white color and a very original design.
A marble countertop sink in the shape of a blot is an option for creative individuals. This form is good because there is nothing standard, monotonous or conservative about it. Complete freedom of lines and natural marble.
A glass countertop sink is one of the few options that can truly brighten up any bathroom. The bowl is made in the shape of a leaf, taking into account the finest details of this piece of nature. Every vein, every tooth was repeated in this design masterpiece.
Types of sink cabinets
Depending on the location, the cabinets are divided into:
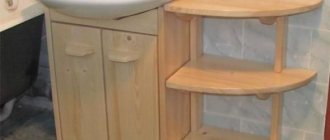
- hanging;
- floor;
- corner.
There are many options for making a bathroom vanity.
Finally, the product can be decorated using self-adhesive film, enamel, varnish, or veneer.
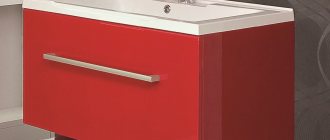
Hanging models look light and do not burden the interior with dimensions. This design is applicable in any situation, even when the location of the plumbing ducts does not allow the installation of large floor furniture options. Hanging cabinets require walls to meet increased strength requirements. Installation is more difficult than floor structures. When choosing, you will need to take into account the weight of the product and future contents. Hanging versions do not require storing heavy objects. Such cabinets are not afraid of puddles on the floor. Subject to operating conditions (avoiding overuse), they last a long time.
It is advisable to select parameters based on financial capabilities, expected functions of the item, style, dimensions of the bathroom, personal preferences of the owners
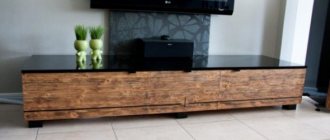
Floor variations are especially popular. They are stable and allow you to store quite heavy items (washing powder, household chemicals). Bedside tables are made on legs and monolithic plinths. To ensure better stability and safety, additional fixation of the cabinet to the wall is allowed. The versatility of the item makes it in demand.
Hanging models look light and do not burden the interior with dimensions.
Depending on the method of attaching the sink, it is necessary to make a countertop: an overhead sink or a panel with a hole for the washbasin.
Corner models characterize the location of the cabinet. They are made suspended or floor-mounted. Corner models do not “eat up” a lot of space by occupying space that is poorly used in any interior. The use of corner cabinets is preferable for small spaces. The nature of the location allows for profitable use of valuable square meters. The spacious shelves of the corner bedside table can significantly expand the possibilities of the storage system in the bathroom.
When choosing, you will need to take into account the weight of the product and future contents.
Based on the method of installing the sink, cabinets are divided into the following types.
| Washbasin type | a brief description of |
| Consolidated | Consolidated modifications of washbasins are manufactured connected to the body of the cabinet. In most cases, it is impossible to make such a model with your own hands. The tabletop, which is an inseparable part of the bedside table, initially contains the washbasin. |
| Overhead | It is easiest to make cabinets with an overhead type of sink mounting yourself. The bowl is placed on top of the furniture box instead of the tabletop, secured, and sealed if necessary. |
| Mortise | Cabinets with a mortise method for installing a sink when made independently will require skill. The bowl is placed in a hole cut out for it on the top wall of the furniture section. The opening must exactly match the parameters of the sink, otherwise the finished cabinet can simply be ruined. |
Subject to operating conditions, they last a long time.
Preparatory stage
See also
Bunk bed for children: which one to buy
Before you begin assembly, you need to complete a few important steps. They are a preparatory stage.
Here we are talking about the following events:
- determine a place to place a cabinet with a sink;
- check the serviceability of the sewerage system and all pipes;
- take measurements of the free space;
- starting from the previous steps, select and buy all materials;
- provide the possibility of installing a suspended structure;
- draw a diagram of furniture;
- prepare tools and materials.
This is a very important stage, so approach it very carefully. Until you fix the problems in the bathroom, it is not recommended to start installing the cabinet.
Materials suitable for vanity cabinets
The lifespan of a DIY sink cabinet depends not only on the quality of the work performed, but also on the material used.
In the bathroom it is permissible to use:
- natural wood;
- MDF;
- glass;
- plastic;
- drywall.
Floor variations are especially popular.
Wood is used protected by moisture-resistant coatings. He is easy to work with. The finished product is durable and looks stylish, but the price forces you to look for alternatives. One of them is MDF, which initially prevents excessive moisture penetration.
To create the necessary strength of the finished product, you will have to take care of reinforcing the structure.
Glass is rarely used for furniture making; working with it will require skills. Special reinforced options are used to ensure structural strength. A product made according to all the rules will become a source of pride and will delight you with its practicality.
Waterproof modifications are perfect for the bathroom, but their fragility will require modifications to the design.
Plastic is a great option for the bathroom. He has a full set of necessary qualities. Working with it yourself will not cause much trouble. To create the necessary strength of the finished product, you will have to take care of reinforcing the structure. The same goes for drywall. Waterproof modifications are perfect for the bathroom, but their fragility will require modifications to the design.
A stylish, unusual product can be created by combining several materials.
A stylish, unusual product can be created by combining several materials. At the same time, it is possible to achieve the optimal combination of practicality, efficiency, and unique appearance.
Plastic is a great option for the bathroom
Preparation of the drawing
Modern users can make a drawing in a special design program that develops three-dimensional design options.
CAD programs specialize in the selection of models:
- show cutting on sheets of a certain size;
- draw up specifications for consumables;
- choose types of mounts based on the built-in base.
If a home craftsman does not have the opportunity to use the program, he manually draws up a drawing. Sometimes this is just a schematic drawing indicating the necessary information:
- Detailed design of the frame with the number of racks, lower and upper cross members, their dimensions comparable to the overall dimensions of the product.
- The outer lining of the cabinet, with data on the dimensions of the side panels, the method of marking on sheets and cutting.
- Schematic drawings of the interface of individual parts, fastening methods.
Based on the drawing, a specification of materials and fittings is drawn up, and the number of hardware and furniture confirmants is calculated. The sketch is needed to calculate the volume of material for tiling and purchasing glue.
Valera
The voice of the construction guru
Ask a Question
When drawing up an assembly drawing, it is taken into account that the optimal height of the sink in the bathtub is 80 - 90 cm. The cabinet doors open wide, slide apart along the guides or recline. Drawers are provided in the sketch, taking into account that such a design will require space in front of the cabinet.
Manufacturing process
Before starting the main work, you should select the necessary tools, materials, and components of the future structure. To make a bathroom vanity cabinet with your own hands, you will need:
- hacksaw;
- drill;
- screwdriver;
- jigsaw;
- hammer;
- screwdriver;
- pliers;
- machine (skin) for grinding;
- pencil;
- roulette;
- chisel.
Wood is used protected by moisture-resistant coatings.
To work you also need:
- parts made according to drawings from the selected material;
- screws, corners for fastening;
- fittings (door hinges, handles).
The lifespan of a DIY sink cabinet depends not only on the quality of the work performed, but also on the material used.
Additional Notes
Before you start work, you should decide on the choice of materials. It is not at all necessary to take only chipboard or boards; you can use plywood or fiberboard.
- Nails may be used as fastening elements instead of self-tapping screws.
- In order for the product to fit perfectly into the size of the sink, you should use a level that will help control the horizontalness of the structure. The coating can be made not only with varnish, but also with paint. The quality of the product will not suffer from this. When choosing paint, you should rely on your taste.
- Instead of a brush, you can use a spray bottle. This will make the job easier. It is recommended to start from the size of the sink and siphon. They must be integral with the manufactured product. This interior element will last for many years.
- It is good to saturate the chipboard with silicone to prevent the negative effects of moisture, because the sink is located above the structure, and drops of water will fall on the surface of the product.
Thus, with certain skills, a do-it-yourself washbasin cabinet can be designed and manufactured in just a few hours.
Progress
- If the sink is mortise, you need to make a hole on the top wall of the future cabinet. To do this, a pattern corresponding to the diameter of the sink is made, placed on the surface, and a slot is cut along its contours. Using a drill, a hole is made, a jigsaw is inserted into it and the contour cut is completed.
- It is necessary to assemble a frame from parts prepared in advance. All elements are pre-treated with moisture-protective agents: the sections are sanded and primed.
- The side walls are attached to the finished frame using self-tapping screws or glue. Corners will be required at the connection points to the frame.
- Depending on the method of attaching the sink, it is necessary to make a countertop: an overhead sink or a panel with a hole for the washbasin. The seams are carefully sealed.
- They install the internal contents (shelves, drawers), fittings (handles, hinges), doors, bottoms, legs (if any).
- The mortise sink is placed in the hole. Connect communications. All seams are sealed with silicone.
- The finished cabinet in the bathroom is installed in place and secured if necessary. Finally, the product can be decorated using self-adhesive film, enamel, varnish, or veneer.
The nature of the location allows for profitable use of valuable square meters.
Making a bathroom vanity with your own hands is not difficult. The main thing is the desire to achieve results, accuracy, and possession of basic skills in working with tools and selected materials.
To ensure better stability and safety, additional fixation of the cabinet to the wall is allowed.
Instructions in a few steps
Let's look at how to make a very simple hanging cabinet for a bathroom sink from 40 cm thick pine furniture board.
Step 1. First of all, you need to make the appropriate markings on the pine board and saw it. There should be several parts - the sides of the cabinet, as well as its upper and lower parts. You need to saw strictly along the pencil lines drawn in accordance with the dimensions.
Cutting furniture board
Step 2. Next, you need to make cuts at the edges of the walls at an angle of 45 degrees. This is necessary to ensure the correct joint of the parts.
Cuts are made at an angle of 45 degrees
Another photo of the process
Step 3. Then both side walls and the bottom need to be laid exactly in one row and connected with tape. You need to glue the elements with adhesive tape on the front side of the shield. This measure will help to smoothly glue the parts into a single box.
The walls are connected with tape
Step 4. After this, you need to carefully turn the workpiece over and coat the cuts (45 degrees) with wood glue, then assemble the box.
The saw cuts are coated with glue
Step 5. Now you need to attach the tabletop to the top of the box. The cuts also need to be coated with glue beforehand.
The top part of the box is attached
Step 6. After this, you need to tighten the box with tape and zip ties.
The box is secured with tape
Screeds are also used
Step 7. Next, you need to ensure the reliability of the connection between the sides of the box. Dowels will be used. To do this, you need to drill deep holes with a drill of the required diameter in the end parts of the future cabinet so that they pass through the lower and upper parts of the box and its end parts. Then you need to pour glue into the holes and insert a wooden dowel there, also coated with glue.
Holes are drilled
Glue is poured, wooden dowel is wound up
Step 8. The cabinet needs to be left in this position alone, and when it dries, you need to saw off the excess protruding dowels.
Excess dowels are trimmed off
Step 9. It's time to start sanding the product. The first step is to sand off the protruding parts of the dowels, then sand the entire surface of the cabinet.
Sanding the structure
Step 10. Places where dowels are inserted, as well as all connections in the area of joints and corners must be puttied. Before further work, the putty must be dried.
Applying putty
The putty must dry
Step 11. Now you need to sand the product again.
Re-sanding
Step 12. Next, the cabinet needs to be painted and treated with protective compounds. By the way, there are certain paints and varnishes that will not only give the tree a beautiful look, but also additionally “preserve” it and protect it from exposure to water. The coating layer must be thoroughly dried. The main part of the cabinet is ready.
Treating the cabinet with a protective compound
Step 13. It's time to start making the facade. It will be made of plywood. You need to cut out the façade part to the required size.
Facade detail is cut out
Step 14. Now the facade blank needs to be sanded.
The workpiece is polished
Step 15. After sanding, smooth plywood must be carefully primed. Do not skimp on the primer composition - this measure will reduce the consumption of paint and varnish material.
Primer is applied
Step 16. Next, the surface of the facade needs to be sanded again.
Re-sanding of the facade
Step 17. Then the facade needs to be coated with a layer of varnish and left to dry.
The facade is covered with a layer of varnish
Step 18. Now you can return to the cabinet itself. It should be additionally reinforced from the inside with a chipboard frame. To do this, you need to cut the elements to the required size and secure them inside the box with self-tapping screws, repeating the outline of the cabinet. The dimensions of the inner chipboard box should be slightly smaller than the main size of the cabinet.
Chipboard parts are cut
Formation of the inner box
Step 19. Next, inside on the sides of the cabinet you need to attach telescopic guides for the drawer to the self-tapping screws. They should be parallel to each other.
The guides are attached with self-tapping screws
Attaching telescopic guides
Step 20. Now you need to make a drawer for the cabinet. It will have a curly shape, in the back there will be a recess, which is designed to ensure that the box fits where the pipes will run. The side walls of the box must be cut from chipboard to specified dimensions, and the bottom must be made from plywood.
Drawer parts are cut out
Another photo of the process
Step 21. It is best to assemble the box using glue with an additional tie with self-tapping screws.
Assembling the box The process of assembling the box
Step 22. Telescopic guides need to be attached to the drawer. To do this, they need to be screwed with self-tapping screws to the walls of the drawer from the outside, maintaining a small gap at the bottom between the drawer and the bottom of the cabinet.
Fastening the guides
Step 23. At the top of the back of the cabinet you need to screw fasteners that will allow you to fix the cabinet to the wall. These can be simple but strong corners secured with self-tapping screws.
Fasteners are screwed on the back of the cabinet
Step 24. The cabinet needs to be hung on the wall. It needs to be placed under the sink and the locations for drilling holes in the wall should be marked. Next, you need to drill holes in the wall, install dowels and hang the cabinet.
The cabinet is hung on the wall
Step 25. In the upper part of the cabinet you need to make a hole where the drain pipes from the sink will pass. When the hole is cut, it is necessary to coat it from the inside with sealant.
A hole is made in the upper part
The edges of the hole are coated with sealant
Step 26. All that remains is to attach the facade. To do this, you need to screw in self-tapping screws in the box at the place where the facade is attached, but not all the way, but so that they come out a little bit through the front side of the box. Next, the facade needs to be placed in its “rightful place”, leveled using wedges (in this case, the role of wedges is played by folded pieces of paper) and a little pressure is applied to it. When the façade is removed, there will be small recesses on its reverse side - imprints of self-tapping screws. Now you can drill holes in the place where these marks appear, and then simply screw the facade with self-tapping screws to the box. The cabinet is ready.
Aligning the facade The facade is attached to the cabinet
Step 27. All that remains is to install the bowl on the cabinet.
Finished vanity unit
It is better to coat the bottom of the bowl with sealant and place it on the countertop. The work has been completed. All that remains is to connect all communications.
Video - Cabinet made of aerated blocks
Style directions
Of course, the most enjoyable part of the purchase is choosing the appearance of the furniture. In order not to get confused in the variety of options offered, you should decide in advance on the style of future furniture. A designer composition of an overhead sink and cabinet can become the main accent of the bathroom interior.
Let's consider the most common style options, which, if desired, can be supplemented with your own design ideas.
Classic
The style is characterized by clear lines and regular shapes
Materials and colors are important
Antique classics will be emphasized by a marble-style cabinet with a stone or porcelain bowl, and for the classics of the century before last, it is worth taking a closer look at products made from noble types of wood in warm shades. Forged decorative elements in brass or bronze will add the splendor of the Baroque style to the interior.
Minimalism
Classic versions of cabinets without decorations are also suitable for the minimalist style. The main rule of this direction is maximum simplicity and functionality.
The main advantage of a bedside table in a minimalist style is that, with its unpretentiousness, it accentuates the beauty and brightness of the bowl.
Provence
One of the areas of country style that deserves special attention. This style is characterized by pastel colors and the cozy atmosphere of a country house in the south of France. The wooden materials of the cabinet will create a feeling of warmth, and artificial aging or stylization like bleached oak will complement the overall style of the interior. Forged decorations on doors, carved bent legs, and an abundance of small drawers are suitable here.
Loft
Conceptual modern style based on an urban approach. It represents a delicate balancing act on the brink of luxury and poverty. The loft-style room resembles a manufacturing factory or an abandoned attic of a high-rise building. However, upon closer examination, designer items made from expensive materials, original works by craftsmen and decorative elements that are incredible in their execution come to the fore.
A cabinet for an overhead sink can be made of a variety of materials, the main condition is that it must convey a semantic idea. For example, a cabinet can be stylized as a metal or wooden box with overhead locks, or a table made from a foot-operated sewing machine.
The style combines elements of wood and steel, brickwork and stone. An overhead sink made of galvanized metal or wood will add brutality to the composition, while airy white faience, on the contrary, will dilute the atmosphere with fresh notes.
To learn how to install a cabinet under an overhead sink, see the following video.