TVs are becoming more compact. TV models make it easy to mount them on walls using special brackets. Despite all the newfangled interior solutions, the TV stand does not lose its relevance.
The interior itself does not always support the possibility of wall mounting. This can be prevented by the window opening or the materials from which the walls are made, which do not allow the bracket to be secured. In addition, the functionality of the TV stand allows you to place a variety of equipment or other items on it.
Each buyer draws for himself an ideal model that will not only fit into the interior in size, but will also match it in color and style.
Not every material requires finishing.
Wooden elements can also be decorated in the form of artistic carvings on the outer walls or table top.
Peculiarities
Modern TV models can be either compact or wide-screen, with the ability to be mounted on the wall using brackets, or simple with installation on a special cabinet or chest of drawers. In order to optimize space, especially in small apartments, flat TV screens are hung on the wall. However, the interior and construction features of the room do not always allow you to install the TV on brackets.
Window openings, bends, the thickness and material of the wall itself can interfere with this installation method.
In this case, modern cabinet furniture manufacturers offer a wide selection of TV stands that can easily fit into any interior style. Wide and narrow, high and low, simple and multifunctional, as part of modular furniture and representing an independent piece of furniture - any online store is literally replete with a variety of options.
But it also happens that the features of the living room interior require an individual approach. Products presented in furniture showrooms may not suit the customer in terms of dimensions or other characteristics. It is quite difficult to choose the ideal ready-made option that will correspond to the given size, design, color and functionality.
Therefore, more and more often, TV tables are made to order. But this option is quite expensive. An alternative and interesting solution would be the opportunity to make a cabinet yourself with your own hands.
Dimensions of the stand stand
This stand is approximately 160 cm high and holds a 32-inch flat screen TV weighing approximately 14 kg. The legs are about 50 cm long and spaced 81 cm apart.
- The pipes have a diameter of 1.5 inches and a wall thickness of 40.
- Fittings: 4 pieces T-bar, 2 pieces 90-degree elbows, 4 pieces leg couplings.
- Pipe lengths: 2 – 20 cm, 2 – 30 cm, 2 – 71 cm, 4 – 73 cm.
All pipes were cut using special shears for cutting PVC pipes, but if you don't have one, you can cut them with a hand saw for wood or metal. Be careful not to split the pipes.
Preparation
In order to build this piece of furniture, it is not at all necessary to have the skill and professionalism of a carpenter. It is enough to have imagination and simple woodworking skills.
Drawings and sizing
The first step is to decide on the dimensions of the future product and sketch out the drawings. It is preferable to draw several variations, having previously familiarized yourself with the models of TV stands that are presented in online stores. The size selection should be made very carefully, especially if the cabinet will be installed in a wall opening.
- First, it is necessary to determine the basic parameters - the length of the product, the width and depth of the tabletop.
- Secondly, you need to decide on the choice of material from which the intended piece of furniture will be made.
Tools and materials
TV bedside tables can be made from various types of wood, plasterboard, chipboard, MDF, plastic or corrugated pipe. Let's take a closer look at the advantages and disadvantages of each.
Solid wood furniture fits perfectly into classic or Scandinavian interiors, looks luxurious, is environmentally friendly, resistant to mechanical damage, has a long service life, and can be easily restored. Among the disadvantages of this material, it is worth noting its high cost, the need for special care, high weight and labor intensity in production.
It should also be taken into account that wood is quite demanding on environmental conditions: it does not like high humidity, temperature changes, prolonged exposure to direct sunlight, and absorbs surrounding odors.
An alternative to wood is chipboard. This material has gained popularity in the manufacture of cabinet furniture for home and office due to its low price, durability and wide range. Laminated DPS panels, in addition to the properties listed above, are not afraid of high humidity and temperature changes.
Speaking about the disadvantages of chipboard/laminated chipboard, it is worth highlighting the toxicity of this material (various formaldehydes, resins and glue are used in the manufacture of the board). In addition, this material is not suitable for the manufacture of small parts and carved surfaces.
MDF boards, unlike particle boards, are more environmentally friendly, since during the manufacturing process, a natural substance with adhesive properties is released from sawdust using a press and high temperatures. This material is quite durable and at the same time soft, which allows it to be used in the manufacture of carved parts for future furniture. However, MDF also has a drawback - it is high in comparison with laminated chipboard, the price.
In modern interior design, elaborate partitions and shelves made of plasterboard are often found. This material is multifunctional and easy to use, has high thermal insulation properties, moisture and fire resistance, flexibility and lightness. However, drywall is a rather fragile material, not suitable for high loads, and it is also not able to support weights.
Plastic furniture is a modern alternative to wooden materials and their cheaper analogues. The undeniable advantages of plastic cabinets are their low weight and safety, which allows them to be used in children's rooms. Also among the advantages it is worth noting ease of maintenance, practicality, and low cost. Disadvantages include instability to mechanical damage and heavy loads. Therefore, placing a 75-inch TV on a plastic stand is unlikely to be a good idea.
Using a profile pipe in the manufacture of furniture will be an unusual design solution.
The combination of metal and wood will fit perfectly into any modern interior. Simple forging and welding skills will help you create a unique, reliable, strong cabinet or shelf for TV. Products made from a four-rib profile pipe are strong and durable, and the profile shape facilitates a tight fit of other parts. Also among the advantages it is worth noting the low price, ease of transportation, resistance to loads and deformation.
Among the disadvantages, it is perhaps necessary to highlight the tendency to corrosion.
When using parts made from natural solid wood of any type, pay attention to the absence of knots, cracks and other possible defects. If chips or other irregularities are detected, you can use acrylic wood putty. It is applied with a spatula, filling the defective surface. After drying, the surface must be treated with fine-grained sandpaper or mesh.
Additional materials may include the use of forged metal, glass, and plywood. Based on this, the choice of tools is built:
- roulette;
- a circular saw;
- jigsaw;
- Grinder;
- plane;
- screwdriver;
- milling machine;
- set of drills
Furniture and interior items
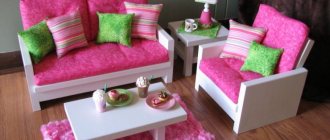
Every DIY enthusiast is driven not only by a love of manual labor and a desire to save money, but also by the desire to furnish a cottage, house or apartment to their own taste. A homemade TV stand is in no way inferior to a purchased one. In addition, furniture created by the caring hands of the apartment owner is not only reliable, but also unique. It will fit perfectly into the interior, and its dimensions can easily be adjusted to the features of the TV.
DIY TV stand: where to start?
The location for the piece of furniture has already been chosen, the necessary measurements have been made. All that remains is to decide on the project and make a drawing of the TV stand. The configuration of the future product largely depends on the size and technical characteristics of the TV itself. If you need to make a small bedside table for an old telescopic TV, it is better to opt for corner models. Owners of wide-screen LCD beauties will love the designs for hanging TV.
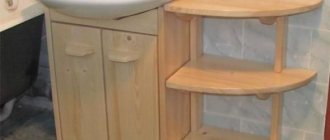
Corner TV stand
To create a table for this project, it is better to use natural wood or 16mm chipboard. PVC tape 0.5 mm is perfect as an edge.
Article on the topic: Why the TV doesn’t show
If desired, display cases with original frosted tinted glass inserts can be replaced with practical facades made of MDF or aluminum profiles. Please note how the photo demonstrates the advantages of this type of finishing for the TV stand. The price of the profile varies and depends on the aluminum consumption.
The shelves are installed on shelf holders, which allows you not only to once again stabilize the structure, but also to subsequently adjust the height of the shelves at your discretion. Small chrome-plated stands 25 mm high are used as additional supports for the tabletop. The cabinet does not stand on a podium, but on massive adjustable legs, which is also very convenient.
Narrow vertical handles on the doors support the lines of the overall silhouette. One of the display cases can be replaced with a system of drawers.
The dimensions of the stand part depend on the dimensions of the TV itself. However, the product is very compact: height – 785 mm, width – 850 mm, depth – 850 mm. The central part is quite spacious. In general, the design takes up a minimum of free space due to its angular location.
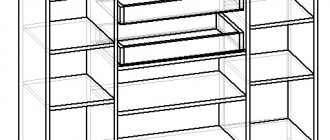
Long TV stand with large screen
The dimensions of the cabinet are quite large, therefore, in order to save money, it is advisable to use chipboard for its implementation.
In the center there is a small hill on which the TV will be installed. Under the lid of the cabinet there is a niche for equipment and information media, which can also be used as a minibar. Many shelves can be adapted for storing various souvenirs. On the right is a drawer on metal guides. On the reverse side there is a niche with a downward opening door for storing linen or other small items needed in everyday life. The drawer and niche fronts are also made of chipboard.
Article on the topic: What is true motion on TV
Shelves can be made of chipboard or glass. In the latter case, the maximum load should not exceed 4-5 kg. Joker pipe supports with flanges are used only in combination with chipboard shelves. They are not needed to fix glass shelves. The ends of the parts are treated with PVC edges.
Dimensions: height – 845-850 mm (excluding the length of the legs), width – 1800 mm, depth – 450-460 mm. One of the advantages of the project is that the wiring is hidden behind a solid base.
Compact TV stand with plasma screen
The cover and bottom of the structure are made of 22 mm chipboard. Accordingly, a 22 mm edge will be needed. The facades are made of MDF or aluminum profiles. Glass for display cases - frosted or tinted.
The shelves are mounted on adjustable shelf holders. The height of the legs is also adjustable.
Dimensions: height – 655 mm, product width – 1100 mm, depth – 450-460 mm. The width of the cabinet can be increased by proportionally increasing the depth. Otherwise the product will be unstable. In this case, instead of chrome legs, you can make a chipboard stand as a support.
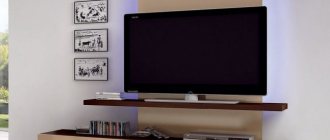
Stand for hanging plasma TV
The design is conventionally divided into two parts - a base with niches and a box for hanging a TV with shelves. To fix the TV, a bracket is used, the basis for which will be the TV stand. The price of brackets ranges from 300 to 1600 rubles.
Article on the topic: How to watch TV via iptv player
The facades of the lower compartment open horizontally. Behind neat doors are drawers or spacious niches separated by several shelves. A small podium carries not only a decorative load. It makes the cabinet more stable.
The back wall and open shelves of the mini-living room are made of chipboard. All parts of the box for mounting the TV are made of 22 mm chipboard.
Dimensions: height – 1510 mm, width – 1850 mm, depth – 450 mm.
Materials
Before you make a TV stand, you need to decide which material is best to use for its manufacture.
Wood
Natural wood is more resistant to environmental influences due to the resinous substances contained in the fibers. Therefore, it is used when making furniture for gardens and other rooms with high humidity. Wooden cabinets have a sophisticated design.
This fiberboard is made from fine fibers bonded with synthetic binders under high pressure and temperature. This material is considered environmentally friendly, since phenolic resins are not used in the process of pressing the plate. This sheet is not moisture resistant, but this is not required. Due to its homogeneous structure and relatively light weight, MDF is often used in the manufacture of table tops for TV tables.
Particle boards
The record holder among the materials used in the manufacture of living room furniture is chipboard. Their extreme popularity is due to their large selection and affordable price. Many varieties allow you to choose material of almost any shade. Chipboard is used if it is necessary to make a voluminous, but not too bulky structure. Of course, TV stands made of wood are durable. But chipboard is much easier to process.
Article on the topic: Which TV is better, Samsung or Panasonic
Cutting the product
We will consider all subsequent stages of creating a cabinet using the example of this simple model made from chipboard.
Cutting can be ordered from the warehouse or carried out yourself. To do this, we transfer all the dimensions of the main and supporting parts from the drawing to whatman paper. On whatman paper we draw patterns, according to which we will do the cutting. The pattern is placed on a sheet of material (MDF or chipboard) and secured with clamps. We cut chipboard with a jigsaw without unnecessary jerks. Otherwise, chips may appear on the laminated surface of the sheet. We grind the edges of the resulting parts.
Edging parts
First we trim the side ends of the shelves. In our case, narrow wooden planks are used, but you can also use a paper edge in a contrasting shade.
We glue the planks, and after 1-2 days we sand them. Finally, we glue the edge to the facades, since it should overlap the adjacent edgings. For reliability, the slats can be nailed with finishing nails, driving the heads into the wood. The holes formed after nailing are filled with putty. After complete drying, we sand the planks with sandpaper.
We coat the edging of wooden planks with varnish.
Assembling the cabinet
We connect the frame parts, starting from the top shelf (lid). We drill holes as shown in the drawing and place the shelf on the dowels. An easier way is to secure the sides and top of the frame with self-tapping screws, the lids of which are masked with special stickers. Now we attach the bottom of the product. Lastly, install the shelf. We secure the fittings and screw the wheels with self-tapping screws.
Article on the topic: Anime series that were shown on TV
Glass TV stand
Recently, ready-made glass cabinets have appeared in furniture warehouses. The cost of such a table for a TV is low. But the glass that is included in the kit is processed much better than can be done at home.
Base installation
We begin assembling the product from the tabletop. The top cover must be placed on a hard surface with the heels facing upward for support. Screw a metal rod into each hole. Next comes a series of cylindrical metal supports.
Assembling the shelf
After installing the supports, we put plastic spacers on the rods so that the glass does not come into contact with the cylinders. Then we mount the glass, carefully threading the rods through the holes. Now we again put gaskets and cylindrical supports on each of the rods. The next step is to install gaskets between the cylinders and the bottom.
Bottom installation
We install the last glass piece on the gaskets, threading it through the metal rods.
Assembling the legs
After all the glass parts are assembled, we begin assembling the legs. To do this, we put limiters on the rods, and then cylindrical legs. The product is ready.
Contrary to popular belief, glass cabinets are very practical and durable. They can easily withstand loads in the range of 30-60 kg and are practically not susceptible to the harmful effects of moisture.
Advantages of a homemade bedside table
Each buyer draws for himself an ideal model that will not only fit into the interior in size, but will also match it in color and style. A wide selection of furniture products, including TV tables, allows you to purchase seemingly any model.
However, when faced with the specific task of choosing, a person is often faced with the fact that the size, color, or design are not suitable. It is this factor that pushes many people to start making furniture with their own hands.
Making a TV stand with your own hands is quite simple. To do this, you just need to choose the right model, focusing on your professional level. The choice of material for the construction is also critical. Some materials make it easy and convenient for even beginners to work with them, while others require not only skills, but also special tools for processing. Assembling a TV stand with your own hands requires meticulousness and a correctly structured step-by-step scheme for installing parts.
By assembling a TV stand with your own hands, you can not only get a unique design, but also save significantly on the purchase of a ready-made model.
Drawing of a bookshelf with indicated dimensions
I would like to invite you to create a very nice piece of furniture, stylish in appearance, a large shelf or cabinet that will fit perfectly into the interior of a large house. Below I attach a drawing of a bookshelf with the indicated dimensions, as well as a list of materials necessary for the work. Maybe it will be useful to someone?
This version of the bookshelf will fit especially well into the interior of a home decorated in a rustic or vintage style. If there are travelers among you, then they have probably seen this type of bulky “antique” shelves in the interiors of Western European homes, where they most prefer to surround themselves with antique furniture and antiques.
What materials are needed to make a bookshelf? It is simply impossible to answer this question unambiguously.
The need for certain materials for the manufacture of bookshelves depends solely on their design and purpose.
To create a wooden shelf or TV stand you will need:
- several boards of different sizes;
- electric jigsaw or saw;
- screws,
- bolts, screws, nails, etc.;
- screwdriver; glue;
- sanding machine or sandpaper;
- means for treating wooden surfaces.
Having decided on the size and design, you need to prepare all the elements for assembly. To do this, we cut out parts of the required sizes from wooden boards using an electric jigsaw or saw, treat them with a sanding machine and a wood preservative. When the parts have dried, we assemble the structure using nails or screws. The finished shelf can be painted or left in natural colors, it all depends on the interior design.
You will need wood materials (dimensions below are in inches):
- 2" x 12" x 20" (x1)
- 2" x 4" x 8' (x3)
- 1" x 4" x 12" (x1)
Drawing a drawing of the future bedside table
For beginning furniture makers and just amateurs, it is best to use ready-made drawings of a bedside table. A lot of options can be found on specialized websites. When choosing a drawing, you need to focus not only on the final result, but also on the complexity of manufacturing and assembly. An important factor is the material recommended for manufacturing.
Some designs require certain materials that may not be suitable for the craftsman in terms of cost or durability.
For example, models with narrow countertops and shallow cabinet depths can withstand a lot of weight when made from solid wood. The use of chipboard in such cases will sharply reduce, possibly, the permissible load on such a bedside table. Therefore, it is extremely important to evaluate the weight and width of the TV that will stand on it. It is also necessary to remember about additional accessories that will be needed when operating the TV, these could be speakers, a video player, and more.
Often, a TV stand can accommodate CDs, magazines, newspapers and decorative items. This should also be taken into account before you start making your own drawing.
Price of corner bedside tables
There are many factors that influence the formation of the cost of the pieces of furniture that interest us. So, we are talking about:
- body material;
- design features;
- quality of accessories;
- the size of the structure.
The price of the structure will directly depend on the materials used to make its body, as well as on the quality of the fittings.
For example, bedside tables made of wood or those made by artistic casting from metal will be quite expensive. And if they are also decorated with high quality or equipped with expensive fittings, then their price can become fabulous (in the region of 100 thousand rubles).
However, there are alternative versions of these designs, so that people who earn a small salary can afford them. Of course, in such cases, it is better to prefer buying furniture made from laminated chipboard or MDF, since such furniture will continue to look solid and pleasant, and at the same time its purchase will not empty your pockets.
In this case, the quality will determine the price of the cabinet, although it will also be influenced by the eminence of the manufacturer
Manufacturing scheme
A homemade TV stand should be made according to a pre-designed scheme. If the craftsman does not yet have sufficient experience in furniture making, you can watch numerous videos on the Internet on how to make a cabinet with your own hands. You can create a drawing either independently or using special computer programs that allow you to create a 3D model of the future product.
- First of all, marking and cutting of all parts is carried out. In the case of using laminated chipboard, after cutting, the bare end of the workpiece remains visible. You can hide it using a melamine edge. When choosing, you must take into account that its size is several millimeters wider than the bare end. At home, when applying an edge, you can use an iron to heat the adhesive side of the product over the entire surface, after which the corner must be sanded.
- A Russian proverb known to everyone since childhood says: “Measure seven times and cut once.” Before sawing materials, carefully measure the sides and clearly draw a cutting line.
- Then the frame is assembled: the side and back walls are installed, the tabletop and bottom shelf are applied. A perforated angle can be used to secure housing parts. Afterwards the legs are fastened and the object is installed vertically. Next, shelves, drawers or doors are installed, depending on the intended model. Lastly, the fittings are attached.
Decoration
In order to make the cabinet attractive and unique, all parts must be carefully decorated and the places where the bolts are attached must be hidden. Decoration of the finished product is carried out by engraving or applying patterns, carving the end surface, painting parts, and applying paint and varnish. Self-adhesive PVC film can be used for restoration or cheap decoration.
Element edging
To make the ends of the cabinet itself look attractive and unique, it is recommended to trim all parts before assembly. For this purpose, it is considered optimal to use a special edge made of PVC or other material. PVC edging is considered inexpensive and easy to use, so the work is accessible even to beginners.
PVC edging can be embedded or glued to the edges of existing parts, and the choice of method depends on the wishes and skills of the person creating the structure.
A wooden cabinet can be edged in different areas, but most often this process is performed for those places where there is a high probability of damage during operation of the product. The entire process of edging parts is divided into stages:
- The cutter is correctly positioned in the center of the end;
- the edges of the parts are polished, and it is important to ensure that chips or other problems do not appear that are almost impossible to eliminate;
- various grooves are carefully milled;
- Next, the edge is stuffed carefully, for which you need to use a rubber mallet, and during work you need to ensure that impacts do not lead to damage to the integrity of the parts;
- the ends of the edging are cut off from the ends, after which the elements are ground flush.
Article on the topic: What is more harmful than a TV or a computer?
A design made with such edging will look really attractive and modern, so there will be no unsightly and untreated areas.
Fastening the edging
How to make a TV stand with your own hands
The first stage of self-production is the same for any product: creating a drawing. Whether to use a ready-made one or develop a project yourself depends on experience, skill and self-confidence.
In any case, you first need to establish the dimensions of the TV, clarify its weight, and also measure the parameters of the accompanying equipment. Subwoofers, speakers, set-top boxes, etc. have very different dimensions, so the compartments in the cabinet must correspond to their parameters.
The drawing is made to scale, indicating all the values for both the main and supporting elements. Then the details are transferred to whatman paper, where they are displayed in true size. The resulting patterns are used for cutting.
Cone products
The product got its name due to its unusual shape - in the form of a cone with an extension up or down.
- The model with an upward extension looks, of course, much more original. However, for making it yourself it is perhaps the most difficult project. The point is balance: here you will need to calculate the balance not only for the product itself, but also under heavy load conditions. Therefore, this model is not used as a TV stand.
- A conical cabinet with a downward extension is much more stable in its design. For self-production, the main difficulty here will be fastening, since the sides of the product or frame elements are assembled at an angle of less than 90 degrees. Complex and accurate calculations will be required to form a drawer.
- The simplest option is a cantilever model, where only the facade plays the role of the side of the cone. But if the product is supposed to be equipped with drawers, it again turns from relatively simple into very complex.
- The furniture assembly itself is carried out according to a standard scheme, but it is difficult to find or develop an appropriate design for conical TV stands with your own hands.
Varieties
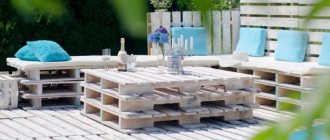
Pallet cabinet
It will fit perfectly into the industrial style, will not take much time to create and will not require serious investments. To prepare the pallet for work, you need to remove excess rusty nails from it and cut the product into two equal parts using a jigsaw.
You can connect them together with self-tapping screws or use only boards to form a table, securing them on top.
The parts should be sanded with coarse sandpaper or a sander. Purchased elements or legs from old furniture are used as legs. If costs are not in your plans, use three halves of pallets fastened together. The finished stand can be painted, oiled or stained.
Cinder block construction
Remains of building materials are often used in interior and landscape design. Cinder blocks are loved by users due to their brutal appearance and versatility.
It also acts as a strong base for the TV, making the homemade stand stable.
To build a stand, you will need an even number of blocks and 2-3 boards to suit the size. You can stack them on top of each other, assembling the parts like a construction set. The middle board will serve as a shelf for devices, and the top one will serve as a tabletop.
Easel stand
This design is suitable for mounting a TV with a screen size of 40-50 inches. Thanks to a portable easel, you make the device mobile and can adjust the desired height to suit your needs. This elegant product fits perfectly into the minimalist style.
The materials used to create the stand are slats, screws and an 8-inch hinge. The base for the TV should be stronger than that of a regular art easel. As an additional fastener, use a cord stretched between the bottom bar and the rear support, or a wooden shelf.
Drawer stand
Another way to construct a TV stand is to use wooden boxes. You will need containers, drills and screws to fasten the elements together.
Even boxes stacked on top of each other will become an interesting, albeit temporary, stand, but for reliability we recommend connecting them with fasteners.
This design will not only hold the TV, but also add storage space for consoles and accessories for the room. If you want to make the cabinet more durable, attach a board over the connected drawers, which will give the furniture rigidity.
Wooden cabinet
This stand is as simple as possible to assemble, but it looks elegant and expensive: it all depends on the chosen material and the accuracy of execution. To create, you will need 4 boards - two long and two short, 4 furniture legs or 4 wheels.
Parts must be sanded and coated with a protective compound. They are assembled together using wood glue and self-tapping screws. The top board serves as a tabletop, and the bottom board serves as a storage shelf.
The thicker the boards, the longer the fasteners should be - this is the key to the strength of the finished stand.
Handmade furniture gives the interior uniqueness. It looks most advantageous against the background of plain walls or fresh renovation, fitting harmoniously into a modern interior. Using available materials, you not only create designer furniture, but also take care of the environment.
From plywood
The procedure for working with any wood material is the same. The only difference is the processing speed and the effort involved.
- Plywood, for example, is available sanded and laminated. The first can be sanded on one or both sides and does not require special care when cutting. Laminated materials must be cut carefully, as sudden movements may damage the lamination layer.
- Birch plywood is most often chosen for furniture. It costs more, but is very attractive in appearance.
- The patterns are transferred to plywood and cut out. The edges are sanded with sandpaper.
- The edge - plastic or wooden, is fixed sequentially on the ends of the shelves, the facade and the countertop. Glue is used; if desired, you can nail the wooden edge with finishing nails. After drying - 1-2 days, the wooden edge is sanded.
- Depending on the model, the frame elements are assembled using dowels or screws. In both cases, holes are drilled in the parts in advance, always checking the diagram. For dowels, holes are made not through, for self-tapping screws - through. The dowels are seated on glue. If necessary, the connected parts are tightened with a clamp and left until the glue dries - 1 day.
- Assembly begins from the top shelf - or tabletop. It is fixed to the sides or legs. Then the bottom shelf is installed, and then the filling elements - the third shelf, partition, and so on.
- It is recommended to install internal shelves on shelf holders. If you plan to install drawers, then guides, preferably telescopic, are fixed to the sides and partition.
- They assemble the boxes and install the fittings. Legs or rollers are mounted to the bottom shelf of the product.
- The finished product can be opened with 2-3 layers of varnish to preserve the natural structure and color of the wood. You can also use stain or paints - alkyd, water-based.
STAND SEPARATOR
A popular design technique for decorating a large room is dividing it into zones. A simple but original TV stand can serve as such a separator. The secret of this product lies in its L-shape, which provides not only a place to place equipment, but also a vertical surface on which you can hang a small panel, or simply use it as a fence.
WHAT WILL BE NEEDED TO IMPLEMENT THE PROJECT
Boards (for example, thick plywood):
- 10.5x1x4 inches;
- 5x1x4 inches;
- 5x1x6 inches;
- 15 fence boards of varying widths should be cut to 5 inches in length;
- 4 square bars 1x1x5 inches;
- flat metal staples – 3 straight, 3 angular;
- 1/2" screws for installing metal brackets;
- screws;
- electric drill;
- screwdriver;
- 1.5 inch flat nails;
- glue that is suitable for working with wood;
- spade drill;
- Heavy Duty Velcro;
- white paint, roller, brush;
- extension wire;
- ceiling lamp sockets;
- LED bulbs.
If the parameters of the TV stand in this project do not suit you, you should take individual measurements at the beginning of work. Then recalculate the parameters of the components, namely: height, width, depth. The structure of the shelf is simple, so no drawings are needed.
OPERATING INSTRUCTIONS
- First of all, we assemble the side and middle L-shaped posts (3 identical ones) using metal corners and strips, as shown in the photo. We additionally lubricate the joints of wooden parts with glue. Protruding excess should be removed immediately.
- We attach a wide strip to the lower base of the L-shaped posts, which will be installed on the floor. We prepare the holes, connect them with nails and screws. During operation, we control the connection angle at 90 degrees.
- Assembling the front part of the back of the stand. First, we attach wide boards: one at the top, the second at the bottom. Then we select 1 narrow strip at a time. We install the remaining wide ones between them. We use glue and screws.
- We place the stand-bedside table in a vertical position, lay the boards on a horizontal plane-table top.
- We install the product in order to make the back part. Use boxes or other objects to avoid damaging the stand. We attach only wide planks to nails. In the lower part, you can not install the last board or prepare large holes in it for the wires. You can also make this part removable using Heavy Duty Velcro.
- Attach the strip at the top of the structure. The L-shaped bedside table is almost ready.
- Drill a hole on the front for the wires after you decide where exactly the TV panel will be installed.
- All that remains is to do the finishing coat. Take safety measures and cover the product with white (or other paint of your choice). Let the nightstand dry.
- If desired, you can install colored lamps in the niches of the stand. They will provide soft light and a pleasant atmosphere in the dark.
Made of wood
A wooden cabinet is made in exactly the same way.
Shelves, a tabletop, and also sidewalls, if provided for in the model, are cut out of furniture panels.
From wooden beams - 50*50, 20*20 mm, crossbars and crosspieces are cut. The latter are needed for long cabinet lengths - more than 1.2 m;
- Assembly begins with the frame, then the crosspieces are mounted, and then the sides and shelves are fixed. The last thing to install is the countertop.
- Dowels and screws are used for fastening. The holes must be drilled in advance - there is a high risk of splitting the wood.
- The external finish of the product depends on the style of the living room and personal preferences. The means used are the same: opening with varnish, staining, staining. Although in relation to an array of trees, the latter method is used less frequently.
What do we need
A TV stand is completely ordinary furniture, and therefore both materials and tools will be needed here. It is worth paying attention to the proportions of the selected model and the weight of the TV.
With a large length and depth, a cabinet made of chipboard will perfectly withstand a load of 80 kg. But with a minimum depth of 30 cm, and a fairly large TV, a more durable material is preferable: solid wood or a combination of chipboard with a metal frame.
Materials used:
- wood - furniture board is chosen for production. The most affordable option is pine. There are no restrictions here, but if the product is made by hand inside and out, then it is worth remembering that different types of wood exhibit different properties from each other. Hornbeam is difficult to process, exotic wood is often not varnished, and so on;
- MDF – wood fiber board. Laminated or even veneered. The material is easy to cut and holds fasteners well;
- plywood is a layered wood material. Despite its low weight, it has good strength;
- Chipboard is the most affordable option and the lightest;
- Fiberboard - the material is used for the back wall of the cabinet and the bottom of the drawers, if there are any in the design.
Most workshops and even stores offering building materials also provide services for cutting, cutting and edging parts.
The standard mount is used:
- furniture confirmations,
- dowels,
- steel and brass screws.
The set of tools is also the most common:
- drill with attachments;
- jigsaw, if you decide to cut the material yourself;
- hammer;
- pencil.
DIY TV stand made of wooden materials
We personalize the cabinet through decor
Not every material requires finishing. Laminated plywood looks quite self-sufficient without additional decoration. Chipboard has glued decorative surfaces and, apart from gluing the cut edges, does not require painting. Solid wood is perhaps the most finicky in this sense. It must be primed and treated with stain. This coating helps highlight the grain of the wood and protects the wood from dullness, dust and moisture. If desired, the wood can be painted or varnished.
Wooden elements can also be decorated in the form of artistic carvings on the outer walls or table top. Any materials can be painted, covered with decorative film, or applied with stencils.
Often, the decor of TV tables consists of combining different materials and decorating it with glass parts. The glass used should not be less than 8 millimeters thick. You can use transparent, dark, mirror glass. Stained glass doors look beautiful, although these designs are more fragile than solid sheets of glass.
Preparing tools for work
You can make a bedside table with your own hands using only a jigsaw. Some craftsmen even do without it, ordering cutting according to the drawing when purchasing the material. Assembling furniture with your own hands still requires the following professional and non-professional tools:
- Pencil, marker or other writing object.
- Thick cardboard for making patterns.
- Ruler and tape measure.
- A compass if some workpieces will have a round shape or rounded edges.
- A jigsaw with files of the required size.
- Clamps for gluing parts.
- Glue.
- Tape for finishing cut edges.
- Screws, self-tapping screws, confirmations.
- Grinding machine.
- Guides for bedside table drawers.
The list may be shortened or expanded depending on the complexity of the product and the selected materials.
Chipboard is the most unpretentious option for work; it does not require any special cutting tools or sanding machines.
When purchasing wood, you should pay attention to its quality.
Stained glass doors look beautiful, although these designs are more fragile than solid sheets of glass.
Making room for the TV
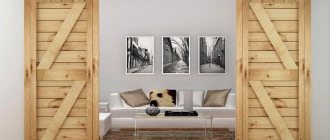
Our mentality is that the TV is usually the main part of the living room. In most cases, this is a solid panel that is placed on the wall or in the center of the room, on a stand. Near her, family members, guests, friends, acquaintances sit in comfortable chairs or on the sofa, and watching TV shows or a movie is accompanied by an active exchange of opinions.
This type of interior can be considered optimal for several reasons:
- original design solution;
- creating a visual illusion of more voluminous space;
- long and narrow furniture goes well with a flat plasma TV panel and tall sound speakers;
- a well-chosen stylish bedside table favorably complements the overall look of the living room;
- departments and drawers filled with necessary things are an example of functionality.
Either way, purchasing this piece of furniture will greatly improve the appearance and functionality of your living room.
TV stand made of PVC pipes
This TV stand is very easy to make. This kind of stand can be assembled in a couple of hours, to the size of almost any flat-screen TV. For this particular project, I will be installing a 32-inch flat screen TV. The stand will be high enough to make it comfortable to watch TV from the bed.
If you decide to replicate my design, please note that larger or heavier TVs may require larger diameter pipes and wider long legs.
Advantages of a homemade bedside table
Each buyer draws for himself an ideal model that will not only fit into the interior in size, but will also match it in color and style.
- A wide selection of furniture products, including TV tables, allows you to purchase seemingly any model.
- However, when faced with the specific task of choosing, a person is often faced with the fact that the size, color, or design are not suitable. It is this factor that pushes many people to start making furniture with their own hands.
- Making a TV stand with your own hands is quite simple. To do this, you just need to choose the right model, focusing on your professional level. The choice of material for the construction is also critical.
- Some materials make it easy and convenient for even beginners to work with them, while others require not only skills, but also special tools for processing.
- Assembling a TV stand with your own hands requires meticulousness and a correctly structured step-by-step scheme for installing parts.
- By assembling a TV stand with your own hands, you can not only get a unique design, but also save significantly on the purchase of a ready-made model.
However, when faced with the specific task of choosing, a person is often faced with the fact that the size, color, or design are not suitable
In addition, you will need screws, self-tapping screws and four guides for further securing the manufactured drawers to them.
The inner wall should not be removed, because it gives the structure additional strength, preventing it from bending under the weight of the TV.
Step-by-step instructions for making a bedside table
- We prepare the drawing. We take a ready-made and proven drawing, or we develop it ourselves, taking into account the size of the TV and its weight.
- We make patterns for all elements. This stage will allow you to accurately calculate the material consumption and not make a fatal mistake.
- We cut out the materials.
- We sand the cut edges. When working with wood, you will have to sand not only the cuts, but also the remaining surfaces.
- Cover the edges with tape. This step is necessary when using chipboard material. To glue the tape you will need an iron and a soft cloth.
- We assemble the cut parts. Assembly is always carried out according to the same scheme. You should start with the countertop. Legs or side backs are attached to it. Then the bottom shelf is screwed on. After the general structure is assembled, we fill the cabinet with additional parts - middle shelves. The rear backrest and doors are attached next to last. If there are drawers, provision should be made for preliminary fastening of the guides on the inner sides of the side walls.
- The last stage of assembly is attaching the legs, rollers or pads.
Assembling a TV stand with your own hands requires meticulousness and a correctly structured step-by-step scheme for installing parts.
Not every TV stand can be made with your own hands using any available material.
There are also more universal designs that you can make with your own hands from existing scraps or leftovers from other furniture.
You can also make a cabinet partially from glass or decorative plastic.
We personalize the cabinet through decor
Not every material requires finishing. Laminated plywood looks quite self-sufficient without additional decoration. Chipboard has glued decorative surfaces and, apart from gluing the cut edges, does not require painting. Solid wood is perhaps the most finicky in this sense.
It must be primed and treated with stain. This coating helps highlight the grain of the wood and protects the wood from dullness, dust and moisture. If desired, the wood can be painted or varnished. Wooden elements can also be decorated in the form of artistic carvings on the outer walls or table top.
Any materials can be painted, covered with decorative film, or applied with stencils.
Often, the decor of TV tables consists of combining different materials and decorating it with glass parts. The glass used should not be less than 8 millimeters thick. You can use transparent, dark, mirror glass. Stained glass doors look beautiful, although these designs are more fragile than solid sheets of glass.
For beginning furniture makers and just amateurs, it is best to use ready-made drawings of a bedside table.
Some designs require certain materials that may not be suitable for the craftsman in terms of cost or durability.
Often, a TV stand can accommodate CDs, magazines, newspapers and decorative items.
Making a long TV stand with your own hands
To make a cabinet with your own hands, take laminated chipboard in the color you like. Chipboard width 16 mm or 18 mm.
Required parts:
- Two sheets measuring 1600x454 mm for the table top and the bottom of the product.
- Three walls 545x454 mm.
- Shelf 767x454 mm.
- The back wall is made of MDF 1600x545 mm.
- Two drawers measuring 759x223 mm.
- 4 decorative handles.
- 4 legs.
- 4 thrust bearings.
In addition, you will need screws, self-tapping screws and four guides for further securing the manufactured drawers to them. Between the drawers, it is advisable to make a shelf from MDF, measuring 767x454 mm.
To make the boxes you will need two pieces of MDF 750x445 mm each, which will be used to create the bottom of the cupboard. The side walls of the drawers will require four pieces of chipboard measuring 450x220 mm. And two pieces of chipboard measuring 755x220 mm, from which the back wall of the drawer will be formed. Assembling the drawer begins with connecting the side and back walls. Then the MDF bottom is attached. The last element is screwed on the front part, on which decorative handles are pre-fixed.
Making a bedside table with drawers is quite difficult, so this model should only be attempted by craftsmen who already have certain skills in assembling furniture.
The same model can be assembled without using drawers. The second compartment can be left without a partition in order to be able to place larger elements of equipment or decor there. Or it can be made identical to the first compartment. The inner wall should not be removed, because it gives the structure additional strength, preventing it from bending under the weight of the TV.
By assembling a TV stand with your own hands, you can not only get a unique design, but also save significantly on the purchase of a ready-made model.
The variety of materials allows you to make very cheap and simple models, as well as go for the chic.
You can use transparent, dark, mirror glass.
Assembly
After preparing all the parts that act as parts of the future structure, the assembly of this bedside table is carried out. To make your own TV stands truly high-quality and reliable, the basic rules of this process are taken into account:
- All parts are connected. To do this, you can use different fastening methods. Most often, holes are drilled in different elements, after which dowels are used for a reliable connection. Another method involves the use of self-tapping screws designed for working with wood or special confirmations, and the caps of all fasteners should be recessed quite deeply into the material. To prevent them from spoiling the appearance of the structure, special decorative stickers are used. The third option for connecting parts involves the use of eccentrics, which are used everywhere in the process of manufacturing various furniture. The difficulty of this method is that to work with eccentrics you must have the appropriate skills, since if you incorrectly calculate the depth or drill not too accurately, a through hole can be obtained;
- different shelves or doors are installed if they are planned in such a bedside table. Their number may vary, so it is possible to make a bedside table containing the optimal number of different compartments. Their sizes depend on what exactly is planned to be stored here;
- The boxes are being assembled. They are usually made from the same material that was used to create the entire cabinet. The depth and other parameters of such boxes completely depend on what will be contained in them. The facade must certainly be well suited to the entire structure;
- The fittings are fixed, making it easy to use different drawers or cabinets. For this purpose, handles and guides are used along which the boxes move.
Thus, the procedure for creating a cabinet on which the TV will be installed is a fairly simple and understandable process, for which different materials and elements can be used.
Front panel elements are glued together using acrylic
Front panel All elements of the cabinet are glued together and dividers are added
Trying on the front panel and cover
Before gluing the stand, assemble it and secure it with clamps
We adjust all sides and glue the stand