Slope design
How can you design slopes?
- Plaster with cement
- MDF or laminate finish
How to do it?
- Plaster
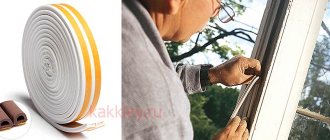
What you need: spatula, level, paint mesh and tape, metal paint corners, beacons. Plaster mixture, finishing coat, liquid primer, sandpaper.
The advantages of this method: reliability, durability, such a finish does not require special care.
How to do it: clean the slopes from the old coating with sandpaper, cover the surface with soil, set the boundaries of the slopes using beacons and level corners. Cover the door frame with masking tape to prevent contamination. When the beacons are securely attached to the wall, it is necessary to secure the painting mesh. Next, dilute the plaster solution and cover the slope area with it.
Slope putty
As it dries, it is necessary to inspect the slopes for cracks; if any, they must be covered with the same solution. After complete drying, cover the surface with liquid primer and finally with a finishing solution. Finished slopes must be sanded in the area of unevenness.
Sanding with sandpaper
- Finishing with plasterboard boards
What you need: sheets of drywall, mounting foam, dry construction mixture or plastic corners for decoration.
Pros: the easiest way to design.
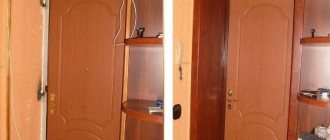
How to do it: cut three sheets of drywall to the required size, remove all excess from the slopes, moisten with water, seal holes and cracks with foam, apply foam to a sheet of drywall, attach to the wall.
Fastening drywall sheets
Do the same with the remaining sheets. When the foam dries, cut off the excess with a knife. Seal the gaps between the sheets of drywall and the door frame with building mixture.
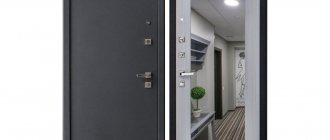
- MDF finishing
What you need: wooden blocks 3 cm wide, MDF sheets, dowels, self-tapping screws, liquid nails. For finishing corners and trims.
Pros: slopes acquire the most aesthetic and complete look.
How to do it: make holes for dowels inside and outside along the edges of the slopes. Attach the guide rails to the dowels strictly vertically. Adjust MDF sheets to the required dimensions. Attach the panels to the guides, secure them on the inner edge with small nails, and on the outer edge with self-tapping screws.
Joining MDF sheets
Decorate the outer edges with corners, placing them on liquid nails.
Installation of slopes from MDF
If necessary, cover the internal corners with a decorative strip.
Decorative slats
Do-it-yourself finishing of the front door with clapboard, MDF or chipboard panels: how to sheathe a second internal wooden or metal door, how to make cladding, design of slopes, video
How to sheathe a second internal wooden or metal door
What materials are suitable for interior decoration?
Chipboard. An inexpensive material made from small chips glued together with resins; the sheet structure is uniform. Since the moisture resistance of this material is reduced, it is undesirable to use it to cover residential doors. Finishing is easy to perform and does not require special knowledge.
Chipboard door
Faux leather. Great variety in structure and color. Finishing is quick and easy; it is also possible to order an individual firmware design.
Faux leather door
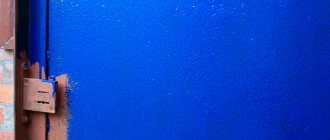
Powder coating. Suitable for doors that do not require sound insulation. Does not require specific maintenance, wear-resistant and durable. The choice of structure is large, the choice of color is small. The complexity of the work is great; you can’t do it yourself without preparation.
Powder coating
Also, the internal door can be covered with clapboard or MDF panels.
Preparing for door trim. For any type of finishing, you need to prepare and treat the surface to be sheathed. The metal surface must first be cleaned with sandpaper, then the dirt must be removed with a solvent and covered with primer. Never cover a rusty surface with soil.
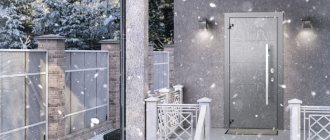
How to cover the outside of a street door?
Moreover, you need to understand that not every material can be used to process the external or internal part of the structure.
To update a box located from the street with your own hands, you can use:
- Steel sheets. Their structure can be smooth or embossed with an imitation of an interesting pattern. Good sheets of steel will protect the room from drafts entering the room, but they must have a backing made of polymer or cork.
- Viniplast. It may consist of fiberboard or PVC. This material is not resistant to sunlight, and therefore it must be coated with a special varnish with an ultraviolet filter.
What are slopes made of?
The classic way to finish a doorway is to plaster it. This method is still relevant today. The slopes are reliable, they are difficult to damage, there are many finishing methods: paint, wallpaper, attach any other finishing material. The only disadvantages include high labor intensity. There is one more point: it will be difficult to achieve a perfectly smooth surface without the necessary skills, but it is possible to level it with wallpaper.
A well-plastered slope is beautiful and durable
You can quickly and without any problems decorate door slopes with MDF panels. There are even special “L”-shaped profiles. Installing a slope in this case comes down to correct markings and inconspicuous but reliable fastening. There is a little more work if you install slopes made of laminated or veneered chipboard:
- The cut out parts of the slopes are attached to the wall. There are three methods: using polyurethane foam and liquid nails, using plaster mortar or using an assembled frame.
- Foam is applied into the gaps between the wall and the material according to special rules.
- The platband is installed.
The finishing made from these materials is quite hard and has a very attractive appearance. The installation technology is simple and does not require virtually any special knowledge and skills. The result is at least good.
Another simple but popular method is covering slopes with plasterboard. Even without the skills, installing door slopes with your own hands from this material allows you to achieve good results: all the work is elementary. It just takes effort.
There is another inexpensive way to design door slopes - from plastic. If you have the skill to work with such material, you will not have any questions. The only disadvantage of this finish: low strength.
So there are many options for designing a doorway. Usually they choose the one that best suits the design of the entire room.
Decorating the opening with PVC panels
The advantages of plastic PVC panels include low cost, pleasant appearance, variety of colors, ease of installation and excellent water resistance. At the same time, such panels break even from slight pressure, fade in bright light and are easily scratched. Due to the increased fragility of plastic panels, they can only be used to decorate rectangular doorways.
Plastic panels are mounted directly on the walls of the opening (gluing them with “liquid nails”), or attached to a pre-constructed metal sheathing.
Now, knowing the basic methods of finishing doorways, you can choose the most suitable option and start decorating the passages yourself. If all the decoration methods described above do not seem attractive enough to you, contact builders and designers for help and they will make any of your fantasies and wishes come true.
Installation technology
MDF panels for metal doors are mounted using a fairly simple technology:
- To do the job most efficiently, you should remove the canvas. This method will allow you to avoid distortions that may appear if you try to carry out the process by weight. All protruding elements are removed from the part. Before starting finishing work, it is necessary to remove the door leaf from the hinges
- The canvas is laid on a flat and stable surface.
- It all starts with sanding all areas well. It is necessary to remove old paint and possible traces of corrosion. Next comes cleaning and degreasing.
Now you should prepare the panel itself. On the reverse side, it is wiped well to eliminate any contamination that could lead to peeling. Next, a special adhesive is applied to the door base. It is selected taking into account the materials used. It is distributed in waves, and all edges must be well coated. The choice of glue should be approached very carefully, otherwise all the work may be in vain. For greater convenience, the location of all door connectors is marked in advance. The panel is laid on the surface. They carefully align it and begin to press it
It is important to ensure that the MDF lies clearly in its place. To get the job done faster, clamps are used. Holes are drilled around the perimeter, the distance between which should be ten to eleven centimeters
They will allow for additional fixation with self-tapping screws. If additional screws were used, then further work is carried out immediately. They consist in drilling out places for handles and locks. MDF panel for the door - installed.
It is necessary to take into account that a significant problem may arise - the handles do not fall into place. This will mean that the thickness of the overlays is chosen incorrectly. But it happens that it is impossible to find another one. Then the holes for the handles are milled, which are recessed into the panel.
Replacing the MDF panel on the door
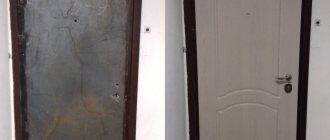
A situation may arise when the MDF trim on the metal entrance door has been damaged and needs to be replaced. This process is simple and you can handle it yourself.
You need to measure the canvas, after which it can be purchased at any specialized store. In addition, you will need a solution for degreasing the metal door and means to protect it from corrosion.
Replacement sequence:
- Preparing the door leaf. At this stage, the old lining is removed, after which the surface is degreased, and then it is painted or a protective film is glued.
- Holes for self-tapping screws are made on the canvas along its perimeter.
- Lubricate the surface of the lining with glue, and then use clamps to fix it on the door leaf.
- Fix the cover using self-tapping screws. The inner panel is installed first, and then the outer panel.
Before replacing the MDF lining, all fittings must be removed
This simple procedure allows you to completely renew your metal front door and give it a beautiful and aesthetic appearance. In addition, the presence of MDF linings can significantly increase the heat and sound insulation characteristics of entrance doors, so living in such a house becomes more comfortable and cozy.
Opening design options
First of all, you need to decide which finishing option is right for you ().
The most common types of decoration are:
- plastering the opening with ordinary cement mortar;
- forming edges using drywall sheets;
- finishing doorways with MDF panels;
- plastic linings;
- wooden extensions;
- an opening trimmed with decorative stone.
These elements have their own characteristics that need to be taken into account when choosing an installation option.
The entrance door slopes must meet the following requirements:
- should serve as a beautiful detail that matches not only the entrance area, but also the entire interior;
- must have good thermal insulation properties, preventing cold air from entering the apartment;
- must be strong enough not to be accidentally broken;
- Such a characteristic as resistance to scratches and mechanical stress is also valued, because they often cling to the slopes and touch them with objects brought in and out through the door.
Plaster
The most labor-intensive option is considered to be plastering the opening with cement mortar. But it also has its advantages. Such slopes are monolithic and completely cut off the possibility of cold air penetrating through them.
The plastering process is carried out in several stages and can take 3-4 days, since it is necessary to wait for the previous one to dry before applying the next layer. After finishing the plastering, you can paint the surface or stick any material on it.
Drywall
This option is used quite often when there is no time or desire to do plastering work.
There are two options for working with plasterboard sheets:
- glue installation;
- installation on guides.
For doorways, adhesive installation is more often used. Special glue is diluted thickly and distributed in cakes in the form of beacons on the back side of the plasterboard blanks. The strips are then glued into place, leveling is done by pressing the sheets until the glue dries.
How to bend MDF
Sometimes it becomes necessary to trim elements of a round or semi-oval configuration with wood fiber sheets. Naturally, the question arises of how to bend the material and whether it is possible. It should be noted that it is possible to bend MDF if thin panels are used (the average value should not exceed 3 mm).
How to bend an MDF panel at home
To bend the panel, perform the following steps:
- Manufacturing blanks from fiberboard.
- Make notches in the sheet across the bend.
- Cut pieces of MDF to the required dimensions.
- At the bend points, apply lines at intervals of 5 mm. The undercut should be 1 mm.
- The resulting shavings must be collected and mixed with glue until a paste-like mixture is formed, which fills the holes.
- Place the MDF sheet on the template and fix it with nails. The nails do not need to be driven deep for ease of removal.
- The last stage is removing the workpiece, sanding and painting.
By following the recommendations, you can effortlessly sheathe slopes with MDF panels or other building materials yourself. Anyone can do all the manipulations with their own hands, despite the fact that finishing slopes with a material such as MDF is a painstaking and time-consuming process.
Features of the material
To complete the design of the doorway, a prerequisite is the creation of smooth and neat slopes. Often, owners decide to do everything themselves. A wide variety of materials are used for these purposes; MDF is one of the popular options.
MDF slopes can be used for entrance doors in almost any interior. This material has a number of positive qualities:
- Strength. Resists moderate impacts and most damage.
- Decorative. It looks great and adds an atmosphere of comfort and style.
- Variety of coatings. May differ in color and type of top layer: veneer, eco-veneer, PVC, etc.
- Ease of installation. Easy to process and install with your own hands, even for a beginner.
- Imitation wood. The coating basically imitates wood texture and may look like an expensive species.
- Soundproofing. Provides additional protection from outside noise.
The main advantages of MDF panels are their strength and ease of installation.
Advantages of building materials
Finishing a door opening is a labor-intensive process that requires precision and following advice. Therefore, it is possible to make this kind of cladding yourself. Slopes can be finished with panel materials, the variety of which can satisfy any needs. Often finishing work is carried out with plastic, wooden panels, plasterboard, but MDF panels are considered the most successful.
Advantages of MDF panels
Since this finishing building material has numerous advantages:
- Availability of material.
- Easy to install.
- Aesthetic appearance.
- The density of the material creates additional sound and heat insulation.
- Environmentally friendly. Fiberboard is made by pressing wood chips under the influence of temperature and pressure. The core binders of the fibrous material use carbide resins, which are harmless to humans. Consequently, MDF is an environmentally friendly building material that can be safely used for cladding both exterior and interior structures.
- The color palette allows you to satisfy any request. You can choose the colors of the panels from wenge to bright shades.
Doorway lined with MDF slopes
But like any building material, MDF panels are not without disadvantages:
- Weak resistance to mechanical damage. If the MDF panel is deformed, the damage cannot be restored.
- Does not withstand significant levels of humidity.
Therefore, finishing door slopes with MDF panels should not be done in conditions of high humidity.
Do-it-yourself MDF front door slope (video)
Installation technology
MDF panels for metal doors are mounted using a fairly simple technology:
It is necessary to take into account that a significant problem may arise - the handles do not fall into place. This will mean that the thickness of the overlays is chosen incorrectly. But it happens that it is impossible to find another one. Then the holes for the handles are milled, which are recessed into the panel.
The interior of a house will not have a complete look without modern doors - beautiful, comfortable and reliable. And in order for the door to be opened conveniently, the doorway slopes must be correctly installed and finished with high quality. In addition, a fully finished slope can be attached to the door frame. In this case, you will not have to spend time on finishing work.
Preparing the doorway for finishing
Regardless of what kind of finishing material - PVC plastic, MDF or artificial stone, you decide to use to decorate the doorway, this opening should first be properly prepared.
If there was previously a door in the opening that you now decide to remove, first of all, remove the door frame from the wall and seal the holes left from its fastening with cement mortar. After this, plaster the opening, controlling the verticality and horizontality of its walls.
If the opening did not initially have a door, clean its walls from wallpaper, paint or whitewash and fill the cracks in the plaster with putty.
How to do wall finishing work with your own hands?
Next, we’ll show you how to decorate the walls inside and outside the apartment with your own hands. There can be several types of finishes:
- Using plaster. This method requires accuracy and skill, so not many people prefer it. To achieve the best result, it is better to use textured plaster followed by painting.
- Covering the frame using special materials. The frame design helps to neatly hide existing wires and save on preparing the leveling mixture.
- A combination of both methods, when a solution is used to give the structure greater strength, all cracks and gaps are covered, and then the finishing material is glued.
For the first method, the procedure is as follows:
- the door leaf should be protected from possible damage with masking tape or plastic film;
- the surface of the slope is leveled and primed;
- to level the base using a level, beacon profiles are installed;
- the slope is covered with the prepared solution and then puttied;
- After the plaster has dried, finishing is done with decorative material.
When choosing a frame method, follow the instructions:
- the wall is prepared for installation of the frame - dust and dirt are removed, as well as finishing materials that were previously used;
- the base is leveled and primed to secure the surface layer;
- a frame made of metal profiles or wooden beams is installed along the edges of the slope;
- if necessary, the cable is laid;
- cladding is done with cladding material.
Attention We note that wood has become more often used for finishing, which has a number of advantages: environmental friendliness, durability, ease of maintenance and aesthetic appeal. Plasterboard sheets fade into the background, because
require additional treatment against moisture, as well as finishing primer and painting.
It is important that the selected material is compatible in texture with the material of the door leaf and matches the characteristics of the room. Artificial stone and tiles are used quite often - these materials give the interior a luxurious look, they are durable and, despite their high cost, are in demand
There are many ways to finish door slopes, the choice of which depends on the operational characteristics of the room and the interior as a whole. To bring an idea to life, you can use a combination of several materials at once - such a solution will look more advantageous.
Decorating a doorway with artificial stone
Artificial decorative stone is a modern finishing material that is inferior to its noble natural counterparts - natural granites, limestones and basalts only in weight and price, which in itself is an argument in its favor. But lightness and accessibility are not the only advantages of this material. Artificial stone is beautiful, diverse, has a rich texture and is produced in a wide range of tones. Due to the fact that this material is made using a technology close to that of tile manufacturing, working with it does not require the skills of a mason - stone tiles are laid as simply as ceramic tiles.
In order for the homemade stone cladding of the opening to look like a stylish and professional finish, when working with artificial stone you must follow certain simple rules:
- the masonry on both sides of the opening must be symmetrical;
- the seams between individual stone dies must be neat, even, of the same thickness and width;
- the stone decoration of the lower part of the rectangular opening is supposed to be wider and more massive than the upper rows of decor;
- The edges of the stone frame should be made uneven - this design technique will create the effect of “ease and naturalness.”
Lining the opening with artificial stone: instructions
To work you will need:
- several packages of decorative stone;
- glue – a special water-soluble dry mixture based on cement and polymer additives or a two-component polyurethane composition of the “Keralastik” type;
- primer;
- construction mixer and bucket for mixing glue;
- marking pencil;
- trowel;
- level;
- spatula - simple and serrated;
- paint roller.
Work order
- Treat the prepared walls of the opening with a primer, and while it dries, remove the stone tiles from the boxes and lay them out on the floor covered with an old sheet.
- Lay out the edge of the opening from the dies, experiment with their location and, having achieved a beautiful combination of shapes and shades of individual tiles, leave them in this position.
- When the soil has dried, mark the outer contour of the finish and the placement lines of the tile rows on the wall.
- According to the instructions, prepare a portion of fairly thick glue. Start attaching the stone dies from the lower left corner of the opening.
- Apply a thin, half-centimeter layer of glue to a small area of the surface to be decorated and smooth it with a notched trowel. Using a flat putty knife, apply the same layer of adhesive to the back of the stone tile and press the tile against the wall in one smooth motion. Use a soft cloth to wipe off excess adhesive from the surface of the tile.
- Having covered the entire opening, mask small chips and scratches with matte paint (if any appeared on the stone during the work) and cover the entire masonry with a special colorless and transparent acrylic composition, which gives the artificial stone special water resistance and resistance to abrasion.
Advice. To make the seams between the tiles less noticeable, mix a little coloring pigment into the adhesive composition, the color of which matches the shade of the stone.
Door slope material
Today there are several technologies for forming entrance door slopes, both outside and inside, where different building materials are used. Let’s just briefly outline them, and also note the advantages and disadvantages of each.
Plaster mortar
This is an old method for making door slopes that is still used today. And here we take into account not only the low cost of the technology and materials used, but also the possibility of obtaining a high quality final result. Moreover, today, more and more often, instead of ordinary plaster made according to the classical recipe, ready-made mixtures of textured and decorative compositions are used. With their help, you can give the slopes an attractive appearance and match them exactly to the interior or exterior design of the house.
Slopes made of plaster mortarSource masterdel.ru
Drywall
This building material is becoming increasingly popular year after year among private sector developers. Simple, reliable, inexpensive, with high speed of installation work. The only drawback is the joints of the strips, without which it is sometimes impossible to finish the door slopes. This problem can be solved, but this requires additional manipulations.
MDF panels and laminate
Essentially, it is a more expensive replacement for drywall. But these two materials have a wide range in terms of decorative finishing of slopes. As for MDF panels, if the width of the doorway is greater than the same dimensional indicator for the panels, then they will have to be joined on the slope, which reduces the presentable appearance. In this regard, laminate is preferable because its joints are less noticeable.
Slopes made of MDF panelsSource dveri-komandor.ru
Natural wood
Slopes for the front door were made of wood before. As in the past, today this pleasure is not cheap. But the end result of the operations will amaze everyone. Wooden slopes have incredible beauty when combined with a wooden door. At the same time, wood can always be restored, which extends its already long service life. The only thing that needs to be noted is that the process of forming slopes from wood is complex and requires knowledge of some of the nuances of the operations being carried out.
laminated chipboard
For some reason, many people believe that laminated chipboard is used only for making furniture. Builders and designers appreciated this material. The only thing is that for finishing slopes they use a thinner grade of material (6-10 mm) than furniture material, which reduces its cost. All other characteristics can give odds to any other type of finish. You just need to understand that ordinary laminated chipboard is used for internal slopes, and moisture-resistant for external ones.
Slopes made of laminated chipboard source dverivmir.ru/wp-content
PVC panels
It should be noted that plastic panels, when they first appeared on the construction market, immediately became popular. The huge variety of design solutions offered was impressive. Therefore, designers immediately began to use them wherever possible. Door slopes were not left out either.
But over time, it became clear that PVC panels do not have sufficient strength, especially if they were exposed to shock loads. Under the influence of changing temperatures outside, they quickly failed. That's why they were abandoned today.
Stone and brick
Finishing the slopes of the front door with stone or brick is rare today. For some reason, many people think that this design option for front doors is unfashionable. But the point here is probably different:
- laying stone or brick is a complex and labor-intensive process that requires a lot of time;
- after finishing the work it will be difficult to finish the walls;
- This is not the cheapest option, because it is not the material itself that is expensive, but the work of the master.
As for the advantages, it should be noted the high strength of the structure and the unique individuality of the surface of the slopes.
Slopes made of decorative stoneSource kakpostroit.su
Extras
The appearance of these elements on the market has made finishing slopes simple. But craftsmen assure that the extensions are best used for interior doors. On the street, under the influence of changing humidity and temperature, this material quickly deteriorates, losing its appearance. But if the task is to decorate the front door from the inside, then there are no restrictions or prohibitions. Today, manufacturers offer entire lines of door finishing elements, which allows you to choose the desired option without any problems, both for the door and for the interior design of the room.
A huge variety of extrasSource oteplicah.ru
Advantages and disadvantages of the material
Finishing a doorway is a simple procedure that requires only a certain amount of care and compliance with some nuances. Different materials can be used in the work, but MDF panels are considered the most successful. Their popularity is due to numerous advantages:
- Availability. Indeed, now there is a wide variety of these products that are affordable. You can purchase all the necessary components for them.
- Easy to install. Naturally, if you have no experience, then any finishing work may seem complicated. But once you practice a little and understand the essence, the work will seem quite easy.
- Great looks. There is a certain rule, which is that all elements must be combined with each other. Therefore, the slopes on the front door must be made of suitable products. MDF will be an excellent solution in such a situation.
- Additional sound and heat insulation. This is an important point that many initially do not take into account.
- Safety. The panels are completely environmentally friendly.
MDF panels allow you to create an impressive decorative coating and insulate slopes.
We must not forget that there are no completely ideal materials. Therefore, the disadvantages should also be taken into account:
- Average resistance to damage. This product perfectly withstands various impacts due to its high density, but is very unstable to scratches, as well as other similar impacts.
- MDF is a bad option for rooms that have high humidity.
- Sometimes difficulties arise with the selection of additional elements. The fact is that overhead MDF corners, which have a limited decorative range, can be used for finishing. Therefore, you should think through the overall design in advance.
On a note! Many people mistakenly confuse finishing MDF doorways with installing extensions on door frames. These are completely different procedures in technology. It should be taken into account that extensions are excellent for narrow (up to 11-12 cm) and straight openings that are found in interior structures.
MDF door frame
The door slope is part of the space
, located between the door leaf and the wall, which can be decorated using:
- MDF panels (finely dispersed fraction);
- drywall;
- plastic;
- laminate
According to the repair rules, the installation of slopes is carried out at the final stage of door installation, and the finishing method is chosen based on the type of door frame. So, if the door is located at the entrance, then it will need to be insulated. Interior doors, as a rule, are not insulated, so their door slope serves only a decorative function.
In general, there is a general requirement for all slopes (external and internal) - they must be perfectly smooth and neat
.
If you choose from different finishing methods, then an MDF door frame is the best option. The great demand for MDF panels for finishing the opening can be explained by:
- the advantage of finishing material made of MDF;
- affordable price;
- many variations of style solutions.
Advantages of using MDF in finishing doorways
MDF door frames are often chosen for finishing door openings made of wood. This is primarily explained by the beautiful texture of MDF panels, and the positive characteristics of the material are added to this:
When finishing with MDF panels, experts recommend not using the material in conditions of high humidity.
Therefore, when purchasing a product, you need to pay attention to its quality. There are cases when door slopes, finished with low-quality material, quickly lose their aesthetic appeal due to its swelling, delamination or damage to the outer surface
Laminate cladding
Such finishing usually does not raise questions even among inexperienced builders. This is due to the special flexibility of the laminate, its ability to take different shapes. The material looks good and does not harm the environment, but it does not tolerate high humidity, so you should not use it on the outside of the opening. The price of sheets is 300-3000 rubles.
Finishing a doorway with laminate differs little from lining it with MDF panels. But it is not necessary to mount the frame: another finishing method, suitable for smooth walls without flaws, involves gluing the material with foam directly to the surface.
Source: misterdver.ru
Installation of slopes using the adhesive method
If preference is given to the glue method, then you should familiarize yourself with the tips for installing the front door and MDF slopes. Work algorithm:
- First of all, for the glue method, you need to plaster the slopes.
- It is recommended to treat the prepared surface with a primer. After priming, the surface must be waited until completely dry.
- Install beacon profiles according to level. To install profiles on slopes, apply a solution and level the beacons in all directions. Give the solution time to set.
- The solution is applied to the slopes and leveled along the beacons with a spatula. After the manipulations, the slopes should be left for 2 days until the solution completely sets.
- The inside of the part is coated with glue and pressed to the surface.
- When all the elements are installed, the resulting joints are sealed or covered with overlays.
Buy MDF overlay in Moscow and the Moscow region
To make an entrance metal or armored door aesthetically attractive and harmonize with the interior design, many office owners and company representatives use door trims. has been providing its services in the door lining manufacturing market in Moscow and the Moscow region for more than 17 years, providing its customers with unsurpassed quality products at affordable prices. Our designers are always aware of all the new fashion trends in the production of MDF overlays. An individual approach, as well as the constant expansion of the range of samples, allow us to provide our clients with the widest variety of ready-made design solutions. Huge production capacity and the use of modern, high-tech equipment allow us to complete even the most complex orders without significant time delays.
You can always order the production of a door lining of any shape and size by calling our managers.
A technician’s visit to take measurements in Moscow and the Moscow region costs 1,000 rubles (free of charge when concluding an agreement to replace the door trim).
What to veneer with
The preliminary stage begins with deciding how to finish the slopes of the front door.
The most commonly used materials are:
- The classic option is plaster. It is durable and easy to use, making it possible to get rid of drafts and the smallest cracks. Finishing the slopes of the front door with your own hands using plaster is labor-intensive work, you will have to smear yourself in the solution, and it takes a lot of time for the mixture to dry.
- The use of gypsum boards for finishing gives them a solid appearance. However, the material is inferior in strength to cement plaster. But it is much easier to work with, and the process goes faster.
- Laminate and MDF panels immediately give the slopes a different look; they look especially good with wooden doors. After their installation, no finishing is required. The materials have sufficient strength and do not deform after use, therefore they are very often used for finishing.
Plaster finishing
Prepare tools and materials for work before finishing the slopes at the front door:
- putty knife;
- trowel;
- rule;
- building level;
- construction mixer, its price is low, but it will save time and materials.
- painting mesh;
- masking tape;
- lighthouses;
- metal painting corners;
- dry mixture for plaster;
- finishing putty;
- liquid primer;
- sandpaper.
- Remove loose plaster and prime the surface.
- Align the guide beacons to the building level and fix them with cement-sand mortar. At the connection points between the slope and the wall, install the painting corners according to the level.
Installation of construction beacons
- Cover the door frame with masking tape to keep it clean.
- Secure the painting mesh when the solution on the beacons has set.
Applying cement putty
- Prepare the putty solution as indicated in the instructions. First fill the potholes with it, and then apply it to the entire wall, using the rule, stretch it along the beacons, creating a flat surface and not forgetting about the corners.
- Prime the dried plaster and level it with finishing putty.
- Sand the slopes with sandpaper after final drying.
- Apply a layer of water-based paint to the putty.
Plasterboard cladding
Probably the easiest way. (See also the article Features of finishing slopes of plastic windows.)
Prepare in advance polyurethane foam and a sheet of plasterboard, some plaster for finishing the corners or a plastic corner.
- Start your work by measuring the slopes. Then cut out three parts from the gypsum board sheet - the top, for the right and left sides.
- Remove any protruding plaster from the slopes and moisten it with water.
- Fill the deep potholes with polyurethane foam, and then apply it to one of the parts with a snake.
- Attach and glue the cut-out plasterboard slope onto the foam. Check its verticality with a building level.
Cladding with gypsum plasterboards using self-tapping screws and a metal frame
Do the same with other blanks.
- Take a sharp knife and cut off the frozen foam, as well as the parts of the plasterboard protruding beyond the wall. Putty the corners and contact points with the door frame. You can instead glue decorative corners to the corners after painting the finished slopes.
Finishing with MDF panels
Laminate and MDF panels have an attractive appearance, are durable and easy to use. The finishing gives the front door a solid and finished look. (See also the article How to siding a house.)
You will need for work:
- MDF panels;
- wooden slats or bars 30 mm wide;
- liquid Nails;
- self-tapping screws with dowels;
- platbands;
- decorative corner.
Correct finishing of entrance door slopes with MDF panels
- Drill holes for installing dowels along the outer and inner edges of the slopes. Guide strips will be attached to them.
- Attach slats of the required thickness to the slopes, maintaining the vertical. Please note that the inner guide will rest against the frame at the outer corner, so when the space between the wall and the door frame is foamed, cut a groove in the foam and insert the panel into it.
- Cut the top of the slope to size. For fastening, use self-tapping screws (counting screws) or small nails.
- Make a template out of paper for the panels so that there are no gaps in the slopes. Cut all the parts according to it.
- Attach the finished parts to the guides - glue or nail the inner edge with small nails, secure the outer edge with self-tapping screws.
- Finish the outer corners of the slopes with a decorative corner, gluing it to liquid nails.
- Cover the inside corners with decorative strips.
- Install platbands.
Sealing door slopes with foam
Finishing the entrance door slopes with laminate is done in the same way. You can also use plastic panels, but they are not so durable.
Plastic finish
A popular material, environmentally friendly, budget-friendly and easy to maintain. Manufacturers offer a wide color palette, which makes it easy to match the plastic to the texture of the door leaf. A square meter costs no more than 200 rubles. But the material is not particularly durable and does not fit every door.
The entrance door opening is lined with plastic according to the same principle as MDF: first the surface is prepared, then a sheathing of slats is attached, and then plastic panels are attached to it.
Making slopes using decorative materials
You can make slopes near the front door using MDF panels or other similar decorative material, for example, laminate.
This method is one of the most optimal and simple, in addition, it is performed quite quickly. Finishing slopes with MDF panels has a number of advantages.
Firstly, there is a wide choice of colors. Secondly, MDF panels are quite easy to process and install on site, and in addition, they have a very affordable price.
To install MDF panels, there is no need to carefully prepare the base surface.
All corner joints with this method of making slopes are mounted using special profiles.
It’s even easier to make slopes near the front door using laminate. Working with this decorative material is quite simple and there should not be any difficulties when doing the work yourself.
Before you begin installing the material, the surface should be primed and all large irregularities should be removed.
Video:
As a rule, the laminate is fastened using self-tapping screws with special decorative caps.
They can also be hidden under special masking putties, which are sold in all specialized stores.
If necessary, you can additionally hide a layer of insulation in the space between the laminate and the wall, which will further increase the efficiency of the slopes.
Also, at the final stage, the laminate can be covered with varnish or special alkyd paint, thus giving the surface of the slope an even more attractive appearance.
Preparatory moments
All the benefits that come from lining the slopes of external doors with MDF panels can be demonstrated during installation. Therefore, before starting work, you can study a video of exactly how slopes are made at the front door. Wood fiber panels come in 2 options:
- Designed for finishing work (they have an L-shape).
- Wall panels.
Measuring the doorway
Most novice craftsmen have a completely natural question about how to sheathe the slopes of an MDF entrance door correctly. First you need to do some detailing. To make door slopes from MDF, you need to take the dimensions of the opening, which should be drawn on paper. Based on the transferred data, each element should be schematically depicted. It is recommended to take into account the following points:
- Presence of a threshold.
- The order of placement of parts.
- Opening width and angles of inclination.
After installing the door, all gaps between the wall and the frame must be sealed with foam. After the foam has hardened, all excess should be cut off.
How to make a replacement?
Panels are attached to the row in various ways. Some models use an adhesive compound (foam, liquid nails, glue), and the overlay is fixed to the frame or stiffeners. Often MDF sheets are screwed onto self-tapping screws. The third method of fixation is through grooves and additional fastening with moldings (lock and end).
If the panel was fixed by grooves and side strips, then it is replaced in the following sequence:
- First you need to dismantle the inner panel. First remove the seal, then unscrew the fasteners at the end and near the lock.
- Remove the locking device and dismantle the strips.
- Remove the old panel and put a new trim in its place.
- Return the lock to its place, secure the bolts and screws.
- Replace the end strip in the same way.
- Remove the outer panel, first loosening the fixing screws. Unscrew the armor plate.
- Make suitable holes in the new overlay, using the old panel as a guide. Place the cover into the grooves.
- Reinstall the moldings and armor plate, then the handle.
After all these steps, you should check the functioning of the locks and handles. To better fix the outer panel so that it fits well into the grooves, you should gently tap the milk on the placed board. This must be done from the opposite edge.
Marking and cutting
No less important stage in the process of finishing door slopes than preparation and installation itself is cutting the necessary fragments. In order to take measurements as accurately as possible, one tape measure will not be enough. Use a square and templates to create unique patterns.
You need to start with the bar that you plan to secure first. This is usually the top panel. Please note that in most cases the edges of the slopes are not evenly cut, but run slightly at an angle. All this should be displayed on MDF. Subsequent elements must be applied after installing the initial panel. That is why the process of marking and cutting is combined with installation.
Cutting MDF panels should start from the top strip
You can cut MDF using a hacksaw or saw, but the best option is a jigsaw. Thanks to its cutting element, it is possible to obtain a perfect cut without chips or burrs. Plus, you won't have to put in any effort.
When working with sidewalls, be sure to take into account the presence of a threshold. This is an important point as it can significantly affect the height of the side bars.