The most common way to decorate walls is wallpapering. But over time, stains and damage may appear on them. Don’t rush to completely change the wallpaper and start renovations - they can be decorated in the right areas.
In this article you will learn in detail how you can decorate and fix wallpaper if it has been torn, worn, or scratched.
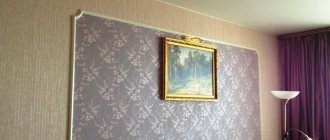
How to hide seams between wallpaper
Many fans of wallpaper decor are well aware of the situation - the craftsmen seem to be very good, and the wallpaper is expensive, and after hanging the wallpaper on the walls, seams between the panels clearly appeared. Unofficially, every third case of renovation with walls decorated with trellises is faced with the problem of how to hide the joints between the wallpaper. It is almost impossible to disguise the stripes by changing the lighting, and re-pasting the entire room is expensive, so before taking radical measures, you can try to eliminate the problem using simpler means.
Lighting and furniture
Often, well-chosen lighting allows you to visually mask the difference in planes. For example, when the perimeter is illuminated from the inside, a volumetric panel will successfully merge with the surrounding surfaces, and the junction of materials will become natural and logical.
In addition, the border of different textured finishes can be successfully hidden with furniture. The easiest way is to hang shelves and install an interesting rack. When connecting vertically, you can install a built-in cabinet in the problem area.
Defect options
Most often, owners blame both the craftsmen and the quality of the wallpaper. But if the craftsmen are professionals, and before this room they managed to glue kilometers of canvases with high quality without any comments, why did they not take into account the peculiarities of the brand of trellis when gluing. Indirect confirmation is the fact that the same problem occurs with both cheap paper and expensive non-woven wallpaper.
The answer to the question of how to make wallpaper joints invisible does not have a clear answer, since the defect itself at the joints can manifest itself in different ways:
- The neighboring canvases have separated, and a thin gap has formed through which the wall is visible;
- A lighter or darker uneven strip of glue residue appeared along the joint;
- The joints at the border of the wallpaper have risen like a “house”;
- At the joints, the difference in shades of the two canvases is clearly visible.
The last point is the most unpleasant. It often happens that when buying wallpaper in a company store, you can purchase rolls from the same manufacturer, the same brand, but belonging to different batches. To sell mismatched items and make the product attractive, salons collect leftover rolls from different batches into one and sell them at a slightly reduced price.
Many manufacturers, due to the peculiarities of the technology for applying paints to the panel, are not able to ensure ideal distribution of the toner; as a result, one edge turns out to be slightly darker and more saturated than the other. It is impossible to hide such a defect, so an icon with two vertical arrows directed in different directions is placed on the roll. This means "reverse sticker sequence". To hide uneven coloring, each subsequent roll must be turned 180 degrees before cutting and gluing. If you do not pay attention in time to the icon hidden in the text of the marking, the discrepancy in shades at the joints can only be corrected by painting the trellises.
Docking profile
The most traditional way of connecting two finishing materials on the floor is a joining profile.
It is almost irreplaceable when tiles are adjacent to a “floating” floor. Laminate, and sometimes parquet, do not have an adhesive connection to the base. When laying such materials, it is necessary to leave compensation gaps for the natural expansion of the board. The T-shaped profile completely hides the joint, connecting the floating and hard floors. A significant disadvantage of this type of fastening is its visibility. Despite the fact that manufacturers offer compact brass, aluminum and plastic profiles in a variety of shades, it is still not possible to completely disguise the joint. If you can’t find the most inconspicuous option, you can support the shade of the profile with other interior accents in color.
Five ways to hide joints
Correctly hiding a defect at a joint is often even more difficult than gluing wallpaper correctly. You can learn how to work with trellises from the instructions, while you have to come up with and look for ways to hide defects on your own.
You can hide joints using one of the following methods:
- Clean the edges of the wallpaper from any remaining glue;
- Shade or paint the walls to hide the background, revealing the gap between the joints;
- Try to flatten the wallpaper panels after first slightly moistening the trellis material;
- Paint the wallpaper or hide the joint using a special tinting paste.
The easiest way to hide revealing light spots is to try to paint over them with special paint or pencil. To do this, you will need to buy a special coloring composition.
To hide the white stripe between the panels, just apply a tinting color to the seam using a brush or ear stick. Wipe off excess paint with a clean napkin.
Unfortunately, hiding the joints in such a simple way is only possible with plain wallpaper, if you can choose the composition of a suitable color.
The riskiest way to hide seam problems is to use tinting paste. To prepare it, you will need to trim the wallpaper, from which the surfaces with paint are removed with a sharp knife or sandpaper. Colored paper dust is mixed with glue and the joint is rubbed. In this way, restorers restore old books and paper products; the method is complex, so it is not always possible to hide the problem.
In particularly difficult cases, owners decide to use polyurethane decorative strips that are glued to the joints. In this way, you can hide any defects, even if the shade of the panels is different.
Sealant
This tool is suitable for eliminating a joint if the edges of two materials fit perfectly together and their texture is similar. In such a situation, you can make the joining line invisible using a sealant of a suitable color or a transparent composition.
Important! The sealant is best suited for combining tiles, mosaics, porcelain tiles, and panels.
Sealing the joint with sealant
It can be used even in damp rooms. True, it will have to be replaced periodically, since the service life of the material is only 2-3 years.
How to hide a joint contaminated with glue
Excess glue at a joint is the simplest case, but only under one condition, if you pay attention to the problem in time. If the wallpaper is glued by hired craftsmen, you will need to check the quality of the work in the first hours, while the glue is still wet.
On vinyl or non-woven wallpaper, it is enough to simply wipe the glue with a dry and clean napkin; on paper, excess adhesive material is blotted, like an ink stain, without rubbing on the canvas. After the wallpaper has dried, the joints must be checked again, since over time, glue stains tend to turn yellow and appear in the picture, after which it will be impossible to hide them.
On dark wallpaper, residual glue at the joints can be hidden using a retouching pencil. Before decorating the seams on the wallpaper in the photo, the marks are wiped off with a paper eraser.
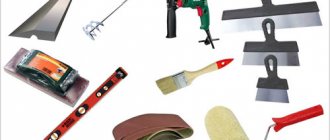
Required Tools
In addition to the wallpaper itself, you will need many more tools and other little things:
- Bucket . It will be needed first. It is most convenient to mix the glue in a bucket. Please note that if you do not plan to use the glue today, you should purchase a bucket with a tight-fitting lid. This is the only way to preserve the properties of the glue.
- Glue tray . Choose a bath that matches the size of the roller. The bath should be a little wider.
- Paint roller . With its help, the glue is distributed on the back side of the wallpaper that you plan to glue, or applied to the wall.
- Wallpaper roller . Don't confuse it with the aforementioned roller, they are completely different. A wallpaper roller is needed to smooth the surface of the wallpaper after gluing. This will help get rid of unwanted bubbles and excess glue protruding between the seams.
- Wallpaper roller for corners . Thanks to its convenient shape, it will easily help you apply the necessary pressure on the corner areas of the canvas.
- Special wallpaper scissors . If you have regular household scissors at home, but sharp ones, you can use them.
- Sharp knife . It is needed so that you can cut the corner joints. A regular stationery knife is best suited for these purposes.
- Rubber spatula . It is needed to level the wallpaper.
- Clean rags . They are needed to wipe off glue from wallpaper. You can also use a regular sponge, but only the soft side. Never rub the wallpaper with the hard side, as you may damage it.
- Large table with a flat surface . If you do not have such a table, then the floor can easily replace it. True, it is not so convenient.
- Ruler . It is advisable to have a construction ruler, but if you don’t have one, then a regular one will do.
- Construction tape . It is needed to measure the height and width of the walls. It will also help to cut the wallpaper correctly.
- Painting spatula . It is very convenient to use when you need to trim wallpaper near the ceiling or floor. In this case, simply place a spatula there and cut the line with a knife.
This is a list of just the basic tools that you will definitely need for wallpapering.
The most difficult case
It is most difficult to hide joints with a gap when the edges of the panels have diverged so much that the wall is visible. To hide the unmasking seam, you need to try to move the edges and fix the canvas using proven glue. Many two-layer wallpapers react differently to moisture. Most trellises swell and become plastic when liquid glue is applied. After gluing to the wall and smoothing, the width of the canvas can increase by several millimeters, and after drying the reverse process occurs.
To hide the resulting gap, you first need to moisten the edges of the canvas using a spray bottle or spray bottle. After 10-15 minutes, the wallpaper will become soft, and you can lightly press the canvas with your hands and try to connect the edges of the panels. The seams are glued with PVA glue and rolled with a rubber roller.
If it is not possible to hide the joint in this way, for example, joints on paper wallpaper are very difficult to hide in this way, you can try to decorate the seams, as in the photo.
Colored stripes and individual fragments are suitable for decorating joints; you just need to stick them on the panel so as to hide the defect and at the same time distract attention from the problem area. Wallpapers of different patterns will help to ideally hide a frayed seam, since a brighter color always attracts the eye. Before you make a joint from different wallpapers, you need to plan an overlap transition. The glued new trellis does not even need to be cut.
Decorative rim
To join 3D panels to a flat wall, use the framing technique. Along the perimeter or sides of the volumetric canvas, a side made of material in the same color is mounted.
The volumetric part of the cladding becomes more accurate and completely draws attention away from the interface with the smooth surface. The width of the bead can vary from barely noticeable to impressive. In the latter case, it may well become an independent decorative element.
Fighting the edges that have risen up like a house
Not the most difficult, but quite common case when joints rise and twist, photo. Usually craftsmen in such a situation, in order to hide their imperfections, blame the quality of the wallpaper and poor glue. In fact, the problem lies precisely in the lack of professionalism of the workers. In the process of coating the cloth, experienced craftsmen apply glue to the edges twice, because the adhesive mass dries much faster along the edge of the cloth. To hide the raised joints, just apply an additional layer of adhesive under the seam line and roll the trellis with a rubber roller.
When they differ noticeably in texture or stand out in contrast
How to proceed? - Depends on the place where both materials meet: on the surface (wall or ceiling), in the corner between the walls or between the wall and the ceiling.
Task 1: Joints on the wall or on one surface
Solution 1: Pronounced drop
The easiest way to connect different materials is to screw a sheet of plasterboard at the junction of the coverings. The minimum difference is 12 mm: this is enough to separate different materials. But it is possible to build more complex structures - it depends on the task and capabilities. In any case, a joint made by a difference in planes will look logically complete.
Solution 2: Bring to one level
This happens when you have to join a relief material of a certain thickness and a smooth one (like wallpaper or a wall painted over plaster) in one plane.
The same drywall will help - “bring” the failed fragment exactly to the protruding level, as was done, for example, with the transition of a slatted wall into a decorative fragment behind the headboard.
Important:
You need to think about joining materials at the design project stage in order to develop drawings for the structure in advance.
Solution 4: Design it artistically (casually)
Once we decorated a wall with painting. The painting itself was made on a piece of hardboard and glued to the wall. As a result, we got two different textures: hardboard with painting - one texture, the wall around the painting - another. The edge of the hardboard was cut carelessly, with jagged edges, but we planned to frame this entire composition and did not worry about the uneven edge.
When everything was mounted on the wall, this uneven edge “made friends” perfectly with the textures and plot of the painting, and overall everything looked harmonious. They didn't make a frame. This is how the artistic joint turned out (you can see a close-up in the photo).
It seems that this is advice from the series “don’t do anything - the joint will still turn out beautiful.” But in practice, behind such “successes” there are serious miscalculations in the layout of materials. Please note that both examples (here and in the photo above) are built on the verified geometry of horizontal lines in the layout of materials.
Task 2: Joints in the corner
If two materials of different textures are joined in a corner, for example, smooth paint and textured plaster, the corner will look sloppy. The plaster ends in the corner and creates a visually uneven line. And even if the angle is drawn perfectly, it will feel like it’s crooked. What can be done in this case?
Solution 3. One tone
This path is chosen in situations where both surfaces made of different materials are intended for painting. At the same time, you can hide unwanted communications, as was done in the project in the photo with a pipe on the wall.
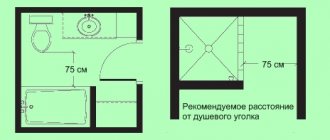
Task 3: Joint between wall and ceiling
The connection to the ceiling is one of the main problems when applying decorative coatings. Everything is simple when the covering from the wall goes to the ceiling (as in the photo below). In this situation, we return to the problem from the beginning of the article - a joint within one plane.
But if the textures meet exactly in the corner, at the border of the ceiling and wall, difficulties are possible. And the more likely they are, the more contrasting the coating is - the joint looks sloppy.
If the wall is adjacent to the ceiling
Here we use the same scheme as when joining coatings in the corner between the walls. To make it neat, we start painting the ceiling on the wall, then we beat off a strip of 19 mm tape and then apply the material to the walls below.
Visually, the corner line seems to “slide” down, but it looks neater than if you bring the coating right up to the ceiling.
+
Small plastering flaws will be visually hidden - a not perfectly flat surface in the corner.
–
It is not suitable when there are many multi-level structures on the ceiling, and the ceiling perimeter line is stepped. A white stripe under the ceiling can create an unsightly effect.
The defect can be corrected in two ways:
1.
Place the covering on the bottom shelf of the cornice, as shown in the photo.
Important:
In order for the composition to look harmonious, the height of the cornice must be at least 5 cm.
This option is good because it helps to design the joint even in a situation where the cornice has a rounded or shaped bottom shelf (as in the interior in the photo). It is quite difficult to cover this with masking tape evenly, so that it does not “come off” anywhere. If there is no tight connection, then during application the paint (or other material) will flow under the tape - the end result will be sad. Climbing down the wall helps solve the problem delicately.
YOUR TURN...
You may know other ways to join different materials. Share with us! Add your photos and comments under this article
The best ideas on how to decorate wallpaper with your own hands
The most common way to decorate walls is wallpapering. But over time, stains and damage may appear on them. Don’t rush to completely change the wallpaper and start renovations - they can be decorated in the right areas.
In this article you will learn in detail how you can decorate and fix wallpaper if it has been torn, worn, or scratched.
How to decorate with your own hands - options, photos
There were scratches from pets, tears in the wallpaper, loose joints, and abrasions. Young artists left drawings, greasy stains formed - all this can be eliminated if you know a few simple techniques.
How to improve the appearance of seams and joints?
It happens that the joints on the wallpaper begin to diverge. You can connect them yourself:
- Using a construction knife, carefully so as not to damage the wallpaper, pry up its edges and lift it up.
- Carefully clean the internal surfaces of old glue and foreign particles.
- We moisten it with a spray bottle (slightly - do not overdo it), let it soak a little and treat it with a 1:1 mixture of glue and polyvinyl acetate emulsion.
- Press the swollen edges to the base. Immediately remove excess glue. Use a rubber roller to pull the wallpaper towards the joint.
- Dip the tip of a construction knife or a thin spatula into the paint and carefully apply it to the joint between the edges.
- Then wipe with a dry, clean cloth.
Such a seal is not visible either close up or from afar.
Sometimes the edges of the wallpaper rise like a house along with a thin layer of plaster. To solve this problem, clean the raised edges from adhering particles, lubricate them thoroughly with glue and press them against the wall using a rubber roller. Make sure that no bubbles form (you will learn why bubbles occur and how to remove them here). Repairs to joints should be made with glue designed specifically for this work. They have better grip and drying.
When working with wallpaper, it is better not to use PVA glue , because yellow spots may appear.
You can learn more about the causes of yellow spots on wallpaper and how to eliminate the problem here. We talked in more detail about how to repair wallpaper joints in this article, and you can find out how to join wallpaper when gluing it so that it does not separate, you can find out here.
How to decorate old, tattered ones?
Are you tired of the old wallpaper, but you still can’t hang new ones? There are several ways to liven up your interior.
- You can update it with painting. This is suitable for any type of wallpaper, regardless of pattern, texture, etc. We talked about what wallpaper can be painted and how to do it correctly here.
We apply water-based paint in a thin layer so that the wallpaper does not swell. An interesting effect can be achieved if you use the technique of glazing with flakes: apply special decorative flakes evenly with a brush onto the painted wall - a shine with a pearlescent tint will appear on the surface.
If you doubt that the result of painting will please you, experiment on a separate piece of wallpaper, if there is one left after the last renovation.
- It is interesting to decorate old wallpaper with applications, stencils, and stickers.
- A stencil design will look more expressive on a plain background.
- There are a wide variety of stickers made of vinyl and plastic, glossy and matte, flat and voluminous - for every taste and income, in various sizes, styles and thematic areas. They will last 1-2 years, depending on where they will be located. On a wall next to which a door constantly slams or in a room with high humidity, the service life will be shorter than in a dry room without drafts.
- In worn places, you can cut out a piece of wallpaper, and instead insert a similar color scheme or, on the contrary, a contrasting one, frame it with moldings and you will get a beautiful solution.
- Plastic corners will help hide worn corners. They come in different colors and sizes, so you can easily choose what you need. The cost of the corners is low, they are easily attached with glue.
- You can make beautiful appliqués from the remnants of various wallpapers, frame them and use them to decorate imperfections on the wall.
They can be single or group, where one motif is repeated in several images. Read about how to make a picture from wallpaper here. Making such a “picture” with your own hands will not take much time and will help complement the interior. Or you can simply cover up imperfections in the wallpaper by hanging family photos or buying inexpensive posters or paintings. - Photo wallpaper will look good both in the bedroom and in the living room. They can be used to repair large scuffs near the bed and sofa.
- Scratches left by animals can be removed using glue, a sheet of paper and an iron. Apply glue to the damaged area and iron it through a sheet of paper. We won’t get a perfect effect, but it will look better than before.
- A torn or torn small section of wallpaper is also easy to replace. Cut out a patch 1.5-2 cm larger than required. We apply it to the torn area and, using a construction knife and a ruler, cut out a double layer of the required size (taking into account the damaged one). We replace the old layer with a new one, smearing it with glue.
You can find out how to choose the right photo wallpaper here, read more about how to decorate wallpaper here, and learn more about how to disguise scuffs and holes here.
How to improve torn ones?
How can you hide stains?
- Decorating a spot on the wall is quite simple. You need a few ideas, old wallpaper, scissors, glue and frames. Let's make pictures. We will cover the frames with pieces of wallpaper or insert them inside.
Several of these paintings with similar patterns - for example, geometric ones - look especially interesting. Or, if it is one drawing, divided into three elements (pictures).
We cut out ornaments from a piece of old trellis. These can be animals, flowers, geometric figures, curls. You need to cut with sharp scissors so that the edges of the pieces of the design are neat. You can make a sketch of the future drawing, so that later you don’t sculpt it haphazardly. Glue your original design with wallpaper glue. It is not necessary to make the drawing complex, since our goal is to hide the stain.
Wallpaper for walls - we create exclusive decor
Creating a unique design in an apartment helps fill it with coziness. In this fascinating process, the most important thing is the correct approach to the matter and strict adherence to the instructions for the materials used. Particular attention should be paid to the walls, the most important part of the room, one color scheme of which can raise or lower a person’s mood.
DIY interior decoration is now available to everyone, so there are many different options to improve your wall design.
The building materials market will help bring any bold fantasy to life, approach the process creatively and with soul. As a result, you can achieve a radical change in the interior of the room using improvised or budgetary funds. Wall decor with wallpaper is one of the affordable ways to add variety to the interior.
Types of decoration
Plain wallpaper is not the best solution for creating a unique design in an apartment, so it’s better to look at brighter and more unusual options.
To decorate walls with wallpaper you can use:
Each of them will be considered separately to help make the right choice. Often, original wall design is achieved by combining different colors and textures. Ultimately, decoration becomes not only an aesthetic component of the room, but also a way to hide its shortcomings. For example, highlighting one wall with contrasting wallpaper can distract attention from the unevenness and cracks of another.
Photo wallpaper
Photo wallpapers allow you to create a very special atmosphere for your room with your own hands. They are large 3D images on the wall.
Among the advantages, factors such as:
- this type of wallpaper does not require the use of glue;
- high quality, allowing the image to remain bright for a long time;
- attractive and unusual appearance.
the ability to reproduce any design to order, or choose from options already existing in the store;
Such wallpaper will be an interesting solution for any interior and will visually expand the space in the room.
Photo wallpaper is only suitable for perfectly smooth walls without cracks. The process of gluing with your own hands must be carried out in full accordance with the instructions.
Classic
Classic options are ideal for the interior of a country-style room. They are made in neutral, often white shades and decorated with simple designs. The most important thing is not to choose dirty brown shades with strange patterns; they are only suitable for African motifs in the interior; the optimal replacement would be a classic beige color.
Classic wallpaper is most often used in bedrooms and living rooms, but in principle it can be hung anywhere. They are not suitable for contrast or zoning space.
Visually they make the room brighter and more comfortable. The classic options used on the walls of the room are unlikely to make the design of the room more unusual, but they will look harmonious with any additions - posters, paintings, and so on.
Classic wallpaper can be decorated with hand-made paintings - it will look original and give the room a special coziness. Various geometric shapes, inscriptions, flowers and anything else can act as drawings - all this will help to create wallpaper decor.
Euro wallpaper for decoration can be considered the complete opposite of classic. They are decorated with lush ornaments, often made in gold colors. Most suitable for rich interiors or for creating similar ones. When choosing euro options, it is important not to overdo it, since they will not fit into every room.
The positive side of Euro wallpaper is the fact that it hides possible unevenness on the wall, as it is often made with convex decorative details. Vinyl options have the same “masking” quality.
Vinyl
Vinyl finishing materials differ from others in their variety of options and durability, which ensures long service life. This detail in the interior can be made in any style, which cannot be said about euro and classic. Most often you can find vinyl wallpaper in sand and beige colors, but you can find a variety of multi-colored models.
They are well suited for zoning space, and thanks to the relief surface they can attract attention. Vinyl wallpaper has a texture that is pleasant to the touch.
When gluing with your own hands, you need to be extremely careful, and subsequently regular care is required for vinyl materials. They are specially designed so that they can be washed by hand.
Which shades are better to choose?
Colors mean a lot in a person’s life, especially those that you see every day. The shade of the wallpaper sets the tone of the mood for the whole day, so the choice should be taken not only from the point of view of style, but also by paying special attention to the color factor.
Dark and depressing shades such as black or purple are strictly not recommended. Even if such wallpaper fits perfectly into the interior, it will not bring much joy.
There is no need to be afraid of white materials if the color does not cause negative associations. Of course, it’s better not to buy dazzling white wallpaper, but options with different finishes are ideal for “airy” interiors.
Decorating with your own hands involves weighing the pros and cons, so you need to take the choice of colors responsibly.
An original solution would be a combination of different textures and shades, only they must be combined with each other. Vinyl wallpaper is suitable for delicate room styles.
As a result, we can say that with the help of proper wall decoration with your own hands, you can achieve an extraordinary design and a cozy atmosphere. The most important thing is that a large selection of materials will allow you to indulge in experiments. The main thing is to think them through carefully.
Cork compensator
Another way to achieve a smooth transition from one type of coating to another is to use a cork expansion joint. It has a number of advantages:
- environmental friendliness and, as a result, safety;
- possibility of tinting to match the color of the coating;
- elasticity, thanks to which it can easily cope with the expansion of the laminate over a small area;
- durability, subject to proper installation and varnishing.
In modern minimalist interiors, cork expansion joints are also used to finish the floor-wall joint, replacing the usual baseboard.