Decoupage
This decorating technique is suitable for those who love art, but do not want to waste time on drawing. Its essence lies in cutting out drawings and transferring them to any surface. Decoupage is translated from French as “to cut out.”
Vases, bottles, boxes, mirrors - anything can change its image, change its dull appearance, and be renewed.
How to easily transfer an image for a beginner
Transferring a picture using a document file
You can transfer an element from a napkin or paper using a regular document file. It is advisable to take a thicker file, then the paper will not wrinkle and it will last a long time. This method will also require water.
- Pour a small amount of water into the center of the file;
- place the cut out motif face down directly into the puddle;
- Carefully smooth out the image, there should be no waves or bubbles left;
- drain off any remaining liquid;
- place the drawing in the desired place in the composition, and carefully remove the file;
- you need to let the element dry a little and fix it with glue;
- if necessary, modify and varnish.
For the second method you will need an iron.
- Apply glue to the table surface and dry;
- warm up the iron, the temperature should not be very high;
- post the motive;
- iron through cloth or baking paper in the direction from the edges to the center;
- leave to dry;
- cover with glue again;
- if necessary, modify and varnish.
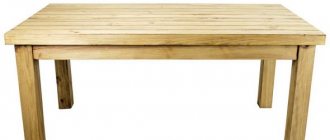
Patchwork coffee table
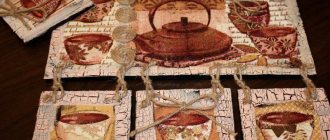
Where can I get the drawing?
Fabric, any type of paper, tulle are suitable for creating a design. It is even possible to decoupage the table with napkins. The table will be used as an example.
The drawing can be printed on a printer. The theme of the carved image depends on the functional purpose of the item being decorated.
For example, a table can be a dining table, a desk table, a coffee table, a table for children, etc. — the theme for the blend should not go beyond aesthetic compliance.
Composition
Composition skills are developed through experience. Table decoupage is a great way to start training them, because in order to find a harmonious arrangement of the objects you like, you don’t have to correct the work during the process or try to beat it after completion. It is better to look for an idea for a composition after preparing the base.
Symmetry in composition
How to search for a song:
- Select your favorite motifs in the chosen style for work.
- Lay them out on the surface and move them, change places, replace them with other elements.
- Mark the borders of the images with a simple pencil. You can just take a photo so you don't forget the location.
The easiest way is to make a symmetrical composition: ornaments or small elements in the corners and a large image in the middle. But you can give free rein to your imagination, the main thing is that it looks balanced and complete.
There are several ways
Before starting work, you need to decide on the options for performing the decoupage technique. There may be several options - each requires different tools and materials. The picture is chosen in accordance with the interior design.
Do-it-yourself table decoupage involves the use of several types of equipment.
Decorating instructions
A classic master class consists of several successive stages. It is suitable for decoupaging a coffee table with your own hands or any other interior item with a flat wooden surface. Step-by-step instruction:
- the table top is sanded with sandpaper;
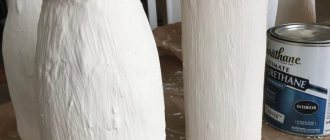
- prime the surface and leave until completely dry;
- small cracks and gaps are puttied and dried;
- repeat sanding with fine sandpaper;
- prime the surface a second time and allow to dry;
- cover the tabletop twice with the paint chosen for the background;
- the necessary fragments are cut out from the selected samples;
- lay out the cut out parts on the plane of the furniture;
- each decorative element is outlined with a pencil;
- the fragments are coated with glue and fixed to the surface;
- smooth the part with your hands or a roller, expelling the air;
- when all the decor is fixed, apply a thin layer of glue on top of it;
- after drying, the tabletop is varnished several times;
- The table legs are varnished or tinted with a suitable color paint.
For an even finish, it is convenient to use aerosol varnish.
Since acrylic products have an unpleasant odor, it is recommended to dry them outdoors. This speeds up not only the weathering of harmful substances, but also the drying process of the varnished coating itself. If it is necessary to achieve an artistic effect, after gluing the fragments, the details are drawn with a thin brush. In this case, to obtain a voluminous result, it is better to use an acrylic contour.
Step-by-step making of a desk with your own hands, examples of decor
It’s not difficult to do table decoupage yourself if you follow the step-by-step instructions and all the recommendations for choosing materials. The end result in the form of an originally decorated piece of furniture will delight you with its individuality. By being creative, you can successfully update the decor of your living room, bedroom or kitchen.
Sand the surface
Prime, fill cracks and gaps, paint the countertop Cut out the necessary fragments
Lay out the cut out parts
Fix the parts and varnish
Direct classic decoupage
The cut out image is pasted on top, on the outside, and then varnished.
The surface of the table is first cleaned of old varnish (if any), sanded and puttied (if the table is wooden), primed, painted in the desired color and only then the design is pasted on.
- Decoupage with plain paper - 125 photos and a detailed video description of how to make decoupage with your own hands
- Decoupage of boxes - 125 photos of beautiful and original options for decorating boxes with your own hands
- Volumetric decoupage - projects, ideas and descriptions of do-it-yourself decoupage techniques (135 photos and videos)
Next, the image is coated with craquelure varnish, which cracks after drying (for artificial aging).
Dry pigments or bitumen paste are rubbed into the resulting cracks. Next, the surface is coated with finishing varnish.
Applying an image
Before applying the image, cover the table with acrylic paint and wait until it dries. Coat the images cut out from a napkin with PVA using an art brush and apply to areas of the table that have also been pre-lubricated with glue.
Using another clean brush, smooth out any wrinkles or bubbles from the image. When the drawing is dry, you can add volume and brightness to it with watercolors.
Reverse decoupage
This option is suitable for decorating glass surfaces, plexiglass - transparent objects. Pictures are glued on the back side, not on the outside.
Then everything is done according to the classical scheme: craquelure (if artificial aging is needed) and final varnishing.
For a better understanding, it is worth looking at various photos of decoupage tables that have a transparent tabletop.
Decoupage in Provence style: rules of application and design options for various surfaces (115 photos)- Decoupage of a vase - 150 photos and videos for beginners. Ideas for craftsmen and features of modern types of decoupage
- Rice paper for decoupage: 120 photos and video master class on the correct use of rice paper in decoupage
Preparing the image
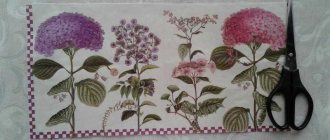
Having chosen a suitable design, we begin to prepare it for transfer to the tabletop. If you are working with special napkins, simply tear off the motif you like with your hands and separate the top layer with the pattern from the other two layers. If you are working with thicker material (newspapers, photos for decoupage, wallpaper), use scissors. Figure out the order in which the drawings will be placed on the tabletop, make outlines with a pencil.
Volumetric decoupage
The three-dimensionality of an image is created in different ways:
You can buy 3D decoupage cards in craft stores.
Prepare 5-6 identical drawings. The first one is taken as a base (as a background), the necessary parts are cut out from the rest and glued layer by layer to the base with silicone glue. But caution is needed - excess volume can worsen the perception of the image.
They use the Italian decoupage technique Sospeso Trasparente.
What tools and materials will be needed?
Decoupage is a technique that opens up a large selection of different techniques and does not require large material costs. But if you still want to get high-quality and beautiful work as a result, then you will still have to spend a little money.
The decoupage technique for decorating furniture products is again at the peak of popularity.
List of materials and tools for furniture decoupage:
- Sharp scissors with short blade and Teflon coating. These will accurately cut out even the smallest parts, and glue will not stick to them. Also a short blade is easier to control
- Brushes. They may be needed for shading pastels, applying glue or paint. For pastels, choose soft, natural bristles, and for glue and paint, hard synthetics are suitable.
- Primer for preparing the work area
- Glue for decoupage.
- Acrylic paints for backgrounds and small details
- Sandpaper
- Napkins are the cheapest and most accessible material for decoupage. Nowadays there are a huge variety of napkins with different prints on the market. Even if you make a mistake, you won’t mind the money spent, because a pack of napkins costs a penny. But this option is not very durable and can tear easily.
- Decoupage napkins are a more expensive option, but have greater durability and covering ability. They are sold in specialized stores in already assembled sets on a specific topic.
- Prints are also an economical option, the main thing is to choose a clear picture and print on a laser printer.
- Also, advanced craftsmen can purchase a special knife for decoupage, which has a rotating blade.
This is the easiest and most affordable way to update your interior.
Sospeso Transparente
To create a three-dimensional image, non-toxic special thermoplastic is used (hotmelt adhesive in the form of small plates is suitable). A drawing is pasted onto it, along the contours of which the remains (excess) are cut off.
For ease of use, the image is divided into parts (fragments). Each part is carefully heated over a small flame of a candle or lighter until the material becomes plastic. Then, using a special tool (bulk), a relief is formed.
- Furniture decoupage: 135 photos of features of the technique, examples and video master class for beginners
- Paper for decoupage: 125 photos and video tips for beginners on choosing and processing paper
- Decoupage varnish - 115 photos of the best manufacturers using the decoupage technique and options for their use
To simultaneously heat the plastic and form a relief, soldering equipment with bulbs is also used instead of a conventional tip.
Next, the fragments are laid out on the mat, a finished pattern is formed, and then it (the pattern) is transferred to the surface of the blend.
Materials and tools for working in decoupage technique
Before preparing the necessary elements, a table and images for its decoration are selected. It is better for beginners to perform their first work on wooden surfaces.
Materials:
- Special napkins or cards, paper wallpaper. Decoupage with cards and paper wallpaper requires a lot of skill.
- Colored rice paper.
- Glue. PVA or decoupage glue, which is used for working with printed images, is suitable. If PVA is selected, then it is diluted with water in a 2:1 ratio.
- Acrylic primer.
- Decoupage varnish to fix the finished design.
Tools for work:
- Scissors, stationery knife, pencil, ruler.
- Flat brushes with synthetic bristles for applying varnish, glue, paint.
- Painting tape to maintain an even paint border.
- Sandpaper for surface preparation.
- Cotton wool and acetone for degreasing.
- Rubber spatula for applying primer.
Artistic decoupage
The idea is to create a smooth, invisible transition between the main image and the background. A smooth transition can be achieved in three ways:
Creating a smoky background. The surface is first primed (if the table is wooden), painted, a picture is glued, and then a haze is created.
Classic way. Here the influence of the drawing is enhanced: colors are selected, shadows, shading, and underdrawing are used.
Decopatch. With the help of pieces of paper, many drawings are used to decorate the entire surface of the table (not just the tabletop).
Features of the technology
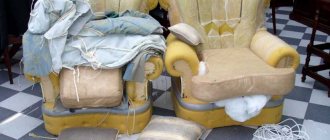
Decoupage of old furniture is an inexpensive and very effective way to restore something that has served for a long time. For example, an old cabinet, dressing table, high chair, or even an entire countertop. With decoupage you can achieve several goals at once.
- Updating the interior of the room.
- Realization and disclosure of creative abilities in yourself and your children.
- Receiving an exclusive item that no one else will have.
- Restoring worn-out furniture, which will help save your budget several dozen times.
Having mastered the “decoupage” technique, you can significantly transform your interior.
Few people know, but the birthplace of this technology is Asia, namely China. It’s hard to guess, because the technique has a French name. The dawn of decoupage in Europe occurred in the seventeenth century AD, when wealthy Europeans decorated their estates with expensive household items from Asia. Venetian craftsmen, sensing a gold mine, learned to give an Asian look to their products.
Decoupage is an excellent option for transforming old but dear furniture.
In recent years, five main types of decoupage have become widespread in the creative world.
- Direct or classic decoupage is a basic and very common technique due to its simplicity. The principle is suitable for beginner craftswomen who are just starting to try their hand at decoupage and do not yet fully understand the principle of operation.
- Reverse decoupage is a decoration method in which an image with an ornament is glued to the reverse side of a glass product. Thus, the drawing will be protected from external influences by a layer of glass
The easiest way to decorate furniture with your own hands is decoupage.
- Smoky or artistic decoupage helps to imitate artistic painting with the help of paints; the boundary between the design and the ornament is almost completely erased and a translucent haze is formed.
- Many of those who went to kindergarten made various crafts there. For example, they tore finely colored paper and pasted it onto cardboard in the form of vases with flowers, colorful butterflies or little animals. So this turns out to be another type of decoupage! And it’s called paper deco patchwork.
This method of decoupage is definitely suitable for all ages and does not require any special skills, the main thing is to use your imagination.
- For more advanced craftsmen who have fully mastered the main principles and want to try something new, a volumetric type of decoupage is suitable. It consists in the fact that with the help of modeling paste, finely cut pieces of fabric, multi-layer napkins, putty and art gel, applications are created with the increasingly popular 3D effect. Working in such a technique really requires a lot of experience, perseverance and accuracy.
The result is worth it!
This technique is also rich in various effects that can create a unique and beautiful piece of furniture. Let's look at the main ones.
- Gilding. To create this effect you will need gold leaf or metallic acrylic paints. All this can be bought at an art store or ordered online.
- Shading is used in the smoky technique and is done using dry pastel, ground into fine crumbs and a dry fluffy natural bristle brush.
- Toning with paints. You should use adhesive-based poster paints, otherwise the ornament may become wet and ripple.
Acrylic paints work well.
- Creating wear and tear will give the item an antique effect. The abrasion is created using wax, which is applied before the paint, and then the dried paint is treated with soft sandpaper.
- Patination is another way to artificially age an object. Patina of black, gold or silver color is applied to the edges and corners of the object.
- Craquelure is a technique that creates artificial cracks.
A special varnish is applied in strokes between two layers of paint.
Some tips
A decorated table looks good in small spaces. In spacious rooms it is better to place objects decorated using the blending technique in black and white tones.
The items will attract attention with their strict appearance. Pictures in vintage style, Provence and shabby chic styles look especially good.
A good master class on table decoupage will help any novice creative artist create masterpieces easily and quickly.
DIY decoupage of a coffee table with napkins and fabric
Today, a design trend that gives old things a new life is gaining more and more popularity. For old furniture that is a pity to throw away because it is still loved, the decoupage technique is used. This method allows you to hide cracks and other damage that have occurred over time.
Decoupage using monochrome photos and drawings in black and white will highlight the table against the general background and add mystery to it.
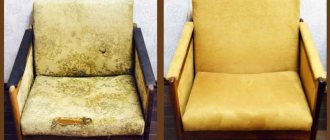
If you have worn-out furniture in your home, you can try to give it new life. To do this you need very little skill and a bit of desire. To begin with, you can make the decor of the coffee table with your own hands. Different types of decoupage will help you create furniture suitable for any interior.
Selecting an image
Most craftsmen, when decoupaging a table with their own hands, use a technique using special napkins. They are purchased in art stores. The motives for such design can be very different.
If flat images are not your thing, then you can use a composition with relief details. The method by which it is created is called trimming.
If the surface of your coffee table is small, then you can print out ornaments using a printer for decoration.
Decoupage cards with miniatures are available for sale, but their use is appropriate for large furniture dimensions. Decorating a coffee table made in a classic style using such stencils would be an ideal option. If you are a fan of modern art, then a regular topographic map will come to the rescue. Decoupage with it will look very original and unusual.
The table can be decoupaged using any topographic map of the world.
More experienced craftsmen use original photographs, newspaper clippings, fabric, lace, and postcards. Napkins and decoupage cards are quite easy to work with, but other materials require additional processing. Thus, old photographs and postcards are pre-thinned.
To work with them, you need to remove the bottom layer of paper. Before processing, the picture is fixed with regular hairspray. Then the paper is taken out, which is pre-moistened on the back side with a wide brush. Ordinary tape is perfect for thinning dry material.
This DIY coffee table decoupage will take a lot of time and effort.
There is no need to make colored decor. Sometimes monochrome images look much more interesting. This case requires the base to be made in grey, black or white.
Decoupage can be done using a spider web or friction effect. It is already artistic. The impulse to creativity finds a way out in three-dimensional images and in the completion of various elements.
Preparing the surface for decoupage
First, let's decide on the color scheme. There can be a great many options here. The tone of the base will depend on the color scheme of the rest of the furniture and on the condition of the coffee table.
If the countertop is heavily damaged, light shades will look best. If its surface is well preserved, then there is no need for painting.
To decoupage a coffee table with your own hands, you need to purchase the following tools and materials:
To prepare the table for decoupage, you need to remove defects on it and paint it.
- PVA glue;
- brush with a wide base;
- primer;
- napkins or cards for decoupage;
- white acrylic paint;
- zero sandpaper;
- coarse sandpaper;
- wood spatula;
- furniture varnish in a can.
Decorating a coffee table begins with disassembling it. It is advisable to remove the tabletop and, if possible, separate the legs from it. Surface preparation involves removing old varnish and paint. To do this you will need coarse sandpaper. All minor defects are removed with fine-grained paper. Only after this the table legs are attached back.
All these actions apply to wooden furniture. The plastic table does not need to be sanded. You can simply degrease it.
The next stage will be putty, which is the treatment of all joints and cracks. After it we leave the coffee table to dry for three hours. Next we prime and paint the furniture. It is advisable to apply acrylic paint in several layers.
Each layer needs about five hours to dry. If this is not done, stains may appear under the varnish coating. After applying the varnish, the table must be re-treated with fine-grained sandpaper. Napkins and other items will fit better on a carefully leveled surface.
Tools
Any surface is suitable for decoupage: wood, stone, glass, ceramic. Each material requires special tools, paints and varnish - all of this can be found in craft stores. You can use improvised means as tools.
Table decoupage for beginners involves the use of the following items:
- working surface;
- Pictures;
- putties;
- acrylic paints;
- products for removing grease and oils, for example, glass cleaners (to prepare for decoupage of the glass surface);
- decoupage glue (PVA diluted with water);
- shading sponges, brushes;
- craquelure varnish (for aging technique);
- special texture paste (for volumetric decoupage);
- varnish;
- sanding tools (for cleaning wooden tables from the old layer of varnish).
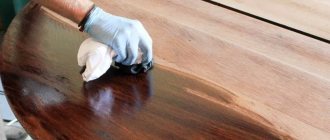
Varnish coating
When the table is completely dry, it should be varnished in several layers, drying each of them thoroughly. After applying the last coat of varnish, leave the table for a day to dry completely, after which it is ready for use. A beautiful table, decorated with decoupage technique, will complement the kitchen interior and highlight the dining area.
Decorating using the decoupage technique is not only useful, but also an exciting activity. You can decorate the table with absolutely any materials, depending on the result you want to get.
Photo of decoupage tables
Tell your friends