Rising prices for necessary interior elements are forcing many lovers of coziness and comfort to look for alternative solutions. To create a comfortable, reliable, functional countertop, many people use mosaics.
A mosaic tabletop has a lot of positive aspects. The main advantage is the ability to do it yourself. In this article we will tell you about some of the nuances of this work, and in conclusion we invite you to watch the prepared video material, which will reinforce the whole theory of how to make a table from a mosaic.
How to do it yourself?
To begin with, decide on a specific location area.
Most often, the following options are chosen: a transition between furniture, a mosaic coffee table, and simply a mosaic surface. All tile finishing options are an excellent solution for your interior. It is used to decorate the living room, finish the apron and countertops in the kitchen, but it is not recommended to lay mosaics on an old set. Sometimes, to expand the working area in the kitchen, the window sill is decorated with mosaics.
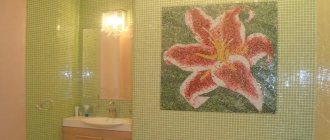
But the most options for using such tiles can be found in the bathroom. For example, it can be used to disguise a washing machine, decorate walls, or link a washbasin to a screen.
Keep in mind that constructing a tile table requires dexterity and some experience, although it appears to be a routine task. The following materials are excellent for the base: concrete, wood materials with good moisture-resistant impregnation, water-resistant plasterboard surfaces, dense polyurethane.
It is worth noting that you can make a mosaic yourself.
You just need to make fragments of glass that are suitable in shape and color. And glass fragments can be obtained from any company that sells consumables and colored glass for stained glass. This is a great way to try something new and get passionate about it.
To fold the tiled surface you will need:
- grout for seams;
- primer;
- putty;
- antiseptic.
Tools:
- putty knife;
- container for mixing glue;
- container for mixing grout;
- rags;
- sandpaper;
- soft spatula for grouting joints.
To ensure that the mosaic tiles are firmly attached to the table, special adhesive mixtures are used. Experts recommend choosing white plastic mixtures. You can use any adhesive mixtures for tiles, but only when laying opaque mosaics. For glass tiles, you need to choose only transparent or white mixtures.
Surface preparation
Before laying the tiles, it is necessary to level the surface using putty. Next, the surface must be cleaned and degreased. To protect the surface from the appearance of mold and mildew, it is necessary to cover it with antiseptic impregnation. The next step is to apply the primer.
Labor and cost
One square meter of self-adhesive mosaic costs about 5,000 rubles. The price depends on the supplier and manufacturer. An already sized chipboard panel will cost 100 rubles. Transparent glue within 200 rubles. 250 grams of mosaic grout cost 230 rubles.
Marking the panel and applying mosaics to the surface is a rather painstaking process. Without experience, you can spend three to four hours on this. Subsequent treatment with glue and grout should not cause any particular difficulties and will take a total of about an hour.
Decorating furniture can not only add personality to it, but can also give a second life to interior items that have served their purpose. One of the oldest, but no less popular ways to decorate and transform a table, wall, garden path, bench or other things is mosaic.
Anyone can make mosaic decor with their own hands. A little imagination and effort - and an original item, one of a kind, will appear. A table is probably the most functional piece of furniture. It can be for dining, coffee, tea, games, toilet, decorative, garden, or simply serve as a beautiful stand for a lamp, flowers, etc. Therefore, it is the countertops that are most often updated and decorated. What is mosaic made from? To create it on the table, they use both ready-made special material (decor, mosaic) and various raw materials that are at hand. These are broken tiles, glass, ceramics; eggshell; shells, pebbles, old CDs and much more.
Description of work
- Prepare the wooden surface for decoration. Wipe the table and sand any uneven areas with medium-grit sandpaper. Wipe well again.
- Cut the discs into small pieces, approximately 3x3 cm.
- Glue the disk pieces to the table using glue. Place the elements on the table so that the distance between them is about 2 mm. Do not forget to alternate the back and front sides of the mosaic particles.
- Using construction putty, carefully fill all the empty spaces and indentations created during the design. Wipe off excess substance from the surface with a slightly damp sponge.
- After 12-24 hours, cover the mosaic table with two layers of acrylic varnish (with a break for drying).
https://youtube.com/watch?v=ZGztVvS_WD0
Read further:
How to make a unique ceramic table with your own hands or arrange an entire countertop in the kitchen
How to decoupage a table in Provence style with your own hands
Creative ideas: how to make a table from a cable reel
Chipboard base
If chipboard (chipboard) is chosen as the material for the base for the mosaic, then only the upper surface of the tabletop is covered with it using self-tapping screws, having previously been coated with a brush with two layers of liquid nitro varnish. A strip of chipboard 5-8 cm wide is attached to the front and side ends with self-tapping screws to add volume to the structure. Then the surface of the chipboard and the joints are also puttied on top and at the ends with auto putty, and then treated with sandpaper.
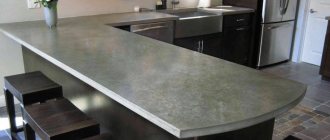
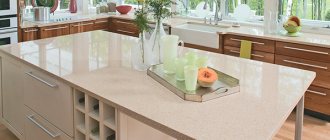
Laminated chipboard countertops are very popular.
Italian sink
Anyone familiar with the architecture of Italy has probably paid attention to the beautiful mosaic ensembles in the interiors, where everything is made of mosaics: tables, sofas, flower vases, bath bowls and sinks. Today, anyone can install an Italian sink in their home.
The technology is the same: decorate an old faience sink with mosaic or install a bowl cast from concrete. You can cast it yourself by using two dishes of different diameters instead of a silicone mold.
You will have to lay out the mosaic on the inside of the sink manually, one tile at a time, making sure that the edges of the tiles are in the same plane and do not protrude and do not create roughness. It's a painstaking job, but you'll be rewarded with a luxurious interior.
Case manufacturing
The tabletop frame is easy to make from steel CD profiles used when working with plasterboard sheets. By inserting one U-shaped profile into another, a strong hollow steel bar of square cross-section is obtained. Profiles for forming bars and joining each other are connected with metal screws or blind rivets.
Making an exclusive tabletop from mosaic is not so difficult
Regardless of what material the frame lining is made of, the frame itself must be strong enough to withstand the loads from personal hygiene items standing on it and not break if a person leans on it. The body of the countertop is made by attaching rods made of CD profiles to a steel block installed on the bathroom wall and must be in the same plane with it. CD profiles are galvanized, so there is no need to paint the manufactured frame.
Tools
- Transparent glue. Needed to give additional strength to the finished mosaic pattern and fix the corners. The glue should be moderately thick to prevent it from spreading over the surface.
- Ruler. A forty-centimeter thick frost is necessary for marking tabletops. The main guiding elements of the drawing are then laid out along these lines. To mark large countertops, you can use a regular tape measure.
- A simple pencil. Needed for drawing marking lines. A soft stylus is best suited for these purposes. It will require frequent sharpening, but will leave clearer marks on the surface.
- Grout for seams. Any company will do. Grouting is necessary to give the mosaic pattern a characteristic feature in the form of obvious seams. The grout also additionally holds the mosaic together, finally turning the pattern into a single whole.
- Rubber spatula. Used to distribute grout evenly over the entire surface. A rubber spatula will not damage mosaic tiles and will not leave scratches.
- Foam sponge. It will help get rid of excess grout and clean the surface of the mosaic panel. You can replace it with a regular rag, but it’s more convenient to work with a sponge.
Which one is used where?
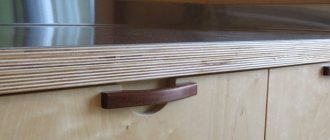
For the end, shaped tiles are used, which have an L-shape in appearance. With its help, they simultaneously cover the first row and cover the end. The top tile can hang over the end dies, protruding by 2–4 mm.
The ends give the countertop a finished look and increase its aesthetic appeal. You can decorate the top surface of the table in different ways. For example, on a horizontal surface, a die can be laid out in such a way that the edge of the glued fragment hangs over the thickness of the porcelain stoneware. Then the remaining dies are cut into strips and glued at the end edge.
As for laying at an angle of 45 degrees, professionals can do this. The downside of this type of tabletop design is the large amount of trimming, which increases the number of glued fragments. In addition, a professional master can handle this work. Therefore, this design may require labor costs for the tiler.
For the countertop itself, you can use large elements, which will simplify maintenance and also speed up the cladding process, reducing the number of joints. However, if the kitchen is small, then it is preferable to use small tiles. This eliminates the possibility of introducing an imbalance, which can visually reduce the already insufficient square meters of the room.
If possible, the sizes can be increased. By the way, the size can determine the thickness of the dies used, which should not be forgotten before purchasing durable and high-quality material.
As for the use of mosaic for the tabletop, professional tilers can choose it. Even if you want to, working with it requires care and experience, and a beginner will not be able to make all the joints perfectly identical.
Sketch and marking in place
Having decided to make a countertop in the bathroom, they begin to design and mark out the location for its installation.
A mosaic countertop in a bathroom can create a special atmosphere
There are no universal recommendations for designing a countertop, but there are still general principles for its design.
Having decided on the installation location, draw a horizontal line along the bubble level on the wall, at a height of 80 cm from the floor, along which the tabletop will adjoin the wall.
Then, based on the width and length of the future structure, markings are made on the floor underneath it for the locations of the support legs or transverse partitions on which the tabletop will lie.
Installation rules
Before making a countertop from porcelain tiles, you will need to prepare all the necessary materials and tools. The installation technology of this material is reminiscent of laying tiles. You will need the same adhesive and spatulas. It will be necessary to level the glue with a serrated tool, and with a solid metal spatula to apply the composition to ceramic products and a previously prepared surface.
It is necessary that the seams between the tiles be as small as possible. The optimal seam size would be 1-2 mm, which will prevent the formation of unnecessary gaps.
It is not recommended to use up all the glue at once, since in its finished form it quickly hardens and its beneficial properties are lost. The tiles should be laid on the surface, using a level to check horizontality. You can choose any direction of masonry, as this does not affect the quality of the cladding.
Once the glue has dried, the attached tape can be removed.
To learn how to properly lay a porcelain stoneware countertop, watch the following video.
Reviews of porcelain stoneware countertops are positive, despite the fact that the method of finishing with tiles began to spread not very long ago. Sheet material allows you to reliably hide surface differences. The technology for laying porcelain stoneware presupposes the presence of a wooden base, which must first be carefully measured in order to make all the necessary calculations.
Choosing finishing material
What can you use to cover a tabletop?
As a rule, to cover the countertop, taking into account the specifics of its operation, purchase:
- Tile;
- Mosaic (glass and ceramic);
- Pebbles.
Table top paved with pebbles
These materials have the necessary moisture resistance and are able to resist any external mechanical influence for a long time (provided that during the installation process all the necessary technological requirements were met).
How to choose material
The choice of suitable material can be influenced primarily by the financial capabilities of the family, as well as the taste preferences of its members. In order for the mosaic countertop in the bathroom to be as harmonious as possible, you need to take care of the presence of a frieze with a mosaic structure.
Also, when choosing a material, you need to take into account the convenience of subsequent care.
Here you need to pay attention to the number of seams. The fewer of them there are, the easier it will be for the future housewife to remove all the dirt that appears on the surface.
From this point of view, the preferred option would be a bathroom countertop made of tiles laid using seamless technology.
When choosing a material for finishing a countertop, you can use an interesting technique. Provide inserts in a contrasting color to the main color on the bathroom walls, and then lay out the countertop with material of exactly the same color.
Mosaic table top and frieze
Advantages and disadvantages
Making a mosaic countertop yourself has its disadvantages and advantages.
The advantages are:
- Opportunity to express your creative abilities.
- Saving money on craftsmen and expensive materials.
- Possibility of individualization and full realization of your own fantasies.
Minuses:
- Lack of knowledge and skills to carry out work. The materials may be damaged.
- Miscalculations in size.
- Errors during the manufacturing process.
We make the tabletop ourselves
What you need
In order for the finished countertop in the bathroom to turn out beautiful, in addition to the finishing material, primer for the base and tile adhesive for attaching the mosaic or tile, you must purchase:
- Plywood;
- Glue;
- Waterproof drywall;
- Self-tapping screws;
- Serpyanka ribbon.
A tile bathroom countertop must be mounted on a solid frame, which must be securely attached to the wall. The preferred option would be its location in a special niche, the presence of which should be foreseen at the design stage of future housing.
Tile countertop
Sequence of work
At the very beginning of work, it is necessary to correctly measure the dimensions of the available space and think through the design features of the future product. Based on these data, the required amount of moisture-resistant plywood is determined, which is most often used as the basis for making countertops on your own.
Tabletop composition
The further sequence of actions is as follows:
- After purchasing plywood, two blanks are cut out, which will act as the base. Here you can abandon the traditional rectangular shape, giving preference to non-standard curved lines. When determining the height of the finished product from the floor, one must proceed from ease of use. Often the best option is a height of 0.9 m. You also need to take into account the shape and size of the sink that you plan to install in the future. By choosing a built-in sink, you can avoid additional work aimed at masking drain lines.
- The blanks are connected to each other using glue and self-tapping screws. This ensures sufficient rigidity and strength of the finished structure and, consequently, increases service life.
- A thin layer of tile adhesive is applied to the surface of the countertop and waterproof plasterboard is glued. Self-tapping screws are also used to secure it. Narrow strips of plasterboard are glued to the edges of the future tabletop.
- All existing drywall joints are taped with sickle tape.
- Another layer of tile adhesive is applied to the entire surface of the tabletop and the mosaic or other selected finishing material is glued.
Mosaic laying
- The joints are being grouted.
- After the grout has completely dried, you need to wipe the tiles with a cloth. This will not only remove excess composition, but will also give it a characteristic shine.
- The tabletop is attached to the corners.
- The sink is inserted. To prevent water leakage, the space between the countertop and the sink is filled with sanitary sealant, which, moreover, after final hardening, can prevent accidental movement of the washbasin during its operation.
Not many people decide to make a countertop on their own, because they are initially sure that they do not have a good command of the necessary tools. This does not mean at all that you should abandon your plan. It is enough to independently think through the ideal design for a particular bathroom and turn to professionals.
DIY mosaic sink decoration
In addition to the mosaic countertop, you can also make a sink designed in the same style. As a source, a ready-made kitchen sink made of stainless steel, cast iron or ceramics is used. With basic construction skills, you can try to make your own sink from concrete or wood.
A mosaic sink looks good in a classic-style bathroom interior
Having the necessary tools at hand, which are not much different from those used in the manufacture of the countertop, you can get to work:
- The surface is prepared: the sink must be dry, clean and grease-free.
- All necessary measurements are taken. It should be taken into account that the sink is not a plane, but has its own bends and a drain hole.
- If the surface is smooth (stainless steel, enamel), then it is better to use epoxy glue, or, using special means or tools, artificially create porosity. In this case, it is allowed to use tile adhesive.
- The cladding begins from the places where the drain holes are located. If necessary, adjust the sizes of the tiles or plates (depending on what is used).
- After each laying, the mosaic must be pressed tightly. Excess glue is removed with a damp cloth. The seams are cleaned with a brush.
- After finishing the cladding, you need to wash the surface well and let it dry.
- After the glue has dried according to the instructions, you should begin grouting the joints.
Despite the fact that a mosaic sink is a very labor-intensive and painstaking task, the result will delight the eye with its beauty and practicality for a long time.
Sequencing
- First you need to make the base of the table top out of plywood. In the place where the center will be, stick the button, securing the end of the rope to it. Measure the radius of the future table, make a loop at the other end of the rope where you should place a pencil. Moving the pencil around the center, draw a circle - the outline of the table.
- Using a hacksaw, cut out the circle you drew.
- Use a pencil on the string to draw several circles of different diameters. This will help to create a symmetrical surface decor scheme on the table.
- Sand the edges of the plywood circle with sandpaper.
- Cover the circle made of plywood on all sides and the end with a wood primer. The layer of special agent should be dense and even. Apply primer to each side one at a time, allowing the previous one to dry.
- Plan what kind of drawing you will make with your own hands.
- Using wire cutters, break the porcelain into the small pieces needed to complete your mosaic design idea. Set aside parts of a more regular shape for placement along the edge of the product.
- Use a knife to apply adhesive to each mosaic piece, then lightly press it into place on the table. Start working from the center, gradually moving towards the edges. Make sure to maintain symmetry in the drawing, lay the drawing evenly, leaving approximately the same distance between the elements. Lastly, decorate the edge of the tabletop.
- Leave the completed mosaic pattern to dry. In the meantime, prepare the grout for work. If you wish, add a little coloring agent to the material. You should get a homogeneous thick mass without lumps.
- Gently rub the grout with your fingers into the voids between the mosaic pieces until it fills them tightly. Coat the edge of the table well.
- Wet the sponge and wring it out well. Remove excess grout from the mosaic tile on the table.
- After complete drying, wipe the mosaic with a dry soft cloth.
A table with a beautiful mosaic tabletop will decorate your garden, cottage or apartment.
Examples of interesting solutions
An excellent option is finishing the kitchen with tiles. The tiles are very easy to care for, they are easy to clean, resistant to external factors and look presentable. Let's look at the most interesting design solutions.
For small kitchens, mosaic or small tiles are suitable.
A bright kitchen is a housewife's dream. The tiles can be matched to the walls, in the same tone as the furniture. The walls, countertops, and kitchen facades can all be the same tone.
To cover the walls above the work area, you can use more interesting shades, then the color of the countertop will echo the tone of the apron and you will get a gentle play of color.
When choosing the size and tone of the tiles, do not forget to take into account the size of the kitchen. Light colors will make the kitchen larger, and bright colors will look stylish.
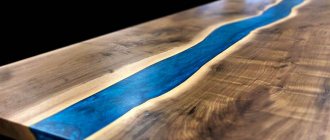
An excellent design solution is to add glass tiles to the interior.
The glass surface will fit perfectly with any design.
There are a great variety of stone and stone imitation tiles on the market; you can also find imitation wood and metal tiles.
Tiles can be not only of different sizes and colors, but also textured or smooth, glossy or mirrored.
When choosing the color of the tiles, do not forget to take into account the level of lighting in the kitchen.
The tile fits perfectly into the Loft style; the tile can be used in any design direction.
Color options in the interior
If you are afraid that a wooden tabletop will not fit into the interior, then you can resort to one of the proven, already classic, options.
White kitchen
Clean and refreshing white can fit into any kitchen, and the wood will give it a cozy and warm feel.
It is important to consider some properties of this color:
- it will expand the space, which will come in handy in a small kitchen;
- if you want to add brightness and contrast, then it is better to use dark wood tones;
- if you want to get a more elegant interior, then a light countertop is preferable.
An example of a white kitchen with loft elements and a wooden countertop can be seen in the photo below
Pay attention to how interesting the apron is designed
Gray kitchen
Now gray is at the peak of popularity, but 5-10 years ago no one could imagine it in the interior, since gloomy and monotonous pictures immediately appeared in the imagination.
Now gray is the “new black”, which combines elegance and sophistication. If you add wood to it, you get a certain hint of elitism.
It is advisable to use light-colored wood. Although the final choice should depend on the tone of gray: for example, if it is too faded, then it is better to choose a darker wood for contrast.
In this graphite kitchen with a wooden countertop, you can again find an unusual solution for a backsplash.
Black kitchen
Black interiors are also popular now because, if handled correctly, they will add luxury, style and originality to the room. But this solution is absolutely not suitable for small kitchens, for example, in a Khrushchev-era building, since it will turn the room into a cave.
But the positive aspects include:
- balancing bright interior details while maintaining contrast. If you add a countertop made of natural wood to a black set, the kitchen will instantly become harmonious, but at the same time original;
- paradoxically, black creates an atmosphere of comfort, aesthetics and even cleanliness;
- A competent combination of black and white will increase the space.
Beige kitchen
If you don’t want to create a strong contrast in the kitchen, then beige will always help out. It is advisable to choose a countertop not tone-on-tone, but a little lighter or darker - this will make the interior much more interesting.
Beige goes well with brown. If the room is not too large, then you can use dark wood for the countertop.
Blue kitchen
Blue, especially its dark shades, is rarely used as a main color, much more often it is found in the form of accents. However, blue has great potential when combined with wood - such a picture will resemble a nautical theme, the sea and ships.
If you choose a deep and dark tone, then it is better to choose a light-colored tree. If blue, on the contrary, is soft, then dark wood will go well with it.
This symbiosis can fit into any interior from classic to modern.
Check out this cute blue kitchen with wood countertops. Perhaps the wood type should be chosen a little lighter, to match the interior filling of the glass cabinets.
Brown kitchen
The rule is exactly the same as in a beige kitchen - you should not allow tone-on-tone countertops to match the facades, so as not to get a large brown wooden spot.
This is only permissible if there is a conscious desire to create a cozy wooden corner, for example, against the backdrop of a modern Scandinavian style, loft or hi-tech. Below is just an example of such a conscious decision - the owners wanted to completely unite with nature.
Peculiarities
Ceramic mosaic tiles have excellent performance qualities. In the first place is resistance to mechanical stress and abrasion. Mosaic, produced using modern equipment and advanced technologies, is practically resistant to chips and is not damaged by scratches. In addition, it is not at all afraid of moisture, which allows it to be used in rooms with high humidity: kitchens, bathrooms, saunas.
You can place hot objects (pots, pans) on the countertop without fear of burning the surface. The tile has good frost resistance, so it can be successfully used for finishing a balcony, cottage or barbecue area.
Retail chains offer a wide range of mosaics with high decorative qualities; a variety of colors allows you to choose the ones you need to create a stylish interior. Consumers can choose from numerous compositions and mosaic panels. For ease of installation, mosaic tiles are attached to paper sheets or meshes, they are glued to tile adhesive in blocks or cut out into the desired shape with a construction knife.
The mosaic manufacturing technology makes the color and pattern of the tiles unchanged throughout their operation; the color does not fade or fade from external factors: ultraviolet radiation, high temperatures, aggressive chemical household care products. This material is easy to keep clean.
Several variants
First you need to clearly determine the location of the cladding. Based on the conditions, a do-it-yourself mosaic tabletop can:
- resemble a small table;
- transition from one furniture to another;
- separate tabletop.
For example, a table with a mosaic will be a beautiful addition to the created interior of any room, either in the living room or in the veranda. If this is a kitchen, then in combination with an apron, this will be an excellent solution. Also finish the window sill in the kitchen, which will become an extension of the work area.
The base for the cladding can be made from a variety of building materials. For example, dense polyurethane, plywood or other similar sheet material, concrete, plasterboard (moisture resistant).
Important! When making mosaic countertops, it is unacceptable to use ordinary drywall as a base. It is necessary to use only moisture-resistant, it has a green color
Garden table
Dishes break for good luck! So why throw away the fragments? Collect them little by little - one day you will make a beautiful thing out of them with your own hands, which will become a reason for a good mood and a witness to your future happiness
A table with a tabletop decorated with a mosaic of porcelain pieces and small ceramic tiles is an ideal solution for the garden. You can put a vase of flowers on it, have a family tea party, and have fun. This colorful ceramic beauty on the table is not afraid of wind, water, and will not fade in the sun.
Preparing the base
Wood is a rather complex and capricious material, so it is important to approach the installation of mosaics on it with special care and some points should be taken into account:
- in relation to wood, you cannot use soluble mixtures prepared on a cement basis,
- excessive moisture in the adhesive composition can cause swelling of the wood and subsequent deformation of the mosaic layer,
- When laying mosaics, it is necessary to use glue with a high degree of elasticity. For example, Atlas-Plus glue has exactly these characteristics, and at the same time its retail price is $12 per bag weighing 25 kg,
- Wood tends to dry out due to hot climates and swell due to humidity, so the base for the tiles must have a layer of primer,
- Mosaic elements can also be laid using regular liquid nails, but it is better to use special mosaic glue, which is a more convenient and economical option.
Garden tables, photos of which are presented in the article, are an excellent highlight for any interior.
DIY mosaic table for the cottage and garden
So, you've already seen the mosaic table I made this week for the seating area in my garden. This was just the kind of DIY project where I couldn’t find what I was looking for, so I decided to do it myself, combining it with a “I’ll figure it out as I go” strategy. I knew what length, width and height the table I needed. And I also wanted it to be unique and luxurious. So I just came up with it and began to implement what came to mind.
I call it a "coffee table" but this design would work great as a bench too. You can create a frame that suits your style best, such as tile or treated wood. The benefit of making something yourself is that you get the exact measurements you want as well as a completely unique piece.
I made the table, painted it and decorated it with mosaics in just one day, starting with buying lumber. I only used pine and mahogany because I was in a hurry: the store had a huge selection, so I just grabbed the pieces in the size that suited me.
Wooden parts for a table measuring 46 x 127 x 46 cm:
- two pine boards 19 x 127 cm;
- one pine board 7 x 127 cm;
- two bars 245 cm long and 5 x 10 cm wide, cut into the following parts: 2 elements 36 cm long for the upper support, 4 legs 33 cm long, 2 elements 38 cm long for the lower support.
I used a saw to cut the pieces and wood screws to join the boards together (see photo).
This is what the wooden table/bench base should look like when assembled. As you can see, this is a very simple design: boards joined together form a tabletop and rest on two legs on each side. We did not put a board between the legs to stabilize it because it is a relatively small product with a strong construction. But if you're making a longer piece, consider installing a board like this for maximum stability.
If you want to decorate your craft with a mosaic, choose the size of the surface of the table/bench so that it perfectly matches the size of the mosaic, then you will not have to cut it with a tile cutter
I bought a blue and green mosaic for $9 a sheet and calculated the dimensions of the wood pieces, knowing the length and width of the mosaic sections in advance, and also taking into account that I could fill small joints with grout
I primed the legs and then painted them with the same brand of super durable white paint. I came to the idea of decorating surfaces with mosaics gradually, thanks to several successfully implemented projects, but the basic principle of work is always the following: first, the mosaic is glued to white glue for stone and ceramics, which is applied with a spatula to the surface to be decorated. Sometimes I buy glue in large packages (you need to mix it yourself), but this time for convenience I used a ready-made mixture.
Since learning how to lay tiles is a very useful life skill, I involved my student in this activity.
We cover the rough ends of the tabletop with strips of mosaic - masking tape fixes them in the right place until they dry. Tip: instead of long ribbons of 12 tiles, I cut the mosaic into strips of 4 elements so that they become lighter in weight and do not slide down.
When the glue has dried, apply the grout with a special spatula (for small products I use a narrow spatula). Use a sponge to remove excess grout and let it dry.
I really love the color combination and rainbow sparkle that this unique piece added to the seating area. This is how the “we’ll figure it out as we go” idea turned into an elegant and bright mosaic table in our garden!
Original text and photos: Kate Riley (centsationalgirl.com)
DIY mosaic table garden table
Mosaic table: turning an old table into a beautiful piece of furniture
Today I will talk about turning an old IKEA children's table into a beautiful piece of furniture. Thanks to a mosaic made from broken tiles, an ordinary table will be transformed beyond recognition.
On such an exclusive table you can set up a small home greenhouse, since the tiles are not afraid of water and various mechanical damage from heavy pots of flowers.
Do you also have a table or other piece of furniture in mind that you would like to update and decorate with mosaics? Then read the job description carefully.
We will need: a table, broken tiles in 4 colors, a hammer for breaking tiles, white spirit or alcohol for degreasing the surface, Titan glue, colored grout for joints, a spatula, a ruler and a pencil for drawing, acrylic paint, thinner and a brush.
Algorithm of actions:
- Using a swab moistened with white spirit, degrease the table surface. The table must first be sanded;
- We draw a drawing using a simple pencil and a ruler;
- Apply glue and leave to dry for 2 - 3 minutes;
- Lay a strip of tile pieces along the outer edge of the countertop. Leave a gap of 4 - 5 mm between the pieces. To ensure that the edge is even, we select tiles with edges;
- We lay out the following stripes in the same sequence. Leave to dry for 1 hour.
- Dilute the grout with water to the consistency of thick sour cream. Using a spatula, rub the seams between the tiles. We remove all excess with a napkin and leave for 12 hours, then thoroughly wash the table surface.
- Take acrylic paint of the desired color, dilute it with acrylic paint solvent and use a brush to paint the table legs. Thinner is only needed if you want the base color of the table to show through.
- After the paint has dried, the table is ready for use.
Mosaics give you the opportunity to decorate a variety of objects with your own hands, decorate any surface, and the creative process is nothing but pleasure!
What's better?
When choosing a particular material for covering a kitchen countertop, it is worth noting several factors.
- The decorative layer should be even and smooth. The porous texture is accessible to dirt, just like a mirror texture. Such tiles will have to be cleaned more often than others, and this often becomes a problem, since dirt quickly eats into the porous base.
- You need to buy dies of the optimal size, reducing the number of cuts. Ideally, it is preferable to cut only the end tiles.
- It’s better not to skimp on material and buy porcelain stoneware. It is resistant to abrasion, moisture, does not change properties when the temperature changes and is not susceptible to mechanical damage.
- Don't neglect buying a border. Such tiles significantly save the time of the entire cladding, including the time for adjusting and cutting edge dies.
Features of mosaic countertop finishing
It is important to follow the mosaic laying technology so that it is airtight and maximally protected from external factors.
It’s quite possible to make a mosaic tabletop yourself
Mosaic looks great in the kitchen; this decoration option perfectly refreshes the interior and makes it more original and bright. With proper care, the countertop will retain its original appearance for many years. It is not recommended to glue mosaic tiles to a set that is not very new - it is better to replace the old countertop with a new one.
You can purchase a new countertop at a building materials store. It can also be used as a board made of polyurethane foam of different thicknesses.
A stainless steel profile can also be sold as a kit, which is glued to the edge of the product using the same glue as the mosaic. The glue used is a standard elastic composition; for glass mosaics, transparent or white glue is used, which is suitable for installing tiles of any color. This glue also functions as a sealant, which is ideal for kitchen furniture. Mosaic flooring involves many joints, which can lead to the formation of mold. To avoid this, special anti-fungal cleaners are used to clean the countertop.
Grouting and polishing countertops
After the mosaic is applied, it must be covered with a special grout.
Then the resulting table decoration must be covered with a special grout, which will give it strength and durability. The grout is applied with a soft spatula exactly to the seams between the elements and rubbed well into them. In this case, it is advisable to wear gloves on your hands that can protect your skin from the effects of the composition.
After applying the grout, the table must again be left until completely dry. It is not recommended to use a hair dryer or other heating methods. The longer the grout dries, the stronger the image will be. In hot weather, the tabletop can be covered with a large damp cloth to prevent drying out too quickly. The dried compound is removed from the tiles using a dry soft cloth. In some cases, if the composition has hardened very much, you can use sandpaper with the finest grains.
The last stage of work is polishing the countertop. It will give the mosaic brightness and beauty, allowing it to shine and sparkle with colors. For polishing, furniture wax is used, which is applied to a soft, lint-free cloth and thoroughly rubbed into the tile elements.
The work is finished - the old table, damaged by kitchen utensils, has acquired a second life. This piece of furniture can decorate even the simplest kitchen. To make the tabletop look more harmonious, a similar pattern can be created on the wall in the kitchen. Here you can use not only ceramic tiles as a mosaic, but also porcelain, pieces of mirror, and pebbles.
Every year the cost of construction and finishing materials increases, which means that not everyone can afford to change the interior when they want to refresh it. The same applies to furniture. It is no secret that kitchen furniture is subject to mechanical damage several times more than in other premises. But what a pity it is to throw away your favorite kitchen table just because its top is worn out and damaged!
If your table top has deteriorated, you can decorate it with mosaics to breathe new life into it.
There is no need to despair, there is a way out. It is enough just to decorate the tabletop with mosaics, and it will shine with new colors, giving the interior a fresh and original look. In order to create a mosaic, you will need to put in a lot of effort, but it is worth it. The painstaking work will be fully paid off by creating an exclusive item with minimal expenditure of the family budget.