Do-it-yourself carriage screeding is a rather complex but fascinating process that anyone can figure out. The use of the carriage screed technique is gaining great popularity around the world, because it is one of the most interesting types of finishing. The main advantage is that you can decorate your furniture in an unusual way - you just need to prepare all the necessary materials, accessories and follow the detailed instructions.
DIY carriage screed
Carriage screed: features and differences
The carriage screed has its name for a reason. Its use has been known since the mid-18th century. At that time in France, during the reign of Napoleon III, this type of decoration was actively used to decorate the interior decoration of carriages. "Capitone" was considered a symbol of wealth, luxury and high status of a person. Later, the carriage screed technique began to be used in other European countries, appreciating its beauty.
Until now, the popularity of such finishing of backs and other furniture elements remains quite high. For example, one of the signs by which you can recognize a soft Chesterfield sofa.
It is loved by those who do not tolerate trivial decisions in the interior and are always looking for special and unique things for their home, be it furniture, interior doors or accessories.
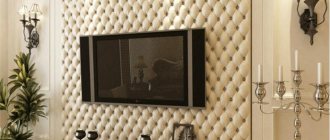
The Capitone technique is also used to decorate large wall panels that occupy the entire space from floor to ceiling, various furniture elements, be it the back, armrests or seat.
Sometimes it is used to decorate various small interior items, such as pillows or mattresses. It is very easy to recognize a carriage tie: it always has soft upholstery, which seems to be held together only by buttons. In this case, the stretched fabric forms a symmetrical pattern: squares or diamonds of the same size.
As a rule, for the outer upholstery of chairs, sofas or beds, dense and wear-resistant fabrics are chosen that are easy to clean and will last for many years. Usually it is: leather - natural, artificial, eco, suede, flock, velor or velvet.
Buttons with threads, special furniture nails decorated with rhinestones, pearls or beads are used as fixing elements.
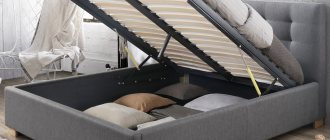
Furniture pieces with a carriage screed design
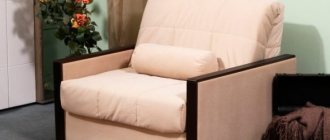
Upholstery using the capito technique can decorate any upholstered furniture. However, most often in the interior there are sofas, poufs, beds, armchairs and chairs. Let's consider the subtleties of their design.
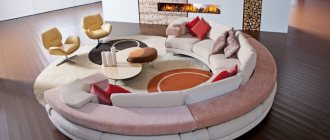
Sofas, armchairs
Options for sofas with carriage screed: straight, corner, island, semicircular, modular. The products will decorate the living room, dining room, bedroom, nursery and office. All types of equipment are suitable for decoration.
Chairs with such upholstery can be either framed or frameless. A square pattern is suitable for compact furniture, and a diamond pattern is suitable for models with wide seats and high backs.
There are several upholstery options for sofas and armchairs. You can choose models that are fully decorated with patterns or choose ones with designed backs and armrests.
Advice! Chair models made in the form of a high throne look luxurious. They will become an exquisite highlight of the office, dining room or kitchen.
Armchairs with carriage screed in the interior
Sofa with carriage screed in the interior
We invite you to look at the original sofas and armchairs in implemented design projects:
- Petrovo is distant. Sofa
- Uralsk Sofa and armchairs with decorative upholstery
- Peace Avenue. Designer sofa
- Millennium Park. Quilted sofa
Beds
Beds with a high headboard are often decorated using the capito technique. The volumetric soft back acts as a catchy decorative element that immediately attracts attention. The element creates a sophisticated contrast with the monochromatic wall design.
Bed with carriage screed in the interior
Implemented projects of bedrooms with beds decorated with an unusual screed:
- Discord. Guest bedroom
- Uralsk Bed with carriage headboard
- Uralsk Bedroom No. 3
Poufs
Poufs with a carriage tie will fit perfectly into the living room, bedroom, and children's room. Round models, fully decorated with figured upholstery, look impressive in modern interiors. No less interesting are specimens of a streamlined square shape.
In a classic interior, rectangular pieces with curly low legs look organic. The combination of wooden supports and soft decorative cladding is a bold, non-trivial solution.
Poufs with carriage screed in the interior
Our designers' ideas:
- Nightingale Grove. Pouf with carriage tie
- Apple orchard. Bedroom
- Tashkent apartment. Bedroom
- Yalta sea descent. Master bedroom
Pros and cons of cardboard screed
Why do many people prefer to make Capitone upholstery themselves rather than buy a ready-made product:
- you have a chance to make truly unique furniture that you will not see anywhere else;
- the design, color scheme and style will completely match your interior or fit perfectly into the design that you want to bring to life;
- there is no need to choose from limited options, because you purchase all the necessary materials yourself: fabric by color, texture, density, price;
- You will significantly save your budget by doing everything yourself.
Of course, before you start tightening the head of the bed with a carriage tie, you should carefully study the instructions and think through all the steps.
Making buttons
How to make beautiful and reliable buttons? This is probably the most important question in a carriage tie. Despite the fact that ready-made options are now not difficult to buy, it is still often impossible to choose the exact shade.
In this case, you will need to purchase upholstery material with the necessary reserves. When purchasing a base for buttons, you should choose those that have an iron ear - plastic ones break very quickly.
Step-by-step instructions for tightening buttons yourself:
- cut the textile into strips twice as wide as the existing base;
- we cut squares out of them, and they, in turn, turn them into circles;
- after that, small stitches are made along the edges of the shred with a needle and a strong thread folded in half, gradually tightening the edge - eventually the material should wrap around the button;
- The smaller the step, the smoother the fabric will lie.
This process is very painstaking and also takes a lot of time, but undoubtedly the result is worth it. If there are no special problems with finances, then it makes sense to save time by purchasing factory-made universal buttons, the heads of which have a special rim that fastens the fabric.
Sketch of a carriage screed for a bed
First of all, decide for yourself what you like best: a rhombus or a square. Draw a rough sketch.
For the first upholstery, the headboard itself (if you are new to this business) is better to choose a standard shape - rectangular or square. At the next stage, decide on the material with which you will cover the soft base. Give preference to special furniture fabrics, as they are denser and wear out more slowly. Try to avoid the usual tailor's linen, no matter how much you like it. Fabric that is too thin can be damaged during the stretching stage. As a rule, plain fabrics are used for carriage screeds, very rarely with a printed pattern, which is caused by the peculiarities of the technology. The fact is that when tensioned, the drawing becomes deformed and does not look so impressive. When using fitted buttons, you will need a press. Purchase it in advance or take care of making the necessary fasteners in a furniture workshop. You can also look at the range of furniture buttons in specialized stores.
Style Features
It is impossible to confuse the carriage screed with any other finish; here even an amateur can clearly see the differences.
- The main hallmark of the “Capitone” style is considered to be a symmetrical repeating pattern of buttons recessed into the panel, which are connected to each other by even folds. The depth and size of the pattern depend on the thickness of the foam filler.
The real Capitone decor is made from a single piece of fabric by creating folds by hand.
Keep in mind - a real carriage tie is made by creating folds between the buttons on a single piece of fabric, the work is done by hand. There are scammers on the market who sew or glue small patches and then pass off this fake as “Capitone”.
A carriage tie sewn from separate pieces is considered a crude fake.
- Contrary to popular belief, the presence of buttons is not necessary for the Capiton style, but the carriage tie with buttons in the recesses is considered a classic.
- All products have a repeating symmetrical pattern. Even in furniture with complex geometry, the correct shapes are visible at first glance.
Regardless of the configuration of the bed headrest, symmetry should be visible in the design.
Materials for making carriage screeds
Once you've prepared your sketch and decided on your supplies, it's time to think about what other tools you'll need. Here's what you'll need:
- a sheet of plywood that will serve as the base of the headboard (it will need to be given the desired shape);
- a piece of thick furniture fabric with a margin (it should be significant, since a large amount of it is spent on the formation of folds);
- furniture buttons;
- soft base (foam rubber) with a thickness of 5 cm for the headboard;
- synthetic filler;
- fastening and improvised tools: furniture stapler, knife, scissors, bookbinding needles, drill with a tsifenbor attachment for creating straight holes;
- glue.
Before purchasing foam rubber, check its purpose (usually indicated on the packaging by the manufacturer). Don't forget to check the density and elasticity. If these parameters are high enough, then the head of the bed will last a long time and will not deform.
It is also recommended to use specialized glue designed for gluing foam rubber. It should not contain toxic and harmful substances, for example, toluene and trichloroethane. In addition, such adhesives usually do not have good adhesive properties. It is best if you purchase a composition based on neoprene, polyurethane, butadiene styrene. As a rule, adhesives intended for foam rubber are characterized by low or zero toxicity, bond surfaces well, forming a strong seam, are relatively elastic and moisture resistant.
What materials and tools will be needed for the job?
It is recommended to prepare all necessary tools and materials in advance. To save time, try to plan the upcoming amount of work.
It is necessary to think through the entire plan for future work.
You will need the following items:
- furniture panel made of plywood base;
- any high-quality fabric for the front side;
- fabric cut for the wrong side of the back;
- foam rubber about 5 cm thick to create a soft base;
- loops with bolts to help secure the finished headboard;
- decorative elements;
- furniture stapler with thick staples;
- electric jigsaw;
- drill;
- sharp knife and scissors;
- Crochet hook;
- universal glue;
- twine lace;
- wall fastenings and screws.
To make a carriage screed you will need a lot of materials and tools.
As you can see, the list is not small. Therefore, in order not to be distracted by searching for the necessary items, prepare everything before you start work.
How to prepare the base for a headboard
Before making holes in a sheet of foam rubber, markings should be made.
Take a marker and a long ruler and draw out a diagram of the carriage tie. It’s even easier to cut out a regular rhombus or square from plain paper in advance, and then use it to mark a sheet of foam rubber. At the very beginning, apply two guides - vertical and horizontal stripes. And then place the template with the center at the point of intersection of the axes, and then draw sequentially.
The top marks of the diamonds are where the buttons are attached. This is where you need to make even holes in the foam using a drill. If you don’t have a drill on the farm, you can use a piece of metal pipe, but you will have to work hard to cut through the foam rubber. You can even try to make holes with a stationery knife; during screeding, flaws and unevenness on the furniture will be hidden.
Next, you need to transfer the markings from the foam rubber to the prepared sheet of plywood.
Place a sheet of foam rubber on the plywood and mark points along the holes. Here you can’t do without a drill, since you will need it to make similar holes in the rigid base of the headboard.
At the next stage, glue the foam rubber to the plywood, keeping the holes symmetrical. Do not forget to use special glue for porous materials, and also read the instructions for it. You may need to wait for the adhesive to set on the surfaces. After checking the strength of the manufactured product, it should be covered with a thin layer of padding polyester. Secure it with rubber cement to the foam rubber.
Stages of work
| Illustrations | Recommendations |
| Create holes. Stage 1. You can draw markings directly on plywood, but it is better to make a stencil from thick paper, because these markings will be needed more than once, and with a stencil you will save a lot of time. The standard distance between puffs is 100 – 150 mm. | |
| Stage 2. Now, use a stencil to mark the locations of the tie rods and drill 8-10 mm holes at these points. Good support is important here; wooden trestles are the best option; only the upper crossbars need to be covered with fabric. | |
| Foam rubber and batting. Step 1. Now we take the same stencil and transfer the markings to the foam rubber slab, but do not drill yet. To drill round holes in the foam rubber there is a Ziefendorf nozzle, but it is expensive. It’s cheaper to buy a furniture jig, attach an adapter to it and sharpen the tube around the circumference, as in the photo on the left. | |
| Step 2. It is more economical to apply glue from a spray gun, using a nozzle of 1.5 - 1.7 mm. In the absence of a spray gun, you can take glue in an aerosol can. As a last resort, take regular glue and apply it with a brush or roller, although the consumption is higher. Be especially careful to lubricate the area in and around the holes. | |
| Step 3. We glue the foam rubber and wrap the shield with padding polyester or batting. I prefer to use padding polyester, it's easier to work with. Next, take wooden sticks and, on the back side of the shield, punch the pillow through the holes with them, these will be the entry points for the buttons. | |
| Step 4 . Now it's time to drill holes for the buttons with a jig. Take out the sticks one by one and drill holes in the center. | |
| We work with fabric. Stage 1. Before attaching the fabric, it must be marked on the reverse side. To do this, take the template again and move the entry points of the buttons.
| |
| Stage 2 . Now we take a nylon or nylon cord and stitch it through the fabric according to the markings. The cord is immediately tightened and shot with a stapler from the back of the shield in 2–3 places in a zigzag pattern. The buttons will be attached at the end. | |
| Stage 3 . After we have pulled together 2 - 3 rows, we begin to form folds on the canvas manually, using our fingers. The depth of the crease is 10 – 15 mm. | |
| Stage 4 . After the folds are formed, they need to be brought to an ideal state, that is, made absolutely even. The same wooden stick, only blunt, is perfect for these purposes. | |
| Stage 5. 2 – 3 rows of puffs are formed at a time, after which move on to the next sector. The fabric is wrapped around the edge and fixed on the reverse side with a stapler, after which you immediately form folds that go behind the shield. | |
| Preparing a button . We insert a cord into the eye of the button and insert it into the hole. | |
| We fix the button . The cord from the button is stretched all the way and fixed on the back side with a stapler, just like we shot the cords from the puffs. | |
| Ready carriage screed . Now all you have to do is build this shield into the head of the bed, assemble the structure and use the product. |
Covering the headboard with fabric
Now the headboard is ready, all that remains is to give it a beautiful and elegant look. Here you will need fabric, place it on the far left side and move gradually up and to the right. Each hole should be secured with two needles, which are brought out through the foam rubber to the back side of the plywood, where the thread is fixed with several zigzag staples using a furniture stapler.
When you walk a little side by side in this way, you will see that the pattern you intended is gradually formed - rhombuses or squares. Once you've finished threading all the holes, secure the edges of the remaining fabric to the other side of the plywood.
How to attach it yourself?
You can attach the headboard in several ways:
- to the wall, which is located above the bed. You will need to screw two hinges with self-tapping screws to the back of the headboard. The element is hung on bolts;
- to the frame. This method involves drilling a pair of holes on the sides of the outer part of the bed frame. The headboard will be screwed through these holes using screws;
- You can also make the headboard as a free-standing structure. You can purchase ready-made wooden legs or build them yourself. The legs are screwed to the headboard, and the structure itself is installed between the bed and the wall.
Where is this type of screed used?
Today, carriage screed has conquered interiors all over the world; it is used to decorate walls, armchairs, headboards, all kinds of poufs and couches. Its classic look will complement any modern design style.
It is not difficult to make, but it requires enough strength and dexterity to tighten the buttons or hammer in special nails, which, when pressing the foam rubber, create an interesting geometric pattern, most often square, triangular or diamond-shaped.
If you want to decorate a wall or piece of furniture in this way, practice first. If you ruin a small piece of plywood, there won’t be much harm, but you will understand the principle of such a craft and gain practical experience.
Reupholstering a bed: how to lay it softly
A hard box and an uncomfortable hard headboard will not give the owners the feeling of desired peace and tranquility. If you turn around poorly, the side of the bed with its narrow edge will leave a mark on the body, and a hard headboard generally interferes with rest by 80%. Now is the time to consider a fabric-covered frame with a small layer of padding underneath the textile.
To make the bed really soft, you need:
- upholstery of the headboard (and footboard, if available),
- covering the bed frame with covers and padding,
- creating bedspreads and pillows from upholstery fabric.
The last point is optional, but it helps to instantly give the sleeping space a complete look. A bedspread sewn exactly to measure in the same style as the headboard and sides turns the sleeping area into an inviting royal bed.
Reliable support
A matter of primary importance is reupholstering the head of the bed. If at the time of purchase it was already decorated with fabric or leather, then it will be easy for the studio craftsmen to update it
But if the headboard was hard, the specialists will have to work. However, the result will justify everything.
Reupholstering the headboard may be the only transformation procedure. It is enough to cover this element with stylish eco-leather with a reptile texture or cozy striped chenille - and the bedroom will no longer be recognizable! Now reading and daydreaming before bed will move to a new level of relaxation.
London passion or a mystery of nature?
One of the most spectacular renovation options is upholstering the bed with leather. This is how a sleepy beachhead turns into the epicenter of high style in the house.
When choosing a shade, you should pay attention to:
- colors of pearl, powder and fog - light colors will make a wide piece of furniture weightless, save space and bring the bedroom closer to designer samples,
- autumn variations - the range of maple leaves is always relevant, scarlet, purple and greenish-yellow skin looks impressive in any environment,
- dark tones are still present in the current selections of this season, but it is by no means black, but graphite, malachite and other “stone” textures.
When upholstering a bed with leather, the texture of the material is no less important. For a pretentious interior with an abundance of crystal and “cold” light, a coarse leather structure is preferable. And for cozy bedrooms in ethnic style, upholstery suede is more suitable.
Partial bed reupholstery
The headboard of the bed has both a practical and decorative function. Cracked or torn upholstery can ruin the look of any, even the most beautiful bedroom. You shouldn’t throw away something with a defect on the headboard - contact the Upholstered Furniture Repair and Reupholstery Studio. Our professional craftsmen will quickly and efficiently upholster the head of the bed or any other parts of the bed at a reasonable price.