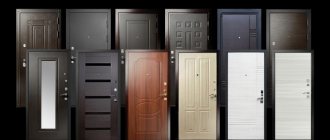
The seal for the metal entrance door is attached at the last stage of installation of the door leaf. With its help, it will be possible to reduce the gap between the metal sheet and the frame, and this, in turn, helps to reduce the intensity of heat outflow from the room. It is difficult to imagine doors without a seal, since this material helps to reduce the amount of error that is always provided for during installation. It is available in several varieties, which allows you to choose the most suitable option.
How can I glue the seal (rubber) to a metal entrance door?
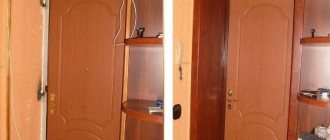
The seal needs to be glued to the door, it blows a lot.
The doors are metal, and the seal is rubber, which can be used to glue it to make it secure.
Self-adhesive seals for entrance doors (rubber) are available for sale.
That is, the seal already has an adhesive layer and an additional one is simply not needed.
If you have a different seal, you can glue it with this glue
This is an especially strong adhesive, moisture-resistant, and glues metal, rubber, leather, plastic, concrete and in any combination.
Or you can glue the seal with glue-sealant.
This is not a bad adhesive sealant
You can also glue rubber to metal.
Regular sealant will do, but you need a sealant for exterior use.
In addition to the glue, it is important to properly prepare the surface for installing the seal.
It is necessary to remove the old seal and clean the surface of glue residues.
Next, be sure to degrease, otherwise any glue will not stick the seal firmly enough.
There is also the option of using double-sided tape, which in principle works, but is short-lived.
It is very difficult to find an adhesive that will provide adhesion between the rubber (that the door seal is made of) and a metal or wood door.
Tubes that are sold near the checkout counters of various hardware stores, even if they say “for rubber” or “universal” and others, such glue will not be able to glue the rubber to the door, I was convinced of this from my own experience!
My favorite WURTH silicone also did not cope with the task, it fell off the elastic band.
Here the glue should be like Velcro, so that there is not a hard or soft layer that, after it hits the surface, hardens and then falls off the elastic, but you need glue that does not dry for a long time, remaining elastic and sticky.
I tried, after unsuccessful attempts to glue it with consumer goods glue, to glue it with double-sided tape, but it also doesn’t stick to the rubber for very long, most likely due to the fact that the rubber is constantly in motion when opening/closing the doors.
But there is also a special glue on sale, which is specifically designed for gluing seals on windows and doors, it is sold in tubes of 50-80 ml, costs about 500-800 rubles, although I have seen it for about 250 rubles, it has a sticky composition, which does not dry on the surface, but constantly sticks.
Safety precautions when working with glue
The adhesive mass contains various components that evaporate during the polymerization process, leaving a strong, durable seam. Therefore, when working with adhesives, you must follow the following safety rules:
- Carry out gluing in a well-ventilated area.
- Use protective equipment (gloves, goggles, respirator). In case of contact with skin or eyes, immediately rinse the affected area under running water.
- To apply the adhesive in doses, use a dispenser tube, brush or spatula. Place items stained with glue on a special stand, and immediately close the tube with a lid.
Adhesives for bonding rubber to metal substrates may contain substances that irritate the respiratory tract and can cause eye burns or burning of the skin.
If during work the mass gets into exposed areas of the body and your health worsens, you should urgently seek medical help.
How to stick insulation on the front door
Choosing self-adhesive insulation for entrance doors
On the shelves of hardware stores there are several options for self-adhesive insulation that are suitable for entrance doors. They are all tape with an adhesive edge.
The tape itself can be made from:
1. Rubber-based seal.
Rubber insulation for the front door can be called universal. It is not afraid of moisture and temperature changes, exposure to chemicals, and is easy to install.
Service life – from 3 to 10 years. One package contains about 12 meters of material, the cost of the tape is 150-250 rubles.
2. Foam tapes.
Among the advantages of foam rubber, it is worth highlighting that it is easy to stick and has an affordable price.
However, the disadvantages outweigh the advantages:
- weak thermal insulation effect,
- short service life.
The cost of one package is about 100 rubles.
3. Polyvinyl chloride. These tapes are valued for their high reliability; they are not afraid of temperature changes from -50C to +70C. Their service life is up to 20 years. Their main disadvantage is their high cost, but taking into account the durability of the material, the price more than pays off.
4. Silicone. Such insulation materials are environmentally friendly, but due to the characteristics of the material they are used mainly for interior doors.
5. Izolon. Another adhesive-based material. It is made from polyurethane foam. Sold in rolls, it is convenient to glue. Cost - from 10 to 160 rubles per square meter.
We take into account the nuances of the door material
1.When choosing a seal for a metal entrance door, follow these recommendations:
- Do not purchase foam rubber tapes; it is not recommended to use them for metal entrance doors, since the material will not withstand frequent opening of the door and will have to be replaced after half a year.
- Lightly press on the base of the insulation. If it quickly restores its shape, it means it can provide a good seal.
- When choosing a color, give preference to black seals; they are considered to be of higher quality.
- Make sure that the adhesive backing has not expired.
2. Fitting a wooden door to a door frame is always accompanied by difficulties, which is associated with the individual characteristics of the natural material.
When it gets wet, dries out, or changes in temperature, the wood becomes deformed, so cracks constantly form.
- To eliminate cracks, it is recommended to stick silicone and rubber insulation that fits tightly to the surface. Izolon has also proven itself well. If the goal is to save money, you can limit yourself to foam rubber, but it is important to understand that it will not last long.
Instructions - how to properly glue the seal to the door
- Carefully remove the old insulation using tools. In our example, the strips are firmly attached to the door frame. We also remove all nails, staples and buttons. This stage is mandatory, otherwise the door will not close after replacing the insulation.
- We use insulation with a gap of 1-3 mm. In the upper part we glue a strip of material slightly longer than necessary. This way we get a neat design.
- We check whether the material is glued evenly. Cut it off at the bottom with a knife. We glue a strip of sealant in the upper part so that it overlaps the vertical strip. We do the same at the bottom of the box.
As a result, we get two strips of sealant with a beveled cut, connected at an angle of 45C. This design will retain heat for about 5 years.
We insulate the metal entrance door using foam sheets
If you have a metal door, research it to see if it is possible to remove the inner metal removable sheet; it is often attached to the top and bottom of the door with self-tapping screws on the corners.
We proceed as follows:
- Remove the removable sheet.
- We go over the inner corners with sealant. We put insulation in the door leaf, for example, polystyrene foam. Each piece must match the size of the cells in the door.
- We lay the insulation in an even layer. If this is not possible, fill the voids with polyurethane foam (excess foam is removed).
- We put the removed sheet back. The door is now insulated and ready for use.
Seal for metal doors: how to glue the rubber seal
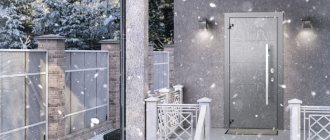
Although metal entrance doors are cast in special molds, their surfaces are not ideal, especially when it comes to the edges of the door leaf. You can observe a poor fit to the box, slight distortions on different sides, and all this can lead to the penetration of cold air, unnecessary noise and even unpleasant odors.
To rid a metal door of these shortcomings, it needs to be pressed tightly against the jamb, and in this case a special seal will be the best assistant for a homeowner.
Why do you need to seal a door?
- From the penetration of excessively cold or hot air flows;
- From the occurrence of a draft effect - a dangerous phenomenon that causes illnesses in households;
- For a better fit of the canvas to the frame of the doorway. This is a kind of lock that protects the locks from play, and if the door is constantly in what is called free flight, then ultimately the key will not be able to get into the keyhole.
What basic requirements must a high-quality seal for an iron door meet?
- Possess exceptional sealing properties;
- Ensure the smoothness of the chassis - good to help open and close;
- Provide breathability and be a good door shock absorber;
- Withstand sudden changes in temperature;
- Be elastic and pliable - do not harden or soften under any influence.
The video shows a seal for a metal entrance door:
Which ones are used for a metal entrance door?
There are several types of seals on the construction accessories market, differing in the following indicators:
- Type of material of manufacture . The most common are products made of rubber fabric, silicone base, plastic, foam rubber bands or products made of polyethylene foam material;
- According to the method of fastening . This group includes self-adhesive sheets, magnetic or pressing, with special glue applied to one side, or installed on additional fasteners.
What to look for when purchasing?
When choosing a seal for steel doors, you need to carefully inspect it and check its quality.
In particular, you should perform the following actions:
- Read the label on the product, which indicates the expiration date, all the necessary information about the seal and the material used for its manufacture.
- By pressing it is worth checking the elasticity and tightness characteristics. The material should be medium hard, then it will not interfere with the door closing well. When pressed, it should quickly restore its original shape. This is a sign of high quality material.
- If the seal is on self-adhesive tape, then you need to find out the expiration date of the glue. Otherwise it could just dry out. Also, small particles of fiberglass should be applied to the adhesive part.
Most often you can find such products on sale from Germany, Sweden, Poland or Turkey. A good product should not harden when the temperature drops, or peel off when it fluctuates; release toxic compounds into the air.
How to insulate the front door?
The apartment has become cool, there is a draft coming from the front door, apparently it’s time to insulate it. Now I will tell you methods by which you can insulate both iron and wooden entrance doors.
Sealing rubber for the front door
This is probably the easiest method and should be used first. Regardless of what kind of front door you have, over time, gaps will appear between the leaf and the frame through which warm air will escape.
What do we need to glue rubber insulation to the front door. First of all, we measure the box around the perimeter, now we know how long the sealing rubber needs to be bought. Now you need to find out the width of the door frame rebate. A rebate is a recess in the door frame into which the door fits when closed. The rubber seal is glued directly to this place. We can find out the thickness of the compressed seal by measuring the gap between the frame and the door. This is a very important measurement, because if you buy a rubber seal that does not fit tightly, gaps will remain. And if you overdo it, the door will not close well. I'll tell you a little secret. You need to take some plasticine, wrap it in cellophane and press it into the door. The resulting roller will be the thickness we need.
The gluing process itself does not cause difficulties, since the rubber seal for the front door already has a surface with a sticky base. Remove the protective layer and glue it.
How to insulate an entrance or street metal door
Inexpensive metal doors have no insulation inside at all. Sometimes you can find cardboard there, folded like a honeycomb. I can’t imagine how he can insulate the door.
Therefore, I recommend opening the door and filling the void with mineral wool, polystyrene foam or polystyrene foam. Expanded polystyrene is similar to polystyrene foam, but is denser and thinner. Choose a thickness to fill the entire door space. It is convenient to glue inside using liquid nails. Well, the cracks between the plates can be filled with foam. As a result, we will get a monolithic layer of insulation. You can also change the rear wooden part of the door if it is pretty worn out. You can screw on a thicker sheet of laminated fiberboard. Try not to increase the thickness of the door, otherwise you may have to change the locks too.
Modern and traditional energy-saving insulation
What types of door insulation are there?
The following types of energy-saving cladding can be used as finishing materials:
Finishing with dermatin coating
Advice. It is not recommended to use polystyrene foam as an external finish, as it is a highly flammable material.
Energy-saving cladding methods
Installation of polyurethane foam insulation
Depending on the design of the door leaf and the materials used in the production process, the door insulation is selected, as well as the optimal method of energy-saving finishing.
There are several insulation options:
Let’s take a closer look at how you can do insulation with your own hands at minimal cost.
Insulation of wooden entrance doors
Insulation with mineral wool
Since wood is an excellent heat insulator, energy saving consists of eliminating all cracks and gaps that arise as a result of deformation of the canvas.
Therefore, the box and the canvas must be carefully adjusted to each other. This will block the penetration of cold air into the house or apartment. The box is adjusted using a plane. As a result of the work, the maximum tightness between the box and the canvas should be achieved .
Important. For windows and doors made of wood, it is necessary to leave a gap between adjacent parts of the structure. The gap is designed for swelling of the material, which occurs when air humidity increases in autumn and spring.
In order to eliminate drafts, strips of felt, felt or leatherette are stuffed along the contour of the canvas. You can also close the gaps by using self-adhesive insulation, available in strips up to five centimeters wide.
Energy-saving technologies for metal doors
The photo shows a sectional view of the installation of a layer of mineral wool
Insulation for metal doors can be placed both around the perimeter of the junction of the frame and the leaf, and on the outside and inside. It all depends on the design and the need for thermal insulation in different regions. There are several options for insulating metal door structures.
First finishing option
Laying a layer of mineral wool and vapor-proof film
Most budget options for metal doors, the price of which does not exceed $500, have one of the sides removable. The metal sheet is secured with self-tapping screws and is easy to dismantle.
Therefore, having freed the sheet from the fastenings, the internal cavity is filled with insulation.
Such internal door insulation can be made of the following materials:
Advice. At the junctions of the metal supporting structure of the sheet, where installation of insulation is impossible, the cracks must be insulated with a layer of polyurethane foam.
After laying the insulation, the removable sheet is screwed into its original place and the entrance to the house has an attractive aesthetic appearance.
The second option for energy-saving metal cladding
Expanded polystyrene can only be used for closed metal structures
If the metal door is non-removable, then the finishing process is more labor-intensive. And it is better to leave the finishing work to specialists who have the necessary equipment, for example, welding. Because along the canvas it will be necessary to install an additional box of metal pipes, lay insulation on the door and cover it with another sheet of metal, wood or laminated fiberboard.
TechnoNIKOL waterproofing for floors video roll
Source
Door seal: varieties and self-installation
Oddly enough, such indicators as the thermal and sound conductivity of any door largely depend on such a seemingly insignificant thing called a “seal”. It is he who is responsible for both the absence of drafts and the ability of the door block to reliably retain sound and odors within one room. This will be discussed in this article, in which, together with the website dveridoma.net, we will look at the types of door seals, their purpose and self-installation or replacement.
Door seals: types and scope of application
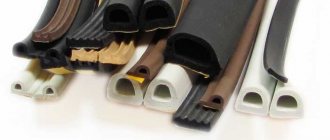
Door seals can be classified based on an unlimited number of characteristics. In fact, this is a product of narrow specialization, and its different types may differ from each other only in some details. Speaking specifically, by size (width and thickness), the material from which they are made, as well as by purpose - in the last variety we mean the type of doors on which they can be installed. For example, the seal for wooden doors is somewhat different from the seal for metal doors - despite the fundamentally small difference, they are by no means interchangeable. Let's take a closer look at all the available types of door seals.
Silicone door seal photo
Types of seals according to purpose
According to their purpose, all door seals can be divided into several large groups - seals for entrance doors and interior doors, for wooden and for glass doors, differ from each other. In general, each individual type of door structure can be equipped with a special seal.
- Seal for entrance doors. In most cases, these products are a dense tubular seal that is hollow inside, which, thanks to the thick material and internal cavity, ensures a reliable fit of the door leaf to the frame. Moreover, the rubber itself used to make such products is also interesting. It is porous, due to which the thermal insulation effect is enhanced several tens of times. In one hundred percent of cases, this type of door seals is made on a self-adhesive basis, which is both an advantage and a disadvantage - over time they come off, but new ones are installed easily and simply.
- Seal for interior doors. Unlike seals for entrance doors, this version of such products is not so demanding in terms of its characteristics - it does not need to counteract drafts. It is for this reason that it has an excellent configuration, and the material used for its manufacture is different - often silicone or soft rubber. In addition, such door seals may differ in the installation method, but we’ll talk about this a little later.
- The seal for plastic doors can be classified as a separate group - its main feature is the ability to quickly replace it. In most cases, they have a special configuration that allows them to be installed in a groove. This approach to installing the seal allows you to reduce the influence of the ambient temperature on the seal itself - it does its job equally well, despite either the frost or the heat outside the door. In general, it is universal and is equally suitable for plastic doors installed both indoors and outdoors. There is one drawback - it is not suitable for all other doors. One can say even more - this door element is not interchangeable among different manufacturers.
Seal for interior doors photo
Another separate type includes a seal for glass doors - as a rule, it is made of silicone, but, unlike many other products, it has a special profile section. Installing such a door seal is quite simple - it is put on the end of the door, as they say, wet-wet. After the water dries, it is firmly glued to the glass. In general, there are several designs of seals for doors of this type - it all depends on the type of glass doors. If they are made using an aluminum profile, then such doors are equipped with a seal exactly the same as that installed on plastic doors.
Types of door seals depending on material
Another criterion by which a door seal can be classified is the material from which it is made. There are also not many options here, only three.
- Rubber seal for doors. In most cases, it is used for street doors, since thanks to various modifiers, rubber can be adapted to any, even the most severe operating conditions.
- Silicone seal for doors. Silicone is somewhat inferior in its performance characteristics to rubber, and it is almost impossible to upgrade it with special additives. Even with the use of additives, this material cannot be made durable, and it is for this reason that it is used mainly for the manufacture of interior door seals. Here it is unrivaled and lasts for a very long time.
- Foam rubber seal is a budget option that often does not withstand even half a season of use. Under the influence of temperature changes, dirt and humidity, it begins to crumble and disintegrate into dust. In addition, over time it shrinks, ceasing to cope with the tasks assigned to it.
Seal for glass doors photo
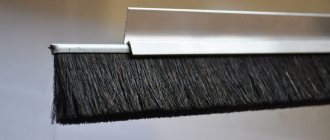
There is another type of door seals - brush or fleecy tape. Almost always, such seals are used to seal compartment doors - they do not provide sound and heat insulation. Their main purpose is to keep dust out of the cabinet or room.
How to insulate a door using insulation, watch the video.
Installing a door seal: three options for resolving the issue
As you already understand, the technology for installing a door seal depends entirely on its type. In this regard, two types of similar products can be distinguished: groove seals and self-adhesive ones, the installation of which we will talk about in a little more detail.
- Installing the seal in the groove. Everything here is quite simple, and the most difficult thing you will have to face is trimming the seal in the corners of the door frame, although with the right approach to the matter you can do without it. The seal, which has a special protrusion with a brush on the back side, is simply pressed into the groove. There is only one nuance here and it is due to such a property of rubber or silicone as the ability to stretch, which is completely unacceptable when installing a seal on a door. It should be understood that if this product stretches, then with the same success it takes its shape back. Therefore, during the installation process, such products should not be stretched, but rather, try to compress them. Another point related to this nuance is cutting the seal - this should be done after the seal is installed in the groove.
- How to install a self-adhesive door seal. The question of how to glue the seal to the door is solved quite simply, and here, as in the previous case, there are not so many nuances. The most important of them is the clean surface of the door at the place where the seal is installed - in a good way, it must not only be cleaned of dust and dirt, but also degreased. The further process looks quite simple. We remove the protective film from the seal (not all of it, but about ten centimeters) and glue the freed part, again, trying not to stretch the product. After the first section is firmly pressed against the door, we release the seal further from the protective tape and glue the new section, carefully pressing it to the surface of the doors. And we do this all the way to the bottom, where we carefully cut off the seal with a knife.
Self-adhesive door seal photo
That's all. As you can see, this science is not complicated, and this process is quite accessible for independent implementation.
To conclude the topic about door seals, I’ll add a few words about how it is installed on entrance doors. To achieve high-quality sealing of the entrance door block, the seal must be glued not only to the door frame, but also to the door leaf itself. Along the perimeter, the area where the leaf adjoins the outer part of the door frame and the area where the leaf adjoins the inner quarter of the frame is glued - in the latter case, the door seal is glued not to the door, but to the frame. It turns out a kind of double protection from drafts, cold and sound from the outside.
Classification of materials
You can correctly use insulation for wooden windows yourself without outside help. Most materials are designed in such a way that their application requires little or no specialized tools.
There are a lot of options for insulating windows today.
On the shelves of specialized stores there are varieties of materials:
- foam insulation for windows;
- rubber insulation tape for windows;
- polyurethane;
- polyethylene foam;
- insulation for PVC windows (polyvinyl chloride).
Also, finished products are differentiated according to the method of application:
- self-adhesive insulation for windows;
- insulation for windows for the winter, fixed using glue.
A tubular seal made of rubber is in demand. This material can be used repeatedly if necessary. An additional convenience is the ability to open windows during cold periods, since the material is glued to only one of the mating surfaces, unlike tape or paper.
Rubber tubular seal
And this is how it is fixed in the frame
Necessary conditions for insulation
To ensure the reliability of the work performed, a number of important conditions will need to be met. Before gluing window insulation, it is necessary to thoroughly wash the surface to be treated from dust and dirt. If necessary, replace cracked glass, because cold air can also be blown in through these cracks.
It is advisable to carry out all sealing work at positive temperatures in order to preserve the ductility of the materials used.
If the glass is not securely fixed, then it must be “seated” with silicone sealant. This will have an additional positive effect, since the glass will stop “siphoning”, which is already +5% in terms of heat retention in the house.
VIDEO: Insulation of window frames
Choosing the right material
Those wishing to use self-adhesive insulation for rubber windows must select a softer texture. This material, unlike hard material, will provide better penetration into all crevices, and it also has lower thermal conductivity. In addition, it is more problematic to work with hard materials.
The use of self-adhesive insulation for plastic and wooden windows helps to increase the speed of work. Simply remove the protective layer and apply the sticky side to the desired location.
When using materials without a sticky surface, it is recommended to use silicone insulation (sealant) for windows. It will withstand moisture from condensation and also has a plastic structure.
How to apply silicone sealant
For ease of application, purchase a sealant gun. Such a purchase costs about 200-300 rubles, but it will provide significant help.
Application of thermal insulating film
A practical material is insulating film for windows. It is applied both from the outside and from the inside. Despite the relative high cost of the material, it demonstrates excellent results in terms of energy saving.
As a type - energy-saving window film
Experts recommend installing energy-saving film on the inside of the window to achieve the best effect.
During application of the film, its uniform tension is ensured over the entire surface. A slight sagging of any area can lead to ruptures during a sharp gust of wind. You can get rid of the damage using tape.
More durable brands of films, also used in greenhouse farming, have a yellowish tint. They are able to withstand large temperature changes with virtually no change in their characteristics. They can also be used repeatedly, which will compensate for their increased cost relative to other brands of material.
To attach the film, use the following options:
- using a stapler directly to the frame;
- stuff wooden planks on top of the film with small nails;
- use nails with wide heads or place a strip of roofing felt or leatherette rolled up several times under them;
- fastening is carried out with paper clips.
Instead of film, you can use transparent polyvinyl chloride. The material is environmentally safe and does its job well.
Using a sealant
It is easy to find material for seals in hardware stores. Visually, they look like a tape with an adhesive layer on one side. The base consists of polymer or foam rubber. Polymers make it possible to tear off the sashes without any problems, as well as use water to clean the surface. When water regularly gets on foam rubber, the material quickly deteriorates and cannot withstand use for more than one season. It needs to be replaced by next winter.
Gluing the tapes is very simple. It is enough to cut the workpiece to the required length and then remove the paper protection from the adhesive side. It is glued both to the window frame and to the stationary part of it. This will provide reliable protection against cracks.
Fighting large cracks on an old frame
Since gluing self-adhesive window insulation in the presence of large cracks will be ineffective, in this situation an additional procedure is carried out to seal the cracks. The cavities are filled with the following materials:
- cotton wool;
- paper;
- rags;
- putty mixtures, etc.
The best way would, of course, be putty, which completely fills the space and does not leave cold bridges. Depending on the size of the crack, the density of the putty can be from liquid - for small cracks, to thick and viscous - for large cracks that need to be sealed.
The surface must first be cleaned of dirt in order to subsequently ensure good sealing. A retaining layer of tape or strips of paper is glued over the closed gap, which is attached to water-soluble glue, for example, PVA.
Working with plastic windows
Insulation for plastic windows is also in demand. In case of initial installation of high-quality materials, it can withstand up to 5 years of reliable protection. After this, the connections may be subject to depressurization.
During diagnosis, you can solve some problems yourself, however, you should clearly identify the cause of the problem:
- when the rubber on the sash has worn out, it needs to be replaced;
- a frame with a slope can also become depressurized, which can be solved by removing the slopes and sealing the resulting seams;
- If shrinkage of the building has occurred, then we carry out adjustment work with the fittings.
High-quality components are used so as not to carry out repairs every season.
VIDEO: Insulating doors and windows using sealant
How to change the seal on the front door
Thermal and sound insulation of a door block are the most important performance characteristics for a structure installed in a residential area. In addition to protection from intruders, metal doors to the apartment should protect the home from unpleasant odors and noise from the outside. If we are talking about a private house, then the thermal insulation capacity of the entrance block comes to the fore. This is what determines the level of heat loss and, as a consequence, the cost of heating a home.
The best seal for a metal entrance door
The main structural method of ensuring good insulation is the installation of sealing contours around the perimeter of the leaf and door frame. However, after several years of use, they may become unusable and cease to perform their functions. In order to avoid problems with such a defect, it is advisable to find out in advance how to replace the seal on a metal entrance door.
First, you need to familiarize yourself with what types of door seals there are. All of them are tapes with an adhesive backing, making it easy to understand how to glue the seal to the front door. The differences between them are in the material and profile shape. The main types of seals are rubber or silicone gaskets of the following sections:
- D-shaped;
- E-shaped;
- P-shaped;
- U-shaped.
In addition, there are polymer seals of complex shapes with magnetic layers that provide the maximum level of heat/sound insulation. They are often installed on three-circuit doors in combination with other types of seals.
Replacing the door seal yourself
The task of replacing sealing contours is solved quite easily if you carry out the necessary sequence of actions step by step. Before removing the door seal, you need to prepare a replacement so as not to leave the entrance block without insulation. For home metal doors, self-adhesive D- and E-shaped gaskets are usually chosen.
To change the sealing contour, you need to do the following:
- remove the worn seal from the door block;
- clean and degrease the area for gluing the new contour;
- remove the protective film and install the seal, pressing carefully along the entire length.
As you can see, installing a seal on a steel door is not difficult. The main thing is to choose the right profile, focusing on the specifics of the room and the design features of the iron door. After this, restoring or strengthening the insulating qualities of the door structure will not be difficult.
How to glue rubber to metal: instructions for use
First you need to clean the gluing areas from dirt and clean the painted base. The second stage of preparation is degreasing, which increases adhesion. Then you will need to do the following:
- lubricate both parts with a thin layer of adhesive mass (approximately 2 mm);
- Place the parts tightly together and hold until the glue hardens (you can use a vice or a press);
- Sand off the protruding frozen mass with sandpaper or cut it off.
It is advisable to start using the glued item no earlier than one day after the repair.
How to properly stick a seal on a door?
Rule 1.
When choosing seals, carefully read the labels on the packaging. They will tell you things that salespeople can't explain. For example, what exactly is this seal made of: rubber, PVC, polyurethane, polyethylene foam, etc. And also whether the glue has expired (if it is a self-adhesive sealant).
Rule 2.
Carefully feel, touch, squeeze the seal. Your job is to make sure that it is soft and recovers its shape well. If the seller swears and does not allow you to “squeeze” the goods, immediately go to another seller. Most likely, they want to sell you low-quality products. Or maybe the seller was just mischievous. But it's better not to take risks.
Rule 3.
If you purchased a seal that you need to glue on yourself, try to buy reliable adhesive. Preferably silicone sealant.
Rule 4.
Before choosing the “letter” (sealant profile), measure the size of the cracks that you have to seal. A profile in the shape of the letter “E” is suitable for gaps of 2–3.5 mm, in the shape of the letter “P” – for gaps of 3–5 mm, profile “D” – for gaps of 3–7 mm.
What else could be sealed?
It turned out that seals can be used not only for insulating windows. One of my friends recently installed a metal door in her apartment. This is such a wow door – quite metal and massive. But, I must say, the hostess tormented me and everyone in the household with comments: “Quiet, don’t clap, the neighbors are complaining!” I know what needs to be done so that I can slam the door as much as I want and still be silent! Can you guess what? That's right, you need a seal. You just need to choose the softest and thinnest one and stick it in several places between the door frame and the door itself. I've already done this myself. And one more piece of advice. At my house, the handle of the interior door was constantly banging against the polished closet door. Mom was always indignant that I, a slob, didn’t take care of the polish, and wrapped a belt from an old dress around my hand! Scary, but supposedly reliable. There was no strength to look at this “design”. And I purchased a special shock softener. This is the same seal, or rather a piece of it, which is put on the handle. It does not tear, does not become shaggy and looks quite decent. And the garage! How my husband and I suffered! Every winter, the gate leaf stubbornly froze to the concrete threshold. It melts a little - water accumulates between the gate and the floor. If it freezes, you won’t be able to open it for anything. You're late for work, you can't get to the car! Clearly, it got on my nerves terribly. I had to break the ice with a chisel! Thank you, smart people advised: attach, they say, a special sealing gasket (it is held on by fastening nails). Now we don’t know grief. Water doesn’t flood anywhere, nothing freezes. My husband just clears the snow - that’s all. Garage door bottom seals can warp in a variety of directions, are typically stiffer than window seals, and are never self-adhesive. The method of attaching such seals is indicated on the packaging. Not only that: we still had a small piece of self-adhesive seal left, so I sealed the shoe box door with it. Otherwise we always have this box wide open! Well, I thought it would fall off in a week, because we open it several times a day. Nothing as long as it lasts. In extreme cases, if it starts to come off, you can grab it with a small nail - and you’ll be in order! So these seals are not such a seasonal product. But it’s easier to buy it on the market in the fall and winter - they offer it at every turn. The same self-adhesive seals as for windows are quite suitable for doors. But if you need a more serious seal, use seals produced by RufIzol.
vote
Article rating
Subtleties of choice: manufacturers and prices
When choosing a self-adhesive tape, you should pay attention to the profile and material from which the insulation is made. For cracks with a width of 1-3 mm, profile C or E is suitable, for 3-5 mm - P and V, for 3-7 mm - B and O.
Important: shelf life plays a big role in insulation materials, since the glue dries out over time.
The modern range of insulation products includes many manufacturers:
Penosil - two-component insulation made of EPDM rubber, price from 600 rubles;
But you can find out how and where you can use liquid insulation in Polinor cylinders by reading the contents of this article.
It will also be interesting to learn about what kind of insulation to put under linoleum and how to do it correctly.
But what is the price of insulation for a warm water floor and which one should be used, this information will help you understand.
Which floor insulation under screed is the best to use and how to use it correctly, you can read in this article.
But what is the price of foil insulation for the floor and where should such a building material be used, this information will help you understand.