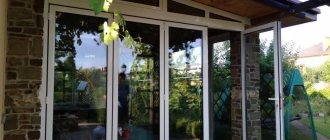
Plastic doors conquered the market two decades ago, and now they are used everywhere. Plastic is a very practical and affordable material, so this is quite natural. Doors made from it are easier to design and manufacture, and consumers, in turn, like them because they provide tightness and are relatively lightweight. Plastic is easier to care for than many other materials, including wood or iron. However, when using plastic entrance systems, the same problems arise as in other cases. The door can sag, rub against the frame, touch the floor - such defects will cause a lot of trouble. But even without a wizard, everything can be fixed; all you have to do is read the instructions. Under no circumstances should it be allowed to reach a situation where the door simply jams or stops going into the frame. Adjustments should be made from time to time as a preventative measure.
Why adjust PVC doors
There are a number of reasons for adjusting the door position. Firstly, this is the shrinkage of the building. The phenomenon is typical for new buildings and is considered the norm. Secondly, improper operation of the door structure leads to the need for regulation. Using flaps and handles for hanging items, such as clothes and towels, increases the load on hinges that are not prepared for this in advance. Sash sagging is another reason to adjust the position. The fact is that the door leaf itself is a heavy structure, and this process will occur in any case. Rapid or frequent temperature changes are a reason to adjust the structure from time to time, since all this leads to depressurization. Door systems made of polyvinyl chloride are also susceptible to this effect. It is also recommended to regularly check gaps and misalignments to monitor the dynamics of possible changes.
First, let's look at what problems may arise during operation:
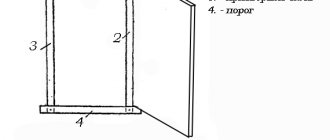
- The door has dropped and touches the threshold;
This is all due to the load of the canvas with glass on the hinges, which causes sagging.
- The door does not close or closes poorly in the middle of the leaf;
The canvas may move towards the free edge of the box due to temperature or increased constant humidity.
- The canvas does not close tightly, and cold air or a draft enters the room from the door;
It can occur during operation when the control mechanism becomes slightly loose.
- The handle is loose;
The handle begins to loosen due to frequent use and this is a common practice when using a plastic door.
Types of plastic doors
Door structures made of plastic according to their purpose are divided into:
- input;
- interior;
- balcony
Plastic structures are characterized by high strength, even without metal inclusions. This also applies to interior doors made of plastic. With the type of construction, everything is a little more complicated. There are sliding, folding and swing doors. Constructions from the first category are a system of two sashes moving in different directions along guide rails. Sliding plastic doors are often equipped with an automatic opening function. Such systems respond to pressure on the lower platform. Such doors save space, but make a lot of noise and are expensive. Folding systems consist of two or more folding sashes. They are also called “accordions”. Due to the joints, the thermal insulation of folding plastic doors is worse. Swing systems come in single and double leaf types and can be opened towards or away from you.
Methods for adjusting the closer
The closer must ensure smooth closing of the sash. This is achieved by the cylinder and oil; the closing force itself is provided by the spring of the mechanism.
Each of these elements can be adjusted depending on what problem arose:
- If you are not satisfied with the opening angle of the door leaf, then in order to adjust the iron door, you need to adjust the rotation of the nut. Turn counterclockwise to decrease the angle, clockwise to increase it.
- By turning the valve, you can adjust the speed of movement of the valve.
- The spring tension can also be adjusted. It has a special nut that can be loosened or tightened with a wrench.
In order for the door closer to function longer, you should not forcefully pull the door before it closes or fix it in the open state.
Frequent defects that require adjustment of plastic doors
The door may sag under the influence of its own weight. This sometimes happens with plastic doors, despite their relatively low weight. Sometimes the canvas “mows” to the side. Its condition is checked by drawing a line. Parallelism with respect to the bottom of the opening is assessed. One of the most common reasons for adjustment is play in the fasteners. Much depends on the design itself: with some doors this happens regularly, with others rarely. In most cases, you have to correct loose handles and adjust the fasteners on the hinges. These elements must be monitored in order to correct defects in a timely manner.
Other signs that need adjustment are cold air leaking in and increased noise levels in the room. Sometimes there is a friction sound when the sash is closed. This means that the door has begun to touch the frame and the hinges need to be adjusted. There are also problems with the locking device of the lock - when the door is closed or in any position.
How to prevent work disruptions
Recommendations may include the following:
- Microlift installation. It will provide automatic adjustment and eliminate potential problems due to the fact that it will take on part of the load.
- Installing a door opening limiter.
- A special tire will reduce the likelihood of sagging and malfunctions of moving mechanisms. It is necessary to promptly replace the seal, which loses its properties over time.
- There is no need to allow sudden opening/closing, excessive force when slamming, no need to hang unnecessary objects on the door. You can replace more correct fittings and select lighter options.
Tools needed when adjusting plastic doors
To adjust and simplify the process, a standard set of tools is prepared in advance. Among the most important tools are pliers, pliers, Phillips and flat-head screwdrivers, L-shaped keys with a 6-sided cross section (another name is furniture keys). If you don’t have the latter at home, you will need to contact construction supply stores. It is recommended to assemble the instruments in several sizes, within the range of 1.5-5 mm. The whole set will cost about 500 rubles. A screwdriver with the necessary bits can replace a Phillips and flathead screwdriver. The most commonly used attachments are T and TX. A screwdriver will be useful in another sense. It will free your hands from additional work. You will also need scissors to cut the sealant and needles.
The list of tools for adjusting plastic doors should also include:
- chisel or special knife;
- spinning hammer;
- handle for removing loops;
- spatula for unpacking.
Instructions for self-adjustment of doors
You can correct minor problems with the location yourself. Initially, a competent installation will help ensure that this moment does not come soon, but if irregularities are discovered, their elimination cannot be postponed until later. And this is connected not only with the possible expiration of the warranty period. Firstly, the warranty itself already constrains actions, since any intervention will give the manufacturing company a reason to refuse appropriate service. And secondly, it is also possible that you will have to buy a new door at your own expense. If the warranty is no longer valid or you have decided to make the adjustment yourself, then you must strictly follow the technical instructions and recommendations of specialists. Particular attention should be paid to adjusting fasteners. You can increase indoor comfort by increasing or decreasing the tightness of the door structure.
Door adjustment involves the following steps:
- Vertical adjustment.
- Changing position in the horizontal plane.
- Setting up hinges, hinges and awnings.
- Handle adjustment.
- Sealing of contacting surfaces.
- Adjustment of various parts of fittings.
Height adjustment
It is better to adjust the canvas height immediately after roughness or dents on the seals are noticed. To change the position of the canvas, you will need to tighten the lower hinged loop. Actions are performed according to a specific algorithm. First we gain access to the adjusting screws on the lower hinge. Usually they are hidden under a decorative strip. This element is removed by moving it towards you and upward. We perform this action carefully, because over time the plastic becomes prone to drying out and cracking. Next we work with the vertical adjustment screw. Place a hex wrench of the required size (usually 4 mm) into the head. Then we turn it. Clockwise movements will raise the sash, and reverse movements will lower it. Some manufacturers of door structures have an “asterisk” instead of a hexagonal hole.
Setting up hinges and awnings
Typically, closed-type overhead hinges are installed on doors made of plastic or metal-plastic. In systems without metal inclusions, as a rule, two fastening units are sufficient. If there is a double-glazed window, the option with three fastenings is considered optimal. The curtains are adjusted in several different ways. They are directly related to the height adjustment of the canvas, as well as its movement left and right. The adjustment is made using the adjusting screw. The sash should be slightly open at this time. Movements are made clockwise or counterclockwise. You should not tighten only one fastener, because this may cause a curvature in the profile, and when opening the door, a creaking or crunching sound may appear. The need for adjustment of hinges and canopies will be indicated by drafts, cracks that appear, slowdown or difficulty in closing the sash. Prevention of defects will significantly increase the service life of plastic door structures.
Violation of the door system installation technology will lead to serious problems that cannot be corrected by normal adjustments.
Horizontal alignment
This type of adjustment involves moving the sash parallel to the top and bottom of the structure. The door can cling to the top near the supporting post or to the threshold next to the opposite one. The canvas is also subject to thermal expansion, which increases the above problems. To make adjustments, you will need a 4 mm 6-sided wrench, or less often, another tool. The screw for horizontal alignment is located in the same way - horizontally. To complete the task, open the door, insert the key into the hole and turn it. Rotating clockwise will pull the blade towards the loop and lift the bottom on the side of the opposite post. Moving the tool in a different direction will have the opposite effect. If you need to eliminate rubbing or neutralize the effects of thermal expansion, then you will need to influence all door hinges.
What to do to close tightly - frontal adjustment of eccentrics
Eccentrics are designed to control the tightness of the abutment of the door frame parts to each other. The operating principle is similar to the functional load they perform in window structures. The clutch density is regulated by turning these same eccentrics. There is a clear sequence of actions for the tightest closure. First, the hinges are freed from the decorative flaps. Then the sash opens and the lock is pressed. The top of the door is then slid back to allow normal access to the cams. Then the screw rotates. If the desired level of pressure is achieved, all that remains is to perform the final steps. Moving elements should be lubricated. Then the lock is pressed and the door returns to its original position. The greatest pressure is ensured by the position of the eccentrics at the maximum level. After adjustment, the locking bolt is lowered, the parts are shifted and the fastening is tightened.
Difficulty closing
The most common problems are misalignment, sagging, loose fit, and difficulty turning the handle. In the worst cases, the door stops closing altogether. If the situation is easier, and the canvas simply no longer fits tightly in the opening, then the reason is purely technical. Most likely, you will only need to adjust the fittings. But if the sash does not fit into the frame at all, then you will have to look for a breakdown. The most common causes of malfunctions are unsuitable fittings, foreign objects getting into the door mechanism, or damage to the integrity of the structure. Less unpleasant than a jammed door, but more common negative aspects are sagging or skewing of the door and inconvenience when turning the handle. If in the latter case the cause is too sharp movements of the handle or leaf, then the distortion and subsidence are associated with excessive load on the axis of the door structure.
Adjusting the hinges
Hinges are components of hinges and other fastening units. Integrated ball bearings, for example, reduce wear and make the opening process easier and smoother. They, like other hinges, should be lubricated in a timely manner. Depending on the detected defect, 3 adjustment methods are used - vertical, horizontal and frontal. In the first case, you will need to remove the protective cap and insert a screwdriver into the hole in the end. Horizontal adjustment involves working with an adjustable screw. When manipulating the tool, you should pull the blade towards the loop. The third method, frontal, involves adjustments on the stand opposite to the hinges. There may be eccentric hinges there. You can work with pliers, a wrench or other tools, it all depends on the specific case.
How to change the seal
First you need to choose and purchase a new one. Typically this is a plastic rubber band. For a plastic structure, you will need material of the appropriate shape. These seals come in 2 types: for frames and sashes. The old gasket is easily removed. First, a place is selected where it can be picked up, and then with a sharp movement it breaks out of the groove. Next, clean the groove from dust and dirt. Then insert the end of a new elastic band into the clean groove. We insert the entire pad into the groove. Then we run our finger along the tape, pushing the pad into the groove. The piping will remain outside. It will take on the role of protection from drafts and street dust. At the same time, you can adjust the door. Installing a seal is also an opportunity to adjust the tightness of the door connection. In addition to installing a high-quality seal, it is also worthwhile to press the door by turning the door leaf clamp bolts. This is especially true in the period before winter.
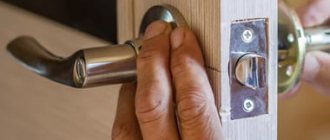
Door handle customization
Adjusting the handles is one of the simplest manipulations. In everyday life, the most common types of faults that occur are stiffness and looseness. Imbalances are corrected in the same way. First, the protective plate covering the mount is rotated 90°. This insert must be moved carefully, as it is made of thin plastic. Once access to the adjusting screws is gained, there are 2 options left. Tighten the screws more tightly if the problem is a loose handle. And on the contrary, we loosen the fixation if the handle is tight. Then we put the plate in its original position and check the connection. If the play remains the same as initially, then there may be a crack in the housing. In this case, new fittings will be needed. If the door is double-leaf, then the halves are adjusted alternately.
How to adjust for winter
First of all, we check whether the sash is sagging and how it fits to the frame. Then you need to find out if there is blowing from the gaps. This can be checked with a regular sheet of paper. Then you should start checking the quality of the fasteners. If necessary, replace the seal. However, the main aspect of door preparation in the winter/summer cycle is the clamp. Its effectiveness is determined by a cylindrical element - an eccentric. This part must be adjusted with a flat-head screwdriver or a hex wrench, depending on the configuration. If the eccentric is smooth, then to turn it you will first need to pull the element away from the blade. Maximum tightness is guaranteed by a 6-sided key No. 4. The mark on the ex is in the direction of the overlap, which presses the blade to the box. If this manipulation is carried out correctly, then even in a strong wind the likelihood of cold air leaking in will be minimal.
Adjusting the door when sagging
If the edges of the door cling to the door frame pillar, this indicates subsidence. In this case, when closed, a more or less noticeable gap will appear in the upper part. The technical part of correcting the defect will consist of adjusting the gap between the hinge unit and the canvas. This process is somewhat similar to aligning the sashes in windows. The skew is eliminated with a horizontal setting that allows you to move the canvas left and right. The first step is to find the horizontal adjustment screw in the lower hinge structure. The hole is located at the bottom of the hinge on the door frame side. By turning the screw, the blade is brought closer or further away from the loop. In the first case, rotations are performed clockwise, in the second - counterclockwise. Then the possibility of freely opening/closing the door is checked. The sash swings open 90°, and if everything is in order, the position is also adjusted through the top hinge. Usually 1-2 turns of the key are enough.
Briefly about the main thing
It is possible to correct most of the various violations in the operation of the door without the involvement of specialists and unnecessary costs, since all procedures are not difficult to perform.
Incorrect installation or inaccurately selected dimensions will require urgent intervention to return the door to its original state. Sagging, too tight door shutter or loose closing become reasons for door adjustment.
There are adjustments of vertical or horizontal type, as well as manipulations to correct the pressure of the sash.
To prevent disturbances in the functioning of the door, install a microlift, a door opening limiter, and try to avoid too sudden openings or closings.
Repairing the door yourself may take a little longer, since you will need to master adjusting the door leaf using keys.
What to do to make plastic doors less likely to need adjustment
There are several ways to facilitate the functioning of doors:
- installation of door closers;
- choosing a suitable design option;
- installation of a microlift;
- lubrication of fittings;
- arrangement of reliable protection from the wind.
It is impossible to completely protect the door from exposure, just as it is impossible to do without leveling. However, by using the above methods, repairs and frequent adjustments can be avoided. The experience of many people shows that some problems can be prevented. It is necessary to realize the importance of the choice of loops. The latter are intended for structures where the load will be approximately 80 or 160 kilograms. The number of loops also matters, but not always. These elements are designed for an average of 200 thousand openings/closings. In any case, it is recommended to maintain a certain safety margin. Reliable protection against door sagging is a microlift. It consists of a bar installed on the canvas and a corresponding element on the frame. Both parts are connected when closing, raising the door slightly and reducing the load on the hinges. A few drops of lubricant also improves performance. Rubber seals will reduce the impact of strong winds and drafts.
For maximum density, the rubber protection should be treated with a silicone pencil.
Features of plastic entrance doors
Plastic entrance systems are manufactured using metal-plastic profiles with separate air chambers and stiffeners. Profiles are made either only from plastic or using reinforcement. To increase the strength of the structure, the frame elements are connected with metal mortgages. The shape of the frame structure, like the entire product, can be very diverse - trapezoidal, rectangular, arched, etc. Special crossbars, high-security locks and power hinges are mounted on plastic entrance doors. A multi-way locking mechanism is provided to ensure maximum tightness. A plastic door of any configuration consists of elements such as the door leaf, frame and fittings. Unlike other types of doors, metal-plastic ones can have a frame made of a solid metal profile.
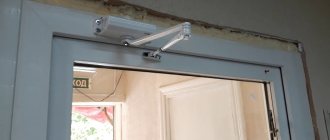
The door closer is a mandatory element of the fittings
They differ according to the type of installation:
- external;
- hidden;
- floor
And the operating principle:
- knee;
- slide.
This device is designed to ensure smooth door movement. As a result of its use, the service life of hinged hinges and other fittings and, accordingly, the entire door structure increases. A closer has to be used in door systems in public places, because the door there opens and closes a large number of times a day. The design features of different versions of this fittings differ greatly - in terms of the closing mechanism, location and method of installation. Based on the location of fixation, there are external, hidden and floor closers. Devices of the first type are placed at the top, of the second - inside the canvas and frame, while floor-mounted devices are mounted in the sash and on the floor. The last subtype is suitable for both one-way and swing doors. According to the mechanism option, there are two categories of closers: with knee (scissor) and slide gear.
Adjustment and configuration of the closer
Adjusting the closer affects the overall speed of closing the door. It is better to reduce it for interior rooms, and increase it for entrance rooms, but a lot depends on the specific situation. Using the closer, the speed of the closing stroke (pressing the door to the frame) and the intermediate stroke are adjusted. In the first case, we are talking about prioritizing: make the movement fast or slow it down to remove excess load on the door frame. With the second option, thanks to the settings, it is possible to organize the passage of several people at the same time. Setting up the closer is not difficult, because it has a special screw. The door closing speed decreases if you turn it clockwise. If the speed has changed too much, the bolt is returned to an intermediate position between the current and initial position and adjusted again. The screws must not be unscrewed more than 2 turns. To adjust the aftershock, the adjustment is made 15-20 cm from the frame. Control of the third adjustment screw determines the intermediate speed.
Using the same 3rd screw, the door closing delay is adjusted.
How to fix clamping density
If the canvas does not adhere well to the frame, it is difficult to provide the necessary pressure, you feel drafts or a kind of air circulation, then urgently find out how to adjust the balcony door. You will need adjustment using eccentrics, called trunnions, located at the end of the door.
Adjusting such eccentrics will allow you to quickly return to the correct position of the structure, after which you can obtain the required degree of fit of the sash when closing.
You can achieve the desired result by synchronously adjusting the eccentrics, which are located in the upper and lower parts, as well as in the center. The easiest way to do this is by turning them at one angle. Then you need to check the level of pressure on the box:
- Locate the locking elements on the frame. The available indicator serifs will allow you to determine the clamping density.
- Using a hexagon, a turn is made so that the notch is turned towards the frame, as a result the clamp will be weakened. To strengthen, you need to rotate the trunnion towards the room, i.e. vice versa.
- Once you have what you want, you should complete the adjustment by adjusting the screws on the awnings. They are located in the area of the upper and lower loop.
Locking elements on the frame to determine the clamping density Source legkovmeste.ru