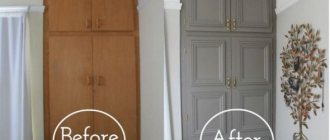
Lining is a modern, versatile, environmentally friendly, inexpensive and easy to install and maintain material. Most owners use this material to decorate various surfaces of their households. But few people know that it is possible to make doors from lining and such a panel looks good, is simple to make and lasts a long time. The versatility of the material allows you to create truly unique canvases.
Povagonke.ru
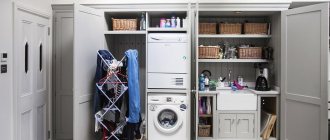
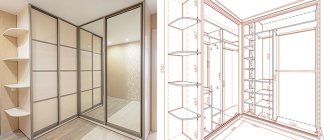
Organizing a balcony space is a complex process that pursues several goals at the same time. You need to get rid of chaotically located household items and things on several square meters and maintain the aesthetics of a small room. A lining cabinet is the optimal solution for storing things that are rarely used (garden tools, spare parts for a car, etc.). It can be corner or located parallel to one of the walls.
A closet on the balcony will allow you to avoid cluttering the space with unnecessary things
To make a convenient and neat cabinet, you should choose oak, linden or ash. These are hardwoods that have little wood glue, and therefore a minimum of released resin.
As for the class of material, it all depends on how much money you are willing to invest to build a cabinet.
The higher the class, the better and more solid the structure will look. And you need to remember that class “C” cannot be used for these purposes categorically, it is designed for technical premises.
It is possible to calculate how much material will be required only after the design has been determined.
For example, if the cabinet will fit into a niche in the corner of the balcony, then material will only be needed for the doors. This is despite the fact that the back wall should be made of laminated chipboard, as it is more moisture resistant.
If the structure is free-standing, then the required amount of materials can be calculated by adding up the total area. Necessary:
- Multiply by 2 depth.
- Multiply by 2 width.
- Sum up the previously obtained amounts. This is how we calculate the area of the floor and ceiling of the cabinet.
- Multiply the height by 4 and get the total area of the walls.
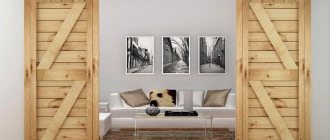
Interesting ready-made options:
Video - we make shelves and doors ourselves:
Installation of shelves
To install shelves, we attach bars to the racks on two opposite sides. We lay several boards on them. In our case - 3 (for boards with a width of 20 cm). To ensure greater strength, guides are mounted around the entire perimeter. When calculating the height between the shelves, they are guided by the fact that a 3-liter jar can fit on the shelf with a margin. The next shelf may be narrower or wider. In our case, there are 4 shelves. We begin their installation from the top. Below there will be quite a spacious space, allowing you to hide an old washing machine, exercise machine, and a tall 40-liter saucepan. The open closet is ready!
Doors
The frame of the cabinet door is made from planed boards. The dimensions of the door will be determined by the parameters of the furniture itself. Remember that the doors should be slightly narrower than the section of the product. These conditions must be met in order to gain access to all its sections equally. In this case, the closed cabinet doors should overlap each other slightly so that an unaesthetic gap does not form between them.
Let's sum it up
Thus, making furniture from lining, as in the photo, is not at all difficult. And in order to make this task even easier for you, the article contains a video with a detailed description of the work required for this. Go for it!
How to choose lumber for sheathing
The choice of lining for finishing a door is not limited to determining the grade, species and shape of the lamella. There are a few more important points.
- Drying degree. The moisture content of lumber should not exceed 12%. It is advisable that it drys under natural conditions. This takes several months, so forced drying is also used. This is also an acceptable option. Damp wood cannot be used. After assembly, it will continue to release moisture and will inevitably become deformed.
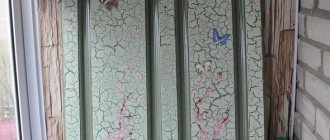
- Appearance. It is advisable to inspect the slats before purchasing. An unscrupulous seller may try to sell low-quality products under the guise of high-quality ones. There should be no defects or chips on the planks. Pale blue or greenish spots are not acceptable. This is a sign of developing fungal diseases.
- Quality of locking connections. Experts recommend always checking this circumstance. To do this, you need to take two plates from the pack at random and try to click the lock. The grooves must fit together accurately, without irregularities or difficulties. If you have problems when trying to click the connection, it is better to look for another lumber.
It is advisable to buy material treated with special compounds. It is more expensive, but the factory processing is worth it. It is carried out in special cells where special conditions are created. They cannot be repeated at home. Therefore, treatment with the most expensive compounds will not give the same result as factory treatment. The photo below shows the material processed in the factory.
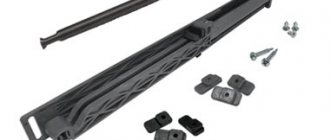
Features of mechanisms
Sliding door systems for sliding wardrobes may also have their own characteristics, which must be properly taken into account when creating furniture. When choosing accessories, special attention should be paid to the rollers. They experience the greatest load when opening doors and wear out the fastest, so low-quality fittings will quickly become unusable. If the rollers fail, the doors may become askew and stop opening, which causes some inconvenience.
You can fix the problem by knowing how the mechanism works and how to configure it correctly. Most often, those rollers that suffer are those that are located at the bottom of the door leaf and move along the rail. At the top of the structure there is another pair of rollers, their shape is asymmetrical. They not only move, but also hold the canvas using a guide located above the door. If the rollers are worn out, they are easy to replace. To do this, it is enough to have a Phillips screwdriver. Unscrew the old and screw on the new structural elements.
For convenience, replacing the rollers begins with the far blade.
To adjust the door, use the adjusting screw located near the roller mechanism. Thanks to the screw, you can raise and lower the corner of the door leaf, which will allow you to place it level.
Where can you use straight arms?
If you ask any city resident about the lining, in 90% of cases the answer will be about the balcony with which it is covered. And it doesn’t matter what it’s made of: vinyl lining or natural – every kind is actively used on the balcony.
Lining can be used not only as finishing, but also as a full-fledged material
It’s a different matter for owners of private houses and dachas, here they will first of all remember lining in relation to a bathhouse, in decorating a house inside and out, in the choice of protective impregnations and paintwork materials. In a word, all mentions of it are in one way or another connected with the possibility of its independent use.
It is for them that our story today.
What are the advantages of creating a cabinet from clapboard with your own hands?
| Making your own furniture | |
| Advantages | Flaws |
| Saving money | Labor intensity |
| Unlimited design possibilities | Time consuming process |
| Individual selection of shapes and sizes | |
| The opportunity to show your imagination | |
You can also get some benefits from a balcony in a small apartment.
All walls and the bottom of the structure must be attached to the walls of the room with anchors.
Creating such furniture yourself is a simple but labor-intensive process. However, by taking a little time, you can build a spacious, functional and original cabinet from lining for household items. It cannot be compared with the monotonous furniture that is presented in stores and hypermarkets.
Working with lining
The appearance of the entire balcony largely depends on how to make a lining door onto a cabinet.
Therefore, we will consider the entire plating process step by step:
- To create doors, we assemble a frame of appropriate dimensions from boards or thin timber. Doors should be both light and strong, for which we recommend choosing thinner lining;
- To add rigidity, a diagonal jumper is installed in the door frame;
- Having placed the finished door frame on a flat horizontal surface using nails or clamps, we secure the lining. The nails are driven “into the secret place”;
- We complete the finished door leaf with trim (optional), handles, locks and hinges.
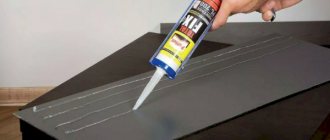
Decorative trims in door decoration
We place the finished door (or doors) on hinges previously fixed in the frame. After the do-it-yourself balcony cabinet made from clapboard is finally assembled, clean the entire room. Vacuum all wooden surfaces and perform the final operation - coat the product with a protective varnish.
When purchasing varnish, pay attention to the manufacturer's instructions:
- for which premises the use of this product is permitted;
- the varnish can be either colorless or contain coloring pigments;
- Observe the recommended temperature conditions when working.
All technical parameters are indicated on the label
Tools and materials for making a cabinet
So, to make a reliable and beautiful cabinet, you will need:
- wooden beams 40x40 mm - for the cabinet frame;
- thin beams - for the door frame;
- lining;
- metal corners;
- boards for cabinet shelves;
- fittings (handles, hinges, lock, etc.);
- nails, screws, clamps.
The beams for the frame can be taken from inexpensive types of trees, for example pine; they will still be hidden. However, the quality of the beams must be good, only dry and clean wood.
If the cabinet is completely built-in, that is, its walls are the walls of the balcony, then you need to prepare long anchor bolts with which the cabinet frame will be attached to the walls.
What tools will you need during the work:
- drill;
- screwdriver;
- hammer;
- saw;
- level and roulette.
Frame assembly
Measure and cut pieces to the required length for the sides, diagonals and cross members. Before assembly, you need to prepare each of them:
- Process the vertical and horizontal parts of the frame at the ends to join them into half a tree, choosing a part of the wood from the cut to the width of the block; cut the diagonals from the ends so that they fit into a right angle between the side and transverse planks.
When trimming parts, you definitely need a square. It will allow you to outline precise cutting lines and join the parts tightly enough.
Connect the prepared ends of the vertical and horizontal bars.
If the parts fit precisely, then when the grooves are combined, you will get a neat, even corner without protruding parts. Lubricate the joining surfaces with glue, put them together and screw in 2 confirmats, having previously drilled holes for them. Do the same with the rest of the intersections of the parts.
To insert diagonals, lubricate the prepared part at the sawn ends with glue. Place it tightly diagonally into the frame. Screw the screws through the horizontal jumpers.
Step-by-step instruction
The structure will be installed on a clapboard-lined balcony. Its walls, floor and ceiling are level, and the corners in which the cabinet is placed are 90°. Next, I will tell you the whole process step by step.
We begin assembly from this corner, adjacent to the window sill on the left side. The window is sliding so there will be no problems opening it.
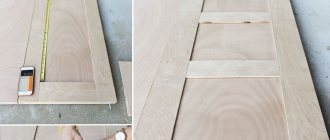
Mark the depth of the cabinet on the sides (in this case 30 cm) and draw vertical lines under the level.
From the side of the wall, along the marked line, screw the rail (leave the line outside).
On the balcony side, after attaching the slats to the wall, use a plumb line or laser level to mark the overhang of the window sill and project it onto the back wall, floor and ceiling.
On the front side, attach an additional rail with an emphasis on the window sill.
Secure it at the top and bottom.
The frame of the front and back looks something like this.
Cut the lining to size and fix it on the side wall (you can fasten it from the inside).
Mark the shelf levels. It’s convenient to do this with a laser level, but if you don’t have one, you can do it with a regular construction and tape measure. Fixed top shelf:
Place a vertical partition (fix it to the block from below, and grab the shelves from above to the lintel). Then begin to assemble the partition with clapboard; the lower part will have to be filed down.
It is convenient to cut the lining with a circular saw - the cuts are smooth, and the process takes little time.