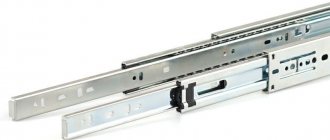
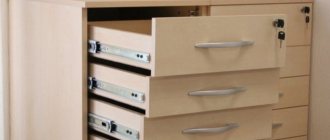
No matter how quickly progress progresses, the most popular today are telescopic or, as they are also called, full extension ball guides.
For those who don't know yet, they look like this:
Their advantages include:
- Relatively low cost;
- Smooth and most importantly quiet running throughout their entire service life;
- Ability to withstand significant loads;
- Excellent strength and wear resistance;
- Simplicity and ease of installation;
Guides of this kind are most often used as sliding mechanisms for chest of drawers, kitchen sections and many other mechanisms with which the owners do not want to have problems during their operation.
Calculation of drawer parts
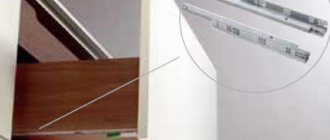
In order to correctly install the full extension telescopic guides, you need to be sure that you have done the detailing of the drawer correctly.
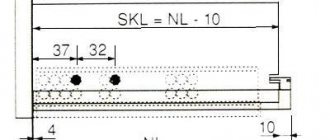
An assembled box without a front installed on it means that between the box itself and the side of the product there should be a gap of 26 millimeters, that is, 13 millimeters on each side. These are the exact dimensions (13 millimeters) of the full extension telescopic guides.
In length (depth), the box should be 6-10 millimeters longer than the guides, which, as a rule, have a length of 25 to 80 centimeters in increments of 5 centimeters. Thus, when installing the guides, place them in the middle of the drawer, leaving a minimum gap in front and behind the drawer. And also do not forget about a gap of at least 10 millimeters between the back wall of the drawer and the back wall of the product (chest of drawers).
The height of the box is usually made based on its purpose and the needs of its owners who will use it. But, as a rule, in the aisles from 8 to 25 centimeters.
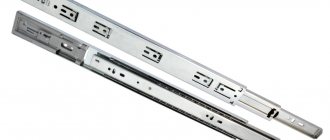
B-Slide Concealed Mounting Slides
B-Slide is the next step in the development of hidden mounting guides, a product with an increased level of comfort that combines engineering developments of recent years and the unshakable traditions of the quality of “hidden” guides BOYARD DB4461, DB4462, DB4463, DB4464.
The B-Slide range of concealed mounting rails is divided into two large groups with their own individual technical characteristics, advantages and target audiences.
First group
- These are guides of increased comfort, service life and manufacturability. Their SKUs include eights. DB888 are suitable for furniture made from standard board materials for Russia with a thickness of 16 mm. DB898 are created specifically for European furniture from thicker slabs - 18 and 19 mm. At the same time, DB898 are universal guides compatible with drawers made of 16 mm thick slabs.
The “Eight” range also includes guides with the push-to-open function (DB8885, DB8886); they are placed in a separate section.
Second group
the guides have sevens in the article and are intended for mass furniture of small shapes. DB777 is distinguished by its ultra-easy opening and closing, which does not cause the furniture product to “walk” on the floor during or after opening the drawer.
B-Slide range
| Model | Slab thickness (mm) | Full/partial extension | Installation option | Length range (mm) | Max load SGS (kg) | Max number of cycles |
| Movement mechanism: soft-closing | ||||||
| DB8881 | 12 — 16 | complete | sliding | 250, 270, 300-550 | 30 | 80000 |
| DB8882 | partial | 25 | ||||
| DB8883 | complete | mounted | 300-500 | 30 | ||
| DB8884 | partial | 270, 300-500 | 25 | |||
| DB8981 | 12 — 19 | complete | sliding | 300-500 | 30 | |
| DB8982 | partial | 25 | ||||
| Movement mechanism: push-to-open | ||||||
| DB8885 | 12 — 16 | complete | sliding | 300-500 | 30 | 60000 |
| DB8886 | partial | 25 | ||||
| Guides for serial furniture with a low budget | ||||||
| DB7772 | 12 — 16 | partial | sliding | 300-500 | 20 | 40000 |
| DB7774 | mounted | |||||
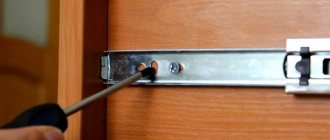
Marking the attachment points for telescopic guides
The process of installing full extension telescopic guides is much simpler than it might seem to a person who is dealing with them for the first time, or, so to speak, picking them up for the first time.
When you take the telescopes in your hands, you can notice peculiar tendrils on it, usually black, so if you squeeze them and pull one half, it will disassemble into two parts, one of which is attached to the inner side of the chest of drawers, and the second to the side of the drawer.
By the way, you need to be extremely careful, since telescopes can be right-handed or left-handed and cannot be swapped.
Your main goal is to determine the exact mounting locations for the guides, secure each of the halves of the telescopes with three screws and carefully insert the drawer into the chest of drawers, thereby connecting the two parts of the telescopic guide into one whole.
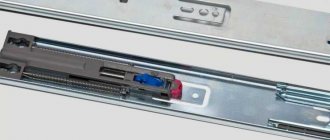
Design
There are two types of smooth running system - ball and roller.
There are two types of drawer pullout mechanisms.
Both systems have the same operating principle, but slightly different designs.
- When using balls, the design is non-demountable, which limits versatility and makes repairs difficult. The mechanism works smoothly.
- The roller version is more reliable, but creates much more noise.
In both cases, the runners are attached to the inner walls of the table, and the guide elements are attached to the outer part of the drawer. The connecting element allows the entire mechanism to move, be it a ball or a roller.
The runners are attached to the inner walls of the table.
Note! To ensure safety, the design has limiters. They will not allow the box to “go off the rails” in the event of a sharp push.
The guides have stops to ensure safety.
Calculation of guides
In order for the drawers to ideally occupy the space allocated to them, you need to perform calculations for the roller guides before installing them. It is best to describe the calculation procedure using an example. If you need to build, for example, a bedside table with two identical drawers, then first of all you need to measure its parameters. For a cabinet with a sidewall height of 367, a plinth height of 70 and a gap between the facades, the height of one facade will be: (368-70-2*3)/2=146 mm.
If the elements have the same dimensions, the best option for their installation is to make them interchangeable.
To do this, the calculations must take into account the extreme positions of the boxes. In addition, you should pay attention to the overlap of the facades and the frame of the cabinet. The lower limit of the installation of roller guides is determined by the bottom of the cabinet. When installing the box on it, the bottom should coincide with its lower edge.
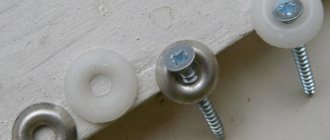
To avoid touching the bottom of the cabinet, you need to add 4 mm to the screw head. The height of the fastening of the lower element of the mechanism will be equal to the sum of the height of the screw head and the size of the center line of the hole, that is, in this example: 18+4=22 mm. You can calculate the location of the mechanism parts from the lower end of the sidewall of the cabinet. In this case: base+bottom thickness+mounting height of the guide from the bottom=70+16+22=108 mm.
It is worth noting that the screw head is usually less than 4 mm. Its average size is 1-1.5. The size is taken as 4 for universality of calculation. The results obtained will also be applicable if a material with a thickness of 18 mm, and not 16, is used to make the cabinet. In this case, a small gap will still remain.
The same procedure is used to calculate the height of the facade for the top element, only taking into account the placement of the lower ones. After performing calculations and markings based on the data obtained, you can proceed to installation.
- Types of guides
- Installation of roller elements
- Installation of ball guides
Home craftsmen often have to assemble furniture with their own hands. This happens both when purchasing ready-made interior items and when making cabinets, cabinets, tables, and the like on your own. At the same time, correct fastening of the guides on a wide variety of drawers becomes a real stumbling block. Despite the apparent simplicity of this work, installation errors can lead to dire consequences. In the process of further use of the furniture, serious difficulties may arise. Therefore, it is important to immediately determine the type of guides themselves and the method of their installation.
Adjusting the dresser parts yourself
On this page we will take a closer look at the process of repairing a chest of drawers, focusing on the internal parts - their types and functionality, and manufacturer errors. Many people, after purchasing, made a lot of efforts to assemble the chest of drawers into a single whole, but encountered a number of problems.
They hit the drawers when rolling out of the chest of drawers.
One of the most common failures when assembling a chest of drawers is the installation of roller guides: the drawers are pressed tightly and the fronts rub against each other, the drawer touches, and the wheel knocks. 1) Incorrect markings for the guides on the sides of the chest of drawers. You may need to move the runners a little higher or lower. Make sure that the skids are installed parallel to the base.
2) On some drawer models, the fronts are adjustable. There are adjustment screws on the sides on the right and left.
3) The screws are twisted crookedly, the head of the screw or self-tapping screw is too large and the drawer catches with a roller when rolling out. For ball systems, adjustment is also possible on the side panels of the drawers.
Drawers fall through or fall out of the chest of drawers.
The distance between the runners on the drawer and the panel does not correspond to the standard. 1) Visually inspect the frame of the chest of drawers after assembly - the tightness of the parts, the symmetry of the back wall. 2) The manufacturer made a mistake - placing washers under the guides installed on the sides of the chest of drawers.
3) Boxes fall out if the runners are installed incorrectly (upside down); the roller does not stop when the box rolls away, but falls through.
The frame of the dresser is warped or wobbly.
1) Install the product level, and if the floors are uneven, adjust the legs. 2) Secure the back wall with ties. 3) If the bottom of the drawers falls in (the bottom is inserted into the grooves), we tighten ties or just self-tapping screws along the edges of the grooves, at an angle around the perimeter.
Types of guides
At the moment, there are 2 main types of guides that are installed on a drawer. These are roller and ball systems. There are also other designs: hidden, with closers, telescopic, and so on. But they don’t install them with their own hands. This installation is carried out in a factory setting.
Roller guides usually consist of 2 strips with perforations for fasteners. Plastic wheels are attached to the ends of the structures. Thanks to them, the drawers slide out.
Figure 1. Types of guides.
Such systems have a number of significant disadvantages:
- When in use, the drawers make an unpleasant sound.
- The wheels are unreliable and quickly become unusable.
- If there is a strong pull, the box may fall out of its intended slot.
But such guides also have advantages. They are cheap and easy to install.
Ball systems are also called full extension guides. This is a telescopic design that allows you to extend the drawer the entire length of the bar. Inside the system there are metal balls that ensure smooth and almost silent movement.
The main difference between roller and ball systems is that the first one consists of 2 profiles independent from each other, and the second one is one-piece. In the first case, 1 strip is attached directly to the wall of the box, and the 2nd – to the furniture. The rollers are disassembled only during installation. And when assembled they look like a solid structure. It is this feature that ensures the reliability of the fastenings: the storage space does not fall out even with a strong tug. The appearance of different guides is shown in Fig. 1.
At the moment, you can find guides of different sizes in stores. This allows you to select a ready-made design for interior items of any type and depth. As a rule, roller systems are placed on boxes that are not expected to bear heavy loads. They can be found in linen and clothing closets, kitchen modules (for example, for storing cutlery), and hallways. Ball structures are placed on linen drawers of beds and furniture intended for children's rooms.
Return to contents
Advantages and disadvantages of roller guides
Before installing the mechanism on your furniture, you need to evaluate all the pros and cons.
The roller mechanism has both advantages and disadvantages.
Roller guides for drawers have a number of advantages:
- the versatility of the sizes of retractable installations is so great that the design is suitable for furniture of any size;
- friction of elements is minimized, which ensures long service life;
- simplifying the movement, making it easier for you to open and close.
The use of this technology gives many advantages, but it is also not without its disadvantages:
- Opening and closing drawers can create quite a bit of noise.
- Some furniture is not initially designed for the installation of additional elements; there is simply nowhere to attach the runners.
Recommendation! Double-check the measurements, this will save the material from unnecessary holes and unsuccessful attempts.
All measurements must be checked.
How to avoid installation errors
If the guide rails themselves are screwed at the same level, strictly opposite each other, and the drawer does not warp in any way during the extension process, then everything will “work” well.
This is the main rule in installing any box - maintain alignment.
The second rule is the need to correlate the height of the sides of the box itself with the height of the facades. Before you start “distributing” them in height. I recommend immediately making marks with a pencil on the end of the body, noting the position of the facades, in order to have a visual representation.
The main pitfall is the irrational distribution of the guides in terms of the useful volume of the box itself.
For example, in the photo, the drawers in the pencil case function absolutely normally.
But due to the fact that the top drawer was “lifted up” too high, its capacity was greatly reduced. It would seem that the middle drawer is more spacious. But no. The lower edge of the front of the top drawer “does not allow” the middle drawer to be loaded along the entire height of the resulting niche.
In fact, this point is not critical. And if you don’t highlight it, the owner himself won’t even notice. But the one who did it will definitely remember that it would have been better differently.
How to assemble a chest of drawers
Before moving on to a precise sequential instruction circuit, it is necessary to consider general principles.
First assemble the base body of the item, and then the remaining parts.
- It is better to start assembling any furniture, especially large-sized ones, from the largest parts, continuing downwards. In our case, first the main body, then the fastening of the drawers and other small aspects.
- Work exclusively on a flat surface to avoid problems with the relationship of the body parts to each other.
- Cover the floor with a protective material to protect both the furniture and the work surface from scratches.
- Some materials may be fragile, which is why you need to perform all actions carefully - slowly tighten the bolts, do not drop components, etc.
The bolts need to be tightened tightly, but not too much.
Necessarily! Perform assembly only in a well-lit area to avoid loss of parts and inaccurate measurements.
Assembling the box
The process of assembling a drawer may vary. For example, we offer the following scheme:
- Attach the side walls to one of the front walls of the drawer,
- Insert the bottom of the drawer into the groove,
- Attach the second front wall,
- Attach the facade to the front - front wall,
- Attach the handle to the facade,
- Attach the guides to the side walls of the groove. Roller guides need to be attached at the bottom of the drawer; ball guides can be attached both at the bottom of the drawer and in the middle.
See further article “Installing roller guides“
Required Tools
Some models involve “seamless” installation of all elements, which greatly simplifies the work. However, for reliability it is worth using fastenings such as nails and screws.
Use professional tools to assemble furniture.
To do the job well, we will need the following set of tools:
- A tape measure is a mandatory attribute; it is necessary for correct assembly and accurate measurements.
- We will also need a Phillips screwdriver that fits the size of the screws.
- It is most convenient to assemble the entire structure using a screwdriver. Since the self-tapping screws in the kit are of medium size, the drill chuck should not be less than 10 mm.
- A hammer will also come in handy.
Use professional tools carefully.
If possible, also use a level to assemble the structure perfectly accurately.
Calculation of bottom dimensions and groove dimensions
The bottom of the boxes is most often made of LDVP or HDF with a thickness of 3 - 5 mm.
The smooth side of the sheet should face the inside of the box. For large boxes it is better to use 10 mm chipboard. When attaching the bottom, the question usually arises - which bottom is better: overhead or in a groove? A false bottom is a cheaper, simpler and faster method. But if you spend a little more time and effort and insert fiberboard into the groove, it will immediately improve the appearance of your furniture. Fastening on the external surface spoils the appearance, and the absence of external fastening is good form when making furniture. So, if you want your furniture to always please your eyes, then insert fiberboard into the groove. To attach the bottom of the drawers, you need to prepare a groove in all 4 walls. Groove width 4 - 4.5 mm, depth 8 mm. A high-quality groove is made using milling equipment. You can order this service from us. You can find out the cost of the service here.
Calculation of the dimensions of the bottom of the box:
Bottom width (mm) = outer drawer width (mm) – chipboard thickness (mm) × 2 + 15 mm, Bottom length (mm) = outer drawer length (mm) – chipboard thickness (mm) × 2 + 15 mm