Kitchen furniture is a modular series of wall cabinets and cabinet tables. Yes, sometimes you have to use non-standard solutions. But most modules have a completely standard design. It is enough to estimate the volumes of kitchens sold in bulk, when the buyer is asked to independently select the modules of the required size and assemble them into a full-fledged set. You can make a simple kitchen cabinet with your own hands at home. And at the same time save a lot.
Nuances to consider
First of all, you should decide on the installation height of the cabinets, and also resolve issues of their installation in that part of the kitchen where communications are laid or are just planned (ventilation duct, gas outlet). To do this, you need to re-size the modules, without relying on the stated dimensions on the packaging, and make markings on the wall. If any of the cabinets will cover part of the gas pipe, it should be measured especially carefully in order to make cuts in the body and along the back wall.
It is better to select the optimal installation height experimentally, taking into account the orientation of the modules (vertical or horizontal), the location of the internal shelves and the height of the owners. Ideally, all adult family members should be able to freely reach the topmost cell of the closet without a stool or other supports. Although in some cases this rule should be neglected, especially if you have a cramped kitchen and wall-mounted modules have to be built up to the ceiling.
You can also use common recommendations for arranging an ergonomic work area in accordance with the height of the owners. The data is summarized in the table:
| Height of the owner/hostess, cm | Height of cabinets from floor level, cm |
| 155-160 | 175 |
| 160-175 | 185 |
| 175-190 | 200 |
Don't forget to check the distance between the top row of cabinets and the countertop of the work area. The optimal indicator is 60 cm, the minimum acceptable is 45 cm.
Where does the work process begin?
Before your wall cabinet for the kitchen appears in the room, in finished form, you need to take several steps step by step. You may ask why we describe each assembly step in detail? In order to eradicate all doubts and questions, rid you of pitfalls and make the whole process simpler and easier.
Selection of materials
First, let’s decide what the basis of our product will be:
- Chipboard is a cheap and visually unattractive material. Of course, it is perfect for any country buildings as decoration for warehouse premises, but not for the manufacture of kitchen units.
- Laminated chipboard is one of the most popular materials used in the furniture industry. It is best to make wall cabinets for the kitchen from it, as it is easy to process, practical, aesthetically pleasing and cheap.
- Plywood is considered a reliable material, durable and completely moisture resistant. However, there are several disadvantages: even, smooth sheets of plywood are expensive, and additional processing is required (paint, self-adhesive film, varnish).
Note! The choice should be obvious - laminated chipboard, but if you need a kitchen for a country house, then feel free to choose plywood or chipboard. For such purposes, you will save a lot of money, thereby being able to purchase high-quality finishes.
Now let's look at the materials that are used to make facades:
- Laminated chipboard - the beauty of this type lies in its practicality; it can be used both for the frame and for facades. Although, this is more of a budget option.
- Plastic – the price of this material is slightly higher, but it can safely be called one of the most popular options. The color range includes several hundred shades. The surface is resistant to external influences.
- Painted MDF is an expensive but very attractive material. If you have small children, we do not recommend it. Outwardly, of course, he is gorgeous, but quite fragile.
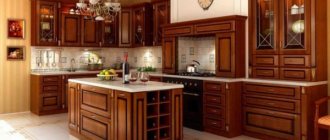
For your information! We do not offer natural facades due to the very high cost and low resistance of materials to temperature fluctuations (pictured).
Wood is a capricious material, but, you see, it’s very beautiful
Preparing the tools
In order to make a wall-mounted kitchen cabinet, we do not need huge machines or specialized equipment; all this is available in organizations offering their services. After you decide on the material, order it from a company that cuts laminated chipboard and other wood bases.
This will cost more than cutting it yourself with a jigsaw, but the quality will be several times higher.
What is required for work:
- Drill or hammer drill for drilling walls.
Note! If the walls are wooden, then one screwdriver is enough to screw the screws into the wood without dowels.
- Screwdriver with Phillips and hex bits.
- Building level.
- Hammer.
- Roulette.
- Hacksaw for metal.
- Screwdriver Set.
Kitchen fittings
As for the components, as we have already said, all wall-mounted kitchen cabinets are different from each other.
In this section we will offer several options that are used everywhere.
- Dish dryer - the cabinet is assembled directly for everyday dishes. The cost of a dish dryer may depend on both the dimensions of the module and the materials from which it is made.
The cheapest type of dish dryer is metal with a plastic tray.
- A cabinet with glass doors is often used for decoration. That is, it stores various interior items (crystal dishes), which can not be hidden, but only slightly tinted with glass.
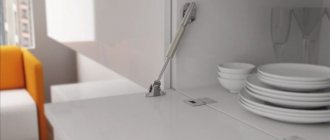
- They prefer to install lifting mechanisms on cabinets with two separate sections. Such lifting facades facilitate access to the insides, while allowing you to separate grains from spices without unnecessary hassle.
Important! Be sure to purchase adjustable awnings for kitchen cabinets, this is the most effective way to make the installation process easier. Now you are not afraid of a mounting error of up to 2 cm; you can easily correct the horizontal level of the module using a screwdriver.
Read also the article about kitchen cabinets.
Preparing for work
After determining where to hang the cabinets, you need to mark the top line of the row and the attachment points on the wall. Here it is mandatory to use a carpenter's or laser level. Even if the geometry of your kitchen is far from ideal, these tools will allow you to hang the modules horizontally, and their contents will not “ride” on the shelves.
The location of the fastening line relative to the level of the cabinets depends on the chosen installation method. The cheapest is furniture hinges (brackets). They are simply attached to the back of the housings and put on anchors driven into the wall. To do everything correctly, you need to measure the length of the hinges themselves, or more precisely, the height of the groove protruding above the edge of the furniture. This will be the distance from the main marking to the fastening line.
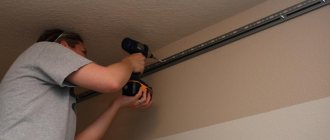
A more expensive, but convenient way to hang cabinets is with a mounting rail. This is a durable metal profile with grooves and holes for mounting to the wall. The modules are simply put on it using special adjustable hinges. The tire is mounted 30-40 mm below the top edge of the row.
Tools and materials
The list of tools required for hanging kitchen cabinets is standard:
- Drill and/or hammer drill;
- Screwdriver (it takes a long time to use a regular screwdriver);
- Jigsaw;
- Clamps;
- Level, plumb line, tape measure.
But the choice of hardware used to secure the cabinets will depend on the material of the internal partition in your kitchen:
- For wood, hardened screws with a countersunk head and a double-start thread with a large pitch are suitable.
- Concrete or brick - anchor bolts or hooks with plastic, metal dowels or wooden plugs (plugs).
- Cellular concrete - long bolts with the possibility of fixing on the back side of the wall or capsule himankeras.
If the kitchen is lined with plasterboard, you will have to find long enough studs that will fit securely into the main part of the wall, going right through the thin sheets. Otherwise, heavy cabinets will not be supported by any fasteners.
Advantages of making kitchen furniture yourself
To answer the question of whether it is worth spending time and effort on making furniture yourself, all you need to do is search the Internet for photos of kitchen cabinets with your own hands.
As they say, appetite comes with eating: considering what amazing, original, unusual things ordinary people can make, you will certainly want to make something similar for yourself!
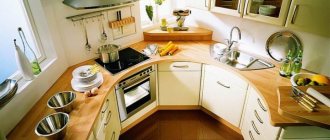
It is no secret that most of our kitchens are small in size, and often it is the independent production of furniture that will make the most efficient use of limited space, making the furniture functional and comfortable.
Making furniture yourself is practically the only possible option if the kitchen is “completed”, i.e. there was a need for an additional locker, for example, after moving.
Stages of work
- Mark the first point from the corner for fasteners on the horizontal marking line and drill a hole. There is no need to hit the entire row at once, since the hinges may be at different heights - you will have to make each subsequent mark after “trying on” the cabinet.
- Drive a plastic dowel into the socket and screw in an anchor hook or a powerful self-tapping screw.
- Screw the furniture hinges to the top of the module with screws - one on each side.
- Try the cabinet on the already driven fastener, place a bubble level on its lid to check the horizontal position and make a mark on the wall for the next dowel.
- After all the modules take their places, they are checked again visually and level, and then connected to each other with furniture ties or simply knocked together with slats along the top covers. Cabinets suspended by hinges should not move, but for reliability, you should first clamp them with clamps, placing pieces of fiberboard so as not to damage the surface of the walls.
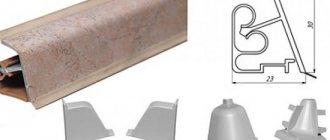
If the design of the set includes a decorative cornice, it is attached last - using furniture nails, screws or special glue. Upon completion of the installation work, all that remains is to hang the facades on the buildings and install the internal shelves.
Additional elements for making a cabinet with your own hands
When making furniture with your own hands, it is important not only to save your family budget, but also to do the work as accurately as possible so that the products last for many years. Therefore, another point that requires attention in the process of creating designs for the kitchen is the choice of fittings for the wall cabinet. Furniture hinges, locks, handles, supports, shelf holders, cup holders, couplers - all this is the same necessary additional material that neither professional workers nor home craftsmen can do without.
Fittings for wall cabinets also include various types of lifting mechanisms for doors, complete dish dryers, and shelves. All these purposes make the furniture easy to use and significantly save space in the kitchen.
When purchasing all these auxiliary parts, it is necessary to take into account the design model, components of the wall cabinet and, of course, the material of the product, which is so important not to be damaged during operation. Some craftsmen separately buy not only handles for their furniture, which should fit harmoniously into the existing interior, but also such details as doors and drawers. For example, a glass door always brings elite, expensive decorative notes to the decor.
Mounting on mounting plate
Hanging cabinets on a rail is much simpler and easier. The plank is attached to the wall along horizontal markings and then the work is transferred to the floor, where the assembled cases are waiting in the wings. Instead of primitive hinges, hinges are screwed to them from the inside - to do this, you usually have to cut small holes in the back wall in order to bring the fastening hooks of the fittings through them.
Cabinets prepared in this way can be immediately hung on the rail, and their position can be adjusted with special screws in the body of the hangers themselves. They allow you to move the module in any direction and even move it a few millimeters from the wall if a thick kitchen apron is already laid below.
Determining the hanging height
The aesthetic component of the interior and the ease of use of the kitchen as a whole depend on the height at which the kitchen cabinet hangs. There are certain standards according to which wall cabinets are installed at a height of 550 to 600 mm from the level of the countertop. This distance is quite enough so that the hostess does not touch them with her head and does not reach for the top shelf on tiptoe.
Much depends on the height of the housewife herself and the height of the floor modules. According to the standard, the worktop is located at a distance of 850 mm from the floor. This parameter can be adjusted by the height of the base, the standard of which is 100 mm.
On a note. The height of hanging the upper cabinets is dictated by the distance between the worktop and the floor level.
Also, the height of the working area from the floor is affected by the thickness of the tabletop, which varies from 20 to 50 mm depending on the material of its manufacture. The front edge of the working surface protrudes from the facade by 30-40 mm, and the rear edge by 50-100 mm. This supply of hidden space is often useful for placing communications.
Main settings
Kitchen furniture is manufactured to standards that depend on the parameters that determine the height of the cabinet you are going to assemble.
We list the main indicators that will be taken into account in the process of creating a corner cabinet:
- The width of the base - this indicator ranges from 10 to 12 cm, while its value is not affected by what type of stand will be used - solid or legs.
- The height of the cabinet is usually 70cm if you are not going to equip the cabinet with a sink. In this case, you need to make it slightly lower than the level of all other cabinets. This is done for convenience when washing dishes.
- Tabletop height varies from 2 to 4 cm. Depends on the material used, primarily on its structure.
- After all measurements, the height of the corner cabinet is usually about 84-85cm.
- The most common parameters for a cabinet are 90x90cm. Of course, the dimensions primarily depend on the parameters of other parts of the headset.
It is important to know: the distance between the tiers of the set is usually 60cm, while the standard height of a wall-mounted corner cabinet, which makes it possible for people of average height to use it comfortably, is 70cm.
Mounting options for kitchen cabinets
Wall mounted modules are mounted on walls in two variations. The choice depends on the size and number of hanging modules, their depth and proportionality.
Mounting ideas:
- Installation on one level means placing the modules at the same height, in a line.
- Fastening cabinets at different levels. The modules are mounted at different heights, and the tops of the underlying cabinets are used as additional shelves.
The latter implies the presence of cabinets of different heights. They are hung so that their lower part forms one line.
Wood material options
The quality of the finished product directly depends on the breed. The easiest to process are coniferous varieties (pine, spruce), and the price of such cabinets is acceptable. However, in terms of service life, they are several times inferior to solid oak, walnut or birch. They are more difficult to work with, but their material is more durable.
Photo: solid wood kitchen
You should be careful when choosing beech furniture sets. This breed is afraid of humidity and, when it is high, quickly absorbs moisture and swells.
To make it at home, it is recommended to take pine, having previously treated it with antiseptics. It is easy to cut, sand, and sand.
Let's take a closer look at the types of lumber from which you can make a good wooden cabinet.
Boards
Popular raw material for cabinet furniture. Regardless of the breed, they have high strength.
However, experts do not recommend purchasing natural wood in its raw form. As it dries, it will begin to deform, which will lead to damage to the product. The optimal humidity level is 12%.
Photo: cladding board - lining
Don't forget about the thickness of the material. For a high-quality cabinet made of boards, it should be from 15 mm and above.
This way the structure will have a sufficient level of rigidity. If this is a small cabinet for dishes and keys, then a thickness of 10 mm is enough.
Reiki
In furniture production they are considered an auxiliary material. They look like flat bars or thin planks. Raw materials - coniferous trees. Used as fastening elements for the main parts of the cabinet. Lightweight, not afraid of moisture.
timber
Used to create cabinet frame racks. Recommended section dimensions are 40*40, 50*50 mm. Timber material is used only if the structure is installed in a heated room.
To make the back walls of a wardrobe or compartment, you can take sheets of chipboard (chipboard) or plywood.
Shields
There are two types:
- Glued (pressed). Several pieces of wood are glued together. Available in different sizes. They have increased strength. Withstands high loads.
- Solid. A solid piece of wood treated with a special solution. In terms of reliability, it is several times inferior to the first type.
To make a cabinet, it is recommended to buy pine laminated panels. With them, structural elements are obtained in various shapes and complexity.
Installation methods
A variety of fittings for hanging kitchen cabinets allows you to choose the most optimal installation method for you. Fasteners can be selected in such a way as to make the work of the home craftsman as easy as possible. In this case, the structure will hold securely and firmly.
Methods for installing cabinets:
- On a bar with a hinge. Using a specially prepared strip with hooks greatly simplifies the work, allowing you to install cabinets accurately and without assistance.
- For hanging corners and furniture hinges. This option is much cheaper, but you can’t handle hanging cabinets alone.
Wooden cabinet doors and hinges
The easiest option is to use door hinges. This is how they used to do it on massive wooden cabinets. Let's look at this option.
Door hinges are the easiest door opener to install.
One of the disadvantages is that there is no door adjustment, that is, you have hung them and cannot adjust them in any way.
The installation diagram is the same as for → installing interior doors. Hinges at equal distances from the bottom and top are screwed into the ends of the doors and cabinet walls. It is important to do this evenly and at the same distance. You need to read how interior doors are installed, specifically hinges, to understand.
The second option for hinges for a solid wood cabinet is furniture hinges.
They are quite easy to install; you just need to drill a round hole for one part of the hinge. They have the ability to adjust, BUT they will not be able to support the heavy weight of massive wooden doors. Therefore, if your cabinet is small and more like a bedside table, then such a mount will be suitable. If this is a massive cabinet, then you need to use stronger hinges.
Another option for fastening doors is antique hinges. Such hinges are installed on the front of the cabinet and bring their own aesthetics to the product. There are a wide variety of them on sale and such loops can be made with your own hands.
Antique wooden furniture hinges
Preparation
The stage begins with preparing the material and tools for work.
The table below shows everything you need:
| Materials | Tools |
|
|
Next steps in the preparation phase:
- Checking the condition of the walls . If the cabinets are going to be hung on drywall, you will need embedded parts, since the fragile material is not able to withstand heavy loads. For curved walls, it is better to use a putty mixture to level the surface or mount the cabinets on a sheet of chipboard or plywood. Also, do not forget about decorative finishing.
- Marking . Using a tape measure, measure the distance from the worktop and set the laser level. If you don’t have such a tool, you can use a pencil with a ruler or a tapping thread, checking the evenness of the line with a level. It is at this mark that the lower level of the modules will be aligned.
- Preparing the site. It is advisable to prepare the space for work by clearing the tabletop of foreign objects.
For your information. By the time you hang the kitchen cabinets, it is necessary to install all sockets and switches, and also check their functionality.
How to attach a kitchen set without much difficulty - below.
Assembly of kitchen cabinets
The disassembled kitchen set is a set of boards of different sizes, a certain amount of fittings and a set of fasteners. From all this you need to assemble cabinets. Usually there are wall-mounted and floor-mounted ones. How to assemble a kitchen set, in what order - the choice is yours. Some craftsmen find it more convenient to assemble them in pairs - the top one, then the bottom one, and install it that way. But there are two other ways: first collect all the top ones, hang them on the wall, then all the bottom ones. They do the opposite - assemble and install the lower ones, then the upper ones. In general, any method is correct, do what is convenient for you.
The correct installation of the confirmat is in the middle of the chipboard
Assembly of wall cabinets
In any case, let's start assembling the cabinets. A typical wall cabinet consists of two side panels, a top, a bottom, a back wall made of HDF and two doors - the facade. The assembly order is as follows:
Installing hinges
The facades (doors) are finally hung after everything is assembled and put in place, but the hinges are installed from the very beginning. They come in mortise (considered more reliable) and overhead.
Types of hinges - mortise overhead
The mounting points are marked on the sidewall and door with holes. Place the side panel and the door on a flat surface (table or floor) close to each other, aligning the marks. We put the hinges in place (included in the kit). Screw it first to the side, then to the facade. In this case, the door turns out to be slightly lower in level than the side panel. Place a block of suitable size or a rolled-up rag under it so that it is at the same level, then screw the loop.
We disassemble the hinge itself (it consists of two detachable hinges that are connected by a screw. We unscrew this screw, put the doors aside, and continue working with the sides.
Assembling the body
We attach the top and bottom to the sides. They are attached to confirmations - special furniture fasteners that come with a hex head. If there is an appropriate bit, we put it on the screwdriver; if not, we work with a hand wrench.
How to assemble a kitchen set: assembling the cabinet body
The installation locations of the confirmations are marked on the outer part of the sidewalls. We fold the side panel and the top part, install the fasteners, then the bottom, and then the second side panel.
We turn it face down, lay and align the sheet of laminated fiberboard, which serves as the back wall. It is nailed down with small nails or staples from a construction stapler. First they nail it in the corners, carefully aligning the edges, then in the middle of each side and then, dividing each section in half. As a result, the installation frequency is 1 nail/staple per approximately 10 cm.
Installation of corners or hinges, shelf holders
The hinges on which wall-mounted kitchen cabinets are hung are different, and they are installed in different ways. We'll talk about them in more detail below. Shelf holders also come in different materials and shapes, but they are mounted basically the same way - into holes in the wall. Holes are drilled in the sides for them. Sometimes we install plastic choppers (small hollow plastic cylinders) in them, hammer them in by lightly tapping them with a furniture hammer, then place stops for shelves in them. But most metal stops (which are probably what you need in kitchen cabinets) simply fit into the hole.
Shelf holders
Actually, you know everything about how to assemble a wall kitchen cabinet. For a visual demonstration, watch the video. Floor cabinets with shelves without drawers are assembled in the same way, only first the legs are installed on the bottom and the top part is the countertop, which is common to all cabinets and is installed after all the floor cabinets are installed and fastened.
Assembling a cabinet with drawers
We continue to assemble the kitchen set with our own hands. Now the most difficult moment is the cabinets with drawers. The general procedure is as follows: install the hinges, bottom and back wall. The top-table top is installed after all the cabinets are assembled and fastened together with ties. There are also features - drawer guides need to be attached to the sides. Go.
Installing the feet
Before assembling the kitchen set, legs are installed further on the bottom. You can install the legs after the frame is assembled, but rotating a heavy bedside table is not very easy. In any case, it is best if they are adjustable - the floor is not always perfectly level. With adjustable legs, it is possible to set them so that the load is redistributed across all legs. For small cabinets - up to 80 cm in length - 4 stops are installed; for cabinets over 80 cm, 6 support points are needed.
Installing legs on the lower cabinet of a kitchen set
If there is a partition in the closet, we place the legs under it. If there is no partition - in the middle. 5-8 cm are removed from the edges, screwed onto self-tapping screws 15 mm long (with a chipboard thickness of 18 mm). Most finished furniture also has countersinks for the legs—small-diameter holes. Align the slots in the legs with the holes and install the screws.
Installation of guides and assembly for drawers
On the sides of the lower cabinets there are markings for installing guides (they are included in the kit). For their fastening, an M6*13 euroscrew is used. We install the required number of guides on both sidewalls.
Installing guides in a cabinet with drawers
The boxes are assembled using 4*45 screws. First, the guides are installed. Depending on the design, they can be mounted on the walls of the box or on the bottom edge of the sidewall. If there are markings (holes) on the wall, then they are placed on the sides. If not, go to the end. To be sure, check the assembly instructions. There should be pictures of the installation process.
How to assemble a kitchen set: assembly diagram for drawers
After the guides are connected, the sides are connected to the back wall, then the front wall is installed, followed by the bottom. Before installing the bottom, check the diagonals. They must match down to the millimeter. The bottom is secured with nails or staples.
Assembling the body
The assembly of the case is already familiar: we attach the lid to the sides, then the lower part with the legs. We put the cabinet in place, tighten the legs so that the top lid is at the desired height and is horizontal. We check the horizon using a bubble or laser level. Then we install the covers.
Features of assembling a corner cabinet
The main feature is that in budget kitchen sets the bottom consists of two parts (to reduce costs). If a sink is installed in this cabinet, the back wall is almost absent, but there are several collet ties that add rigidity to the structure. Otherwise, everything is the same as when assembling a regular cabinet with doors.
Installation instructions
Methods for installing cabinets vary in level of complexity. The installation method directly depends on the chosen mounting option: cabinets of different heights cannot be installed on a rail.
Let's consider both mounting options.
On the rail
We attach the cabinet to the wall according to the bottom marking line and knock off the top one. This will simplify the task if the modules are planned to be mounted at the same height.
Further:
- We drill holes in the wall for the slats according to the markings.
- We drive dowel nails into the holes and firmly fix the rail.
- We hang the cabinets on the fixed bar.
- We level the modules using adjusting screws.
- We drill through holes in the side walls of the cabinets.
- Starting from the corner one, we connect the modules to each other.
The final stage of attaching the cabinets to the rail will be the installation of facade elements.
On hinges or corners
At the initial stage, this method differs in that the height of each module is noted separately. In the same way, attach each cabinet to the bottom fastening line and draw the top line.
On a note . The method of installing cabinets on corners differs from the option with hinges only in the place where the elements are attached. The corner is screwed to the upper end of the side of the cabinet, and the hinge is screwed to the back.
Further:
- We screw hinges or corners to the cabinets in the right places.
- We lean the corner module against the wall and place the fastening points.
- We drill holes in the wall according to the marks.
- We hold the wall cabinet in the desired position and use hardware to attach it to the wall.
- In this way we fasten module by module, checking the evenness of their joining and the top.
When all the cabinets are already hanging in their places, we tighten them tightly with through bolts and install the front parts.
Installing the upper part of the furniture: tips from the experts
It is difficult to carry out installation correctly, especially if you have never done such work.
Some professional advice will help you do everything correctly:
- Before hanging the upper kitchen cabinets, determine how to install them: overlapping the kitchen splashback or flush against it. The layout and general appearance of the structure will depend on this.
- When using a bar, secure the hooks on it in the middle position using the adjusting screws. Then secure them from the inside to the sides.
- When applying the top marking line, keep in mind that the mounting rail should be located 30-40 mm below the top edge of the rear wall of the cabinet.
- To correctly make mounting holes for the slats in a concrete wall without a hammer drill, use a punch and a hammer.
- When drilling into walls, if the drill bit jumps, make small holes with a punch, then continue drilling.
- If the plaster is crumbling, drill a small hole first and then drill it out to the desired size.
How to assemble boxes
- The walls for the boxes are tightened with screws. As soon as you assemble three walls, insert pieces of fiberboard into their bottom, which were created according to the parameters of these walls.
- The fronts of the drawers must be secured using eccentric ties. In this case, the screws are screwed into the facade, then the side with the head is inserted into the bushings located on the sides of the drawers. The main thing is to make nests in them first. Once the bushings are in the holes, rotate them until they engage the screw heads.
- If we are talking about a corner cabinet, you need to screw guides for rollers onto the lower corners of the drawers.
If we are talking about assembling an oven, the last stage is excluded due to the lack of drawers in this type of cabinet.
Features of hanging kitchen cabinets on drywall
The use of drywall is far from uncommon in modern renovations. The material is used to line the walls, and decorative and functional structures are built from it, such as furniture, columns, niches in the walls or partitions.
But how to hang kitchen cabinets on a hollow wall? There are at least 5 methods, but they all boil down to additional preparation of the partition for the installation of heavy structures at the stage of construction of the partition. Namely: the use of expansion anchors, the main wall as a capital support, embedded beams installed during the construction of the wall, the use of horizontal tires or conventional dowels.
How to properly hang kitchen cabinets on a plasterboard wall if it is already completed:
- We attach the mounting strip to the gypsum board surface in several places with anchor bolts into the main wall or self-tapping screws into the drywall.
- We mount cabinets on a rail.
- We tighten the modules together.
Tightening the cabinets prevents them from moving horizontally, allows them to be leveled in height and distributes the load across the points of attachment to the wall, eliminating the possibility of a separate module falling.
However, this fastening method is not entirely suitable for installing kitchen cabinets when storing heavy utensils or household appliances.
Important ! If you use the upper kitchen modules to build in appliances or store large quantities of groceries, use decorative tubes or cables.
How to hang a kitchen cabinet on drywall using auxiliary elements? The modules are attached to the vertical surface in the manner described above, but in addition, they are additionally suspended from cables attached to the ceiling, to the floor slab. Or they are installed on supports in the form of chrome-plated tubes, which form a frame supported on the floor.
Main features of corner models
The list of the most important differences includes:
- doors are not required. The open top cabinet is great for storing beautiful crockery sets;
- variety of forms. The design can be triangular, L-shaped, or even trapezoidal (by the way, triangular variations have become very widespread in our time). Choosing the right varieties depends on the people who will be using the cabinets and their preferences;
- the lower part of the structure, located on the floor, is often used to create sinks. The sink placed on top will be convenient to use;
- it is possible to integrate large types of household appliances for their more efficient operation;
- Various methods are used to decorate the facade. The most common options are applying a pattern to wall cabinets or upholstering them with some material;
- the lower cabinet under the sink is often equipped with legs, which makes cleaning the room easier;
- The upper corner cabinet can be equipped with carousel shelves to store dishes and other accessories.